Introduction

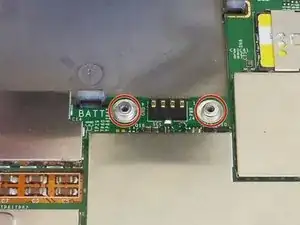
This guide will teach users how to pry open the back cover, and remove screws in order to access the battery.

  1. 1vUk1M2Obu4XhFO1
    1vUk1M2Obu4XhFO1
    enVoop1fmc6ZVakG
    1WIECQBhZYfp6xE6
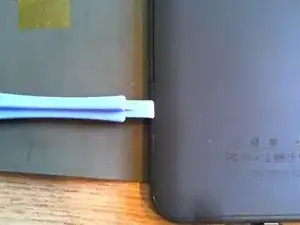
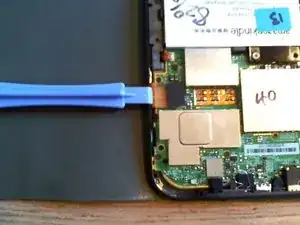
    • Starting 15mm below the right page-turning button, insert the middle of the pry tool. Pry open the back of the device using the pry tool, or similar plastic opening tool. The flexi cable for the screen is 10mm wide and passes 10mm to 20mm below the right page turn and is very easy to tear the edge.

    • Do not attempt to pry directly on the page turning buttons. This will damage the buttons. By inserting it at 15mm this will reduce the chance of damaging the flexi cable. Look closely at the image of Kindle with the back removed, this will help to identify the location.

    • Be super careful here!! That flex cable is inherently tied into the screen, so if you damage the cable, the screen is ruined. Try opening from the other side, if possible. No single-points-of-failure to damage on that side.

    • If you are having trouble getting an initial gap to pry from, run the flat edge of the pry tool along the front-to-back plate seam until it slips into a gap.

    • Don't insert your tool too far, or you may damage some of the orange flex cables near the edges of the device.

    • When reinstalling the back cover, slide the bottom edge into place first, and then press up the sides and along the top until all the clips snap into place.

    Ah, I put it on in the wrong order, then figured out that starting at the bottom works best. I did the bottom, top and corners and then the sides, because I already had the top done.

    kwood -

    BE VERY CAREFUL HERE!! 15mm below the "next page" button was directly where the flex cable was. And it is an extremely fragile cable, even for flex cables. Which means I, of course, tore right through it without knowing until I got the cover off. So don't do that. Start 15mm above the lower corner, if anything, or start on the opposite side. Starting on the side with a single-point-of-failure is a really risky choice. The opposite side has basically nothing up against the edge, so you're free to poke it.

    The other thing that isn't stated here is that the flex cable is inherently tied into the screen. Which means that if you, like me, damage that cable, the entire screen now broken and needs replacing. And if you, like me, was just trying to replace the battery or the motherboard, now it just makes sense to replace the entire device, both environmentally and financially. Whomp whomp.

    bhurwitz -

  2. B51l2kNaPeitE2Wc
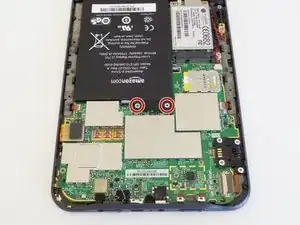
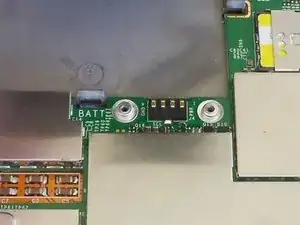
    • Unscrew the two silver 4 mm Phillips screws securing the battery connector.

  3. ZXRxwRAU646cVc3X
    ZXRxwRAU646cVc3X
    mojIVFWd1NjYZGEr
    EQHvSTIWKqKkXxqu
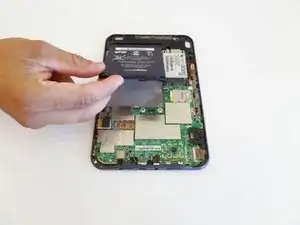
    • Lift battery out of housing starting at the end that was secured by the screws.

    • Two silver washers beneath the battery connector may come loose—don't lose them.

    • When reinstalling the battery, first slide the bottom edge into place and make sure the two retaining tabs are secure, before screwing down the connector.

    Remove the washers and place them with the screws, don’t leave them on the board, you’ll be removing it later and you don’t want to have them slide off.

    domarius -

    The washer came loose. Will it be ok?

    Sunrise Sunset -

Conclusion

To reassemble your device, follow these instructions in reverse order.

Allison Monahan

Member since: 08/09/14

2782 Reputation

19 comments

Hi Allison Monahan,

thank you very much for yor help! By using your guide I made my nearly 6 years old Kindle Keyboard fixed - great!

Stefan Schiche -

I went to mpfproducts.com and ordered my new battery which came in today. I’ve changed out the battery and my Kindle 3 is now charging. YAHOO!!!

Ruth Kuykendall -

Where did you get the battery? I couldn’t find it on Amazon. Do you have a model number for the battery? Thanks.

sand1k -

The old Amazon link has been removed. There’s now a link at the top of this guide to an eBay vendor that stocks the battery. Good luck!

Jeff Suovanen -

Thanks, Allison and IFIXIT!!! God, I love this site. Cheers, Tom
tombeanhall -

My Kindle won’t turn on, but the on/off switch glows. It has been working, somewhat. If I tried to turn it off, it would reboot, so I just let it go to sleep on its own. Does the battery need replacing?

Judi Johnson -

My 10-year old kindle is now like-new. Bought my replacement battery (with tools included) at:

https://www.mpfproducts.com/gp-s10-34639...

aseisman -

The toughest part was prying off the back. Be careful but forceful, those who are attempting this! Thank you for the guide and the part, iFixit!

Sean Williams -

Putting the back on was a bit tricky. The secret seems to be to do the ends and corners first. Then it snaps on easily because the forward and back buttons are somewhat more flexible than the ends and the corners.

kwood -

Terrifically useful - rescued my old Kindle. Thank you Allison!

Mark -

This is great! Thank you for the guide!

Giorgi -

Hi

I lost the 2 silver washers, what do i do now?

selvan govender -

Thanks, my 2010 Kindle 3 is as good as new :D

Vojtěch Míček -

My Kindle 3 was 12 years old and the battery died. Given my very limited skills in working on devices (that is, taking them apart etc), I was happy to have found this guide. With some difficulty opening it, I managed to replace the battery. And, thanks to the tip about the silver washers I knew what to do with them when I saw them on my desk after I had closed the kindle and it was dead. So, I opened it again, put the silver washers in place, and, voila, hopefully I have another 12 years with this. I prefer the older Kindles, with no backlight. So this guide was immensely helpful. tnx

Dana Kenneth Lewis -

Great tutorial! Went smoothly and now our Kindle is ready for more years of trouble free service and we don’t have to buy a new one! Thanks, Allison and I Fix It for helping us with all by hosting this site for information as well as selling quality parts and tools that make these repairs possible.

Julie Garbutt -

Hi. I was wondering if I could replace the kindle 3 (keyboard) battery by rigging a 18650? Would that be possible?

Thanks in advance!

Kristof Bodric -

OK, so I'm replying to myself and anyone who's interested. I was too impatient to wait for a reply so I tried it out myself. I opened my Kindle, removed the battery and peeled the paper wrapping off. Then I freed the BMS circuit and kept the plastic frame while snipping off the terminals of my old battery. I soldered 2 wires to the B+ and B- pads on the BMS circuit and soldered their other ends to a 18650 battery holder. I then screwed the frame back in and inserted a generic 18650 battery into the holder, at which point my kindle told me to charge it up. After a few minutes, the device awoke and I was able to read. There. It's a bit ghetto, but with a little work you can attach the battery holder to the back of the kindle and drill a small hole in the back of the case for the cable. Makes battery replacement a breeze and gives your old Kindle a new lease of life as well as a cyberpunk look :)

Kristof Bodric -

I purchased the battery for my Kindle (Gen3) from IFIXIT, and the customer service, shipping and instructions were excellent. I'd recommend that you give them a try - you'll be back. I also like what they offer, which is a way to keep durable products alive, and not having to "rebuy" a perfectly repairable item that you already like. Thanks guys!

hatkins -

I have an old Kindle 3, it was "working" with the original battery but would need to be recharged within a day. I attempted replacement with this kit but it stays on the "Empty Battery" screen. I had charged it overnight and measured 4v on the battery. I swapped the original back in and the kindle booted normally. It seems like it is not seeing the new battery. What can I do to get it going besides the 15/30/40 "hold the power button" reset?

Chris -