Introduction

Having charging problems? It could be time for a new battery. Use this guide to replace the battery in your Kindle Paperwhite 1st Generation.

  1. l6YfE2jZFZPgjnbT
    l6YfE2jZFZPgjnbT
    v232H5bUQRNS4I1A
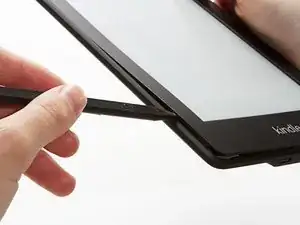
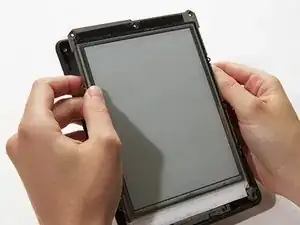
    • Using a spudger or plastic opening tool, gently pry the bezel from the screen. It is easier to start in the corners and work your way around the bezel.

    • Do not insert the spudger too far under the bezel; it could easily damage the screen.

    I found it easier to start this step off with one of the Opening Picks found in the iOpener pack.

    NathanF -

    The glue on bezel started to peel the sticky back protective layer off the screen for me - managed to smooth it back down, although now have an unsightly crease. I would try to hold the screen down when you pull the bezel off to stop damaging the screen.

    Callum Rogers -

    This step is most time consuming. Take you time and try not to scratch the bezel :)

    Oleksii -

    Couldn't get the plastic spudger under the edge of the bezel. A right-angle X-Acto blade was a satisfactory tool here.

    dbrick -

    The glue was VERY difficult...I used a trick, from taking apart phones, and used a hair drier to loosen up the glue...worked like a charm.

    billkaris -

  2. eehmSQ1GQCtSUWAM
    eehmSQ1GQCtSUWAM
    mSkG2naoP2YZttuh
    BTFwBysYHHKV33Y5
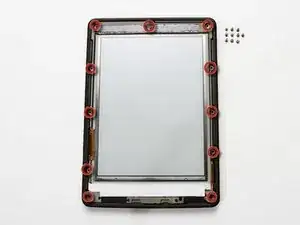
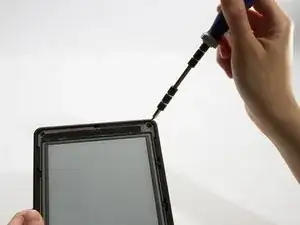
    • Remove the eleven 3.0 mm Phillips screws surrounding the midframe.

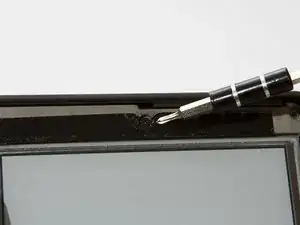
    • At the top of the display, a strip of black tape covers one screw.

    On 3G version you will not have the top middle screw.

    BJones -

    Hello, the original battery is 1420m Ah and 3.7VDC, but the buttery you offer to sell is 1600mAh, is it right? there is no problem with different mAh? mi kindle is the amazon kindle 1est generation

    Paula Ponce de Leon -

  3. aGfN4NevUPtVveNb
    • Lift the midframe out of the case.

    • If the midframe is stuck, slide it to the left first, and then lift it out.

    There are clips in the bottom of the case helping hold the midframe in. Lift the top of the midframe up enough to clear the black back piece and then slide up and out.

    BJones -

  4. OlqJjhiOD5YDSuGJ
    OlqJjhiOD5YDSuGJ
    RjSDqWAwMMMiPxCI
    • Turn over the midframe to locate the battery.

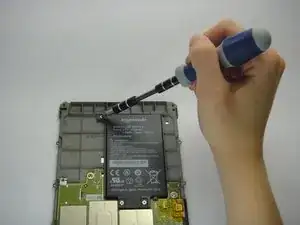
    • Remove the three Phillips 3.0 mm screws securing the battery to the midframe.

  5. aiaJ3CmXFPTPslVs
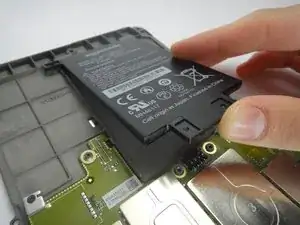
    • Gently lift the battery from the bottom, and slide it out of the midframe.

    Thanks for providing this guide, I would have been lost without it. My old kindle, however, had very stiff and hard rubber/plastic. There was no way I could have slid the glass to the side or gotten the plastic spud under the edge of the glass or the plastic.

    What I did was to remove a piece of the plastic next to the glass , about 1/8” square, then insert a putty knife in between the two sides towards the edges. It all popped apart without breaking anything. Perhaps I could have done this without cutting out the little piece.

    Joseph L Woollett -

    Thank you for this very user friendly guide.My kindle is now working as new.The screws are small and fiddly and the correct tools are essential. I took roughly about 45 minutes from start to finish and the most difficult part was taking the casing apart without damaging the screen .. A 5 star service.

    jonesmrse -

    Thanks for the useful and practical guide. Five stars.

    dbrick -

    The bezel sits on a film meant to protect the screen. When lifting the bezel, it is a good idea to slightly push on the screen with cardboard or something elese, to make sure the screen film stays on the screen as you lift the bezel.

    tropdetremblay -

Conclusion

To reassemble your device, follow these instructions in reverse order.

Isabelle Burgess

Member since: 24/01/13

1555 Reputation

13 comments

You may not need a new battery. I had the issue of the paperwhite re-indexing ALL of my content and getting snagged on a corrupted book toward the end of the process. This looks for all the world like the battery is dying.

Backup your kindle devices folder to a computer.

Delete everything but the book you are reading.

Delete the hidden indexes in the system folder.

Restart the kindle.

Now it should charge to 100% - and last weeks instead of hours.

(search for kindle paperwhite indexing battery re-indexing)

cimac tiga -

If you have a corrupted book how do you tell which one it is?

Bonnie Ferguson -

The spudger was no help what so ever as it was too thick to get between the edge. I finally had to use a exacto knife. And the #2 screwdriver they recommended was laughably large! I ended up using a screwdriver I got with a kit to tighten your glasses. On the battery (which iFixit doesn't sell but recommended from another seller) the last two digits were different (03 rather than 05) and it didn't work. I don't know if that's why, or if something else is wrong. The only thing that was useful was the video - at least I knew what to do and the order to do it. Too bad none of it worked. Guess I'm getting a new Paperwhite Kindle!

pjparke -

The battery on my Kindle Paperwhite 1st Gen died earlier this month. I ordered a replacement battery online, opened my Paperwhite using the instructions on this page, replaced the battery and yeehaa, it works again. Thank you!!!!


Paul Magis -

My Kindle Paperwhite (first generation) only has 10 screws rather than 11 as described, i.e. the one in the top middle is missing from the description. So before digging for that extra screw you might want to check whether the midframe lifts out of the case already with the 10 easily accessible screws removed.

I had some trouble first with prying off the bezel using different spudger tools. The Jimmy finally did the trick for me, since it is thin enough to get into the edge around the screen and also flexible enough to cut into the adhesive.

markus -

After removing all the screws I tried to remove the mid frame. Unfortunately, it was very difficult to prise it away. In the end it came free but broke the switch at the base. There are parts at the base of the mid frame which overlap with the cover and make the job tricky. I would suggest prising it off from the top first. My kindle is now permanently switched on, so I'll be investing in a brand new one!

chrissmithj -

I was very careful and replaced the battery. When plugging in to charge the golden light blinks then is steady or goes off. After a few hours checked and the screen is just white. Cant view menu or and data. Please help!

grcapugh -

when buy battery kindle paperwhaite?

nayaachm -

Great instructions worked. Just a warning to others, it took my kindle a long time to charge up enough to tell me that it was charging after the battery replacement. I was a little worried but a little waiting goes a long way.

Steve Heffern -

I read this and watched a couple of youtube videos, this was very helpful.

Getting the back off was simpler than I expected. I’d thoroughtly reccomend taking the back off first, then ordering the batery - without that I could easily have ordered the wrong one (my kindle is 8 yeasrs old, and the amaxon order details didn’t show much info on model or part numbers).

It’s apalling that Amazon design these with the apparent intention that people will simply get a new Kindle rather than replace the battery,, and I don’t remember any warnings about not letting the charge go completely flat.

Donna Cullen -

the screen froze on my kindl and no restarting, hard resetting, charging… helped. So I thought let’s take the battery out and see if that helps. It didn’t. Screen still frozen in the same place. Still fun to take my kindl apart though.

Mountain Squirrel -

My Kindle Paperwhite apparently wouldn’t take a charge, yet the screen was lit. I tried to turn it on and turn it off to no avail. It had a symbol of a battery with an exclamation mark in the display. I followed the instructions provided here and everything went smoothly (good job on instructions). After removing the battery and before committing to the purchase of a new battery, it occurred to me that by removing the battery, I can reboot the device with this action. So I attached the battery and Voilà, the device is up and running and charging. I did not reassemble it till I was sure it would fully charge in a timely fashion and would easily turn on and off with the push of the switch. So, before you commit to a new battery give it a try.

Glen Jeffrey -

00 Philips head driver is what this replacement needs. One of the ifixit driver kits will have the one needed. Similarly, I used a tiny flathead screwdriver to start removing the bezel. Once I had an edge up, I could put in a spudger and separate the bezel.

dalexgray -