
Introduction
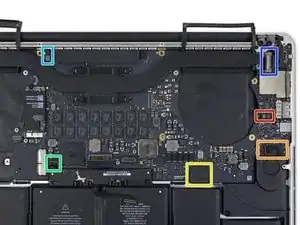
Hearing things? Not hearing things? Use this guide to replace the right speaker in your 15" Mid 2015 MacBook Pro Retina.
Note that the right speaker is on the right of the machine while you're using it, and on the left while you're working on it.
-
-
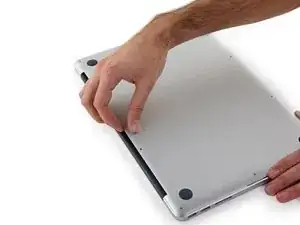
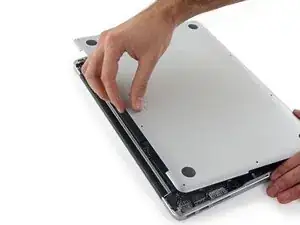
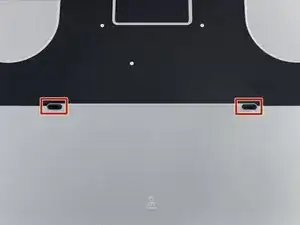
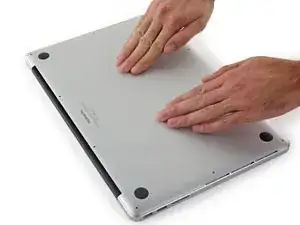
Remove the following P5 pentalobe screws securing the lower case to the MacBook Pro:
-
Eight 3.1 mm
-
Two 2.3 mm
-
-
-
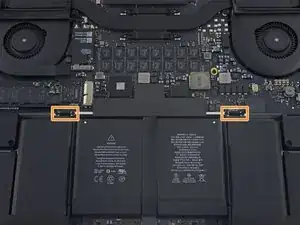
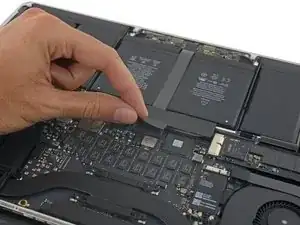
Gently lift each side of the battery connector to pry the connector out of its socket on the logic board.
-
Bend the connector back toward the battery, ensuring that the battery connector doesn't accidentally make contact with the logic board.
-
-
-
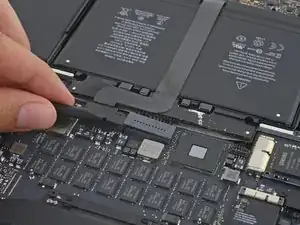
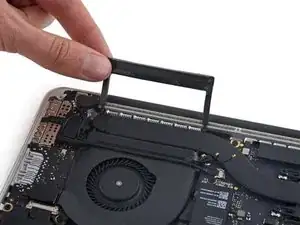
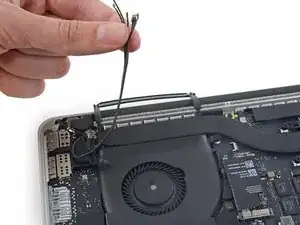
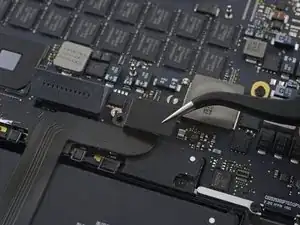
Use a spudger or tweezers to pry the three AirPort antenna cables straight up off of their sockets on the AirPort board, and bend them up and out of the way.
-
-
-
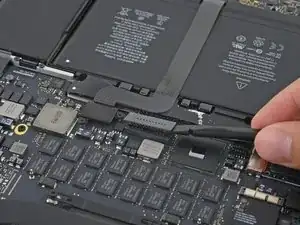
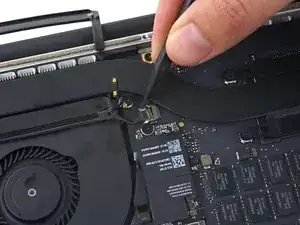
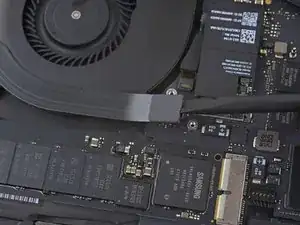
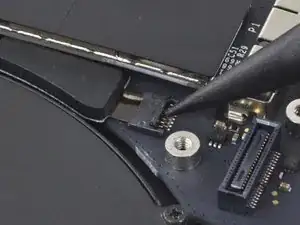
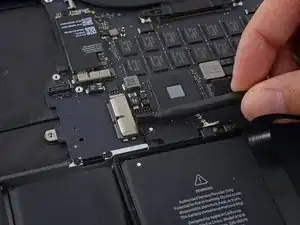
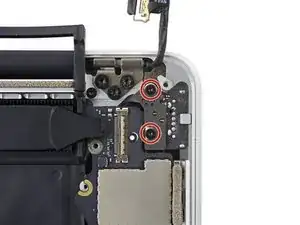
Use the tip of a spudger to push the camera cable connector out of its socket on the logic board.
-
-
-
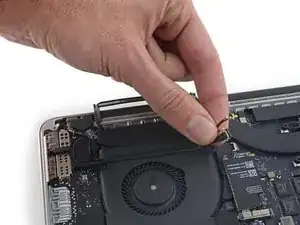
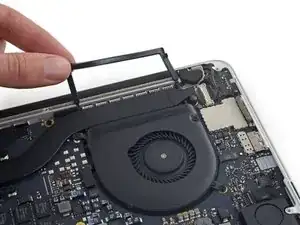
Use your fingers to pull the AirPort/Camera cables up off the fan.
-
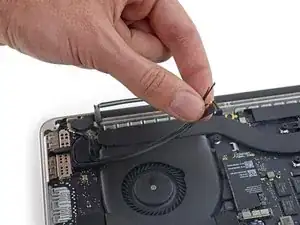
Carefully de-route the cables from the plastic cable guide.
-
-
-
Remove the left connector cover.
-
Use the flat end of a spudger to pry the left end of the I/O board cable up from its socket on the logic board.
-
-
-
Remove the right connector cover.
-
Use the flat end of a spudger to pry the right end of the I/O board cable up from its socket on the logic board.
-
-
-
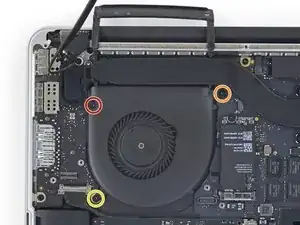
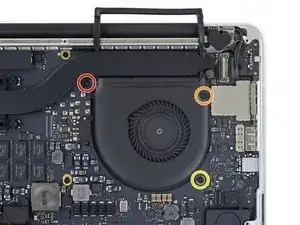
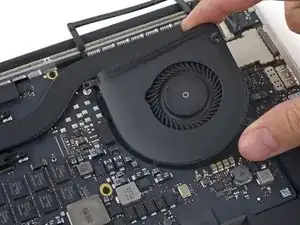
Use a T5 Torx driver to remove the following three screws securing the right fan to the logic board:
-
One 5.0 mm screw with a 2.0 mm long shoulder
-
One 4.0 mm screw with a wide head
-
One 4.4 mm screw
-
-
-
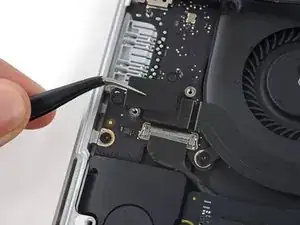
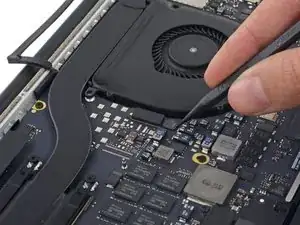
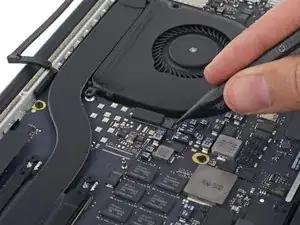
Use the tip of a spudger to flip up the retaining flap on the right fan ribbon cable ZIF socket.
-
-
-
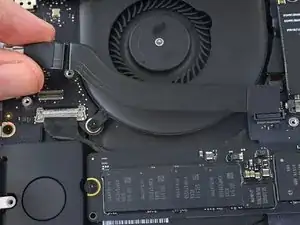
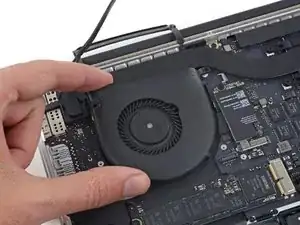
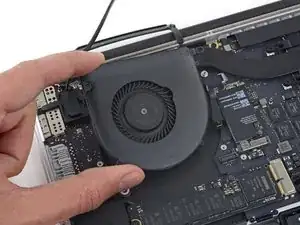
Lift the fan and push it gently towards the back edge of the MacBook to free the fan cable from its socket.
-
Remove the fan.
-
-
-
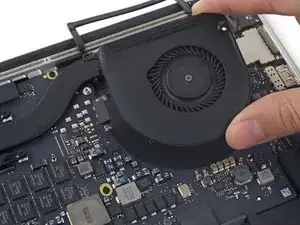
Remove the following three screws securing the left fan to the logic board:
-
One 3.6 mm T5 Torx screw with a wide head
-
One 5.0 mm T5 Torx screw with a 2.0 mm long shoulder
-
One 4.4 mm T5 Torx screw
-
-
-
Use the tip of a spudger to flip up the retaining flap on the left fan ribbon cable ZIF socket.
-
-
-
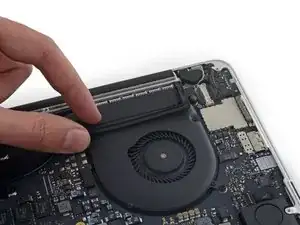
Lift the fan and push it gently towards the back edge of the MacBook to free the fan cable from its socket.
-
Remove the fan.
-
-
-
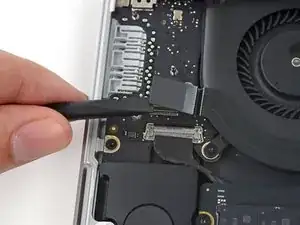
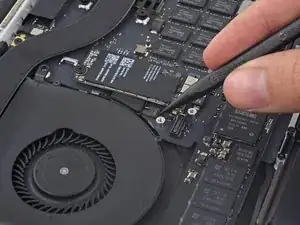
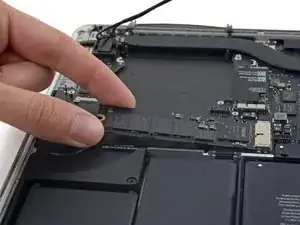
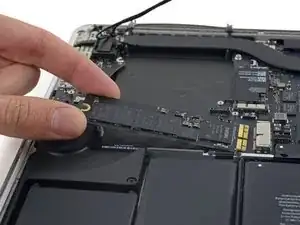
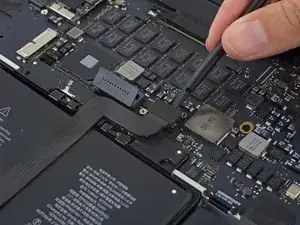
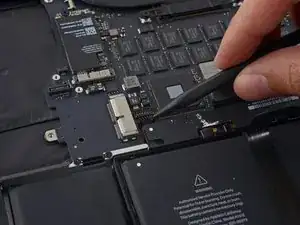
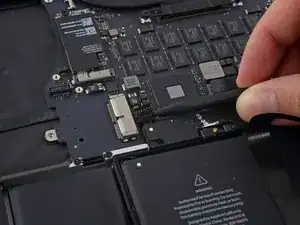
Lift the end of the SSD up enough to pass over the speaker directly behind it.
-
Pull the SSD straight out of its socket on the logic board.
-
-
-
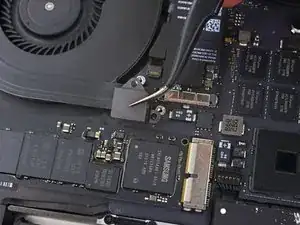
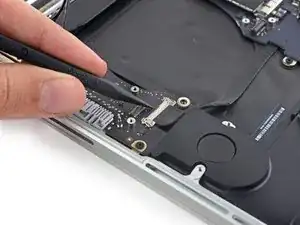
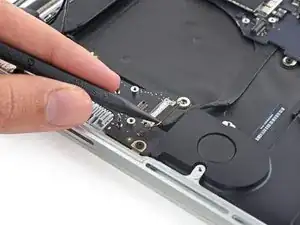
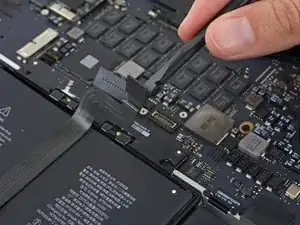
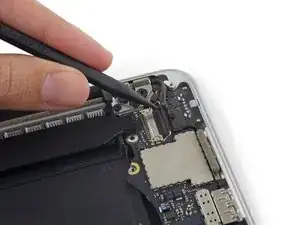
Use the point of a spudger to flip up the locking mechanism on the I/O board connector.
-
Flip the spudger around and use the flat end to slide the I/O cable out of the connector.
-
-
-
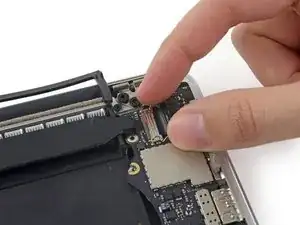
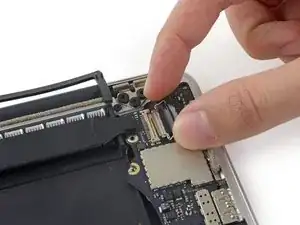
Slightly lift the interior edge of the I/O board and pull it toward the center of the MacBook, away from the side of the case.
-
Remove the I/O board.
-
-
-
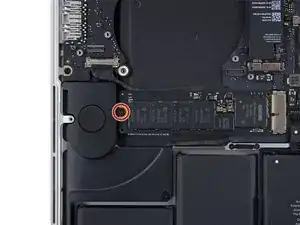
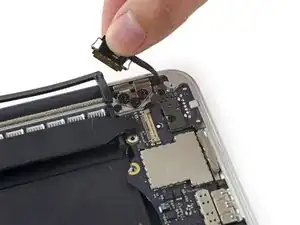
Remove the two 2.2 mm Torx T5 screws securing the touchpad cable connector cover to the logic board.
-
Remove the cover.
-
-
-
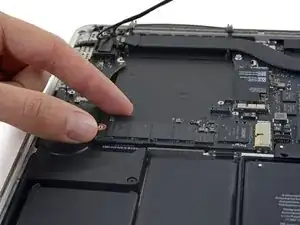
Use the flat end of a spudger to disconnect the touchpad cable connector from its socket in the logic board.
-
-
-
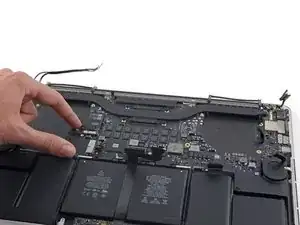
Remove the following six screws securing the logic board assembly to the upper case.
-
One 3.8 mm T5 Torx screw
-
Two 5.7 mm T5 Torx screws
-
One 5.6 mm T5 Torx screw (this one is silver and has a taller head than the others)
-
One 2.6 mm T5 Torx screw
-
One 3.2 mm T5 Torx screw
-
-
-
The following steps will detail disconnecting these six connectors. Be sure to read each step, as these connectors come in different styles that disconnect differently.
-
Microphone cable
-
Left speaker cable
-
Keyboard data cable
-
Right speaker cable
-
Keyboard backlight cable
-
Display data cable
-
-
-
Use the tip of a spudger to flip up the retaining flap on the microphone ribbon cable ZIF socket.
-
Pull the microphone ribbon cable out of its socket, parallel to the logic board.
-
-
-
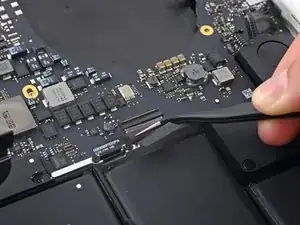
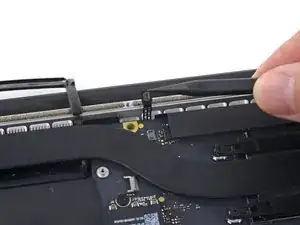
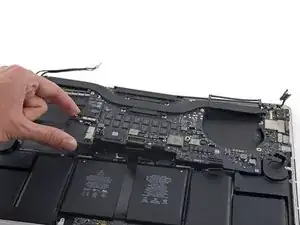
Use the flat end of a spudger to pry the left speaker connector up and out of its socket on the logic board.
-
Gently fold the cable up and out of the way of the logic board.
-
-
-
Use the tip of a spudger to flip up the retaining flap on the keyboard data cable ZIF socket.
-
Pull the keyboard data cable out of its ZIF socket. Be sure to pull parallel to the logic board, and not straight up.
-
-
-
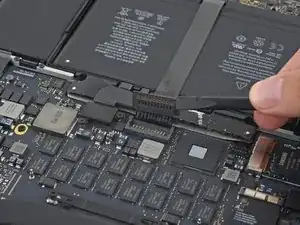
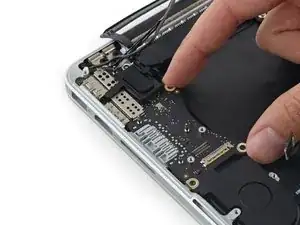
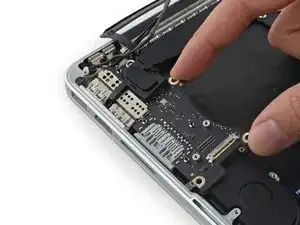
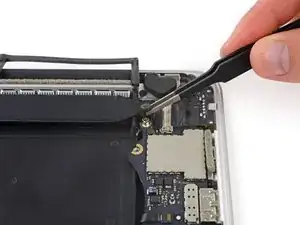
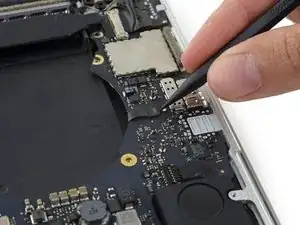
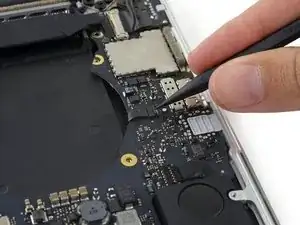
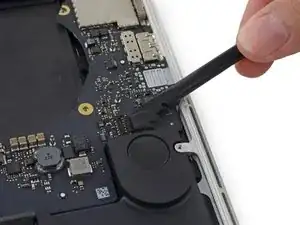
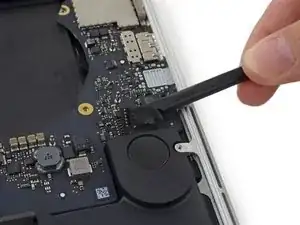
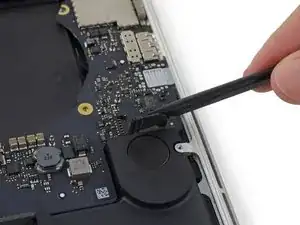
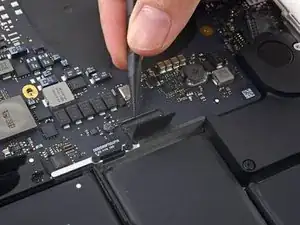
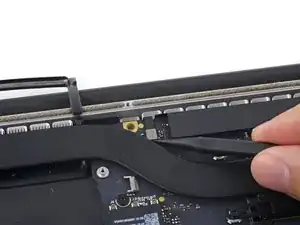
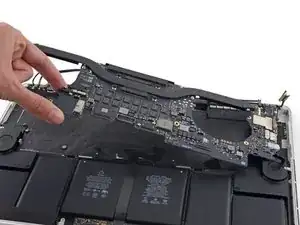
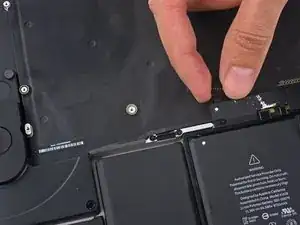
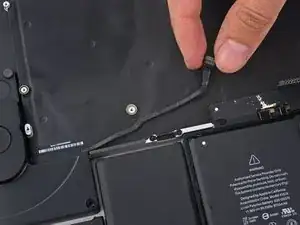
Use the tip of a spudger to pry the right speaker connector up and out of its socket on the logic board.
-
Gently fold the cable up and out of the way of the logic board.
-
-
-
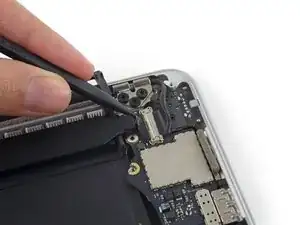
Use the point of a spudger to pry the keyboard backlight connector up from its socket on the logic board.
-
-
-
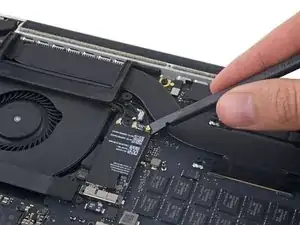
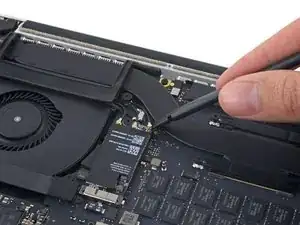
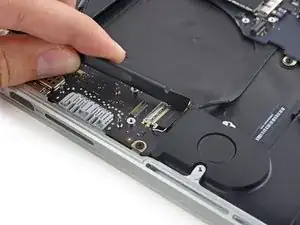
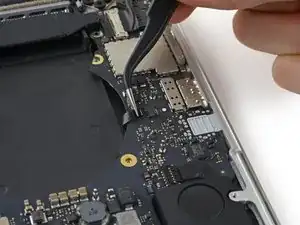
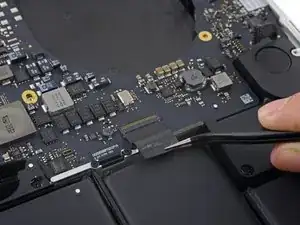
Use the tip of a spudger to flip up the display data cable lock and rotate it toward the MagSafe 2 power port side of the computer.
-
-
-
Pull the display data cable straight out of its socket on the logic board.
-
Gently bend the display data cable toward the display hinge, to expose the screws on the MagSafe 2 board.
-
-
-
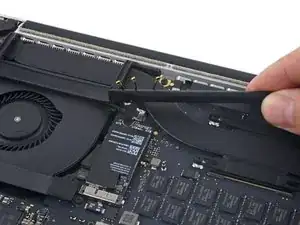
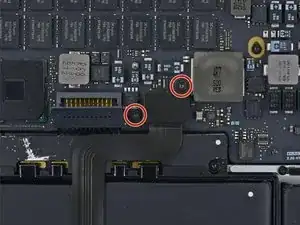
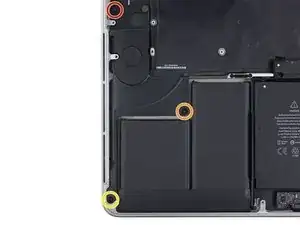
Remove the following screws securing the right speaker to the upper case:
-
2.7 mm T5 Torx screw
-
6.9 mm T5 Torx screw (with 4.5 mm shoulder)
-
5.6 mm T5 Torx screw
-
-
-
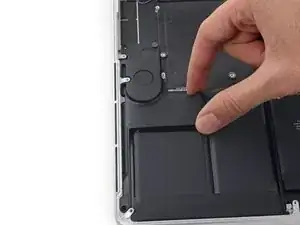
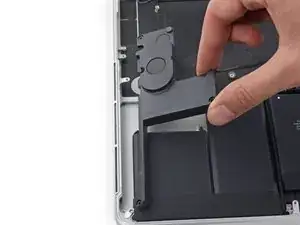
Remove the right speaker by pulling it slightly away from the side of the upper case, and out from under the aluminum tab blocking it in.
-


To reassemble your device, follow these instructions in reverse order.
36 comments
My Mac book pro 15” Mid 2015 got the right side speaker issue. I have ordered the speaker from iFixit and I am able to replace the speaker by following the steps given above. Thanks to iFixit.
Is there any way replace right speaker without remove the mainboard? Can we cut off the cable socket of fail speaker to get speaker out without remove the mainboard, and then when reassembling, we put the cable wire lie on the mainboard?
Thank you!
Tai Le.
Tai Le -
I know this is 2 years too late probably, but you can by removing just the IO board and a few screws from the right side of the motherboard. You should be able to flex it enough without damaging it to gently pull the speaker cable out from under the board.
Zach -
thanks zach. was super easy this way.
Chris J -
Excellent. Successfully replaced RH speaker in my 2015 retina MBP. Took about 3 hours.
Tricky bit: Before screwing main board back into case I forgot to first make sure the left speaker wire, keyboard light cable, etc were all poking above the board (rather than squidged underneath), so had to retrace some steps…. i.e., make sure that none of the connectors are stuck under the board.
My tips:
1. use correct screwdrivers which are also magnetic (to hold screws), and also to use a plastic spudger where shown in instructions.
2. Get a couple little bowls (like might hold sauce) and place screws for case in one, and some other bits in another.
3. Use couple of upturned post-it notes and stick the little screws on the tacky strip while noting with pen underneath what size, and what for.
4. For some bits (cable end cover plates, logic board, etc) rather than try to keep track of all these different screws I immediately loosely placed them back in the chassis mounting holes for safekeeping, after removing each part.
Ray Lowe -
The number of screws listed here is wrong on my model. I had four of the smaller size.
anonymous 1286 -
Just to add to my comment above (I can't edit it because it's anonymous), my MacBook Pro is a mid-2015 15in model 2.8GHz (A1398; EMC2881). For the bottom case it uses six 3.1mm screws, and four 2.3mm screws at the clutch/hinge side of the MacBook Pro. I tried using a 3.1mm screw at the clutch/hinge end, as described in the main article, and they don't fit. It has to be four 2.3mm screws.
anonymous 1286 -
The instructions below have you basically taking ALL of the guts out of case. I’ve been doing my own apple repairs since before ifixit was a thing and this one is a handful. My battery was swelling and I wanted to remove it before it burst or bent the case so I took it out without having a replacement and it occurs to me that aside from using the solvent (liquid) to remove the adhesive, you could probably do this only taking the trackpad ribbon out. I have mine reassembled now and will research the best battery to buy but I think installation will take about 5 minutes. See if you can slip a plastic gift card under the battery and wag/saw the adhesive out without the solvent before you go through all of this. It might work. Note, don’t bend or put too much stress on the battery and certainly don’t puncture it…
br1ansk -
Battery Recall for 15-inch MacBook Pro Retina mid-2015. Check Apple’s site for recalls, and put in your serial number. They replaced my swelling battery for free, regardless of warranty.
Steve -
As we are only replacing the battery, you can safely skip steps 6-26 and 28-48, no need to disassemble the computer to pull out the battery. Use nail polisher remover I was able to pull a super bloated battery out, without disassembling my MacBook.
John Sikking -
I qualified for the recall. These bloated batteries are dangerous! DO NOT, UNDER ANY CIRCUMSTANCES, PUNCTURE THE BATTERIES!
Thanks for the heads-up on the recall.
Datajockeys -
I’m having a problem trying to get the screws off. I have a set of pentalobe screwdriver set. I found one screwdriver that fits perfectly on one set of screws, but I am unable to unscrew it. I tried using some force pushing the screwdriver into the screw, but nothing happens. Any suggestions?
henry_k_wong -
All the screws on mine are the same length for some reason.
ccfman2004 -
I would recommend the first step is: Run the battery down to ZERO before doing any next step. This reduces risk to you, people nearby, to the MBP and greatly reduces the risk of fire. Step 2 should be: Double-check that the battery is at zero.
I like others listed below and on YouTube, disagree with these full tear down 70+ steps being the only focus. I get that I have to be careful not to get the acetone solvent near the speakers. I skipped 25+ steps by: tilting the MBP away from the speakers and using very little acetone solvent. More pressure with the plastic cards and only a few drops of solvent. While giving the full set of instructions is fine it should be very clear that you can (at the user’s own risk) do this.
Kenneth Schleede -
As above—I consider full disassembly to be far riskier to fragile cables and connectors than the risk for solvent spillage. I did steps 1-5 and 46-74. No issues. I HIGHLY recommend the iFixit magnetic Project Mat. It’s a white marker board surface gridded into squares and invaluable for labeling part sizes/steps in disassembly.
philtrit -
As above too. I benefitted from the advice. From step 51 onwards, I found a easier way using tip from China battery seller. Use a 2” width plastic scraper/plastic paint scraper to poke under the battery. Use moderate strength to poke and avoid rough handling of the battery so as not to puncture it. There is no need to pry the battery to avoid stressing it, just use a firm poking action under the battery and the double sided tape adhesive will yield. After 5 min of such poking, the entire battery pack can be removed without the hassle of pouring the adhesive remover from step 51 onwards. Get a scraper with a stronger handle so that it is more comfortable to poke.
https://www.aliexpress.com/item/32889670...
Emma Pn -
Heads up as you go…we (husband/wife team) had a notebook that when screws/covers were removed, we marked the step # and actually taped the screws into the notebook noted by the step number. This was very helpful on reassembly and we knew we would be using the exact screw into the original screw hole.
Ann Brainard -
After replacing the batteries myself, I wouldn’t even consider doing it again. Not that it’s difficult to do—that’s not the issue. The issue is aftermarket batteries. I’ve been using notebooks for well over 30 years, and never had satisfaction with aftermarket batteries.
Modern lithium batteries are an amazing technological feat, but a dangerous one. So even putting aside that I’ve never found any aftermarket batteries with quality anywhere near original, I learned “cheap” aftermarket lithium batteries are downright dangerous.
After doing research into what’s involved with manufacturing lithium batteries, I know there are so many corners to cut, you’ll end up with junk regardless of what you pay.
A week after replacing my batteries with those from iFixit, they showed clear signs of failure. Thank goodness iFixit refunded my money.
After having Apple replace my batteries, everything is back to like-new. For my $199, I got not only excellent batteries, but a new keyboard and trackpad as well. That’s it’s done!!!
AnnoniMoose -
I found an Apple Support link that said MBP battery replacement was $199, but the 2 Apple Stores near my house would not provide any appointments. Instead, I scheduled an appointment with and “Apple Authorized Service Provider” & that repair center quoted about $750 to replace the battery.
I refused, went home, & opened a chat with Apple Support.
After a lengthy & painful chat session where the Apple tech didn’t want to provide a battery replacement quote (he feared other issues with the MBPr), he finally gave me an Apple price of just under $650 to replace the battery.
Did you go into an Apple store, or mail it in? I’m struggling to reconcile a price of $199 to get a battery + keyboard + trackpad against what I was just quoted 2 weeks ago. The new track pad & keyboard might have been due to repair tech error. i.e. they trashed those repairing your batter & had to toss them in.
Bartt.Shelton@gmail.com -
I took mine in after being quoted for a $199 replacement of battery and keyboard, only to have the repair refused as they found a "water sensor" triggered and now I'm left with my AUD$5,000 laptop with messed up keys. Shame on me for not getting this repaired during COVID while under warranty. This is the first time I've truly been disappointed in Apple, but suppose it was bound to happen someday. I was quoted US$ 1479 to replace the battery and keyboard and the sensor (likely the logic board is replaced as well) if I were to send it in to the US repair center. Any chance these sensors can be triggered by humidity?
C0RT -
I 1000% recommend watching this video and performing the battery replacement without all these steps from this guide and without using the acetone solvent. https://www.youtube.com/watch?v=ImonCWcc... (15" inch Retina MacBook Pro A1398 Mid 2015 Disassembly Battery Replacement Repair)
The video is narrated well and the guy goes slow and zooms in where appropriate. Instead of removing all components, he simply removes the track pad cable, battery cable, and unscrews two of the speaker screws on each side. From there, you can lift up the speaker arms where the video guy uses a thin pry tool to push through the sticky tape. No solvent is needed except for residual sticky stuff leftover.
Instead of the thin pry tool, I just used the plastic cards that came with this ifixit kit. It takes a little force and wiggle/jiggle so take your time using the corner of the card to start.
This method makes a difficult 2-3hr job into a much easier 1hr job.
Spencer -
+1 for this approach! I watched the video that Spencer mentioned. It took me a little over an hour, and it was stress-free. https://youtu.be/ImonCWcc1xk
Chris Wicklas -
Another +1 - I followed the video pretty exactly (after having already gone through steps 1-5 here). I'm not sure it's necessary to clean off the adhesive residue as thoroughly as he demonstrates in the video, but the instructions were clear and the end results were good - trackpad still working fine and new battery already charged to 50%.
Jeff Zinn -
Glad I read these comments before plunging into the iFixit instructions.
+1 for skipping the iFixit instructions and using the youtube video linked by Spencer.
I followed the instructions and had my battery replacement done succesfully.
Instead of the metal spatula like thing he used - I used the plastic ifixit credit card things that came with my battery kit.
It took about 15 minutes of wiggling under the battery to free it from the adhesive but it wasn't too bad.
I did remove the residual adhesive as he indicated with isopropyl alcohol - but after finishing my installation I realized it was completely unnecessary. You can install the new battery over the residual gunk and skip that step.
picardo -
Yes! This YouTube tutorial works great and it was really easy to replace the battery. I needed about 75 minutes.
Perform steps 1-5,
Then skip to step 41.
In 41 + 43 do not unscrew the red marked screws.
In 42 an 45 just lift the speakers, do not remove them.
Skip 44
Up from 53, I did not use the glue remover, the plastic cards were enough.
In step 63 watch out to start from the middle. This prevents you from peeling up the lower „platform“.
Great job :-)
weekendiac -