Introduction

This guide will walk you through the steps to disassemble the Oculus Quest 2 controller to access the joystick and clean it to remove drift.

PROCEED AT YOUR OWN RISK. It is easy to lose pieces and damage the device. Opening it up like this will void the warranty if the device is still covered.

I first used Electrical Contact Cleaner to help fix the drift with some success, but the drift eventually would come back. Over time, the duration my controller would work without drift would decrease; so I decided to open up the controller to learn more about what was happening and how to correct it.

Before attempting this, I recommend trying Electrical Contact Cleaner first.

3 pieces of advice on using contact spray:

  1. Remove the battery first!
  2. Less spray is better. (If you completely saturate the joystick, it will take longer to dry since it is enclosed. I like to leave the controller upside down for 5-10 minutes to let it dry out.)
  3. Make sure that you are pressing down on the joystick while spraying so that the cleaner can reach the sensor.
    • Once you have sprayed it, move the joystick around in circles. This will cause the 2 contact pieces to move the cleaner around on the sensor to try to clean it.
    • Pressing down on the joystick while moving it doesn't make a difference. In fact, it might actually make it less effective.

I hope this helps anyone adventurous enough to attempt this. At the very least, you will now understand what causes drift and why you can't soak the joystick with Electrical Contact Cleaner to fix it.

  1. Bhv5rEBEpqDx31Cx
    Bhv5rEBEpqDx31Cx
    YeBNbPIb3u2EOBAR
    • Start by opening the battery compartment and removing the batteries, using your fingers or something else to gently pull them out.

    • Peel off the three stickers that are hiding screws using your fingernails or something pointy, such as a pair of tweezers.

    • The stickers cover three of the screws. They are not shown in this image.

    • Unscrew the three T5 Torx screws behind the stickers using a small Torx screwdriver.

    • Remove the fourth screw located inside the hole near the top of the battery compartment using the same Torx screwdriver.

  2. MrIw2HTBBqcLJMrB
    • Gently pry the faceplate off using a spudger or flathead screwdriver.

    • The plate is secured with adhesive, so it may be a little difficult the first time you remove it. You don't need to worry since it is also held in place using plastic posts.

  3. 141fPaUmsJ4bhNWn
    • Remove the five Torx T5 screws.

    • Remove the longer, black T5 screw.

    • Remove the two smaller T5 screws.

    • Remove the single long silver T5 screw.

    The ring is going to fight you every step of the way, by design. Many of the screws are angled in such a way as to put the ring in the way of a driver. You may need to just use a bit and hand-screw them.

    Thomas Stage -

    It seems, that the yellow marked screws are something under T5, like T4 or T3. With my T5 bit, i couldn't remove these screws.

    Gulliver -

    Yes, I use T4 for the yellow marked screws

    Allan Vendiola -

  4. j1DxLSqgrKLBUEYY
    • Use a spudger or screwdriver to press the plastic notch until it releases.

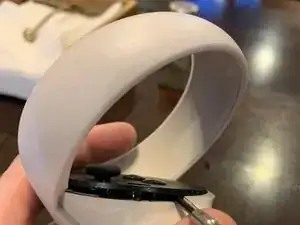
    • Starting from the side without the notch, gently remove the casing using your hands by moving it away from the center of the console.

  5. 6Z4ZCCXrFVUEXOQn
    6Z4ZCCXrFVUEXOQn
    DsiDNBGwkWPuSuN2
    vpFcgeuhP2H4kqSf
    • There is a plastic pin that is inserted into a hole, to separate the parts you need to be a bit careful in the steps below.

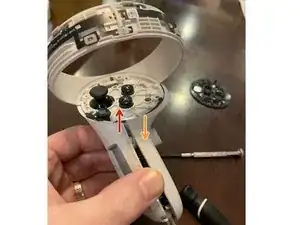
    • Using your hands, move the left half of the handle slightly (0.5cm) away from the controller.

    • While holding the left side as described above, push the right side towards the body of the controller.

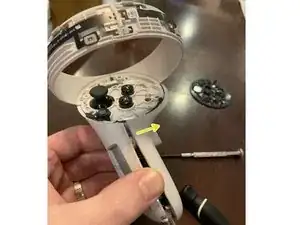
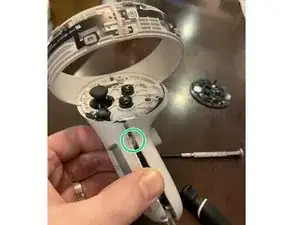
    • Now you are able to slide the right part to the right and remove it.

    • The pin is located here.

    I am struggling with this step there is a pin holding it right behind the button you push with your middle finger and it won’t come loose.

    Kaleb Israel-Everett -

  6. hGEPyq5MXLmEEPhM
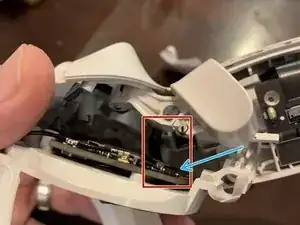
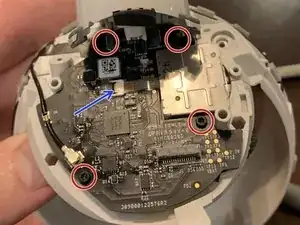
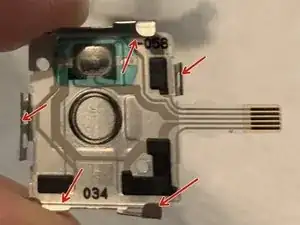
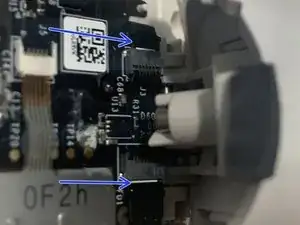
    • Disconnect the ribbon. There is a latch you flip up on the circuit board (blue arrow). This is easy to take apart but a pain to put back together. Make sure you have needle-nose pliers or tweezers for this when you put it back together.

    You just need to pull, in paralel direction to the board. There is no latch to open. I got it back in using flat head pliers but slightly scratched the coating. Still works but idealy you use pliers with plastic tips.

    VR Wizard -

    I got to this part and the little plastic clip just disintegrated.. what a cheap worthless pos..

    Groltank -

    You can get to this ribbon cable if you teardown the handle further and then you can remove the ribbon cable from the handle and fit it better to the circuit board and avoid the risk of tearing the ribbon cable just by removing the bottom part behind the battery bay and to give your self more space you can remove the bottom trigger

    Juic-e -

    I struggled with getting the ribbon cable re-attached until I saw this Youtube video: https://www.youtube.com/watch?v=aZ57n6ia.... At 9:20 he explains how to break the handle down further. After that, it took me 10 seconds.

    David Reavis -

  7. 5NXEjHCLI2OxH2C5
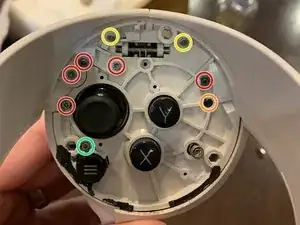
    • Now, you need to remove the 4 screws holding the circuit board to the controller.

    • The joystick has a small ribbon (blue ribbon) as well, but it is easy to connect and disconnect. Flip the latch up to disconnect the joystick ribbon.

    • You are NOT going to remove it completely, just lift it high enough to remove the joystick.

  8. ENMfCYrYMDOrJEBj
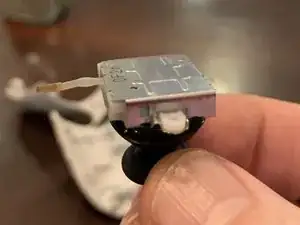
    • Lift up the circuit board and pull the joystick free. The X button and the Oculus button may fall out. Not a big deal, just make sure they are put back in the correct position before sealing everything up.

    this looks extremely similar to gulikit switch joy-cons anyone knows if they could be used instead?
    https://gulikit.com/productinfo/945307.h...

    Emmanuel Espinal -

  9. VCU5OVRZUKnO2Gjr
    • Pull the rubber cap off of the joystick.

    There is a myth going around that the Oculus/Meta Quest 2 joystick/ thumbsticks have a capacitive censor on the rubber pads. That seems to not be the case as there are no circuits attached to it.

    Think For Yourself -

  10. rWgnGQvSF6xkaxkU
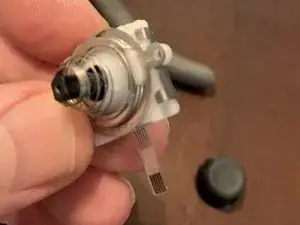
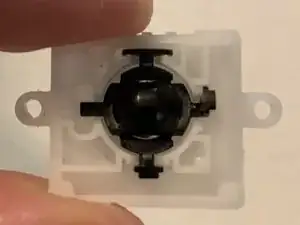
    • The housing is held together by the tabs on the bottom plate. Bend them back to pop it off. Be careful doing this, there are a lot of little pieces and a spring that can go flying.

  11. 3DWFKreBmLSv1LeI
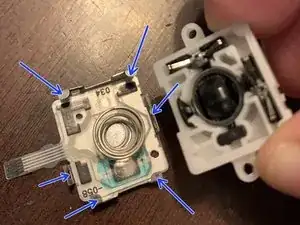
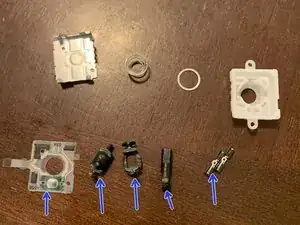
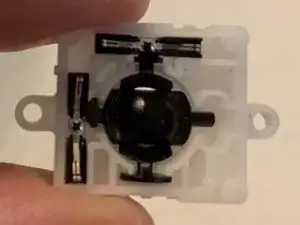
    • Here are all of the pieces inside the joystick on the bottom row.

    • 1 - The sensor that causes drift when dirty

    • 2 - The bottom part of the joystick that the stick fits into. This is what moves the sensor left/right.

    • 3 - This piece sits on top of #2. This is what moves the sensor up/down

    • 4 - The stick. This fits through the hole in #3 and fits inside #2.

    • 5 - These two pieces are what make contact with the sensor and they are moved around by #2 and #3

    • MISSING FROM PICTURE - There is a little black plastic piece that is in the shape of an arch that locks #2 into place in the housing.

  12. KJI3NoVpHYFEI45x
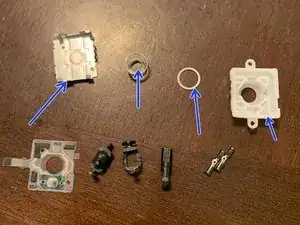
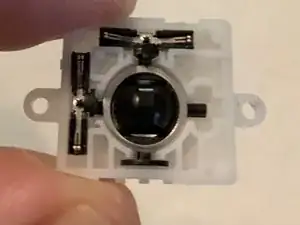
    • Here are all of the pieces inside the joystick on the top row.

    • 6 - Metal housing

    • 7 - Spring for pressing down on the joystick

    • 8 - Metal ring to keep the joystick in place and to create contract with the spring (#7)

    • 9 - Plastic housing

  13. AJIMrFkWnnXcGhGA
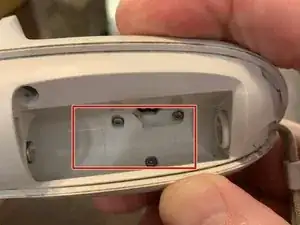
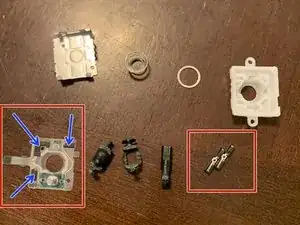
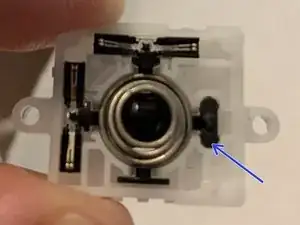
    • Now that you have it taken apart, use contact cleaner to clean both pieces in the red box on the right and clean the sensor in the red box on the left. Cleaning the sensor is the most important. After spraying with contact cleaner, I use a small paint brush to clean it.

    • The 3 black sections (blue arrows) are what recognize up/down/left/right. If there is anything on those, it causes drift. The more you use the controller, the more the black material breaks down and leaves residue behind. Also, the more you use it, the more sweat/dust/dirt find their way into the housing.

    • If you use the controller long enough, eventually this will breakdown and can't be fixed. This is a problem with all controllers, not just Oculus.

    so seeming that the problem is residue from the black material and foreign debris. is it possible to seal the housing?

    Ryan Montgomery -

  14. S6rRKxR1qMarodYJ
    • Place #3 into the plastic housing

  15. NJTtfE2oNZLTK5uV
    • Put the stick through the opening and attach #2 to the bottom of the stick like this. Both #2 and #3 can only sit in the plastic housing a certain way. If it doesn't move correctly, this is probably the problem.

  16. lw1uApALtT2UfXUQ
    • Slightly push the stick up so that you can place both #5s in the groove. #2 and #3 sit on top of #5. At this point you should be able to see how the joystick makes #5 move.

  17. vNAkYXEr1EAk6KPE
    • Place the metal ring on.

  18. eTUbZPuG6r45o4WW
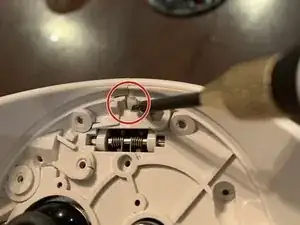
    • Place the spring on and the tiny little black piece. That tiny little black piece (blue arrow) locks #2 in place.

  19. xsUlQo2LnlYUynnX
    • Put the sensor on the metal housing. It can only fit one way.

    • Now, sandwich the housing together without letting anything slip.

    • Bend the metal tabs back into place so that it is secured.

  20. wkl3SmXYeK5F6Pob
    • Reverse the instructions to put it back together. Be careful with the ribbon I mentioned in Step 6.

    • Some of the pieces require a little finesse to reassemble, especially the piece that goes around the trigger.

    • Make sure that you didn't disconnect any of the ribbons. The last time I did this, I accidentally loosened one of the ribbons under the trigger (blue arrow) and eventually is disconnected.

    Can you reattach the the part the ribbon slides into if it comes detached from the circuit bouard

    Michael Franta -

    my controller doesn't have screws behind the battery place

    That Amogus Guy -

    You have to remove the sticker first

    JR Thompson -

Conclusion

To reassemble your device, follow these instructions in reverse order.

matty_mac_21

Member since: 17/02/22

985 Reputation

25 comments

i wanna know how the controller worke. infared or bluetooth, or even area positioning system bull $@$*, please help actually sent from my quest 2

Soren Nordgren -

The controller uses infared to connect to the quest 2.

Lucas C -

That's BS. It uses Bluetooth 5.0 LE. The Quest 2 has no way to send or recieve IR

Blus cream -

Both replies are half right. The controllers use BT to connect to the headset for functionality, but positional tracking is done via infrared in the halos. The 4 cameras on the front of the headset are infrared cameras.

Justin P -

Yeah, a basic inspection of the controller says it does not operate by infrared. Infrared is an optic device, and the controller has no optics. I'll stick with Lucas on this one.

Tj Casteel -

Justin P has the correct answer. Button / Trigger / Analog-Stick / Touch-Sensor inputs are communicated to the headset through bluetooth, while the positional tracking of the controllers is done visually through the headset's cameras which are looking for the (invisible to human eye) infrared spots emitted from ir leds in the controller's ring.

-A VR Developer

BAM5 -

Thank you! This guide saved me from purchasing a new left controller, when it developed at “stutter” or “stumble” when i tried moving forwards. I followed the guide, though i didnt have any contact cleaner. I used isopropylalcohol on cotton swab (cotton bud?) instead with excellent results.

Mathias Hertz -

thank you, fixed my controller when adjusting the deadzone and spraying contact cleaner from the outside didnt help.

Teyorya- SEA Branch KFP -

thank you, but I tried opening mine and the analog assembly looks a little bit different from yours. for one the outer casing is black plastic instead of white, and on the sensor inside it only has 2 black pads while the other ones are just bare copper traces. also there are no small black piece that holds #2 in place.

I tried cleaning them still with mixed result. it does help with the jitter issue (in my case the analog keeps being tilted down on its own randomly) but it doesn't entirely fix the problem for me.

replacing the whole analog part might be the only way but sadly it's hard to find replacement for

here's a picture for reference https://imgur.com/a/kys5llb

Galafador -

Replacements are available on aliexpress

Lucas C -

you can buy replacement analogs on amazon

I got one for $12 USD

It comes with tools as well!

https://a.co/d/2PB8VYs

TheyCallMeScitter -

Thank you, we fixed both controllers at the same time. It did take us longer (4 hours, and some pizza).

Beth -

Replacement now available on Aliexpress.

Илья Смирнов -

Part is also on Ebay and Amazon, "look up Quest 2 Joystick replacement" Amazon even has it as a kit with pry tools and a very handy set of the torx driver and tweezers to put the ribbon cables back in!! A deal for $14.

Baba Luba -

Excellent guide, fixed my left controller's jitter and drift issues! 👍

Sulfrix -

I need help with the infrared LED. Everything seems fine, pressing the Oculus button + B does make the controller vibrate, but the LED's wont turn on.

Madhatter494 -

Hi all,

Bulldog pup mauled right controller towards bottom. Works perfectly does anyone know where I can get outer shell and battery cover?

Justin -

This worked for me. Thank you for such a detailed instruction.

The symptom I experienced was that the RIGHT controller was not selecting items in the O2 home menus. This is because the left controller joystick was constantly stealing the focus due to "noise" that this wonderful guide helps resolve. Thank you thank you thank you!

Alex Olshove -

I had horrible stick drift/jitter to the top and right even when I had my dead zone set to 99%💀. Took the whole thing apart and wiped away some black powder off the sensors with isopropyl alcohol and a q-tip. Put it back together and it works perfectly.

chocomosi -

I did this fix this evening and the drift is completely gone. there is 0 drift now. One thing that I would recommend you add to your tutorial as I have a problem that future me will have to tackle.... When putting everything back together, please mention that the long silver screw should not be over tightened as it is very easy to break. I tightened the long silver screw and after trying to make sure it was tight, the top part without thread broke off. :-/
BUT.... nothing structurally was compromised or loose. I will just have a problem when I go to clean the joystick once more.

Thank you for this tutorial.

Joe Soap -

@matty_mac are you actually still alive? I would love to have a video tutorial because my small brain can't get the controller back together. Would this be possible for you or anyone else with experience?

Blus cream -

Alguna idea de como reparar el gatillo lateral?

Jalil Diamond -

These are fantastic instructions. The symptom for me was that left & right was drifting and not working consistently. Upon disassembly of my joystick I found that one of the black plastic pieces (the tab that controls left-right, unsurprisingly) was broken. Gluing it wasn't a realistic option so I ordered a replacement part.

Stefan -

Do you have a repair service? I'm not too technical.

hitmeat2 -

Spilled some juice on the controller and the stick was stuck reading full left. Removing cap and injecting spray didn't help. Teardown revealed the joystick ribbon connector was contaminated.

Sprayed connector with electrical cleaner for a few seconds, reassembled, and performed stick calibration - good as new.

Thx for the teardown instructions!

Keuzy -