Introduction

Use this guide to replace a worn-out or dead battery in your Oral-B iO.

If your battery is swollen, take appropriate precautions. For your safety, discharge your battery below 25% before disassembling your toothbrush. This reduces the risk of a dangerous thermal event if the battery is accidentally damaged during the repair.

You’ll need the charging station of the Oral-B iO during the battery removal procedure.

  1. NNNPPII5FwO6FMn4
    NNNPPII5FwO6FMn4
    5qbI5W55y2Fo2ZFB
    • Before you start, disconnect the charging station from the power socket.

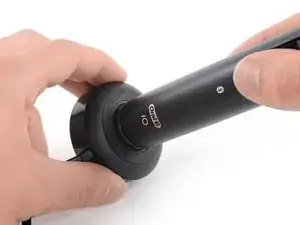
    • Flip the charging station of your OralB iO upside down.

    • Align the three recesses on the iO's silver bottom cap with the notches at the bottom of the charging station.

    • Push the toothbrush into the charging station with mild pressure and turn it about 90° counter clockwise to unlock the thread of the bottom cap.

    Hi

    Mein Deckel läßt sich nicht aufdrehen. Es gibt dafür keinen Ersatz und will es auch nicht mit Gewalt machen.

    Was jetzt?

    LG

    Ela

    An Lu -

    I’ve used a wrench. With its help I managed to open it.

    Artur Krysiak -

    Leichter Druck hilft vielleicht bei einem neuen Gerät. Bei mir war viel Druck nötig, was die Nasen auf der Unterseite der Ladestation auch etwas beschädigt hat. Nach dem ersten Lösen habe ich den unteren Deckel dann durch Schritt 5 "herausschiessen" können. Im Zuge dessen habe ich die Komponenten (nicht das Innenleben) mit 2/3 Wasser und 1/3 Essigessenz in 3 Minuten in einem Ultraschallreiniger auch noch eben grundgereinigt.

    Bjoern Mueller -

  2. m5RejDpQKcKcs6ME
    • Unscrew the bottom cap of your toothbrush.

    • Remove the bottom cap.

  3. idISfpLARnfAXgOp
    idISfpLARnfAXgOp
    LJPheb66rNDFOf4m
    • It is possible that toothpaste residues or lime have accumulated underneath the metal ring above the gray rubber gasket. For this reason, the ring may behave somewhat stubbornly during removal.

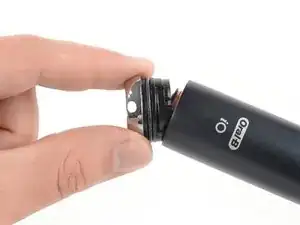
    • Insert one arm of a pair of tweezers or a small flathead screwdriver underneath the bottom edge of the metal ring sitting above the grey rubber gasket.

    • Use ur tool to carefully pry up the metal ring.

    • The metal ring is held in place by small plastic clips. During reassembly make sure, it snaps back into place.

    • When prying up the metal ring be careful not to puncture or tear the grey rubber gasket.

  4. pCoavWkSAwRh45Nm
    pCoavWkSAwRh45Nm
    i1NbXb1nBLDNPaKo
    • Use a pair of tweezers or your finger to remove the metal ring.

    • This is a good point during reassembly to clean off toothpaste residues and lime from the gasket and the metal ring. However avoid using liquid cleaners or use them in very small amounts. With the removed metal ring they can run easily inside the toothbrush causing water damage.

  5. YRxmILlnQ4CPBuQg
    YRxmILlnQ4CPBuQg
    wNxZOTrGHQyqYfw4
    uTOKAkutBX2Qw5TT
    • Remove the brush head from your toothbrush.

    • Hold the toothbrush body in one hand and use your thumb to press down the top of the toothbrush assembly.

    • Pull the toothbrush assembly out of the opening at the bottom end of the toothbrush body.

  6. 4YtX6tBZl1KahREq
    4YtX6tBZl1KahREq
    Bf4hImGpioRBbtJQ
    • Do not use excessive force or pry at the battery with metal tools.

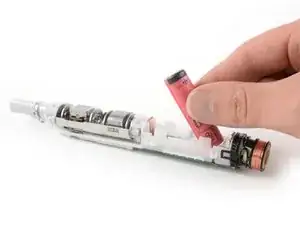
    • Pull the battery out of its recess on the bottom of the toothbrush assembly.

    • In case the battery sits to tight in its recess, you can use a plastic tool like a spudger to pry the battery out of its recess.

    • Remove the battery.

    • Do not reinstall a damaged or deformed battery, as doing so is a potential safety hazard.

    Does this fix do any damage to the brush and where can I find and buy the replacement battery for the brush?

    Fischer DeCraene -

    Just took mine apart.

    It is a Sanyo UR14500AC 740mAh installed. Unfortunately this info is not shown on the picture of the item.

    You should be able to find a replacement part with this data.

    Florian -

    This description is missing an important detail. Before assembling, it is important to remove the silver ring on the top and reattach it at the end. Otherwise the seal will not fit properly.

    Florian -

    Looks like it’s impossible to find that exact battery (in Canada at least). Does anyone know if any other battery model should be a viable substitute?

    Andrei Toumanov -

    Did anyone try if a higher capacity battery with protection is working? Like a Keeppower P1450C3 1100 mAh.

    The drawback of the IO is its weak battery life. Not even a week is possible while my old Genius 3764 Type was able to run for 1-2 weeks without charging (ok came without this nice display and LEDs).

    The Sanyo measures 14,0 mm x 50,0 mm. The 1100 mAh with protection measures 14,3 mm x 52 mm.

    Sebastian Voit -

    I try it with the Keeppower P1450C3 1100 mAh. It work, but it fits really hard ;).

    Christoph Müller -

    Does it give you roughly 50% more use? Should give you almost 14 days of battery, 2min use twice a day ?

    Richard S -

    Ein wichtiger Schritt wurde übersehen, oben muss der kleine Crome/Metallring ab, nach dem das innere Teil ausgebaut wurde. Dann den Akku tauschen und das Gehäuse gut sauber machen. Jetzt die Technik wieder in die Außenhülle einschieben. Dabei drückt es oben die kleine Gummidichtung nach außen. Das ist richtg so. -jetzt unten alles verschließen und zuletzt den Metallring vorrichtig von oben draufschieben, bis er einrastet. Setzt ist die Bürste auch wieder wasserdicht.

    Jason Nein -

    Habe das zu spät gelesen und irgendwie die alte Anleitung gehabt von ifixit... Jetzt ist die Zahnbürste kaputt :( Display ausgefallen

    Friedrich Haska -

    I used the iFixit Prying and Opening Tool Assortment pack I bought from MicroCenter in Madison Heights, MI, to replace the battery in my Oral-B iO9 Electric Toothbrush.

    The instructions worked extremely well with their soft plastic and hard plastic tools, I didn't damage my toothbrush, and the new battery I ordered from E-Bay worked extremely well in my toothbrush.

    Here is the battery I ordered from E-Bay in March 2023 for my Oral-B iO9 Electric Toothbrush:

    E-Bay - Oral-B iO9 Electric Toothbrush Battery Replacement: (NEW!!! 2 pc SANYO UR 14500 AC Li-ion 740mAh Rechargeable 3.7v FLAT-TOPS) - https://www.ebay.com/itm/155327347466

    Chavez Clemons Jr. -

Conclusion

If possible, turn on your toothbrush and test your repair before resealing.

Take your e-waste to an R2 or e-Stewards certified recycler.

Repair didn’t go as planned? Try some basic troubleshooting, or ask our Answers community for help.

Dominik Schnabelrauch

Member since: 23/11/16

167396 Reputation

24 comments

thank you for this tutorial! any idea how to source a battery for it? Couldn’t find a 0307 740 mh type

M Marco -

can you tell what is the size of battery (dimensions) ? it’s LiOn but what is the form factor of it?

marcinlag -

14500 is the form factor. See comment below

John McEntee -

Thank you for your tutorial, it allowed me to fix a dropped toothbrush

martin -

Curious what battery to replace with?

Chris & Heather Scher -

Ich verstehe irgend wie den Punkt. „Drehen sie die untere Abdeckung heraus“ nicht. Ich sehe auf Bild kein Gewinde. In welche Richtung soll man drehen? Nach Links weiter drehen geht nicht. Nach Rechts geht auch nur bis 90 Grad. Vielleicht kannst du mir hier helfen.

VG

Gleichlaufartisten Live -

Hallo Gleichlaufartisten Live,

wenn du die Kappe am unteren Ende mit Hilfe deiner Ladestation gelockert hast, solltest du durch leichtes weiterdrehen und ziehen die Kappe entfernen können.

Dominik Schnabelrauch -

Genau das geht nicht da die Kappe wasserdicht versiegelt ist Ich habe das Teil mit Hilfe einer Rohrzange gelockert und herausgenommen

Beim Zusammenbau wär halt ein Dichtmittel gefragt um das Eindringen von Wasser zu verhindern

Aron -

It is a Sanyo UR14500AC cell. I have just taken my apart to have a look. Fairly easy. I would say any 14500 form factor li-ion battery will be fine.

John McEntee -

The Sanyo batteries are difficult to source, and I found only one EU seller had stock, and (because of Brexit) shipping costs were high. I am going to try Sony Murata US14500VR2 which are plentiful and cheap, at least in the UK, and will feedback my results. They are the correct specification and have flat terminals. These batteries seem to be used by many vapes and torches (flashlights)

Mark Stapley -

Thanx for the tutorial. Got some difficulties in setting up the rubber seal on the upper neck of the brush but finally got it right after one failed attempt

Anonymous Person -

very informatieve tutorial, thxs a lot!

Have barely started unfortunately, because I cannot get the bottom cap loose in any way- apart from using pliers s which might damage it.

Carefully warming up bottom cap with hot water no effect.

Any suggestions perhaps?

pim appel -

It's probably got calc in the screw thread - mine did. I just had to press the toothbrush and charging base together with considerably more than "mild pressure" - I would describe it as considerable but controlled force; don't use brute force, as you especially want to avoid the charging base and toothbrush slipping since that will damage both like when a screwdriver slips in a screw.

Feanor -

I used a Vapcell L10 14500, as it's 1050 mAh compared to the 800mAh Sanyo that came with the toothbrush.

My battery wasn't properly dead, but I wasn't really getting the milage out of it compared to what is advertised and in reviews. Some have quoted longer than two weeks on a single charge - brushing twice a day; I was getting nowhere near that. I'm hoping this bigger battery will get me much closer.

How long has everyone else found they are getting out of their iO brushes?

Jacob -

We bought ours in February 22, and the battery is empty by 33% now. We had def. had some longer runs before and there was no issue using it for 2 weeks or even more. Now it is just frustrating because it shuts of, while displaying 1/3 of charge. I have now come up on this article and am considering to change the battery, as the service of these is very expensive. While the cost of a new battery is at max 5 euros.

pszappanos -

My Oral-B io9 also is shutting down mid brush with 40-50% battery left from the morning session. Either the battery is toast or it's a software glitch. I will monitor it with more attention. The brush is exactly 1 year old and I have taken really good care of it, charging only up to 90% and down to 20%.

Daniel -

This guide is missing a really important aspect of disassembly - and, going by the photo of the toothbrush before disassembly, it appears as if the author had previously disassembled the toothbrush, fell for the same pitfall I have been struggling with and reassembled it incorrectly.

Before dissassembling your toothbrush, note that there is a metal ring which sits at the base of the toothbrush neck, above the rubber gasket for the neck. I'm not talking about the cosmetic chromed plastic above the LED that glows blue/green/red during use depending on pressure, I'm talking about the metal ring above it. If you compare your pre-disassembly toothbrush, you can see yours will have a ring which is missing from the author's image.

When you disassemble the toothbrush this ring will likely remain on the toothbrush mechanism, and force its way past the gasket.

Feanor -

It will then sit incorrectly on the neck and, if you just jam the toothbrush back into its housing on reassembly, it will then be on the wrong side of the gasket and I'm sure wouldn't seal properly.

To reassemble, remove the metal ring from the toothbrush mechanism; don't force it, you will likely need to gently squeeze the sides to get it over the ridges in the toothbrush neck.

Then thoroughly clean all the built-up calc off all the seals to ensure it doesn't leak after reassembly and fail. With fingernails, scrape the calc off the mechanism neck (don't use cleaner here as the liquid will likely get onto the electronics). You can use gentle citrus cleaner and an old toothbrush on the metal ring, casing gasket, base gasket and thread.

(Just don't drop the little ring down the sink like I did and needed to disassemble the U bend!)

Gently push the mechanism/body into the housing, ensuring it sits correctly in the housing rails. If it gets stuck at the start it's not lined up correctly.

Feanor -

The gasket will be pushed outwards. Once the mechanism sits correctly in the casing you then need to gently re-seat the base, using the charger as a "screwdriver" in reverse of disassembly - but, again, be careful as correct positioning is essential.

At this point, the little metal ring is placed over the screwdriver neck and clips into position. Reassembly is now complete.

Is there scope for editing / adding to other people's guides on here? If not I'll try to do a separate reassembly guide when I have to take it apart again after I get a new battery.

Feanor -

Hallo Dominik,

ist deines Wissens bei allen Elektrozahnbürsten der Serie Oral B IO (Nr. 4-9) ein Akkuwechsel möglich? Grüße Richy

Richy Müller -

Hi Richy,

leider habe ich nur eine iO 9 vorliegen und kann deshalb keine genaue Aussage darüber treffen. Da die Zahnbürsten 6-9 aber alle gleich aufgebaut sind, sollte der Akkuwechsel bei all diesen Geräten möglich sein (ich bin nicht sicher ob sich etwas bei der neuen iO 10 geändert hat, in diesem Fall wäre ich vorsichtig, ebenso bei 4 und 5, da diese eine andere Ladestation haben und sich deshalb eventuell nicht auf dem selben Weg öffnen lassen).

Beste Grüße
Dominik

Dominik Schnabelrauch -

do you know where i can get a replacement gasket?

brady -

Spezial Akku Emmerich 14500 /800mA geliefert von Conrad.at

Aron -

14500 ordert by Conrad

Aron -