Introduction

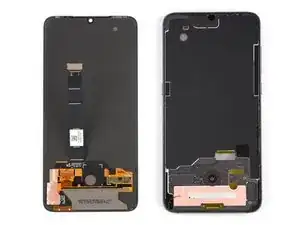
Use this guide to replace a broken or defective AMOLED & Digitizer in your Xiaomi Mi 9.

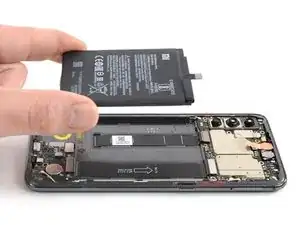
Due to the phone’s design, you must remove the lithium-ion battery to access the display cables. Reusing a deformed or bent battery after it has forcefully been removed, is a potential safety hazard. Replace it with a new battery in this case.

Before disassembling your phone, discharge the battery below 25%. The battery can catch fire and/or explode if accidentally punctured, but the chances of that happening are much lower if discharged.

Note: This guide instructs you to replace only the screen while leaving the original frame and motherboard in place. However, some replacement screens for this phone come pre-installed in a new frame (a.k.a. chassis), which requires a very different procedure. Make sure you have the correct part before starting this guide.

You’ll need replacement adhesive to reattach components when reassembling the device.

  1. 2RPRexuBjPIWdChg
    • Before you begin, switch off your phone.

    • Apply a heated iOpener to the rear glass to loosen the adhesive beneath the edges. Apply the iOpener for at least two minutes.

  2. pHrmswE1VaXX6y5L
    pHrmswE1VaXX6y5L
    JCsSSrKRDLRSFMOx
    JsggSKUOPjVxkAdJ
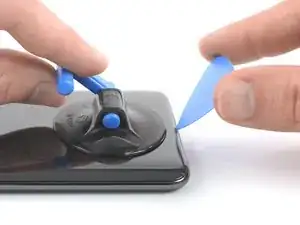
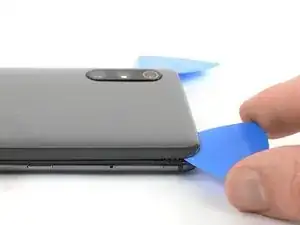
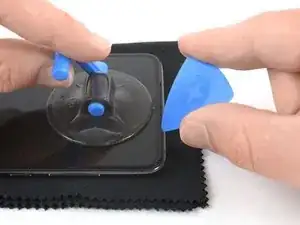
    • Secure a suction handle to the lower edge of the rear glass, as close to the edge as possible.

    • If the phone's rear glass is cracked, the suction handle may not stick. Try lifting it with strong tape, or superglue the suction handle in place and allow it to cure so you can proceed.

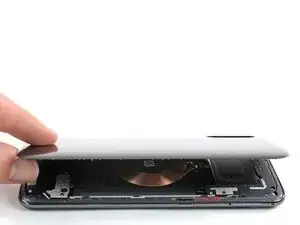
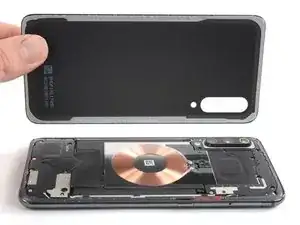
    • Lift the rear glass with the suction handle to create a gap between the glass and the frame.

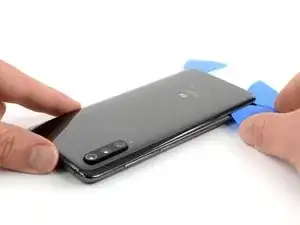
    • Insert an opening pick into the gap.

    • If you have trouble, apply more heat to further soften the adhesive. Follow the iOpener instructions to avoid overheating.

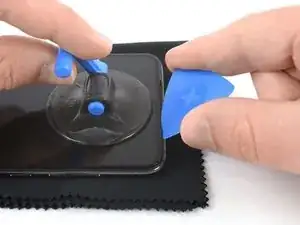
    • Slide the opening pick to the bottom right corner of the phone.

  3. yTF5uO4KbDSCtQxr
    yTF5uO4KbDSCtQxr
    rYeWYEhMZtGA43EY
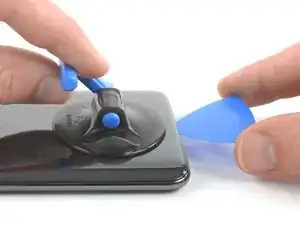
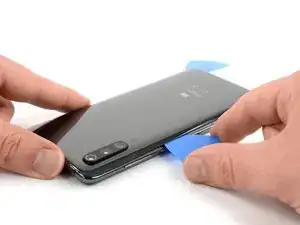
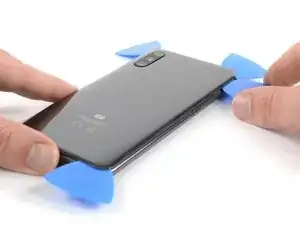
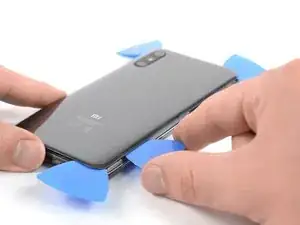
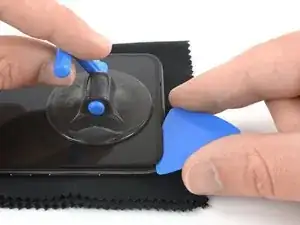
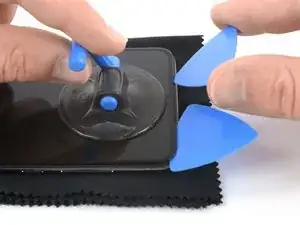
    • Insert a second opening pick and slide it to the bottom left corner to cut the adhesive.

    • Leave the opening picks in place to prevent the adhesive from resealing.

  4. De6lobZdtIArYytf
    De6lobZdtIArYytf
    RNNXc4fC43CyJOrL
    aUnMdDfOZ3OU2MRa
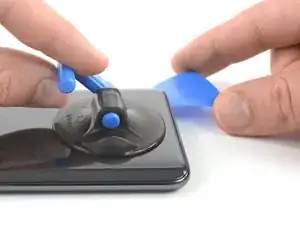
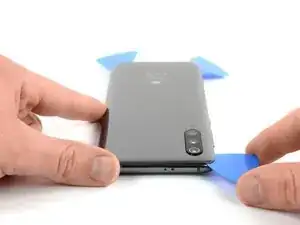
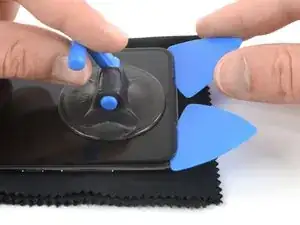
    • Insert a third opening pick at the bottom left corner.

    • Start to slide the opening pick from the bottom left corner along the side of the Xiaomi Mi 9 to cut the adhesive.

    • Be aware of the rear cameras and only insert the tip of the opening pick. As the adhesive cools down it gets harder to cut. If necessary use your iOpener to reheat it.

    • Leave the opening pick in the top left corner to prevent the adhesive from resealing.

  5. EdK4WnqgJwetyrxm
    EdK4WnqgJwetyrxm
    brmSZantnTEZBHqb
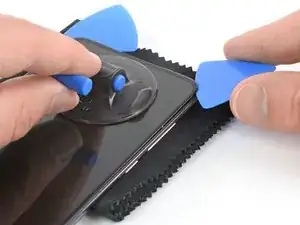
    • Insert a fourth opening pick under the top left corner of the rear glass.

    • Slide the opening pick along the top to cut the adhesive.

    • Leave the opening pick in the top right corner to prevent the adhesive from resealing.

    Be very careful at this point not to raise the cover too much, at the slightest bending the glass shatters. It just happened to me :(

    enrica_spiga -

  6. e3BnipEoxkinOCOT
    e3BnipEoxkinOCOT
    sTOsqiG5sWBiHQyk
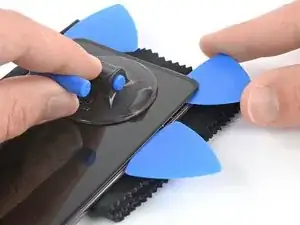
    • Insert a fifth opening pick at the top right corner of the phone.

    • Slide the opening pick along the right edge to cut the remaining adhesive.

  7. gWvnIF6PPQUREMWB
    gWvnIF6PPQUREMWB
    Pxub5yuADPsnIoMO
    • Carefully lift the rear glass and remove it.

    • Before installing new adhesive and reassembly, remove any remaining adhesive from the phone, and clean the glued areas with isopropyl alcohol and a lint-free cloth.

  8. mNPiTHVUA5iAGt1V
    • Remove the ten Phillips #00 screws (3 mm length) that secure the motherboard cover.

    • There might be tamper proof sticker on some of the screws.

    Note, the Explorer/Transparent edition does not use phillips #00 screws.

    Jason Baginski -

    It uses 0.8mm star screws(P2 Pentalobe in the iFixIt store)

    Jason Baginski -

    Thanks for mentioning Jason!

    Dominik Schnabelrauch -

  9. crEsbkOrfbeVBFyY
    crEsbkOrfbeVBFyY
    UlR6WDIgZQhmOrhH
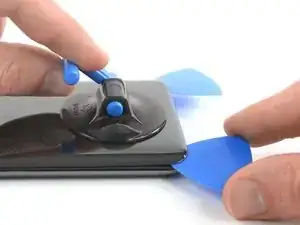
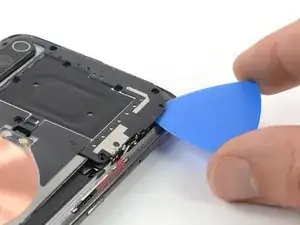
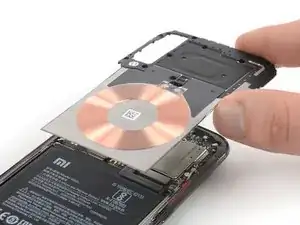
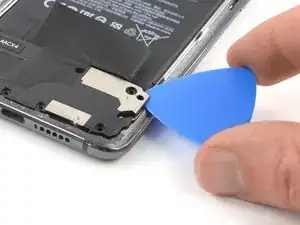
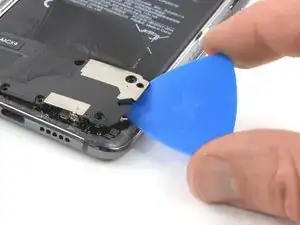
    • Insert an opening pick at the top right corner of the motherboard cover.

    • Twist the opening pick sideways to pry up and slightly lift the motherboard cover.

  10. JXrDimYCjPcCXYaC
    JXrDimYCjPcCXYaC
    MexVAhDGGLQHoMvY
    • Carefully remove the motherboard cover including the charging coil / NFC antenna.

  11. JD1bfZVuYKInvJmn
    JD1bfZVuYKInvJmn
    UyBwLXPGJOUj4IAI
    • Use a spudger to pry up and disconnect the battery flex cable.

  12. UMQKubnJaWouYbOL
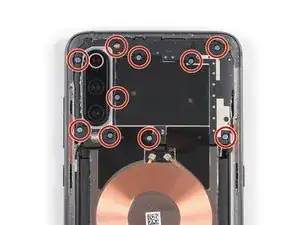
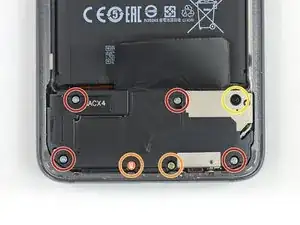
    • Remove the seven Phillips #00 screws securing the loudspeaker unit:

    • Four silver 3.2 mm long screws

    • Two yellowish 3.8 mm long screws

    • One black 2.8 mm long screw

    • Some screws may be hidden beneath tamper proof stickers.

    I found that there was no need to remove the loudspeaker assembly at all. The battery adhesive was easy to pull out (by rolling it up on a screwdriver) without needing to remove the loudspeaker.

    Jez S -

    I can confirm this. Worked like a charm without taking the loudspeaker assembly out.

    Alexander Niehoff -

  13. KDilPs4eZgjHxedG
    KDilPs4eZgjHxedG
    wFNyENXXdI2DH4Ih
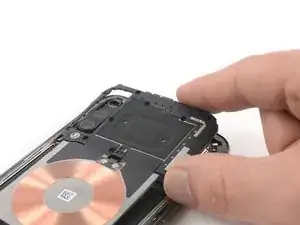
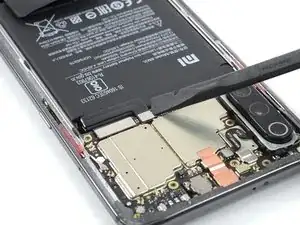
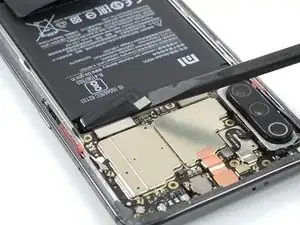
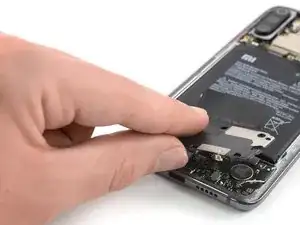
    • Slide an opening pick under the right side of the loudspeaker unit.

    • Twist the opening pick sideways to pry up the loudspeaker unit until you can get a good grip.

  14. xsIsY5KbnyWlmTWq
    xsIsY5KbnyWlmTWq
    D4HdeMCUnE1yuf1P
    • There is still an antenna cable connected to the back of the unit.

    • Carefully lift the loudspeaker unit and hinge it open towards the left side.

  15. 4ShAxBYiZOUvAVn4
    4ShAxBYiZOUvAVn4
    sW6lgEQqhTdHRSFY
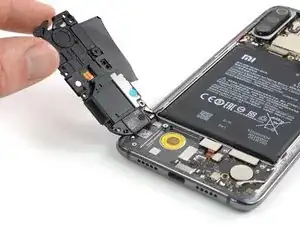
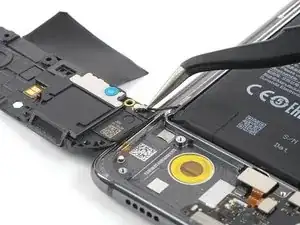
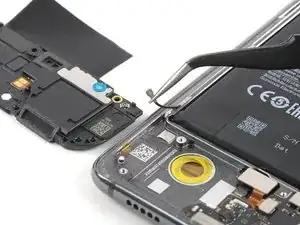
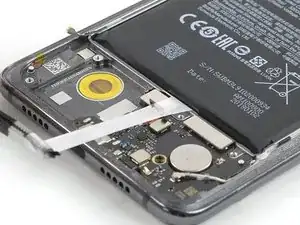
    • Use a pair of tweezers to pry off and disconnect the antenna cable from the loudspeaker unit.

    • Remove the loudspeaker unit.

    • Before reassembly check your old loudspeaker for components that might need to be transferred to the replacement part such as the antenna flex cable with its coax connector.

  16. QYbYVXEfVZrys3J1
    QYbYVXEfVZrys3J1
    vyEeBwUNbDHSqfaR
    N3fy1hCUqEMd5BvO
    • Use a pair of tweezers to peel the black ends of the adhesive tabs off the battery.

  17. VHSSkBSpnFXBM1OG
    VHSSkBSpnFXBM1OG
    FjQyFJOFXBcIHlxa
    • Use a pair of tweezers to pull out the left adhesive tab from underneath the battery.

    • The adhesive tab underneath the battery can rip very easily. Make sure you pull out the tab in a slow and steady motion and in a flat angle. To prevent the adhesive tab from ripping, it's helpfull to twist the strip around the tweezers.

    • In case one of the adhesive tabs rips and it‘s not possible to pull it out completely, you can use isopropyl alcohol or an heated iOpener to loosen the adhesive. After the adhesive is soft enough use a prying tool such as an opening pick or a plastic card to pry out the battery.

    Be careful with this one. My fully charged battery catch fire.

    I tried to forcefully remove the battery after ripping the adhesive tab. I was bending it a lot.

    It started to burn and smoke a lot. I didnt get any burn wounds but it left some nasty marks on the floor even though I throw it out on the balcony after 1 second.

    Lars Pekkala -

  18. eYAr6OVNhDjbDMBO
    eYAr6OVNhDjbDMBO
    HHDvgPxbqbCA2Alw
    • Use a pair of tweezers to pull out the right adhesive tab from underneath the battery.

  19. aO6bDroFnrFXCaiD
    aO6bDroFnrFXCaiD
    BuxpVbcMjFa5u4e6
    • Use an opening pick to pry the battery out of its recess until you can get a good grip.

  20. RmjNfVUlF5KajcaS
    RmjNfVUlF5KajcaS
    uGtmlSOWxmCKKnSV
    • Remove the battery.

    • Reusing a deformed or bent battery after it has forcefully been removed, is a potential safety hazard. Replace it with a new battery.

    • Remove any remaining adhesive from the midframe, and clean the glued areas with isopropyl alcohol and a lint-free cloth before applying new adhesive.

  21. e4HkZ3rIKPPQvnXd
    e4HkZ3rIKPPQvnXd
    ZLtClQi4YZWjl63L
    WubqJ1LWXlLrn6uD
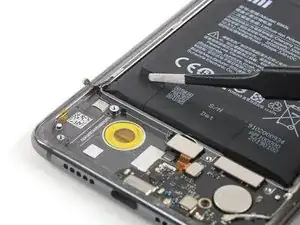
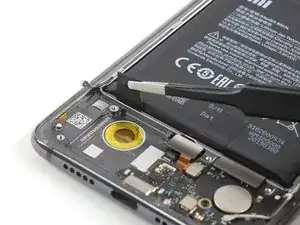
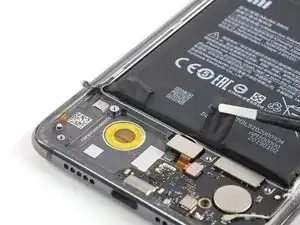
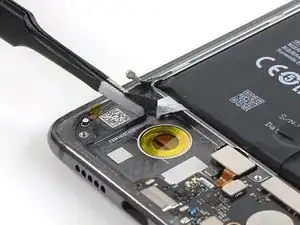
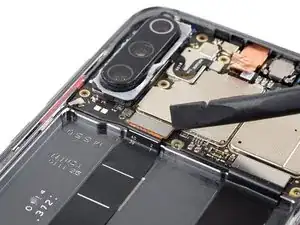
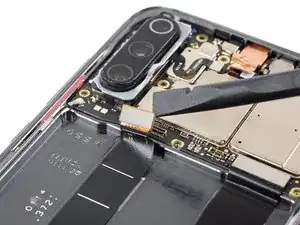
    • Use a spudger to pry up and disconnect the display flex cable.

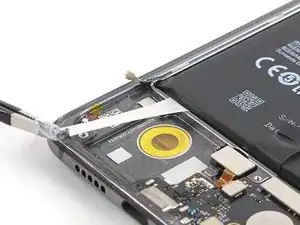
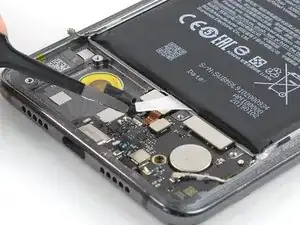
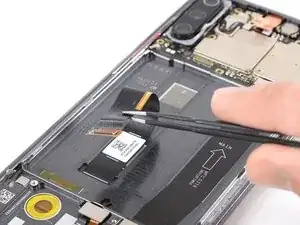
    • Use a pair of tweezers to peel the display flex cable off the midframe. It is attached with mild adhesive.

  22. 3vUjUfTJJaTSHiAP
    • Apply a heated iOpener to the display for two minutes to loosen the adhesive beneath.

    • The adhesive that holds down the screen is fairly strong. You might need to reheat and reapply the iOpener several times to get the adhesive warm enough.

  23. HUJeXAVfkGPuB6qL
    HUJeXAVfkGPuB6qL
    GXMsJoePDIjtidRF
    bvNf63DSVXUDeZGc
    • You can use a piece of cloth to minimize the phone rocking over the camera bump.

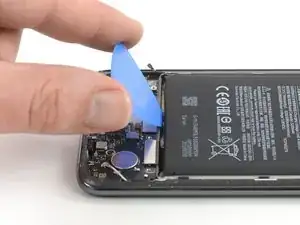
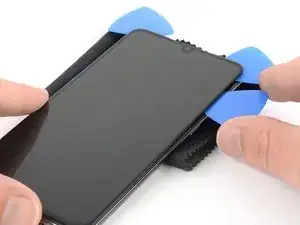
    • Apply a suction handle near the top edge of the phone right under the earpiece speaker.

    • If the phone's screen is cracked, the suction handle may not stick. Try lifting it with strong tape, or superglue the suction handle in place and allow it to cure so you can proceed.

    • Use the suction handle to pull up the screen and insert just the tip of an opening pick under the right edge of the speaker recess.

    • Rotate the opening pick sideways to bring the long edge of the pick under the display glass and slide it to the top right corner. Leave it there to prevent the adhesive from resealing.

  24. HYIA3kRpWViwj5HQ
    HYIA3kRpWViwj5HQ
    vtElpHR1kONSWeCC
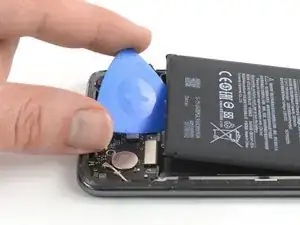
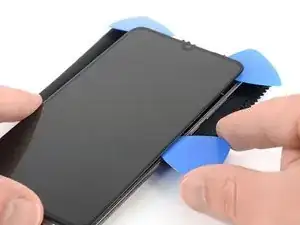
    • Repeat the previous process on the left corner of the speaker recess and slide the long edge of an opening pick to the top left corner of the phone.

    • Leave the opening pick in its place to prevent the adhesive from resealing.

  25. MwXiokx2vYFcsHtG
    MwXiokx2vYFcsHtG
    pLoT4WMivqIdooLE
    ArdJKECHpGGbY23r
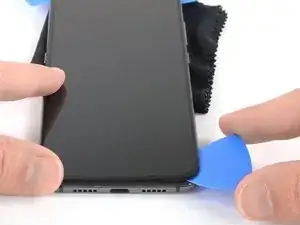
    • Slide the long edge of the first opening pick around the top right corner and along the right edge of the phone.

    • Leave the opening pick where the power and volume buttons are located to generate a bigger gap between the midframe and display glass.

    • Insert a third opening pick at the top right edge of the screen. Make sure to slide it underneath the AMOLED and not between the the display glass and panel.

  26. TXHgUtdPOHeFyGTx
    TXHgUtdPOHeFyGTx
    ck2QEiOX1efXkxId
    hgbBa2bNWuiS2fPR
    • Apply more heat if the adhesive becomes hard to cut.

    • Reposition the opening pick above the power and volume buttons so that the tip of the opening pick is placed underneath the display panel too.

    • Slide the opening pick to the bottom right of the phone to cut the adhesive. Leave it there to prevent the adhesive from resealing.

  27. XxUcFwkHgmkPbPLV
    XxUcFwkHgmkPbPLV
    mr1K1VCJMIIER5FT
    EljxuJdrUONibvds
    • Insert a fourth opening pick underneath the display panel at the top left corner of the phone.

    • Slide the opening pick along the side towards and around the bottom left corner of the phone to cut the adhesive.

    • Try not to remove the display all the way yet. The display flex cable is still threaded through the midframe.

  28. 5gjWNEwy22iQiD52
    5gjWNEwy22iQiD52
    vAJdpDMRsQKkj1K2
    XCGEGJsL1Zkv5pSt
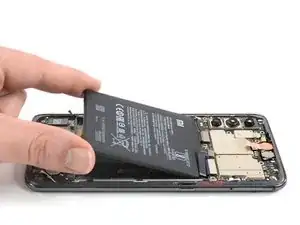
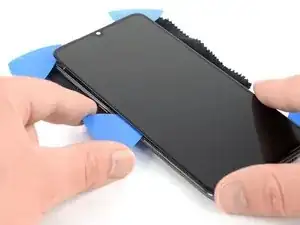
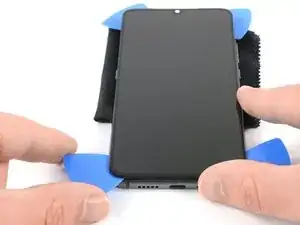
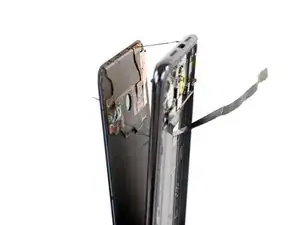
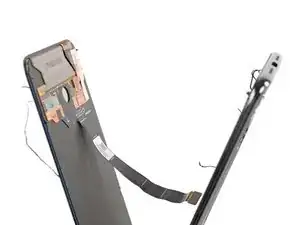
    • Slowly separate the screen from the frame and cut any remaining adhesive. Make sure the flex cable is no longer stuck to the frame and carefully thread it through its gap.

    • Remove the screen.

    • Remove any remaining adhesive from the midframe, and clean the glued areas with isopropyl alcohol and a lint-free cloth.

Conclusion

If possible, turn on your phone and test your repair before installing new adhesive and resealing the phone.

The best way to secure the new screen is with a sheet of custom-cut double-sided tape. Apply the tape to the back of the screen, then carefully feed the display cable through the frame. Align the screen and press it into place.

To reassemble your device, follow these instructions in reverse order.

Take your e-waste to an R2 or e-Stewards certified recycler.

Repair didn’t go as planned? Check out our Answers community for troubleshooting help.

Dominik Schnabelrauch

Member since: 23/11/16

167372 Reputation

13 comments

Hat jemand einen Tipp, womit ich das neue Display einklebe?

Marcel -

Doppeltes Klebeband. Gibts auch amazon passgenau oder du bastelt dir selbst wad

schifferyan -

¿Sabe de alguna pagina donde pueda conseguir la pantalla original?

Eva -

il manque la partie ou on enlève la batterie (via les petit scotch. de plus la première étape devait être d’enlever le tiroir pour la carte sim

Gosselin Mathieu -

Bonjour Mathieu, merci de votre attention et de votre remarque. La partie du retrait de la batterie a été ajoutée. Par contre, la carte SIM qui se trouve derrière la carte mère ne dérange pas la procédure. Il n’est donc pas nécessaire de commencer par la retirer. J’espère que vous avez à présent toutes les infos pour effectuer la réparation. Bonne continuation !

Claire Miesch -

Bonjour

est ce que les écrans des MI9 Standard / lite et SE sont les mêmes (ou compatible) ?

Merci

Yohann

yohann bouvier -

Hi Yohann,

the Xiaomi Mi 9 SE has a 5.97 inch screen while the Mi 9 and the Mi 9 lite have 6.39 inches. So there’s no compatibility here. Regarding the Mi 9 and the Mi 9 lite all I can say is, that the Glass Protection is different between them (Corning Gorilla Glass 5 respectively 6). Besides that the screen specs look kind of the same but I can’t guarantee that they are interchangeable.

Dominik Schnabelrauch -

Hi Dominik

this is a very accurate and helpful answer. I’ll need to be carefull when choosing the vendor because they don’t always indicate clearly the destination of glass.

Thank you very much

Regards

Yohann

yohann bouvier -

Wie kann ich die gesplitterte Frontscheibe ersetzen.

herbertschlueter -

Das Frontglas ist gesplittert

Was muss

herbertschlueter -

Wenn wirklich nur das Frontglas gesplittert ist, das Display aber funktioniert, kannst du es laut diesem Video allein ersetzen: https://youtu.be/i3lJQ7z1cy8?t=527 Du musst das Display trotzdem ausbauen, dann erhitzen und dann das Glas vom Display lösen. Und natürlich brauchst du das Glas als Ersatzteil.

Fabian Neidhardt -

Was hier vielleicht noch wichtig zu erwähnen ist: Nach dem Displaytausch muss man höchstwahrscheinlich den Fingerabdrucksensor neu kalibireren, zumindest wenn einem auffällt, dass dieser nicht mehr richtig funktioniert. Dafür nimmt man am besten ein spezielles Tool (z.B. RELIFE RL 071B). Bevor man sich jetzt aber direkt das (oder ein ähnliches) Ding bestellt, vorher vielleicht einmal das Entsperrmuster entfernen (was auch alle Fingerabdrücke löscht), das Ensperrmuster wieder aktivieren und dann versuchen neue Fingerabdrücke hinzuzufügen. Wenn das klappt, kann man sich die Kalibration natürlich sparen ;)

Über den USSD-Code " *#*#64663#*#* " kommt man in das QC-Menü. Dort über das Kebap-Menü oben rechts auf "Additional tools" und den Punkt "12. fod fingerprint calibration" auswählen. Hier muss man dann die verschiedenen Pads des Kalibrations-Tools auflegen, einfach den Anweisungen auf dem Screen folgen.

Alexander Niehoff -

Great guide, my phone (Mi9) decided to die 2 days ago, where can i buy the entire front screen from a thrusty place and good price?

rl.-ribeiro -