Introduction
iMac won't read disks? Use this guide to replace a non-functional optical drive.
-
-
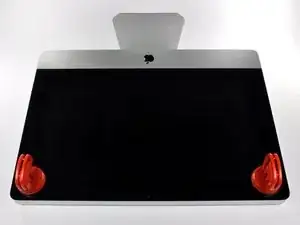
Stick a suction cup near each of the two top corners of the glass panel.
-
If your suction cups refuse to stick, try cleaning both the glass panel and the suction cup with a mild solvent.
-
-
-
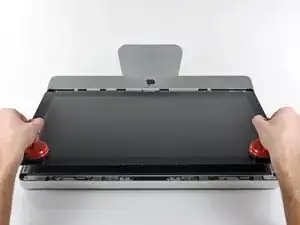
Gently lift the glass panel perpendicular to the face of the LCD enough to clear the steel mounting pins attached along the underside of the top edge of the glass panel.
-
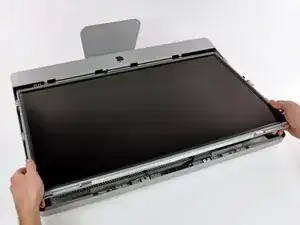
Pull the glass panel away from the lower edge of the iMac and carefully set it aside.
-
-
-
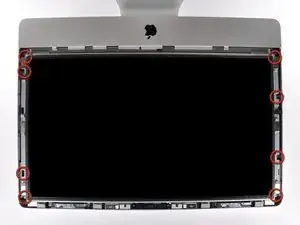
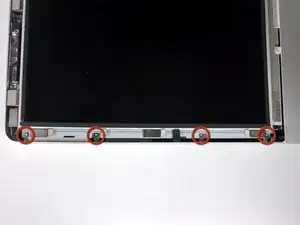
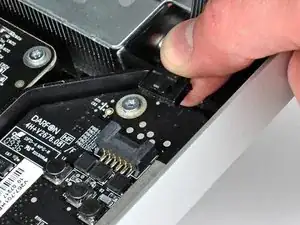
Pull the vertical sync ribbon cable out of its socket on the LED driver board near the top left corner of your iMac.
-
-
-
Rotate the display out of the outer case enough to disconnect the LED backlight power cable from the LED driver board.
-
-
-
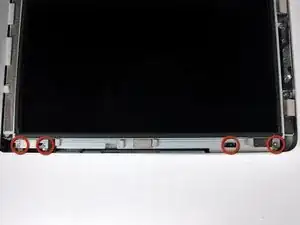
Squeeze the two display data cable connector arms together to unlock it from its socket on the logic board.
-
Pull the display data cable connector away from its socket on the logic board.
-
-
-
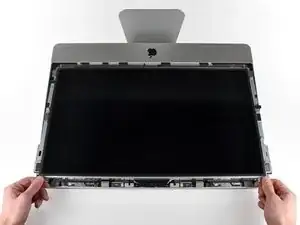
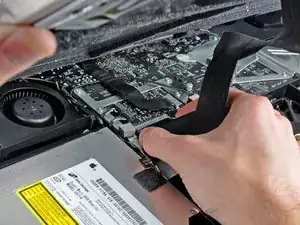
Carefully pull the display toward the top edge of your iMac and lift it out of the outer case, minding any cables that may get caught.
-
-
-
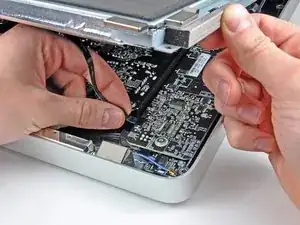
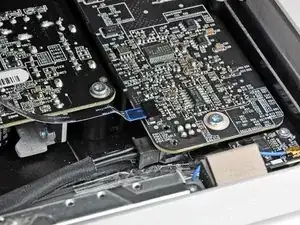
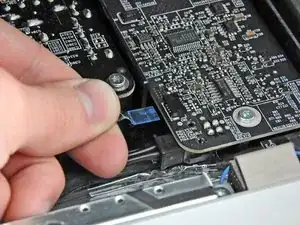
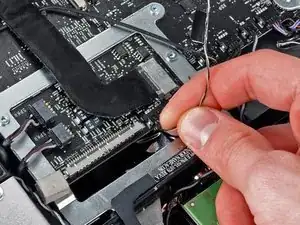
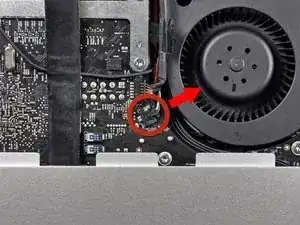
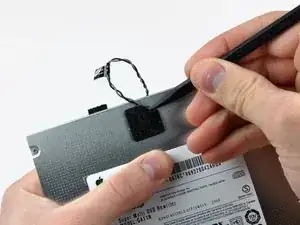
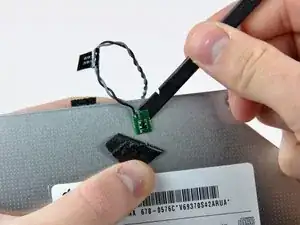
Pull the optical drive thermal sensor connector straight away from its socket on the logic board.
-
-
-
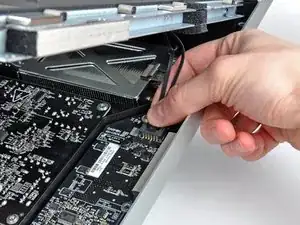
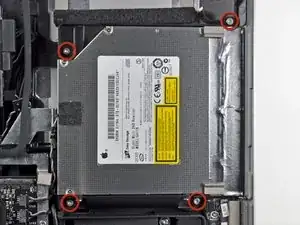
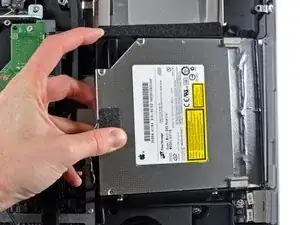
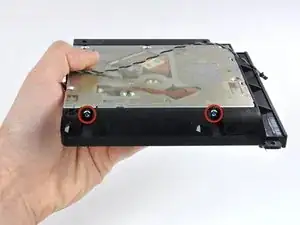
Lift the inner edge of the optical drive and maneuver its connector past the frame attached to the logic board.
-
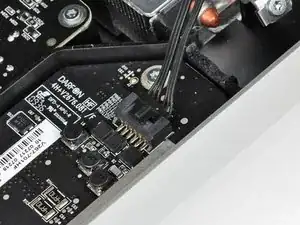
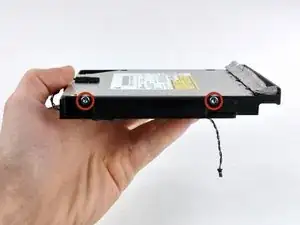
Carefully pull the optical drive off its mounting pins on the edge of the outer case to gain clearance for disconnecting the optical drive cable.
-
-
-
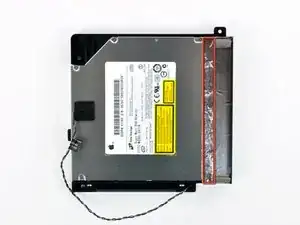
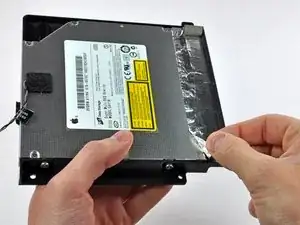
Peel back the portion of aluminum tape highlighted in red, leaving the rest attached to the black plastic optical drive bracket.
-
-
-
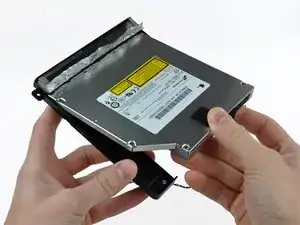
Rotate the optical drive bracket slightly away from the optical drive.
-
Pull the optical drive bracket away from the open end of the optical drive, minding any tabs that may get caught.
-
-
-
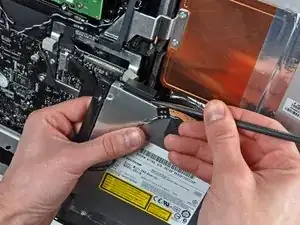
Use the tip of a spudger to peel back the piece of foam tape covering the optical drive thermal sensor.
-
Use the flat end of a spudger to carefully pry the thermal sensor up off the adhesive securing it to the optical drive.
-


To reassemble your device, follow these instructions in reverse order.

3 comments
A word of caution when reassembling. Be sure to replace the LCD thermal sensor connector and the optical drive thermal sensor connector with the contacts facing down. They are both very small and easy to overlook the contact points. If either or both are reinstalled wrong the iMac will not power up. You will get a white screen momentarily and then it will go black. I made that mistake and had to go back in and correctly insert them which solved the power up problem.
cwrd -
I successfully put an SSD (mounted in OWC data doubler) into the optical drive slot.
I got slightly thrown for a moment that at step 10, the iMac was apparently rotated 180 degrees. I didn't really want to change my work position, so I turned my iPad upside down to follow the pictures correctly. Not sure why the perspective changed at that point in the manual.
The other "interesting" task was reattaching the LCD, what with the nearby rare earth magnets trying to steal the screws. Having a heavily magnetized torx screwdriver was a big help; I just took a magnet of my own and stuck it on the handle end of the shaft, and then it held the screw enough to make the job possible.
I was quite relieved when my iMac booted after all this. :)
Per error se'm va introduir una targeta portadora de microSD tipus SD a traves de la ranura del lector de CD-DVD.
Seguint aquesta guia perfectament bé explicada i amb les eines adequades, T10 Torx, tornavís de rellotger tipus estrella o philips i en el meu cas dues ventoses solidaries tipus mànec d'enganxar a la paret de la dutxa per no caure; he aconseguit recuperar la microSD, el lector de CD-DVD i el iMAC continua sencer.
Mil gràcies Andrew Bookholt, ets un crack e indubtablement molt bona persona.
Very easy to lift the glass out. Don't jerk too hard.
kctipton -
Another comment on DATA & LCD Temp. Sensor cables: I had to remove the vertical sync, and the backlight cable, however, if you have an assistant or/can carefully rotate the screen clockwise/and then have it held up about 5" to 6" at a slight angle, you do not need to remove LCD data cable or LCD thermal cable, however - IMPORTANT: you must have a second pair of hands/or way to securely prop up the LCD. Also, don't rotate too much, since then you will pull out LCD data cable, and it renders the whole exercise moot, or can damage the cable or connector.
MaximBorzov -
You don't need suction cups. The screen, held by magnets, can simply be pried off using a very thin blade such as a screw driver and fingers.
Deepsurvival -
That's a bad idea. using a metal tool to pry off glass is likely to end with an expensive broken front glass.
Suction cups are common. Find a couple and do it the safe way. I use some cheap ones that came with iPhone repair kit.
max damage -
No need for suction cups, I just stuck my nails (short like guys usually have) between the top part of the screen and body, and it came off easily. I've never done it before, so it seems to be very easy.
Nikolas Lintulaakso -
Nails worked for me too
Rob Dale -
Just completed the replacement of the optical drive with an SSD using an OWC Data Doubler kit. Attempted to remove the optical drive without disconnecting any cables but found it a bit fiddly to orient the screen for good access. I bit the bullet and disconnected them and found the process less daunting than I imagined. Reconnecting them was similarly straightforward if you're careful.
Tip: you can skip the step for removing the optical drive thermal sensor connector from the motherboard. Still need to remove the sensor from the optical drive but you can leave that hanging and reattach it to the SSD later.
osienna -
I use Garmin GPS suction cup. Work very well
jc3Dcx -
I’ve just successfully installed a 1TB SSD in place of my optical drive thanks to the information here- thank you to everyone who has contributed!
3 comments- the procedure described here seems to vary between HD replacement and dual HD/optical drive replacement. This can be confusing at times.
Expect there to be minor differences between the layout described and what you find when you open up your iMac. There are also, surprisingly, differences between the HD enclosure description, and the article provided by ifixit.
I was able to replace the DVD/HD enclosure single-handedly without fully removing the LCD, or deconnecting any of the cables (steps 5-11). It’s a bit cramped, and fiddly, but I was not happy removing any of the cables despite watching videos, etc., since they all seemed to involve applying more force than I was comfortable with. A more detailed description of how to release them might have helped, but even here, there may be minor variations even within the 2389 model.
Good luck!
ivan birks -
I did it several times with one suction cup at the end of a kitchen brush. Once with the blade of a swiss army knive, also ok. And i’m pretty sure it works with fingernails too
Tai -
Fingernails are all you need to free the glass from its magnetic hold. If you don’t have them, slip something thin and plastic, like a spudger, at a top corner.
Max Powers -
Minha dúvida é a seguinte: após o técnico trocar o HD do meu iMac de 21,5 polegadas, a câmera parou de funcionar. Seria por causa da troca do HD? Tem solução?
Claudio -
Creio que o cabo da camera não foi plugado ou deu mau contato… ou até danificado.
glecyo@gmail.com
glecyo medeiros -
I can’t get my glass to budge. I’m replacing a cracked one and now it’s about to shatter.
jamboxmitchell -
I know that I'm replying really late but I advise to use clear tape over any cracks so the cracks don't get bigger
Jace Holmes -
Check for chips in the glass BEFORE you do this step. If there is a chip when you pull up with the suction cups you will wind up with a jagged mess. If you do have a chip I would advise covering the screen near the chip with clear tape of some kind before lifting out. Mine shattered right at the chip and the resulting glass dust cloud got all over. My solution was buying a new glass screen.
BCam -