Introduction

Prereq only.

  1. NSogTWXkaACgjgqK
    • Remove the two 9 mm T10 Torx screws securing the upper hard drive bracket to the outer case.

    Mine does not look like this AT ALL

    jinnifer douglass -

  2. 16K61KZCLZKDuEXP
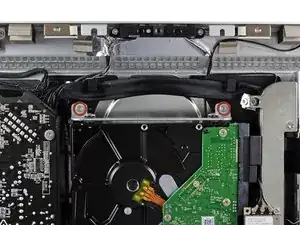
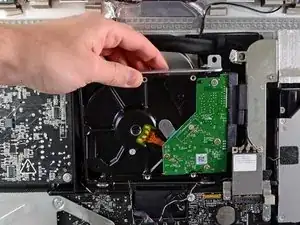
    • Slightly rotate the hard drive out of the outer case and lift it up off its mounting pins toward the top edge of the iMac.

    • Be careful not to contact the AirPort card as you lift the hard drive out of its recess.

    Mine seems to still be connected by something else on the other side, and I cannot remove it…

    jinnifer douglass -

  3. QOmONKbiPP5gUKAU
    QOmONKbiPP5gUKAU
    QN4VZmhyLibH2Dbt
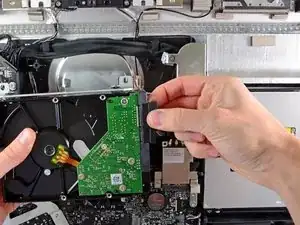
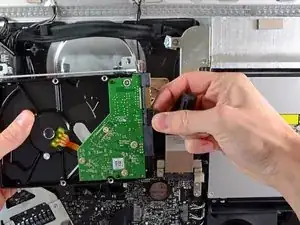
    • Disconnect the SATA data cable and SATA power connector from their respective sockets by pulling each connector away from the hard drive.

    J’ai un 3ème câble de branché sur le disque dur ?

    Delon -

    My iMac HDD have 3 ports in the back, SATA data, SATA power and a small one that looks like jumpers pins. When i removed the HDD there was a cable in it. Does anyone know what it is? I bought a new HDD and this port is slightly different. Thanks in advance.

    Rodrigo -

    It is a sensor, it is used by the fan control. I did not connect it because my SSD does not have this extra port. So after the iMac reboot, everything worked but the fan was always on (noisy!). I solved this issue by installing a small soft called ssdfanctrl in order to control the fan manually. All good now.

    yeshelolo -

    Pour le remontage, pensez à ajouter l’iMac Intel 21.5" and 27" Mid 2011 SSD Temperature Sensor’

    Une fois cette installation entre le disque et la nappe d’origine, vous pouvez remonter votre iMac.

    Gui -

Conclusion

To reassemble your device, follow these instructions in reverse order.

Walter Galan

685236 Reputation

0 comments