GUIDE TO REACHING LOW AUDIO LATENCY WHEN RUNNING AN APPLICATION VIA WINE
This guide was written with the aim of creating a universal system for musicians with minimal changes to the Ubuntu operating system. The guide was tested on Ubuntu 24.04.3 LTS with Wine v10.0 and WineASIO v1.3.0 installed. All tests were performed on a system with the following configuration:
- MSI® motherboard Z170A
- Intel® Core™ i5-6600 Processor
- GeForce GTX 1650 AERO ITX 4G OC
- Inateck RedComets U21 USB 3.2 Gen 2 PCIe Card
- Steinberg UR22C Portable USB 3 Audio Interface.
Note: Using a discrete graphics card will likely help eliminate crackling at low latencies. Additionally, using a USB PCIe x4 Gen 3.0 card with exclusive USB port throughput will likely help eliminate crackling at low latencies when using a USB audio interface.
Please read the text carefully before you start system changes. Also, an inexperienced user may find it helpful to read the guide “The Linux command line for beginners.”
Disclaimer: This guide was written for research purposes. The author have no responsibility for any consequences, including potential device brick, violating manufacturer licenses, lose device warranty etc.
PREPARATION
Find and remove previously installed wine packages
$ sudo apt list --installed wine*
Note: To find out about manually installed wine packages, you can use the command “$ sudo apt list --manual-installed wine*”.
$ sudo apt remove <package package package>
Preparing to run an application via Wine using PulseAudio on PipeWire
P1 STEP 1. Install Wine
Enable 32 bit architecture
$ sudo dpkg --add-architecture i386
$ sudo apt update
Find out Ubuntu's VERSION_CODENAME
$ cat /etc/os-release
Create a “keyrings” directory if it does not exist
$ sudo mkdir -pm755 /etc/apt/keyrings
Download the WineHQ repository key
$ sudo wget -O /etc/apt/keyrings/winehq-archive.key https://dl.winehq.org/wine-builds/winehq.key
Add the WineHQ repository key from the keyrings directory
$ software-properties-gtk --open-tab=3
Add the WineHQ repository
$ sudo wget -NP /etc/apt/sources.list.d/ https://dl.winehq.org/wine-builds/ubuntu/dists/noble/winehq-noble.sources
See more detailed information here.
Update the list of available packages
$ sudo apt update
Install Wine using the Stable branch
$ sudo apt install --install-recommends winehq-stable
Note: In the case of using a Development or Staging branch, step P2 STEP 9 (WineASIO registration) is slightly different.
P1 STEP 2. Install complete lowlatency Linux kernel then reboot your system
$ sudo apt install --install-recommends linux-lowlatency
or use the lowlatency-hwe kernel variant
$ sudo apt install --install-recommends linux-lowlatency-hwe-<version>
Note: For example, if you are using Ubuntu 24.04.3 LTS, you would use linux-image-lowlatency-hwe-24.04. Find out more by clicking here and here.
P1 STEP 3. Make the necessary changes to ease access and use of the GRUB menu
$ sudo nano /etc/default/grub
Add the following line: GRUB_SAVEDEFAULT=true
Replace the following lines: GRUB_DEFAULT=0, GRUB_TIMEOUT_STYLE=hidden, GRUB_TIMEOUT=0 with GRUB_DEFAULT=saved, GRUB_TIMEOUT_STYLE=menu, GRUB_TIMEOUT=3
Example (fragment of the final text):
GRUB_SAVEDEFAULT=true
GRUB_DEFAULT=saved
GRUB_TIMEOUT_STYLE=menu
GRUB_TIMEOUT=3
GRUB_DISTRIBUTOR=`( . /etc/os-release; echo ${NAME:-Ubuntu} ) 2>/dev/null || echo Ubuntu`
GRUB_CMDLINE_LINUX_DEFAULT="quiet splash"
GRUB_CMDLINE_LINUX=""
P1 STEP 4. Update GRUB and reboot your system then set a lowlatency kernel as the default boot kernel
$ sudo update-grub
In the GRUB menu, go to Advanced options and select lowlatency kernel. Your choice will be saved as default.
Note: For updates and standard tasks, use generic kernel.
P1 STEP 5. Install winetricks and run. Use winetricks to set Windows version to Windows 10
$ sudo apt install winetricks
$ winetricks
Follow the sequence of selecting options: Select the default wineprefix > Change settings > win10
Note: The “Windows Audio” audio device is available on Windows 10.
Note: If low buffer size values are not available for the “Windows Audio” audio device in your application, try the following steps: P2 STEP 1, P2 STEP 2, P2 STEP 3.
P1 STEP 6. Enable Pro Audio mode for the desired Audio interface/Sound card (optional)
Install PulseAudio Volume Control
$ sudo apt install pavucontrol
Open pavucontrol
$ pavucontrol
Go to the Configuration tab
Select the “Pro Audio” profile from the list of profiles for the
desired Audio interface/Sound card.
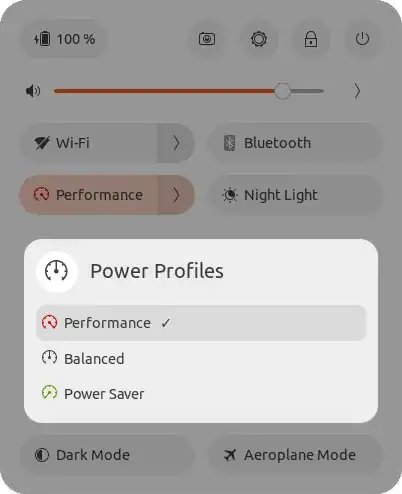
P1 STEP 7. Set CPU governor on Ubuntu operating system to "Performance"
Note: You may find the following documentation useful: CPU Governors and the cpupower tool.
Preparing to run an application via Wine using WineASIO
Please note that steps P1 STEP 1, P1 STEP 2, P1 STEP 3, P1 STEP 4, and P1 STEP 5 are required.
P2 STEP 1. Install the following packages to output the JACK audio stream through PipeWire
$ sudo apt install pipewire-jack libspa-0.2-jack pipewire-audio-client-libraries wireplumber
P2 STEP 2. Enable and start the WirePlumber
$ systemctl --user --now enable --now wireplumber
P2 STEP 3. To make all changes take effect, do a system restart
P2 STEP 4. Run pactl info to display detailed information about the running PulseAudio sound server
$ pactl info
P2 STEP 5. Install Wine using the Stable branch with additional packages
$ sudo apt install --install-recommends winehq-stable wine-stable-i386 wine-stable-amd64 wine-stable-dev wine-stable-dbg winetricks
P2 STEP 6. To use WineASIO, you will need to install the following packages
$ sudo apt install --install-recommends jackd jackd2 jackd2-firewire jack-tools jack-stdio jack-capture libconfig++9v5 libffado2 liblo7 libxml++2.6-2v5 libzita-alsa-pcmi0t64 libzita-resampler1 qjackctl
When the following text appears, select “<Yes>”:
If you want to run jackd with realtime priorities, the user starting jackd needs realtime permissions. Accept this option to create the file
   /etc/security/limits.d/audio.conf, granting realtime priority and memlock privileges to the audio group.


Running jackd with realtime priority minimizes latency, but may lead to complete system lock-ups by requesting all the available physical system memory,
which is unacceptable in multi-user environments.
Enable realtime process priority?
Note: If you encounter a complete system lock-ups due to a request for all available physical memory, or simply change your mind and want to enable/disable realtime permissions, run the following command: $ sudo dpkg-reconfigure -p high jackd2
P2 STEP 7. Enable the KXStudio repositories
Up-to-date/Actual instructions on enabling KXStudio repositories can be found by clicking on the following link.
Example:
Update software sources
$ sudo apt-get update
Install required dependencies if needed
$ sudo apt-get install gpgv wget
Download package file
$ wget https://launchpad.net/~kxstudio-debian/+archive/kxstudio/+files/kxstudio-repos_11.2.0_all.deb
Install it
$ sudo dpkg -i kxstudio-repos_11.2.0_all.deb
P2 STEP 8. Install WineASIO
$ sudo apt-get install --install-recommends wineasio
P2 STEP 9. Register WineASIO
for 32bit (if you used the Stable branch)
$ cd /opt/wine-stable/lib/wine/i386-windows/
$ wine regsvr32.exe '/usr/lib/i386-linux-gnu/wine/i386-unix/wineasio32.dll.so'
for 64bit (if you used the Stable branch)
$ cd /opt/wine-stable/lib64/wine/x86_64-windows/
$ wine regsvr32.exe '/usr/lib/x86_64-linux-gnu/wine/x86_64-unix/wineasio64.dll.so'
P2 STEP 10. Reboot your system
Note: You must run the lowlatency kernel.
P2 STEP 11. Set CPU governor on Ubuntu operating system to "Performance"
P2 STEP 12. Make the necessary changes using QjackCtl
Run QjackCtl
$ qjackctl
Go to Setup > Settings > Parameters
Select the required Audio Interface, Sample Rate, Frames/Period click
the Apply button to apply the changes.
Example: hw:audiointerface, 48000, 128
P2 STEP 13. Start the JACK server via QjackCtl.
EXAMPLES OF USE
To reach low audio latency when running an application via Wine using PulseAudio on PipeWire
E1 STEP 1. Make sure that a lowlatency kernel is used (necessary to eliminate crackles at low latencies)
$ uname -r
E1 STEP 2. Ensure that the CPU governor in the Ubuntu operating system is set to “Performance.” (necessary to eliminate crackles at low latencies)
E1 STEP 3. Set a force sample rate and buffer size
$ pw-metadata -n settings 0 clock.force-rate <samplerate>
$ pw-metadata -n settings 0 clock.force-quantum <buffersize>
Example for Default mode:
$ pw-metadata -n settings 0 clock.force-rate 48000
$ pw-metadata -n settings 0 clock.force-quantum 128
Example for Pro Audio mode (see step P1 STEP 6):
$ pw-metadata -n settings 0 clock.force-rate 48000
$ pw-metadata -n settings 0 clock.force-quantum 48
Note: This should be done every time the operating system is started or restarted.
Note: Ideally, the app's sample rate and the forced sample rate must be the same (for resampling latency bypass). Additionally, you can make changes to the following files $ sudo nano '/usr/share/pipewire/minimal.conf', $ sudo nano '/usr/share/pipewire/pipewire.conf'.
Note: For your convenience, you can use the Cable app. Please note that before using files available from this link, such as AppImage and DEB, you must install dependencies.
E1 STEP 4. Confirm that the changes have been set
$ pw-metadata -n settings
Note: To cancel the force-rate and force-quantum changes, run the following commands: $ pw-metadata -n settings 0 clock.force-rate 0, $ pw-metadata -n settings 0 clock.force-quantum 0
E1 STEP 5. Find out about quantums (buffer sizes), rates (sample rates), if Xruns or Errors have occurred
$ pw-top
E1 STEP 6. Install the application
$ wine '/home/username/Downloads/setup.exe'
Note: You can practice with Surge XT tool
E1 STEP 7. Launch the application via the Dash menu
Note: If the application does not appear in the Dash menu, reboot the system
E1 STEP 8. Use the app's Audio Settings menu to make the following changes:
- Audio Driver: Windows Audio (Low Latency Mode) or Windows Audio or DirectSound
- Audio Device: Audio interface/Sound card or Audio interface/Sound card Pro
- Sample rate: <samplerate>
- Buffer size: <buffersize>
Formula for approximate calculation of total latency: total latency=(((alsa.output.quantum + application.quantum + audio.driver.quantum)÷rate)×1000).
Calculations for Default mode
Example using “Windows Audio (Low Latency Mode)” Audio Driver: (((128+128+0)÷48000)×1000)=5,333333333ms
Example using “Windows Audio” Audio Driver: (((128+240+0)÷48000)×1000)=7,666666667ms
Example using “DirectSound” Audio Driver: (((128+240+256)÷48000)×1000)=13ms
Calculation for Pro Audio mode (see step P1 STEP 6)
Example using “Windows Audio (Low Latency Mode)” Audio Driver: (((64+128+0)÷48000)×1000)=4ms
Note: When using the “Windows Audio (Low Latency Mode)” and “Windows Audio” audio drivers, regardless of the buffer size value you set, the buffer size value is equal to zero.
Note: The examples were tested on a Realtek® ALC892 Codec and a Steinberg UR22C Portable USB 3 Audio Interface.
To reach low audio latency when running an application via Wine using WineASIO
E2 STEP 1. Make sure that a lowlatency kernel is used (necessary to eliminate crackles at low latencies)
$ uname -r
E2 STEP 2. Ensure that the CPU governor in the Ubuntu operating system is set to “Performance.” (necessary to eliminate crackles at low latencies)
E2 STEP 3. Install the application
$ wine '/home/username/Downloads/setup.exe'
E2 STEP 4. Launch the application via the Dash menu
E2 STEP 5. In the application audio settings, select “WineASIO Driver” as the audio device.
Note: The required Buffer size (Frames/Period) and Sample rate are set using the QjackCtl app (see step P2 STEP 12).
To listen to audio content via browser on Ubunto OS with the JACK server enabled
E3 STEP 1. Run QjackCtl app
E3 STEP 2. Go to Setup > Misk | Check the box Enable JACK D-Bus interface
E3 STEP 3. Click the Apply button to apply the changes
E3 STEP 4. Go to Setup > Settings > Parameters | Set the Frames/Period (Sample Rate) to 1024
E3 STEP 5. Click the Apply button to apply the changes
E3 STEP 6. Start the JACK server via Start button
E3 STEP 7. Open Ubuntu System Settings
E3 STEP 8. Go to Settings > Sound > Output device | Select JACK Sink as the Output device.
E3 STEP 9. Launch your browser.
Note: To listen to audio content using PulseAudio on PipeWire, click the “Stop” button to stop the JACK server, then set your audio interface as the output device via Ubuntu’s system settings.
SEE ALSO
GPU PASSTHROUGH GUIDE FOR UBUNTU WITH NOUVEAU DRIVER INSTALLED
GPU PASSTHROUGH GUIDE FOR UBUNTU WITH NVIDIA PROPRIETARY DRIVER INSTALLED
NVIDIA HARDWARE-ACCELERATED TRANSCODING USING FFMPEG
PipeWire Guide
LinuxMusicians
TROUBLESHOOTING
Problem: I hear a choppy sound with crackles.
Action:
- Set the correct rate (sample rate) and quantum (buffer size)
Problem: I hear a sound with crackles.
Action:
Check CPU usage using “glances”. The CPU is probably overloaded by the
running application
$ sudo apt install glances
$ glances
If you are using “WineASIO”, run QjackCtl app then click the
“Messages” button, go to the “Status” tab and check the DSP Load. The
crackling may be caused by the Digital Signal Processor (DSP) being
overloaded. In this situation, the “PulseAudio on PipeWire” solution
using the “Windows Audio (Low Latency Mode)” Audio Driver may be more
suitable for you.
Perform experiments using Windows Audio (Low Latency Mode), Windows
Audio, DirectSound, WineASIO Driver as the audio device.
Increase the quantum (buffer size)
Try using the
taskset
command. Examples: $ taskset -p -c 0,1 <PID of Application.exe>, $ taskset -c 0,1 wine '/home/username/.wine/drive_c/Program Files/Brand/Application.exe'.
Note: To show or hide hidden files and folders in the Ubuntu file manager, use the keyboard shortcut Ctrl+H.
Problem: The options with small values of Sample rate has disappeared from the Audio Settings menu of the installed on wine application.
Action:
REFERENCES
PipeWire
PipeWire - ArchWiki
Config PipeWire
Advanced Linux Sound Architecture
WineASIO
Set the default kernel in GRUB
Chapter 6. Affinity | Reference Guide | Red Hat Enterprise Linux for Real Time

Other programs go great. My plugins of AAS works awesome on wine. But Ableton Live...
– Roberto Huelga Jan 11 '21 at 21:01