Einleitung
Anhand dieser Anleitung kannst du das Display deiner Apple Watch Series 2 ersetzen, wenn es gesplittert oder defekt ist.
Achte darauf, deine Apple Watch auf watchOS 5 oder eine spätere Version zu aktualisieren (und das gekoppelte iPhone auf iOS 12 oder eine spätere Version), um nach dem Displayaustausch Probleme mit der Kopplung zu vermeiden.
Der Displayaustausch kann zu Problemen mit Apple Pay führen. Um Problemen vorzubeugen solltest du wenn möglich alle deine Apple Pay Account Infos vor der Reparatur löschen und dann erst nach Einbau des neuen Displays wieder eingeben.
-
-
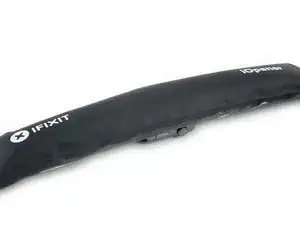
Verwende einen iOpener (oder einen Haartrockner oder ein Heißluftgebläse), um das Display so zu erwärmen, bis es sich fast nicht mehr anfassen lässt.
-
Lasse den iOpener mindestens eine Minute auf dem Display liegen, so dass dieses überall heiß wird und der Kleber darunter aufweicht.
-
Wahrscheinlich musst du den iOpener mehrfach erwärmen oder auf dem Display bewegen, bis es überall heiß genug ist, um es abzuhebeln.
-
-
-
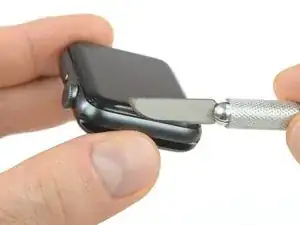
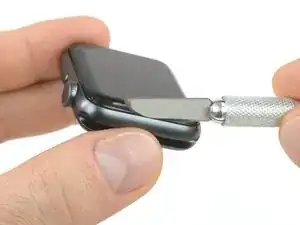
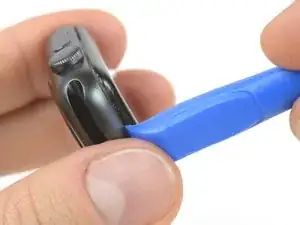
Setze eine gebogene Klinge in den schmalen Spalt zwischen Display und äußerem Gehäuse. Beginne an der kurzen Seite des Displays, nahe der Krone.
-
Drücke die Klinge mit viel Kraft gerade runter in den Spalt.
-
Wenn die Klinge drin ist, dann neige die Klinge seitwärts, um das Display etwas zu öffnen.
-
-
-
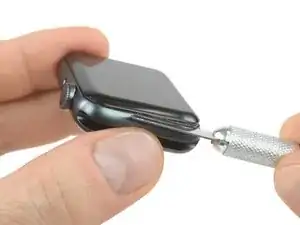
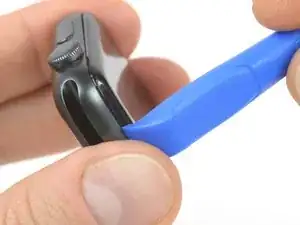
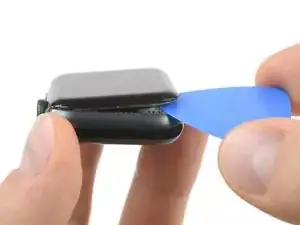
Wenn du mit der gebogenen Klinge einen schmalen Spalt geöffnet hast, dann entferne die Klinge und setze die dünne Kante eines Plastiköffnungswerkzeugs in den Spalt.
-
Drücke das Plastiköffnungswerkzeug in den Spalt hinein und vergrößere ihn, wobei du es mit deinem Daumen abstützen kannst.
-
-
-
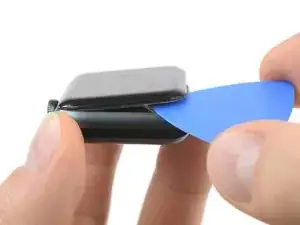
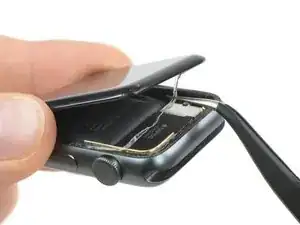
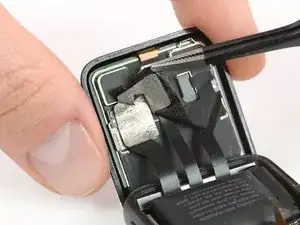
Setze ein Plektrum unter das Display und trenne die Force Touch Dichtung behutsam vom Display.
-
Schiebe das Plektrum um das Display herum und trenne den Kleber zwischen Force Touch Dichtung und Display auf.
-
-
-
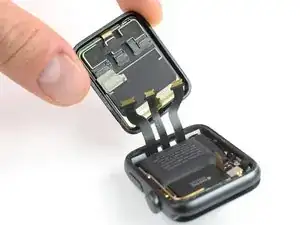
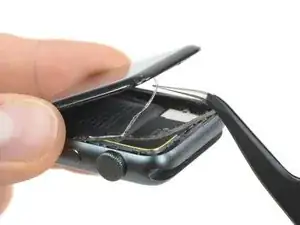
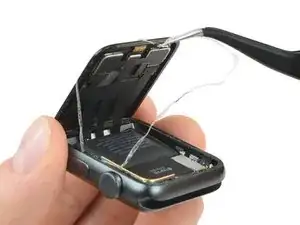
Ziehe den Klebstoff mit einer Pinzette vom Display und dem Force Touch Sensor Kabel, während du das Display im 45° Winkel öffnest.
-
Fädle den Klebstoff hinter die Displaykabel und über das Display um ihn zu entfernen.
-
-
-
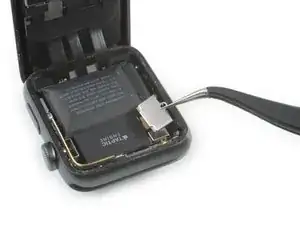
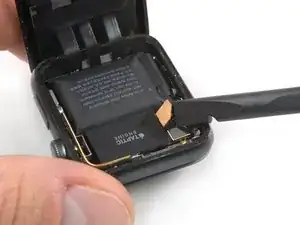
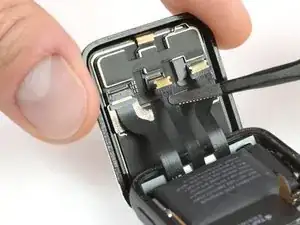
Entferne die Tri-Point Y000 Schraube, mit der die metallene Abdeckung des Akkusteckers befestigt ist.
-
Entferne die Abdeckung.
-
-
-
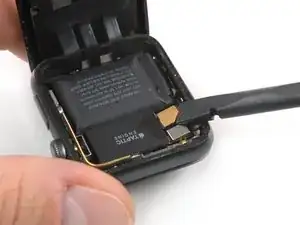
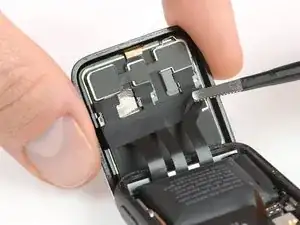
Trenne den Akku ab, indem du seinen Stecker mit der Kante eines Plastiköffnungswerkzeugs nach oben hebelst.
-
Biege den Stecker leicht nach oben, damit er sich nicht versehentlich wieder verbindet.
-
-
-
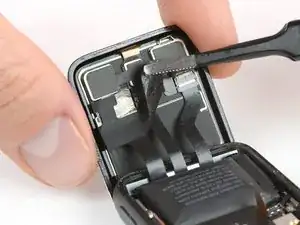
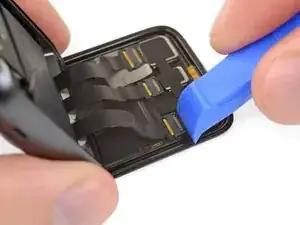
Löse das Klebeband auf den Displaykabelsteckern mit einer Pinzette.
-
Beginne rechts unten am Klebeband und arbeite dich vorsichtig zum Stecker in der Mitte vor.
-
-
-
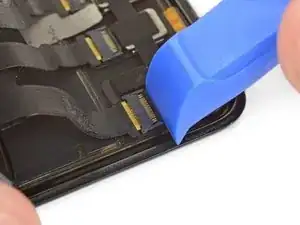
Auf dem Stecker ganz links ist auch eine leitende Folie, die leicht reißen kann, wenn du das Klebeband abziehst.
-
Falls sie reißt, fasse sie unten links, um sie ganz zu entfernen. So bleibt die passende Folie darunter (auf dem Display) unversehrt.
-
-
-
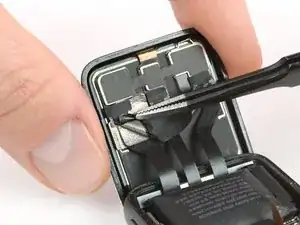
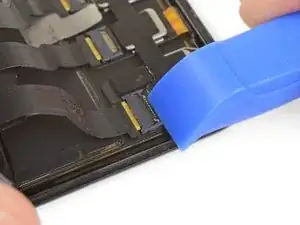
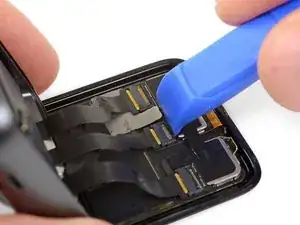
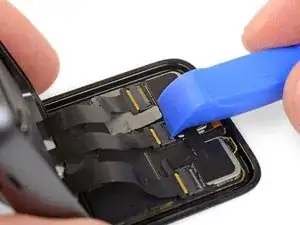
Benutze ein Plastiköffnungswerkzeug oder deinen sauberen Fingernagel, um den ersten der drei ZIF Stecker zu entriegeln, indem du die kleine schwarze Klappe auf dem Stecker gegenüber vom Kabel aufhebelst.
-
-
-
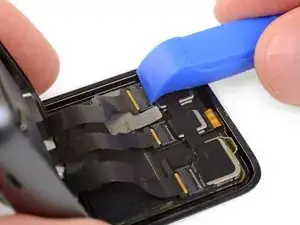
Trenne die Display-Flachbandkabel, indem du sie vorsichtig mit einer Pinzette herausziehst.
-


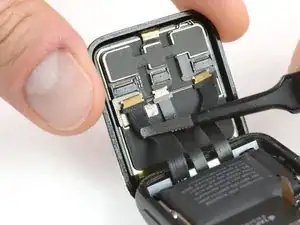

Wir empfehlen dir, jetzt mit Schritt 10 unserer Force Touch Sensor Anleitung weiterzumachen, um die Dichtung zu erneuern, bevor du die Reparatur abschließt. Beste Ergebnisse erzielst du, wenn du das neue Display erst nach Schritt 17 wieder anschließt.

18 Kommentare
Job done….With a smashed screen remember to apply clear scotch tape to hold the screen together. Continue to heat the remaining stuck shards when the main bulk of the glass comes out. Pick them out carefully, and not to raise the gasket. Use a strong magnifying glass. the ifixit heat gel pack and tweezers helped me. Ensure that all tiny bits of glass have been removed form the body. Just turn it upside down, give a couple of gentle taps with something plastic. Pick out if necessary, taking care around the components. For a smashed screen, needs a good hour or more.
pep073 -
Congratulations on the successful repair. And thanks for your comment and additional hints.
This one was tough…and I’ve been doing various repair for years. Thank you iFixIt for top notch tutorials and instructions (and the progressive photos). I had a broken display and an iCloud locked watch for parts. Getting the display off the broken iWatch was easy…getting the replacement/good display off the other iWatch was very difficult. I keep at it and eventually it released, but I think I chipped the display edges slightly. If I have to do this one again, I may think twice. I’d say use plenty of heat. I used the iRemover, which helped a lot, it gets plenty hot and holds the heat for job. Once you’re inside, you’ll need that every so special 000 tri-lobe bit for the battery (for this I bought the iFixIt Pro toolkit…worth it to have a solidly made set of disassembly tools). I don’t think it’s worth breaking down the iWatch for repairs much further than the display or battery. The water resistant seal is compromised enough as it is with the display removal.
Just wondering are the ion x glass and sapphire crystal screens interchangeable because I have a broken series 2 aluminum case and it comes with the ion x glass but I want to get the sapphire crystal glass instead to make it stronger
Displays of the same Series, model and size should be compatible.
Just noticed that my reply might come across a little vague.
Same Series hopefully makes sense (some swapped Series 3 onto Series 2 and vice versa which lead to the displays getting warmen than usually).
Same model means LTE or GPS which is probably irrelevant since the Series 2 does not have LTE.
And same size is hopefully a no-brainer ;)
So to summarize, yes, Sapphire display of the same watch should work instead of an ion-x.
Please let me know if it won’t work.
Verify your model. The back of the Cellular model just says GPS, so be sure to check the groves where the watch band goes to determine you model. I made the mistake of just reading the back of the device and since I’d been gifted the device didn’t know it was cellular. Cellular has a different type of touch force gasket, different screen, and different battery connections.
Ryan Holt -
From what I just read on Apple, the only differences in watch series 3 is 38mm and 42mm.
mcr4u2 -
As a consumer all you need to know are 38mm and 42mm
Michael Adoga -
The back will say GPS LTE if it’s the cellular version. If it doesn’t say LTE it is only the GPS version. The displays are different whether or not it is LTE(cellular).
themepark -
This alternative method only reboots the watch.
Gregg Stanley -