Einleitung

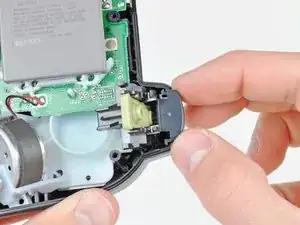
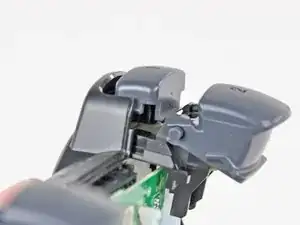
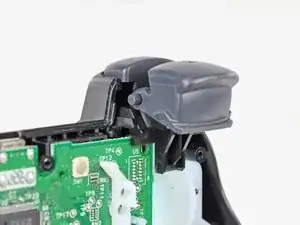
Diese Anleitung zeigt dir, wie du die Auslösetasten austauschen kannst. An der Taste Nr. 2 ist innen eine Feuer angebracht.

  1. MnO4C2NgVBnH1meE
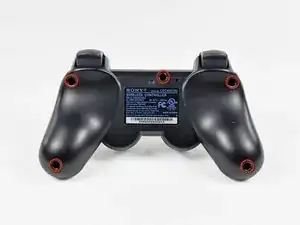
    • Entferne die fünf 7,2 mm Kreuzschlitzschrauben, die die Rückabdeckung am Controller befestigen.

  2. lvGLlAtXpOWLih6R
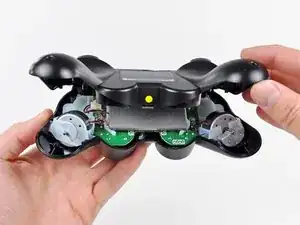
    • Drücke zwischen des beiden Analogstocks auf die Rückabdeckung und hebe ihre Unterkante ein wenig vom restlichen Controller weg.

    Es ist nicht ganz eindeutig das zwischen den beiden Analog-Sticks gedrückt werden muss. Der gelbe Punkt fällt kaum auf. Ein Bild mit Daumen an dieser Stelle wäre gut oder soooo…

    Tom -

    it’s not very clear but for this step you need to push where the yellow dot is shown on the picture. it’s rather tough. you kind of have to move the whole back plate a bit for it to work.

    Brandon der Blatter -

    I’m stuck at this step because I can’t for the life of me undo the clip

    IttyBittyGamerVR -

  3. pteSAIrvQBgU3cdM
    pteSAIrvQBgU3cdM
    BnFWDEdOvNaFHOJa
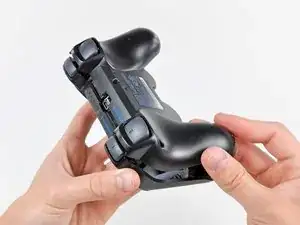
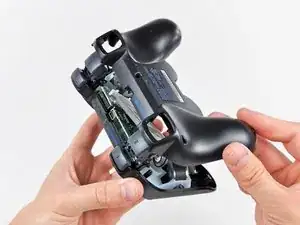
    • Schiebe die Rückabdeckung etwas in Richtung der Oberkante des Controllers bis die Vorderkante der #2 Trigger freiliegt.

    • Ziehe die Rückabdeckung vom Rest des Controllers ab. Pass dabei auf, dass die #2 Trigger nicht versehentlich von ihren Sockeln entfernt werden.

    • Solltest du versehentlich die Trigger-Tasten doch entfernt haben, haben wir einen Anleitung für Trigger-Tasten, um sie wieder anzubringen.

    the "trigger button guide" link links back to this page :o

    Alexander McMahon -

    I accidentally popped a trigger off, and both L1 and R1, because I skimmed and didn't read this step. Fortunately it's not hard. The tricky part with the triggers is that there's a little spring on them. You have to press the side of the spring that's pointing away from the trigger against the sloped surface of the controller (look at the other trigger for reference, if you only popped one off). Then you just slide the trigger on until the "handlebar" bits near the center click into place.

    briancaraher -

    The reset button – a small mostly-rectangular rubberized piece – fell out as I removed the rear cover. It covers the hole near the middle screw and has a post that presses SW1 on the motherboard.

    Fletcher Stern -

  4. ePnXu1RHEGhtPRK6
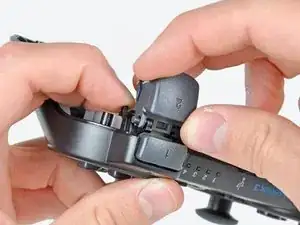
    • Halte die schwarze Kunststoffhalterung der Auslösetasten mit einer Hand fest und ziehe die Taste Nr. 2 von ihrer Achse ab.

  5. 4qFpjOuKiJditMGG
    4qFpjOuKiJditMGG
    b3DDMP1YpMDoVEXT
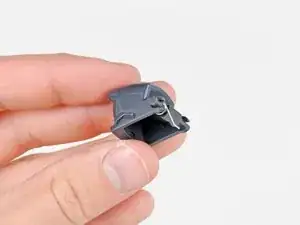
    • Achte beim Einbau der Taste Nr. 2 darauf, dass die Feder wie gezeigt liegt, bevor du die Taste wieder auf der Achse festdrückst.

    For this step, i would suggest looking at the other trigger to get an idea of how to put it back in. So if you were replacing the L2 button look at R2 and vice versa.

    Then looking at the picture above, just make sure that the spring is aligned in a similar fashion to the other button. Pushing it forward to match might help as the spring might fall out of place.

    Michael Vichiola -

  6. Y3qeJbDjiYhFVoAd
    Y3qeJbDjiYhFVoAd
    pkqDrsRHOCcQ1QKt
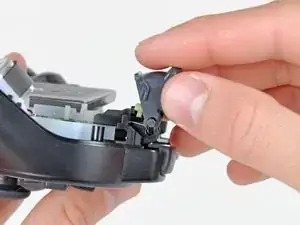
    • Ziehe die schwarze Kunststoffhalterung ein wenig von der vorderen Abdeckung weg.

    • Ziehe die Taste Nr.1 aus der vorderen Abdeckung heraus.

  7. vlgF3Q5pFCdPWdBr
    vlgF3Q5pFCdPWdBr
    yArFLBJOXafVqARJ
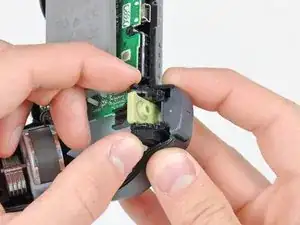
    • Bevor du die Halterung wieder in die Führungen in der vordere Abdeckung einschiebst, musst du darauf achten, dass der runde Stift an der Taste Nr.1 flach auf der grünen Gummiabdeckung des elektrischen Schalters liegt. Wenn das falsch ist, kann es beim Zusammenbau Passprobleme geben und es könnte sein, dass der Schalter Nr.1 nicht mehr funktioniert.

    • Die Auslösetasteneinheit ist korrekt eingebaut, wenn der Rand der Halterung der Auslösetasten eng an der Hauptplatine anliegt.

    I really would have liked to see how the little metal piece on the #2 button is supposed to fit back in

    Miko -

    Wow, so in reverse it’s really really fiddly- probably needs a separate guide as I can’t get it back together with the fiddly trigger parts

    Ben Dawson -

Abschluss

Um dein Gerät wieder zusammenzusetzen, folge den Schritten in umgekehrter Reihenfolge.

Andrew Bookholt

578335 Reputation

7 Kommentare

Might want to add that there's a small catch/tab in the middle of the bottom of the controller that needs to be released when taking apart the covers.

This worked great, and also works on normal Sixaxis controllers. I used this to swap the broken spring from the L2 button on my DS3 for a good spring from my Sixaxis. Works like new now.

Will Foss -

The little green eletronic ribben where is it supposed to go?

dmall -

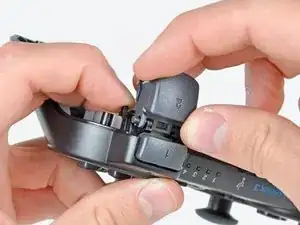
The #00 screwdriver is working better
Leopold287 -

Did you replace button 2 rod with plastic replacement part or use original rod piece when fixing button 2

Sidney Klemkosky -

Is there a way I can buy trigger retainers?

CynicalSheep -

thank you!!!

ivanbt007 -

I have SIXAXIS gamepad and I don’t know how to put it back I see it have ribborn.

NiGGaZGamePLay -