Einleitung
Du kannst dieses Verfahren auf vielen Chromebooks durchführen, nicht nur auf den auslaufenden, die keine Updates mehr von Google erhalten. Eine große Ausnahme sind offenbar ARM-basierte Chromebooks. Bei diesen schlägt das Flashing-Script auf irgendeine Weise fehl. Ich bin mir nicht sicher, ob es eine entsprechende Fehlermeldung oder einen undurchschaubaren Code ausgibt, da ich kein solches System zum Testen habe. Wenn jemand den Drang verspürt, mir mitzuteilen, wie der Fehler aussieht, oder mir einen Screenshot schickt, werde ich ihn in diese Anleitung aufnehmen. Ich werde Links und Informationen für einige mir vertraute Roms anbieten, wie man deren Schutz aufhebt. Andere können gerne weitere hinzufügen, wenn sie es für richtig halten (ich verlange allerdings 500 Reputationspunkte, um an den Bearbeitungen teilzunehmen).
Achte darauf, dass Folgendes nicht mit deinem Chromebook passiert:http://h22235.www2.hp.com/hpinfo/globalc...
Hinweis 1: Leider erfordern neuere Chromebooks einen tieferen Eingriff in die Firmware, um den werksmäßig gesetzten Schreibschutz aufzuheben. Ursprünglich war ein einfacher Hardwareschutz vorgesehen, eine Art Schalter oder Schraube. Wenn du rauskriegst, wie dies an neueren Geräten geht, dann lasse es mich wissen, damit ich es in diese Anleitung übernehmen kann.
Hinweis 2: Update Bist du jemand, der mit einer Menge von technischen Informationen in Englisch gut zurecht kommt und keine Angst vor Befehlen in der Kommandozeile hat? Wenn das auf dich zutrifft kannst du es mit einer neuen Technik probieren, um dich auch bei den im ersten Hinweis erwähnten Notebooks an Linux zu erfreuen. Es handelt sich um "breath". Wenn du dich unsicher fühlst, dann versuchen es lieber nicht. Du könntest sonst bald zu den frustrierten Linuxgegnern gehören, die das Web mit Falschinformationen füllen. Es gibt Hardwareanforderungen, um die Installationsmedien zu erzeugen und die Liste von unterstützten Notebooks wächst ständig. Die Daten sind sehr gut auf GitHub zu finden. Danke an Cameron für den Link! Ich probiere das jetzt und werden später von meinen Erfahrungen berichten. Hier der Link: breath
Werkzeuge
-
-
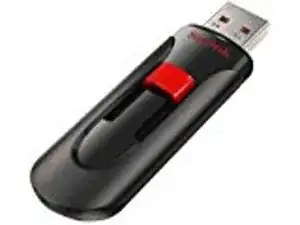
Es werden zwei ausreichende USB-Sticks benötigt, z.B. 16 GB Sandisk Cruzer. Einer ist vorgesehen für das Linux-Image, der andere für ein Backup das ursprünglichen ChromeOS Support Image. Du benötigst den nur, wenn du wieder zu ChromeOS zurückkehren willst
-
Ich habe den zweiten Stick nur für den Fall vorbereitet, dass der Vorgang nicht klappt. Das war allerdings nicht nötig, weil alles perfekt funktioniert. Wahrscheinlich ist das bei dir auch so, dann wäre der zweite Stick überflüssig.
-
Führe einen Download eines amd64 lubuntu LTS Images durch. (oder eine andere gewünschte Linux Version). Brenne es mit geeigneter Software zum Brennen von bootfähigen Images auf den Stick, hier ein Link für Ubuntu: http://cdimage.ubuntu.com/lubuntu/releas...
-
Beachte, dass du diesen Schritt mit einem zweiten Computer durchführen kannst, ich konnte ihn mit meinem crouton chroot auf meinem bestehenden Pavilion Chromebook durchführen. Ich verwende und empfehle die Etcher-Software für dafür: Etcher: Linux - Mac - Windows creating bootable images on USB keys - SD cards the easy way. oder ...
-
... benutze "chromebook recovery utility" vom Webstore. Im Wesentlichen führst du eine dd-Kopie jedes Images mit .bin Extension durch, gibst der linux iso die .bin Extension, wählst dann "use a local image" indem du auf das Zahnrad-Icon oben rechts drückst.
-
Jetzt kannst du dein Chromebook entrümpeln. Kennst du noch diese nervigen Anzeigen? Ich habe mein Chromebook fünf produktive Jahre lang geliebt, wenn es noch weiter unterstützt würde, würde ich es weiter verwenden.
-
-
-
Hier wird Schritt 2 für ein HP Pavilion Chromebook gezeigt. Diese Anleitung zeigt auch, wie du den Speicher und Arbeitsspeicher aufrüsten kannst.
-
Hier ist Schritt 2 für ein Lenovo Thinkpad X131e Chromebook... Wie der Schalter für den Schreibschutz deaktiviert werden kann, ist auf S.14 des .pdf-Files beschrieben. Natürlich muss dazu etwas auseinander gebaut werden, gutes Gelingen!
-
Für viele andere Chromebooks besteht Schritt 2 darin, die Schraube für den Schreibschutz irgendwo auf der Hauptplatine zu finden und zu deaktivieren. Google hilft dir dabei.
-
Beispielhaft hier für das HP Chromebook 11 G3 (2013) HP Chromebook 11 G3 Schreibschutzschraube.
-
Da das Chromebook sowieso geöffnet ist, kannst du - wenn möglich - den Speicher aufrüsten, oder eine SSD zum schnelleren Booten einsetzen. Baue anschließend wieder alles zusammen.
-
Fahre ChromeOS für den nächsten Schritt hoch.
-
-
-
Wahrscheinlich benötigst du in diesem Fall mehr Speicherplatz. Da dies etwas anspruchsvoller ist, werde ich das hier nicht weiter ausführen. Google in seiner Weisheit hat ja sowieso nach fünf Jahren die Unterstützung eingestellt und du willst diese Option wahrscheinlich garnicht mehr haben.
-
-
-
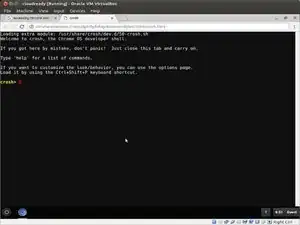
Drücke [ Ctrl ] [ Alt ] [ T ] um die crosh shell auf das Chromebook zu bekommen. (erstes Bild). Hinweis: diese ersten drei Bilder der Shell images wurden mit cloudready produziert, sieht ganz ähnlich aus und ist für unsere Zwecke hier ausreichend.
-
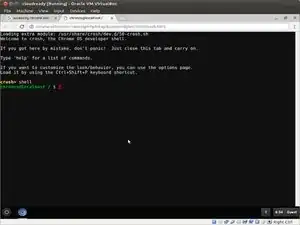
Gib das Kommando "shell" ein, um den Prompt zu erhalten. Drücke dann die Eingabetaste (zweites Bild).
-
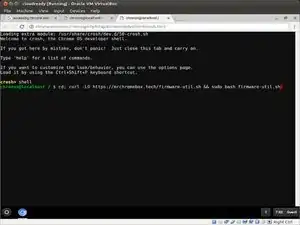
Tippe folgende Zeile als Ganzes ein, oder kopiere sie einfach hinein. (drittes Bild).
-
cd; curl -LO https://mrchromebox.tech/firmware-util.sh && sudo bash firmware-util.sh
-
Wenn du wirklich bereit bist, dein Chromebook in einen voll funktionsfähigen Allzweck-Laptop zu verwandeln, dann drücke jetzt die Eingabetaste.
-
-
-
Du solltest ein Menü (siehe Bild) mit den zu deinem Gerät passenden Daten erhalten. Wähle Punkt 3 aus, um ein voll UEFI-fähiges ROM deines Systems zu erzeugen. Beachte, dass dies das Ende deines Laptops als Chromebook bedeutet, wenn du den "point of no return" passiert hast.
-
Beachte: manche Chromebooks werden nicht unterstützt (besonders solche mit ARM-CPU). In diesem Fall erhältst du eine entsprechende Warnmeldung.
-
Du erhältst die Auswahl, ein ChromeOS-Backup zu erstellen. Dazu musst du den USB-Stick bereit halten. Entscheide selbst, ob du es ohne riskieren willst.
-
Wenn alles zu Ende ist, erhältst du die Aufforderung, das Gerät auszuschalten und neu zu starten. Nun musst du deinen Linux-Stick einstecken und in ganz normaler Weise das Betriebssystem aufspielen.
-
Ich habe mich für die komplette UEFI-Routine entschieden, das musst du aber nicht unbedingt. Folge hier den Anweisungen in den FAQs (https://mrchromebox.tech/#faq). In der fünften Frage wird beschrieben, welche Optionen die UEFI Bootauswahl bietet.
-
-
-
Ich habe cairo-dock installiert und nun geht meine Hardware ordentlich ab. Ich habe jetzt den Freund des armen Mannes... die freie Open-Source-Software, die dem Macintosh ähnelt.
-
Um dein Gerät wieder zusammenzubauen, folge diesen Anweisungen in umgekehrter Reihenfolge.
12 Kommentare
Thank you very much for the detailed information. I have successfully converted my ASUS C302C chromebook to Linux laptop.
A better and safer way to install Linux on Chromebooks exists :) https://cb-linux.github.io/breath/
Cameron -
Thanks for the useful input Cameron. I added a follow up note to the heading here. Now I am going shopping for a more modern used chromebook.
tcagle53 -
hello, thank you for sharing
i want to ask for lenovo chromebook slim 3, can it install linux?, cause when i reboot and start to mode developer not found properly
Did you read "Note2" in the above introduction? If not and if your device is supported by "breath" that may be a viable approach. It is a fairly complicated process that I have not tried so beware if it is out of your comfort zone.
tcagle53 -


