Einleitung
Outlines hardware and software steps required to turn this sunsetted chromebook into a real linux laptop.
Don't let this happen to your chromebook https://www.coursehero.com/file/12425426... or worse still https://www.dreamstime.com/dump-trucks-u...
Werkzeuge
-
-
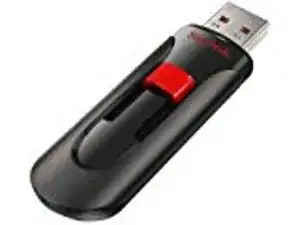
You will need a couple of decent sized USB sticks. I used 16gb sandisk cruzer sticks. One for your desired live lubuntu image and one for taking a backup of your original chromeos supporting image. The second one is optional since you only need that if you ever want to go back to your unsupported chromeos image.
-
I did it just in case I bricked my laptop. Turned out to be unnecessary since the script worked perfectly. You can probably skip taking the chromeos flash backup since it probably won't be needed for yours either.
-
Download amd64 lubuntu LTS image or whatever flavor you desire of linux. Burn it on one of your USB sticks with software suitable for creating bootable USB sticks. Download: http://cdimage.ubuntu.com/lubuntu/releas... (note this url is unresponsive you should use whatever distros USB image you prefer)
-
Note that you may need a second computer to perform the above step. I was able to do it with my crouton chroot on my existing Pavilion chromebook. I use and recommend Etcher software for this step: Linux - Mac - Windows creating bootable images on USB keys - SD cards the easy way.
-
You are now ready to "unscroogle" your chromebook. Remember those silly ads? I actually loved my chromebook for five very productive years. If it was not unsupported, I would continue to use as is too.
-
-
-
-
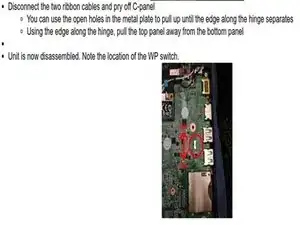
Above link gives all the gory details about how to reach the write protect disable/enable switch and set it as required for the following steps. You don't have anything to lose except an unsupported chromeos device right?
-
Reassemble carefully. Since you have it apart this is a good time to upgrade to 8gb memory and a larger SSD if you wish.
-
See my other guide for details if you are unsure about those hardware upgrades. HP Pavilion Chromebook 14-c050nr RAM & SSD upgrade procedure.
-
-
-
Press [ Ctrl ] [ Alt ] [ T ] to get to the crosh shell prompt on the chromebook.
-
Use the "shell" command to get to the shell prompt. Just type "shell" into the prompt and press enter.
-
Type the following (or cut and paste into a single command line). I include the full command in the next bullet point...
-
cd; curl -LO https://mrchromebox.tech/firmware-util.sh && sudo bash firmware-util.sh
-
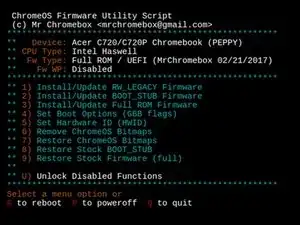
You should get that menu (see graphic) with appropriate device data for HP Pavilion Chromebook etc. Press option 3 to flash a full UEFI capable rom onto your system. Note this is the end of your chromebook effectively once you pass the clearly identified "point of no return".
-
You can either perform the chromeos rom backup or not as the option presents itself (your choice). You will need that extra USB stick if you choose to backup the original rom. Do you feel lucky punk? Sorry :D
-
Once it is finished it will prompt you to power off and restart the device. At that point you can insert your new linux boot/install USB stick. From there you simply install like you would on any typical laptop.
-
I opted to go the full UEFI route on mine but it is optional. Follow the instructions under the FAQs (https://mrchromebox.tech/#faq) The fifth question there is answered with how to proceed to setup your UEFI boot option files correctly.
-
-
-
I have installed cairo-dock and now my hardware is off the leash. I have the poor man's friend... the free open source software macintosh work-alike.
-
If you use a mouse instead of the trackpad you might need this too! Disabling builtin trackpad on HP Pavilion Chromebook running lubuntu 18.04
-
I probably should have done this before my HP chromebook became an unsupported device but I am intrinsically lazy.
7 Kommentare
Thanks for the write up! I was able to install Peppermint 8 Respin-2 on my friends HP Pavilion Chromebook 14-c050nr. However, there are a couple of gaps in the procedure that may throw some people off. Between Steps 2 & 3 I had to enable developer mode as directed by <https://mrchromebox.tech/#devmode>. In Step 3 if you cut & paste the command you still need to change "util.s..." to "util.sh". Also, at the end of Step 3 to correct the location of the grub EFI boot stub as directed by the answer to the second question of <https://mrchromebox.tech/#faq>, the choices for selection where a bit more complicated than Mr Chromebox wrote. IIRC, I first chose the partition containing the bootloader (partition 1), then "ubuntu", then "grubx64.efi". After that the Linux bootable USB stick booted, I opened a terminal, and entered the three commands as directed using "ubuntu" as the distro name, not Peppermint. Hope that helps someone.
Lee -
You are welcome! How about some reputation love? See the big blue button above? Also sorry about dropping the ball on the wiki markup. I have fixed my earlier omission on that front by surrounding the command to cut/paste in the step 3 bullet points by surrounding them with wiki markup tags and removing the useless quotes I had tried earlier.
tcagle53 -
Blue button punched. Thanks again!
Lee -


