Einleitung

Diese Anleitung wurde von iFixit-Mitarbeiter:innen verfasst und ist keine offizielle Reparaturanleitung von Google. Hier erfährst du mehr über unsere Qualitätsstandards.

Verwende diese Anleitung, um einen gebrochenen oder fehlerhaften Bildschirm einschließlich des Displays und dem Touchscreen am Google Pixel 2 zu tauschen. Es kann kleinere Teile geben, die von dem alten Display auf das neue übertragen werden müssen. Schaue dir beide Displays genau an und stelle sicher, dass alle wichtigen Teile vom alten Display auf das neue Display umgebaut werden.

  1. wAO2rliBKNjRPNFp
    wAO2rliBKNjRPNFp
    sOF3jgMKtXwTw3QE
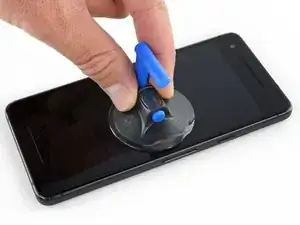
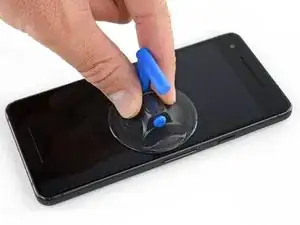
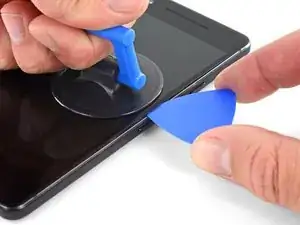
    • Wenn dein Displayglas zerbrochen ist, dann klebe es mit Klebeband ab. Dadurch werden die Glassplitter zusammengehalten und du vermeidest Verletzungen. Außerdem haftet der Saugheber besser an einer glatten Oberfläche.

    • Bringe den Saugheber so nahe wie möglich an der Kante nahe den Lautstärketasten an, vermeide aber den abgerundeten Bereich.

    • Der Saugheber hält im abgerundeten Bereich der Glasscheibe nicht gut.

    My screen is severly cracked. I would recommend clear packaging tape as it is wide enough to accomodate the suction cup. Thinner cellophane tape won’t seal properly.

    John Tippitt -

    Does the Google Pixel 2 have be powered off before removing the digitizer screen? Its not mentioned in this article...

    Will the phone be damaged if the power is still on when disconnecting the broken screen?

    Alex -

    Replacing the battery in my Pixel 2 was successful because I read the comments. They are invaluable in this endeavor.

    David Castro -

    Suggest procedure revision:

    Step 1: Read all steps and associated comments before proceeding.

    Step 2: Ensure they supplied you with the right F$%^ING TOOLS in the kit before proceeding.

    I'm F$%^ED because any store around me that might have this T4 Torx bit is already closed and my screen is already off. My kit came with a T2 Torx bit which is not used anywhere in this entire process.

    Jens Davidsen -

    I bought one of the kits and it had everything needed to change the battery except the alcohol, including spudgers, screwdriver, torx (2 sizes), tweezer, alcohol dispenser, glue strips and die-cut glue card that fit the phone case perfectly. I followed these instructions and read the comments. Applied alcohol and patience, took my time and got the job done without any damage to the phone. Thank you ifixit!

    Jeffrey Price -

  2. avTQkVCTMJZevgJY
    avTQkVCTMJZevgJY
    dJrwweYej11ijuYM
    txYtFqoGDv4UxBDE
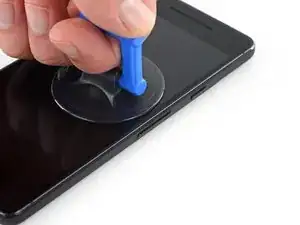
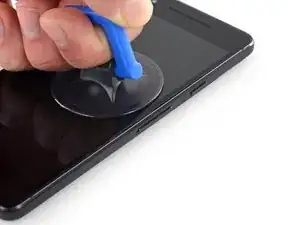
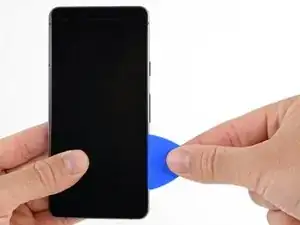
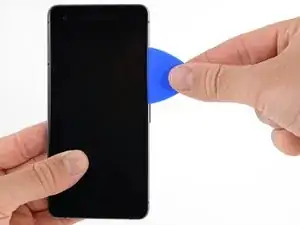
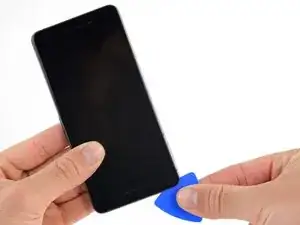
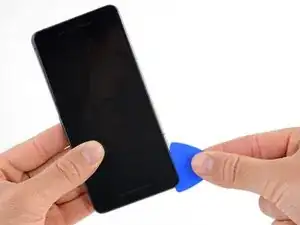
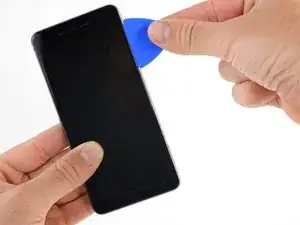
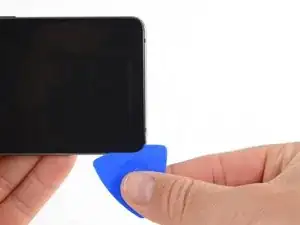
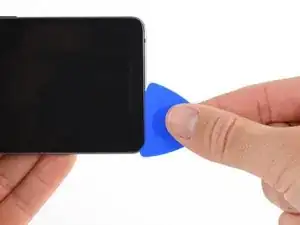
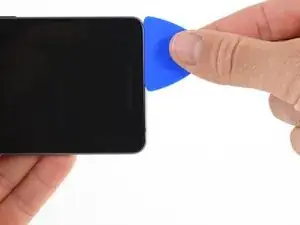
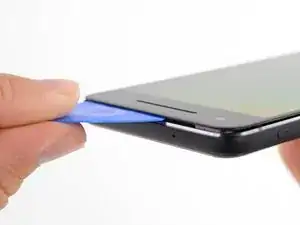
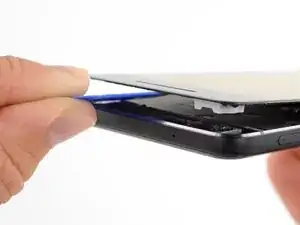
    • Ziehe den Saugheber gleichmäßig und fest hoch und setze ein Plektrum zwischen Frontscheibe und Rückgehäuse ein.

    • Setze das Plektrum nicht tiefer als 1,5 mm ein, sonst riskierst du Beschädigungen am OLED-Panel.

    • Du brauchst dafür viel Geduld und musst recht kräftig ziehen. Wenn es nicht gut geht, dann rüttele am Saugheber und der Scheibe, damit der Klebstoff geschwächt wird. Du kannst die Scheibe auch mit einem iOpener, einem Heißluftgebläse oder einem Haartrockner erwärmen.

    • Die Displayscheibe ist zerbrechlich. Wenn du das Display weiterverwenden möchtest, solltest du darauf achten, dass du das Werkzeug zum Auftrennen des Klebers nur soweit wie nötig einführst. Wenn du das Werkzeug zu tief einsteckst, kann das OLED-Panel unter der Glascheibe beschädigt werden.

    They cannot emphasize enough how careful you need to be when separating the screen. The iOpener does not work well enough to prevent breakage (opinion). I spent a majority of the hour and forty five minutes replacing my battery on removing the screen, i.e. reheating the iOpener, warming the device, slowly, with multiple passes, separating the adhesive. Use a heat gun or blow dryer.

    Devin McMillen -

    How many passes do I need? I do have a heatgun but I’m afraid to discolor or damage the screen. Anyone know the best temp before stopping to seperate the screen?

    Sen Lin -

    try the alcohol as instructed instead of heat. “Do not heat your phone. If needed, you can use a dropper or syringe to inject isopropyl alcohol (90+%) around the edges of the back cover to weaken the adhesive.  “

    Rogerio Sa -

    Make sure to remove the adhesive under the top and bottom speakers to make it much easier to remove the screen.

    Chibi Chica -

    Isopropyl alcohol works well to loosen the adhesive. However - GO SLOW. Slide the pick a bit, then apply some isopropyl alcohol into the gap where you’re sliding toward. Wait a moment, then slide a bit more. Move very slowly, particularly around the corners!

    Raquel Smith -

    Any idea on what to do when the suction cup pops off of the screen before there’s enough clearance to slide the pick in?

    Douglas Leenhouts -

    I used a hairdryer to weaken the adhesive. If you place your finger in the path of the hairdryer you’ll have a good idea of when too much heat has been applied (when your skin becomes unhappy at the temperature). BE VERY GENTLE. I cracked my screen because I didn’t weaken the adhesive enough. I also chipped(dog eared) the corner of the OLED screen underneath with one of the plastic tools. Don’t stick it in too far. As the guide says, use the flat edge or the pick to help control this.

    Alex Lawson -

    I did the 90% alcohol and the iOpener. Took a while but finally got the screen off. As others have mentioned, there is lots of adhesive around the top and bottom speaker openings. I ended up reaching in with a small brush and more alcohol to get it. I used a tooth pick to break the final adhesive.

    I also had a set of dental tools and a set of magnifying goggles (I’m a model railroader) which helped greatly.

    John Reagan -

    Like others have said, THIS STEP IS THE MOST DANGEROUS!!! You must be extremely gentle (no real force should be necessary to separate the screen from the glue) with the screen and take your time. (IMO if it takes you less than 30 mins to get the screen loose, your going too hard at it). Two suggestions from my successful battery replacement that I can give, use alcohol instead of heat (seems to work better with this phone) and start with a much thinner plastic tool that is also flexible (I used a metro card from the NYC MTA). This will allow you to get at the tiny gap without using any significant force and then get some alcohol into the gap by dripping it down the thin plastic tool. Honestly, IFIXIT should make a small thin rectangular card to use for this with lines around it for measurements…

    Aleksandr Demidenko -

    The first pry to get the pick inside the edge of the screen needs A LOT OF HEAT and a very firm pull, and just as someone else mentioned, the iOpener did not work well, instead, a regular hair dryer proved more beneficial in applying a controlled amount of heat until its almost too hot to touch. Then, once the pick is inside 99% isopropyl alcohol worked wonders, use a syringe or dropper to apple some at the edge, wait for about 15 seconds and move the pick centimetre by centimetre. Make sure to not insert it more than 2mm at the sides. I took more than an hour just to get the screen off.

    A Sid -

    As an experienced (1) screen remover, I’d recommend that if you don’t plan to change your screen, change your plans. You will be less disappointed that way. I managed to get mine for just over $10 with shipping and test it first (weak Battery). Pixel 3’s (Not 3a or XL) sure look a lot better now. They have removable backs. My pixel 1st gen was a cheap lesson. Looking for another cheap one to try alcohol on.

    Scott Graham -

    Used a hairdryer on medium heat (very warm but not burning hot), suction cup, and applied isopropyl alcohol into crack made when applying pressure. Rinse and repeat until loosened enough to get a pick in. Took many attempts. Don't try to force the pick in, as you could chip the edge of the thin glass of screen this way. The suction cup pressure and weakened adhesive should do the work. Once the pick gets it, you can work a little faster but did the same basic steps minus needing the suction cup anymore, working around the edges. Good lighting is a must to see the crack forming.

    Arthur Kay -

    I have to disagree with folks who said this is the longest step of the whole process...for me...the longest step was having to drive around and find a T4 Torx bit because this kit came with a T2 Torx which proved absolutely USELESS...

    The screen came off very easily with the liberal application of 90% Isopropyl Alcohol. Took around 15min to get the screen off and I hardly had to use picks except for the top and bottom.

    That Torx bit though... F$%^ED ME

    Jens Davidsen -

  3. RSYXSBeeSGreK1tU
    RSYXSBeeSGreK1tU
    rJRrccJKxCssQRxL
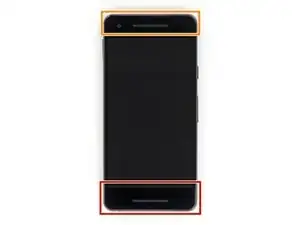
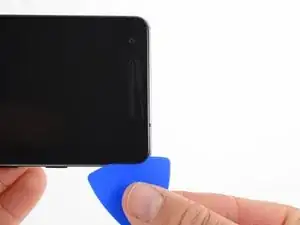
    • In den folgenden Schritten musst du besonders aufpassen, damit das Smartphone in bestimmten Bereichen keinen Schaden nimmt:

    • Setze das Plektrum nicht tiefer als 9 mm an der Unterkante des Smartphones ein. Wenn das Plektrum den gebogenen Bereich des OLED Panels berührt, kann dieses beschädigt werden.

    • In der oberen linken Ecke darfst du nur sehr knappe Schnitte führen, wenn du tiefer hineinkommst, kann die Frontkamera beschädigt werden.

    • Wenn das Öffnungswerkzeug an den Seiten des Gerätes tiefer als 1,5 mm, an der Ober- und Unterseite tiefer als 9 mm eingestzt wird, kann das Display dauerhaft beschädigt werden.

    This is inaccurate. The Pixel 2 phone’s back comes in two parts: a plastic main section and a glass back upper section. Only the glass section is required to be removed to replace the camera. Once the glass back is removed, the camera can easily be replaced without removing the motherboard, battery, or any other components. What is picture here looks like the original Google Pixel Phone.

    hunter alden -

    Firstly, I disagree with hunter’s comment above - my Pixel 2 looked identical to this when I had it opened up.

    Secondly, the whole thing about 1.5mm at the sides - literally scared the cr*p out of me when I started this as it’s such a tiny margin - but what this doesn’t say is that you can see these limits on your phone - just turn the screen on and it’s where the display ends - the digitiser starts there and is a couple of mm deep - hence the need to be careful. You can also see it (though less obviously) when you have the screen off - the jet black part at the edge is where the adhesive is - just make sure you don’t push in past there. It’s not like you can’t make very gentle contact with the digitiser when clearing the adhesive - I believe it’s just any kind of real pressure which will render the screen useless.

    Dave Watts -

    I think it would be helpful to highlight the adhesive patches around the microphone/speaker areas and that you do need to project your pick in quite a distance to break this adhesive. I think simply creating a highlighted tracing of all of the adhesive areas would be helpful and pretty simple to do. It is shown to some extent, but in my opinion it could be more clear. In all of the prefaced concerns for digging too deep, I spent extra time and effort carefully prying upward and cracked my screen and OLED rendering my phone useless. Eventually I decided to probe more deeply toward the mic/speaker and broke things loose which allowed me to remove the screen easily.

    Matt Escher -

    Yes your right. I didn't e that and I disassembly the scree from it's digitiser layer. If i would know in advanced the adhesive borders it wouldn't happened.

    Ronen Stolarski -

    I took my time but a few times I slipped in more than I wanted. No harm. The bottom is the more tricky. The adhesive around the bottom opening goes right up against the ribbon cable for the screen. I got the edges unglued with alcohol & iOpener. I then gently pried the screen away and reached in with a small brush and more alcohol. I then used a toothpick to break the last pieces of adhesive.

    John Reagan -

    Besides the adhesive at the edges, there are 2 rectangular shaped adhesive patches at the top (around the speaker) and bottom (around the microphone). These are pretty thick, but can be easily chipped away with the pick. You start to see these as you gently lift the screen upwards with the suction cup and peer inside (use a flashlight). I did not need to use a heat gun or blow dryer. Just the pick and some isopropyl alcohol.

    Hasan Akhter -

    Use isopropyl alcohol with a syringe at the top and bottom speaker to weaken the adhesive, gently pull apart (about 2mm) and use a finer piece of plastic (like a milky file plastic sheet) to cut through the adhesive at the speakers, but still do not take the screen off completely yet! After extensively reading about failed attempts to get the screen off (instances where people damaged the OLED underneath) one thing is in common: few devices have little adhesive underneath the ribbon cable as well, which people failed to notice and while separating the screen and in turn, damaged the OLED because of the pull from the ribbon cable. Thanks to having this information beforehand I found the same issue in my phone after I separated the screen (not completely) from the frame, I used a piece of finer sheet of plastic to cut the adhesive holding the ribbon cable. You will have to be extremely patient and take your time.

    A Sid -

    Word of warning - it is incredibly easy to slip and damage the ribbon cable at the back of the screen (where it folds over on the left in the image)! I accidentally did this removing the screen on my phone and it killed the touch functionality.

    Joshua -

  4. EMmUoacoYJBggeoq
    EMmUoacoYJBggeoq
    aNShcRN3lT1gILvU
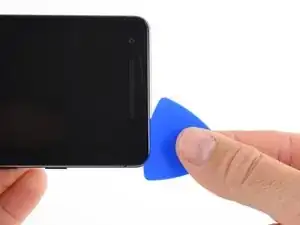
    • Verwende beim nächsten Schritt anstatt der Spitze den flachen Teil des Plektrums. Das hilft, um mit dem Plektrum nicht zu tief in das Smartphone einzudringen.

    • Ziehe das Plektrum an der rechte Seite des Smartphones nach oben, um den Displayklebstoff aufzutrennen.

    • Sei an den seitlichen Blenden besonders vorsichtig, sie sind nur 1,5 mm breit.

  5. 2ZereWB1RyT1fDqM
    2ZereWB1RyT1fDqM
    QheOxYBPND2qTmEW
    ABqclJOsvBrYbSRi
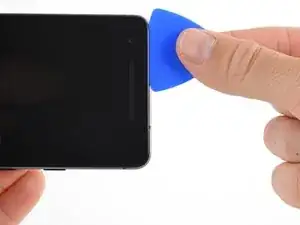
    • Ziehe nun das Plektrum um die rechte obere Ecke und weiter entlang der oberen Kante des Smartphones.

    • Der Ohrhörer-Lautsprecher am oberen Displayrand ist mit einem Gitter überdeckt. Wenn du kein Ersatzgitter hast, dann achte darauf, dass du dieses Bauteil nicht beschädigst oder verlierst.

    Leaving one pick inserted at each corner will help prevent it from sticking back.

    A Sid -

  6. CSIHJiCWeWNvyTYT
    CSIHJiCWeWNvyTYT
    6nflAeiavcU2ayr4
    WjQhcowbgPGBLQPx
    • Ziehe das Plektrum um die linke obere Ecke und weiter an der linken Kante des Smartphones nach unten.

  7. tO5kFjHUNBjm4AsA
    tO5kFjHUNBjm4AsA
    WJIBfKgTsge5j4Yi
    FSAYTUP5IIkJH4Mo
    • Ziehe nun das Plektrum weiter um die untere linke Ecke und weiter entlang der unteren Kante. Halte das Plektrum leicht schräg zum Display, um Schäden an den Ecken des OLEDs zu vermeiden.

    • Setze das Plektrum nicht tiefer als 9 mm ein, damit das OLED-Panel nicht beschädigt wird.

  8. JqE263rlSCiGMMPx
    JqE263rlSCiGMMPx
    ybiQ4Z6SU44i4TXK
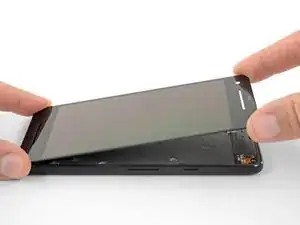
    • Setze das Plektrum nun erneut an der oberen Kante ein und heble vorsichtig das Display hoch.

    • Falls das Display sich nicht ohne Weiteres lösen lässt, musst du noch etwas mehr hebeln, damit sich der restliche Kleber auch noch löst. In der Nähe des oberen Lautsprechers ist dieser dicker als an anderen Stellen.

    • Versuche noch nicht das Display komplett vom Smartphone zu trennen, da es noch durch ein sehr empfindliches Flachbandkabel mit der Hauptplatine verbunden ist.

    This for me was by far the hardest step. What this guide fails to say is just how much adhesive you’ll encounter - mine was heaving with the stuff - so I wouldn’t attempt this fix without the rubbing alcohol, and I would be prepared to spend 30 mins on this - the images above make it look like as soon as you can get the pick in and around the whole phone the display will come off - this wasn’t true on mine, and I put a small crack in the top of my screen as I applied a little pressure to lever the top - the edges were ok, but there was so much adhesive at the top and bottom - right down and around the speaker grills - that I used scissors to cut the remaining strands as I managed to lift the screen higher enough! Don’t be shy with the rubbing alcohol, it really helps - and you really need to feel all sides loosen properly before you attempt to lever - but if you’re patient, it’ll be ok.

    Dave Watts -

    agree, way more adhesive at top and bottom than guide implies. go really slow on sides with thin plastic but top and bottom speaker needs a bigger dig

    Erik Sorensen -

  9. AWBi6gyoZBNSFCVg
    AWBi6gyoZBNSFCVg
    2YNgAiW26hAJxtF2
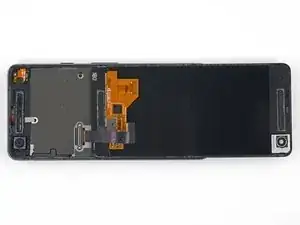
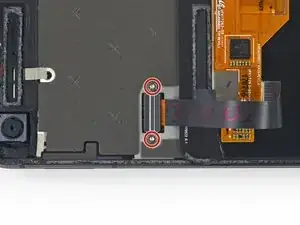
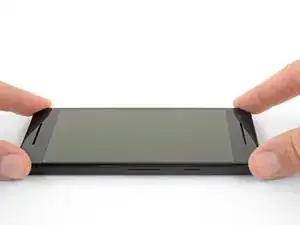
    • Lege das Display nun vorsichtig wie abgebildet auf das Rückgehäuse und achte darauf, dass das Displayflachbandkabel nicht geknickt oder abgerissen wird.

    • Entferne die zwei 4,0 mm T5 Torx-Schrauben, mit denen die Displaykabelhalterung befestigt ist.

    • Halte während der gesamten Reparatur die Schrauben gut geordnet und achte darauf, dass jede an ihren ursprünglichen Platz zurück kommt.

    I cannot imagine how much easier this project would be if they provided the bit for this screw and the others of the same size. The torx bit included in my kit is a 2mm - entirely useless here. Only other bits are Philips...also pretty useless...

    Jens Davidsen -

  10. HuntXSUMrTQOPvUT
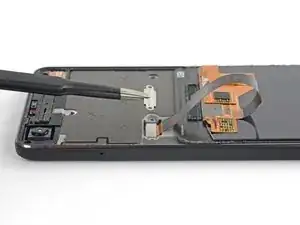
    • Entferne die Displaykabelhalterung.

  11. htMtx16FFYrRZWZB
    htMtx16FFYrRZWZB
    nbBnajSgXNRgYwgn
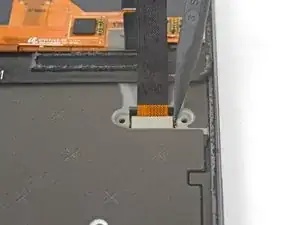
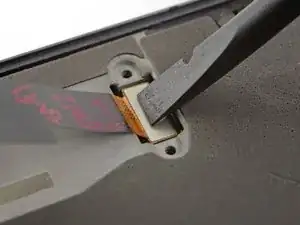
    • Verwende die Spitze eines Spudgers, um den Displaykabelstecker nach oben zu klappen und aus seinem Anschluss auf der Hauptplatine zu ziehen.

    • Vermeide es, die Hauptplatine mit der Spudgerspitze zu berühren. Die Teile um den Anschluss herum sind sehr empfindlich.

    • Um Press-fit Verbinder wie diesen wieder anzubringen, richte diesen vorsichtig aus und drücke auf einer Seite nach unten bis er einrastet. Wiederhole das Ganze auf der anderen Seite. Drücke nicht auf die Mitte, denn falls der Stecker falsch ausgerichtet ist, können sich die Stifte verbiegen und dauerhafte Schäden verursachen.

    • Sollte nach der Reperatur das Display in gewissen Bereichen nicht auf Berührungen reagieren, setze diesen Stecker erneut ein und achte darauf, dass sich kein Staub oder anderen Fremdkörper in der Buchse befinden und der Anschluss richtig einrastet.

    • Halte beim Zusammenbau an dieser Stelle an und erneuere die Klebestreifen an den Kanten des Displays.

    Wow, I think I damaged my motherboard on this step. It would be helpful if there was a warning in this step to avoid doing that! Now my pixel 2 is reduced to a cool paperweight with a static display.

    Zach Laporte -

    Yep, there’s a small surface mounted component below the connector that is super easy to dislodge from the circuit board. Shown in this YouTube video - https://www.youtube.com/watch?v=0BEpgqpI.... Unfortunately, the part is smaller than a grain of sand, so not really practical for the average fixer to put back on the board.

    jlyonsmith -

    I also knocked the tiny chip off of the board while removing the ribbon cable in this step. Use the spudger exactly how it’s shown in the photos.

    John Ware -

    A spudger is the wrong tool to remove the video connector. You cannot see where you are poking with that tool and I wound up dislodging one of the surface mounted devices hidden by the connector and ruining the phone. I also broke a ground path near the corner of the middle frame that is not mentioned in this repair procedure. Watch this YouTube before you begin disassembly: https://www.youtube.com/watch?v=yKULr67Z...

    jamesdrobinson -

    None of the tools provided in the repair kit seemed slim enough to fit the space required to pry this up. I ended up using a thin / flimsy plastic health care card to get under and pry up. It popped up with enough pressure.

    Arthur Kay -

  12. IqnjxPkUZpfKRIZt
    IqnjxPkUZpfKRIZt
    ZViI262FF1N4t6RN
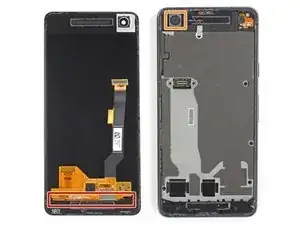
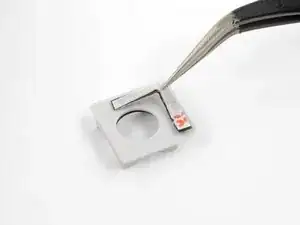
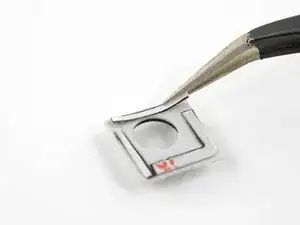
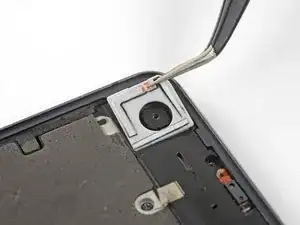
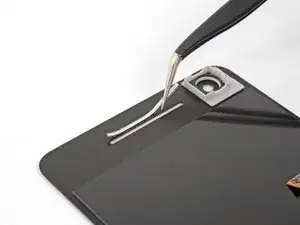
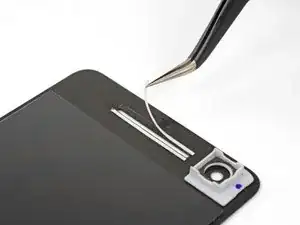
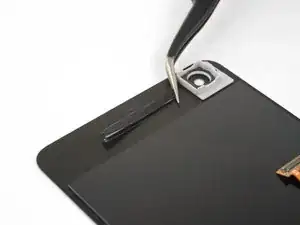
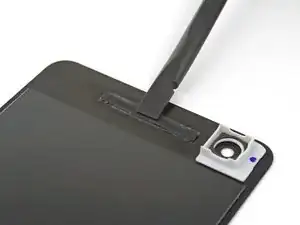
    • Möglicherweise wurde dein Ersatzdisplay nicht mit vorinstalliertem Lautsprechergittern oder der Frontkameradichtung ausgeliefert. In diesem Fall musst du diese Teile sorgfältig vom alten Display ablösen und mit Hilfe der nachfolgenden Anleitung auf das neue Display übertragen.

    • Zum Entfernen der Kamerahalterung musst du sie erst erwärmen und dann mit einer dünnen Metallklinge vom alten Display abhebeln.

    • Das Lautsprechergitter besteht aus zwei Schichten — ein Gitter aus Metallgewebe und dahinter eine dünne Lage aus Stoffgewebe. Ziehe mit einer Pinzette beide Schichten gemeinsam vom alten Display ab. Trenne sie dabei auf keinen Fall voneinander.

    • Achte darauf, dass du die Gewebe und die Dichtung vor dem Anbringen des Klebers befestigst.

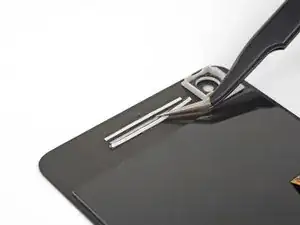
    • Schneide zwei Ecken eines vorgestanzten Klebebogens so ab, dass keine Seite länger als 12 mm ist, oder schneide vier 12 mm lange Stücke von doppelseitigem Klebeband ab.

    • Die Klebestreifen dürfen nicht breiter als 1 mm sein.

    • Bringe die Klebestreifen an Kanten der flachen Seite der Frontkamerahalterung an. Wenn du fertig bist, sollten an allen vier Kanten der Kameraöffnung Klebestreifen sein.

    • Drücke den Kleber vorsichtig mit einem Finger oder einem Spudger fest.

  13. 4VymQDCpFCGlhslL
    4VymQDCpFCGlhslL
    EdeG4gPKiQ5JiYsY
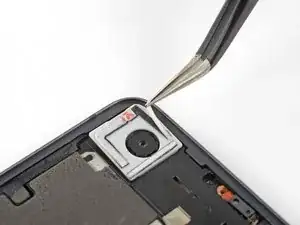
    • Setze die Kamerahalterung in ihren Schlitz um die Frontkamera ein.

    • Achte darauf, dass die abgerundete Ecke der Halterung zur oberen linken Ecke des Smartphones zeigt. Wenn die Halterung nicht dicht an der Kamera sitzt, ist sie nicht richtig eingepasst.

    • Ziehe die weiße Schutzfolie von den Klebestreifen ab.

  14. 1YKieaJ2DokwQ6OO
    • Verbinde den Displaykabelstecker des neuen Displays mit dem flachen Ende des Spudgers oder einem Finger.

    • Um Press-fit Verbinder wie diesen hier einzustecken, musst du erst eine Seite sorgfältig ausrichten und nach unten drücken, bis er einrastet. Wiederhole das Ganze für die andere Seite. Drücke nicht in der Mitte nach unten. Wenn die Kontakte nicht gut aufgesetzt sind, können sie sich verbiegen und dauerhaft beschädigt werden.

  15. IN514G6DbxFqMXIl
    IN514G6DbxFqMXIl
    mOA3NCgaiN3uqYfU
    • In diesem Schritt wirst du das neue Display zeitweilig einbauen, damit es mit der Halterung der Frontkamera korrekt ausgerichtet wird, wenn du die Halterung am Display anbringst.

    • Achte darauf, dass keinerlei Kleberreste am Display sind, bevor du mit diesem Schritt beginnst. Du darfst das Smartphone jetzt noch nicht zukleben.

    • Richte die Unterkante des neuen Displays sorgfältig an der Unterkante des Smartphonegehäuses aus.

    • Setze zuerst das Display mit der Unterkante in das Gehäuse ab und klappe es langsam nach unten, wobei du auf die richtige Passung achten musst.

    • Setze das Display in das Gehäuse hinein und drücke an der Öffnung für die Frontkamera nach unten, so dass du sicher bist, dass die Halterung am Display festklebt.

    • Hebe das Display wieder vom Smartphone weg und überprüfe, ob die Kamerahalterung wirklich am Display festklebt.

    • Trenne das Displaykabel ab.

    • Beim ersten Start nach der Reparatur wird das Display eine Kalibriersequenz durchlaufen. Berühre es dabei nicht, dies könnte dazu führen, dass der Touchscreen nicht richtig kalibriert ist und schlecht funktioniert.

  16. dnF5tfYXpbQBC4T2
    dnF5tfYXpbQBC4T2
    LMpWKB4sPjnMsfOc
    e3OJgsh2Oy2NLUIX
    • Schneide ein etwa 3 cm langes Stück von 1 mm breitem doppelseitigen Klebeband ab.

    • Lege den Klebestreifen an der oberen Kante des Ohrhörer-Lautsprechers in deinem neuen Display entlang, so dass er mittig über dem Schlitz ist und die Oberkante berührt.

    • Der Klebestreifen muss so nahe wie möglich ohne hineinzuragen an der Kante des Schlitzes sein.

    • Drücke den Klebestreifen sorgsam mit dem Finger oder einem Spudger fest.

    • Befestige mit der gleichen Methode den zweiten gleichartigen Klebestreifen an der Unterkante der schlitzförmigen Lautsprecheröffnung.

    • Ziehe die weiße Schutzfolie von den beiden Klebestreifen ab.

  17. SgMqRqhpiCwYKECb
    • Setze das Lautsprechergitter lose in seinen Schlitz ein, so dass die abgerundete Seite im Schlitz sitzt und die flache Seite vom Display weg zeigt.

    • Achte darauf, dass das Gitter mittig und richtig ausgerichtet im Schlitz drin sitzt, bevor du es nach unten gegen den Kleber andrückst.

  18. GiBgINAdqqUrFnKf
    • Drücke die Kanten des Lautsprechergitters mit dem flachen Ende eines Spudgers oder deinem Finger gegen die Klebestreifen herunter.

    • Wiederhole die vorigen Schritte für das untere Lautsprechergitter.

    • Beim ersten Start nach der Reparatur wird das Display eine Kalibriersequenz durchlaufen. Berühre es dabei nicht, dies könnte dazu führen, dass der Touchscreen nicht richtig kalibriert ist und schlecht funktioniert.

Abschluss

Vergleiche dein neues Ersatzteil mit dem originalen Teil. Du musst eventuell Komponenten übertragen oder vor dem Einbau Schutzklebefolien vom neuen Teil abziehen.

Um dein Gerät wieder zusammenzubauen, folge dieser Anleitung in umgekehrter Reihenfolge.

Entsorge deinen Elektromüll sachgerecht.

Hat die Reparatur nicht ganz geklappt? In unserem Forum findest du Hilfe bei der Fehlersuche.

Adam O'Camb

Mitglied seit: 11/04/15

178849 Reputation

17 Kommentare

I removed my screen to change the battery but unfortunately I wasn’t careful enough and nicked the display on one of the corners resulting in a dead screen now.

I can replace the screen np, but I was wondering, I should be able to still connect my phone to my PC to check it is still working right? Because I have it connected now but there seems to be no power at all and my phone isn’t connecting to my PC to do a full backup. I have double checked all connections and held the power button in to try start it up or will it not start up if the screen is broken?

Leon Cope -

Have you gotten any further? I was doing a battery replacement and while removing the screen it cracked. Since I didn’t have a spare screen, I reassembled the phone with the cracked screen and saw some flashes of light but was dark. Upon attaching a replacement screen I get nothing on screen but can feel the vibration of the phone restarting. Tried a second replacement screen but no different.

Erik Karlin -

I needed to back up my files and pictures from my Pixel 2 to my PC with a dead screen just yesterday. I used the “squeeze” feature and asked the Google assistant to “turn on talkback.” This allows you to blindly navigate the screen (providing the touch functions still work). You can then use this feature combined with the Google assistant and fingerprint reader to open the navigation bar and change the PC connection from “charge only” to PTP. This will allow you to transfer your files. Hope this helps.

Sarah J. -

I recommend using a playing card instead of the plastic guitar pick to cut the adhesive once you get the side pried up a bit. It took just a moment for my hand to slip and the pick went too far in and chipped the corner of the OLED display. I also was trying to avoid using heat, but using even just a little of the low setting on my Harbor Freight heat gun really helped soften the adhesive up.

Chase Nachtmann -

This sounds like a great idea! I just put a pack of old playing cards in my repair kit. I destroyed my OLED display with a pick too. Hopefully next time I remember to use the playing cards and don’t mess this up.

Gabriel Staples -

I have replaced my screen with a new one but now the touch screen function doesn’t work. I can view the screen just can’t tap or select anything. does anyone have any advice? I have already detached and reattached the display cable connector but I’m still having the same issue.

Edward Aboagye -

I’m having the same issue. Did you find a fix?

Ryan Moeggenberg -

Try doing a hard reset. On my screen once I reset it the touch started to work.
Drew Busmire -

I replaced both front and back screens and the rear lens cover on my Pixel 2.

Pretty easy going once the glass is removed.

I highly suggest buying the repair kit and not using a guitar pick unless you’re at least a semi-pro at this. Guitar picks come in an array of different thicknesses and some edges are quite sharp .

Thanks !

Genevieve Hewitt -

Any hints for applying the tesa tape around the edge of the phone without any folds? This seems like you only get one shot at it. How hard do you have to press the screen in place, assuming that’s the last step? Does it click/snap into place? It seems like there are some steps that are implied after Step 18, would be nice to know what those are.

Douglas Leenhouts -

No click or snap. The screen should just fit in perfectly, resting on the adhesive. It’s hard to not get any folds in the adhesive, I failed at this. In the end, I used a razor to cut out the folds and made all the adhesive flat again.

Alex Lawson -

My replacement screen came with a blue plastic on the back, which I removed. However, there was also a black sticker underneath that, which really wanted to come off with the blue piece. I couldn’t tell if the black film/sticker should stay on or if it should be removed. The original didn’t seem to have that, but there were other non-insignificant differences between the two which made me not really trust that comparison as an indication of what I should do.

I left it on in the end, but the screen doesn’t really want to sit down flush. I’m wondering if this thin film is part of the problem since every tenth of a millimeter matters with these things.

Raquel Smith -

I needed to remove my screen to replace the camera module (Common Pixel 2 camera problem which was solved by replacing the camera module) and I did not heed the caution warnings as well as I thought I did. BE VERY CAREFUL. These screens are damaged very very easier. Do not stick the pick in too far. Perhaps use playing cards as some youtube videos show. I know it’s a pain but USE A HAIRDRYER or other heat source, it softens the screen and speaker adehsive and makes things much easier and safer. Also, watch some youtube teardown videos. The proper tools from iFixit will help you a bunch. Don’t skimp on the tools like I did the first time around (regrets). All in all this job isn’t that hard. You just need to take your time and get it right.

Alex Lawson -

I totally agree! Destroyed my OLED screen 10 minutes into the repair as I tried to remove the screen so I could replace the battery. I have now bought ~$100 of tools from iFixit (got them on Amazon for faster shipping) and hope to get this right. The iOpener heating tool looks REALLY useful!—much better than a heat gun, as it uses conduction instead of convection, and can target just where you want to apply the heat!

Gabriel Staples -

Question.

Ordered a full kit, screen and OLED display. Removed the old screen and oled easy. Plugged my new oled panel in and its just pixelated, like old CRTV’s. Is the screen dead on arrival? I was very careful placing the new oled panel in the phone, careful to align the pins on the connecter and it went in very easy. Should I contact ifixit for another oled panel?

Christopher Carson -

Same thing that happened to Christopher Carson happened to me. New OLED display is pixelated. I’ve worked with these delicate connectors in the past and I was very careful (e.g. discharged static). Appears to be damaged in some way. Not sure I would recommend this repair on such an old device at this time. Not worth the gamble.

ndipatri -

FYI: I have a Google Pixel 2... not 2XL...

Does the phone have be powered off before removing the digitizer screen? Its not mentioned in this article...


Will the phone be damaged if the power is still on when disconnecting the broken screen?

Alex -