Einleitung

Ist die Akkulaufzeit der Box geschrumpft? Scheint der Akku nicht zu laden? Eine fehlerhafte Batterie ist möglicherweise die Ursache für diese Symptome. Wenn der Akku schon oft aufgeladen worden ist, hält er weniger Ladung.

  1. TPdTjBXgaNNyAUQE
    TPdTjBXgaNNyAUQE
    uyxjyBvlQ5EvE4JM
    SXsnMdYGMSiQt6TY
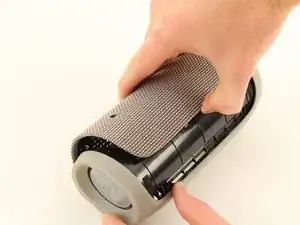
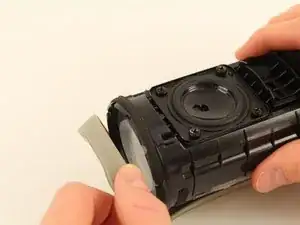
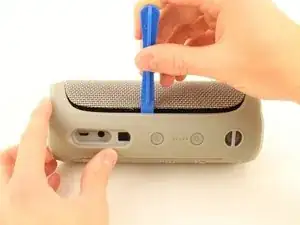
    • Führe das Öffnungswerkzeug in den Spalt zwischen der Abdeckung und dem Gummiboden ein. Achte darauf das die Box so steht, das die Akku-LED's links neben dem An/Aus Knopf sind (wie auf dem Bild).

    • Heble die Abdeckung ab. Beginne an der Seite, wo nicht die Lautstärkeregler sind.

    • Beim Abnehmen der Abdeckung erzeugen die sechs Clips (drei entlang jeder Seite des Gummirückens), mit denen die Abdeckung am Lautsprecher befestigt ist, Schnappgeräusche.

    • Heble sehr vorsichtig, damit die Clips nicht beschädigt werden.

    • Ziehe die Abdeckung mit den Daumen ab.

    Important suggested edit to these instructions - make sure to pry off clips/ridges from BOTH sides before attempting removal of the cover.

    I interpreted these instructions as saying you only needed to pry clips from one side - then peel off cover. Doing this broke a clip from the other side. Bummer. I'd like others to avoid that.

    kevmuldoon13 -

    If you do break a clip - save it. They are relatively easy to glue back into the cover.

    kevmuldoon13 -

    My Flip4 had a single long clip on the non-button side that ran the entire length of the rubber spine. The other side (with play/ vol buttons) had three seperate clips (middle and both sides) as mentioned above.

    takentrashout -

    What if my speaker battery dies very fast and makes weird crackling noise, is it counted as faulty battery?

    Jayden Koh -

    Yes. I first thought one of the drivers was defective.

    Paul Sommer -

    What was the fix in the end ?

    Jack Mulcahy -

    I used the flared edge of a metal measuring spoon handle since I didn’t have an opening tool. Worked great! Replacement battery from iFixit is on order. Thanks for the guide!

    Greg -

    My battery was glued. Tried it anyway to remove. Battery exploded!!!!

    Don't go on if the battery is glued.

    darthvader007 -

  2. MqSuoCcPNBeHtZpb
    MqSuoCcPNBeHtZpb
    bRHK1IRZthrIHwUj
    YFp1hjI2RBYUSP5B
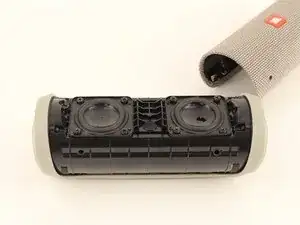
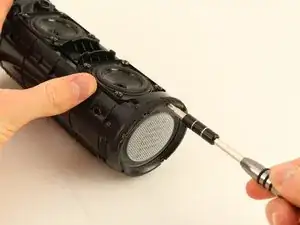
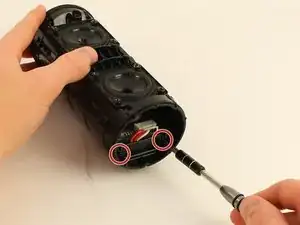
    • Entferne die vier 13mm JIS #0 Schrauben, mit denen die Gummiränder an den beiden Seiten befestigt sind.

    • Löse mit dem Öffnungswerkzeug die Clips, die den mittleren Teil des Gummirückens halten.

    • Heble einen Gummirand mit den Daumen weg, bis er sich löst. (Wie auf dem Bild).

    • Das Abnehmen der Rückseite kann etwas Fingerspitzengefühl erfordern.

    • Die Lautsprecher sind starke Magnete. Halte sie von anderen empfindlichen Elektronikgeräten fern.

    Suggested Edit : Be careful when removing the screws that they don't get attracted to the speaker (magnet). They can scratch the speaker.

    kevmuldoon13 -

    Note : screws don't need to be removed from their “channel” (it’s quite difficult). Just unscrew fully and leave in channel.

    kevmuldoon13 -

    Note or precaution: Place a piece of cardboard over the speaker or use a plastic/rubber/nonmetalic handled screwdriver when loosening/removing the 13 mm screws. The speaker magnets are so powerful that the end of my metal jewelers phillips screwdriver was pulled into the speaker, tearing the plastic/rubber cone. I destroyed two speakers in the process of replacing the battery. Had to buy the speakers from JBL ($16 each).

    Clark Brown -

    The rubber spine was fixed with glue strips.

    Jaider -

    I have 2 Flip 4's bought approx. a year apart. The older speaker was exactly as described here. The newer speaker does not have the 5 end screws, instead it has a twist to lock end plate. Make sure the top screws that secured the rubber end are removed, as these will prevent end cap twisting. I used rubber gloves to get a grip and twist end cap counter-clockwise to unlock. I found that if you grip end cap too tight it makes it even harder to twist off. Someone may find a better solution, like prising the tags around circumference, but be warned these look flimsy.

    Phil -

    Great guide. Only problem is that the battery on mine was in a neoprene sheath and had swollen. It was a bit of a problem to get out. There didn’t seem to be room to fit something to push it out without damaging wires or the motherboard. At the risk of a fire, I worked it back and forth and pulled with a pair of needle nose pliers. Yes there were sparks and some smoke. I did it outside and knew I was risking the whole thing catching on fire. Luckily it went ok.

    Q Switch -

    Great guide! I have a model with the twist-off caps (not 5 screws) with helpful, though subtle, lock/unlock icons on the plastic. Only other problem was replacing the white neoprene battery retainer cover (2 screws). One screw slipped off my screwdriver and fell into the unit - probably stuck to a speaker magnet now. But it doesn't seem to be affecting the sound. iFixit is the best!!

    Jen Morris -

  3. CELaISyrgtXGc1iH
    CELaISyrgtXGc1iH
    UG3SwRKCBTR4uBcT
    CPaJ5d5YWaVrrGPo
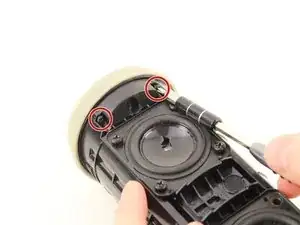
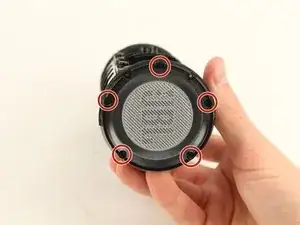
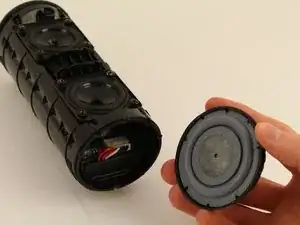
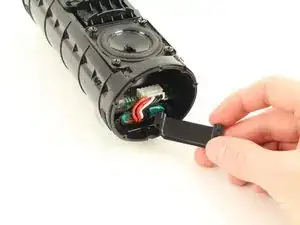
    • Entferne die fünf 9mm Phillips #1 Schrauben von der Endkappe gegenüber dem USB-Anschluss.

    • Nimm die Endkappe mit den Händen ab.

    The end cap has some kind of adhesive on it. I’m a strong guy and couldn't pull it off. Sliding a plastic pry tool around the edge helped break the adhesive and make it removable.

    kevmuldoon13 -

    You helped me a Lot!! There is som versions of these speakers that you need to Twist It a little bit before remove it but wasnt my case… thank you Very much!!

    Luis Frederico -

    You have to possible sides, chose the one with an “R“ on it. In my version there are no 5 screws. Just lever the endcap lose to remove it.

    Ste fan -

    In my version there are also screws. The end cap must be rotated instead to remove it.

    Jaider -

    There were no screws on mine. It twisted counter-clockwise 1/8 turn then pulled off easily.

    cbehmer -

    Mine also had no screws and instead the ends just twist off. It seems that the JBL flip 4 internals have changed quite a bit as to how they are put together since this guide was written.

    Melinda Rabenstein -

  4. ZoPbBBMVyqKZG5kS
    ZoPbBBMVyqKZG5kS
    kTCZjgoOwdFpfNOd
    vDYjEkV3hClJWffO
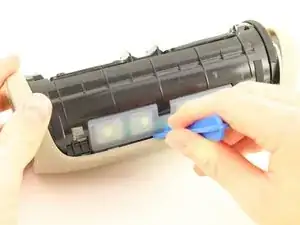
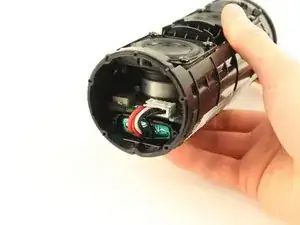
    • Entferne die zwei 11mm Kreuzschlitzschrauben #1 Schrauben am Akkufachdeckel.

    • Ziehe den Akkufachdeckel mit den Händen ab.

    Take care when reassembling: Make sure the cable is tucked under the cover properly and as far as possible - if it sticks out, it can block the movement of the bass reflex thingy and create a rattling sound.

    Benjamin -

  5. VSeG5DfyOKMkNdZm
    VSeG5DfyOKMkNdZm
    nRQPLcO3G2TBy3PK
    cZvluumtOYDERBTA
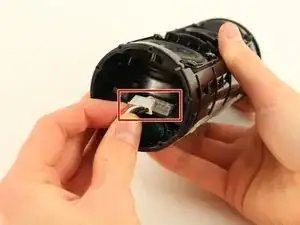
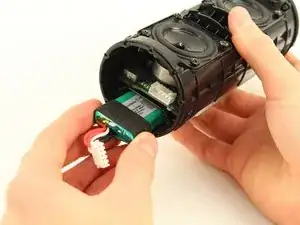
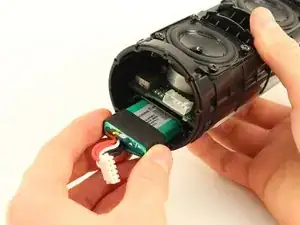
    • Entferne mit den Händen den großen weißen Stecker, der die Akkukabel an der Hauptplatine anschließt.

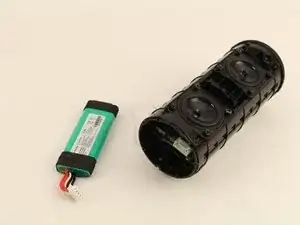
    • Ziehe den Akku mit den Händen heraus.

    • Wenn der Akku aufgebläht ist, kannst du ihn vielleicht nicht einfach mit den Händen rausziehen, du könntest die Kabel und die Ladeplatine abreissen.

    • In diesem Fall kannst du versuchen, die Endkappe auf der anderen Seite abzuschrauben und den USB-Anschluss zu lösen, damit du mit einem großen Schraubendreher daran vorbeikommst. Mit diesem kannst du dann den Akku herausdrücken.

    • Der USB-Anschluss könnte festgeklebt sein und unter dem Klebeband verlaufen Flachbandkabel, achte darauf, dass du diese nicht beschädigst.

    In my case there was no way to get the Battery out this way as it was a bit bloated and thus stuck.

    By removing the cap on the other side and removing the Charging Port I was able to push it out with the thick side of my screwdriver.

    I also have a slightly other version of the body where the caps are hold by a rotation/clipping mechanism not by screws

    Richardo Otros -

    Thanks! That was in my case as well needed to complete. Pulling was not possible, pushing out was also not easy.

    Dénes Bezzegh -

    +1 to this solution!

    I was trying to remove the battery in pulling direction as much as I could to avoid touching other parts but it was impossible and I was afraid of tearing it. So I decided to try this. It was actually easier than I thought.

    This tip should definitely be part of the guide!

    Héctor Antonio Rodríguez Arias -

    +1 Thanks! Alls I needed to do was shift the USB port a little bit (by removing the four retaining screws) to make space to push the battery from behind with the back end of a marker.
    JBL Flip 4 USB Anschluss auswechseln

    Noah Silverman -

    Similar to the other comment - I agree - this step was incredibly difficult. It took me about an hour of gentle prying, wiggling, and forceful pulling to get it out. In the end, VERY cautiously using a pair of broad nosed pliers was what allowed me to pull out it.

    Bloating I'm sure does play a role - but I think the main factor is the foam wrapper around the stock battery. It makes it stick to the battery channel.

    You have to be extremely cautious when doing this step, as you don't want to rupture the battery but need to apply a considerable amount of force to get it out with not much leverage for your hands.

    kevmuldoon13 -

    As mentioned above, the battery is HARD to remove.

    You also need to be very careful to not tear or puncture the battery, as Lithium Ion can have a violent chemical reaction when it mixes with air (Google “Galaxy Note 7 Explosion” to see what I mean!) WEAR EYE PROTECTION at the very least.

    I don’t recommend removing the other side cover and charge port to push the battery out with a screwdriver. Danger!!

    What worked for me was first I inserted my this screwdriver down one side of the battery.

    This pushes the battery all the way to one side of it’s little compartment.

    Then I sprayed some WD-40 on the side after removing my screw driver.

    Then I switched my screw driver to the other side and repeated with the WD-40 on that side.

    Finally, I clamped the wires in a vise and gently pulled while wiggling the batter back and forth in it’s little compartment.

    Still, it took maybe 7mins of carefully pulling while wiggling to finally get it out.

    The wires were destroyed but who cares. The point of removing the battery is to replace it anyway.

    takentrashout -

    Thank you!!! Your WD-40 idea made this work. What a pain in the ass but I got it!

    James Egan -

    Mine was really bloated and stuck so I also had to push it out from the other side. You have to disconnect the first connector as you look down the tube from the charging port. Then take out 4 screws from the charging port and pull it out toward the exterior as much as you can (there is still another connector on it). That will give you enough room to snake in a long screw driver beside the ribbon cable and push the battery. Be careful around the ribbon cable!

    Flaviu Ciobanu -

    Can confirm, it’s the hardest part.

    Push from the other side +WD40 was the solution.

    Thanks guys!!

    Juan José D'Ambrosio -

    At the first try i couldn’t move the battery - totally stuck.

    Next day i bought a can of WD-40. After adding some drops an waiting for a couple of minutes the battery was pushable from behind (remove the charging port). ;-)

    Tammo Meyer -

    Mine was also bloated i had to take out the charging port, and start pushing it from behind until it got out, you have to be really careful since it is a lithium battery and if you pierce it there is a risk of explosion. Great step by step guide!

    Melvin Ulerio -

    Same “stuck” problem here too.. WD 40, patience and a Card helped… after ALL, I put some felt around the New battery to prevent vibration noise. Take a look: https://photos.app.goo.gl/BH5wGmBpQXRW7g...

    Luis Frederico -

    Since the Flip 5 have a 4800mAh cap, can I change the battery capacity of the speaker from the current 3000mAh?

    Randl Manigsaca -

    Didn’t work at all! The contacts came off, and the battery is still stuck. Have throw the whole thing away. Thanks!

    Mr. Caravaccio -

    Dommage d'avoir jeté.

    Frédéric ORAIN -

    J’ai réussi à extirper la pile de son logement grâce au truc du wd-40 et en la poussant par l’extrémité du port de recharge. Heureusement car en tirant sur les fils, je n’ai réussi qu’à les arracher.

    benoitbensimard -

    y donde consigo una batería nueva?

    solri

    jordy -

    Another stuck, bloated battery. Using an eyedropper to add a few drops of isopropyl alcohol around the sides seemed to somewhat dissolve the sticky rubbery foam tape, but wasn’t enough to free the battery from the front. In the end I removed the charging port and used a pair of pencils (blunt eraser side toward the battery) to get enough reach and grip to force the battery out from the rear with firm pushing.

    Jason Gerecke -

    Agree with other commenters. Remove the other end cap, remove 4 screws around charging port, remove first cable from charging port and kind of pull the charging port out of the body a little bit to give yourself some room to see the battery behind (be careful because there are two more cables connected). Apply a few drops of oil around the battery and wiggle the battery back and forth a few times. Use the eraser end of a pencil (nothing sharp like a screwdriver, if you pierce the battery it may catch on fire) to push the battery out from the back side, being careful to avoid the ribbon cables. You may have to push pretty hard. Use a paper towel to clean up the oil before installing the new battery.

    Kyle Winfield -

    apparently I have been lucky that my battery didn’t explode! The battery was stuck and I used a tiny flat spatula with some vinegar to get rid of the sticky black material around the battery and then a corkscrew into the battery and took it out as I open my favourite wine! Worked best for me; however, I don’t suggest doing it if there is a risk of explosion!

    Mehran vafaee -

    How to play JBL without battery as its batter is not available market or battery is very expensive

    shobhitjain664 -

    Mine was bloated too, but it was enough to remove the other end cap and push the battery out with a screwdriver.

    Jaider -

    Leider läßt sich der Akku nicht so leicht hinausziehen wie erwartet. Er ist mit dem Gehäuse verklebt.

    Thumm78 -

    guys, as mentioned above, be very careful! my battery kinda exploded while pushing with screwdriver (stupid idea) luckily just a little smoke/steam came out, finally i got it done but please do not use sharp tools at all. good luck!

    p.jiranek -

    The pencil and “triflo” did the trick. I removed the other end and, careful of the ribbon cable, put the pencil in and used a small hammer to tap the battery free!

    Paul -

    No joy. Tried for one hour but could not move the battery by even a mm. Nicely done, JBL. Next speaker is another brand.

    Sebastian Bernhardt -

    You have to use a fair bit of force. Just make sure you're using a blunt object that spreads the force as much as possible and be careful of the ribbon cable

    Kiraely Adam -

    I had to put the blunt object and flipped it around and tap it against my table

    Kiraely Adam -

    Another thing I don’t see people mentioning is that when you are putting the screws back on the end caps make sure they are as tight as possible. At first mine were loose and cause a vibration/muddy sounding bass.

    Dylan Ceronio -

    It was really hard to get the Original Battery out,. pushing in a tiny Screwdriver on one side of the battery and spraying WD-40 in the “hole” you created definetly helps. If you repeat the process on the other side aswell it is even easier to remove the Battery. Still stuck? Try ripping off the Original connector, then youre left with a litte metal piece sticking out of your battery, you can grab onto that with big pliers and pull the battery out. I wouldn't recommend trying to push from the other side and removing the Charging port since i almost ripped my cables out of the connector and you can pierce the battery and set your Flip 4 on fire

    GLHF

    Tanne 55 -

    Der Akku geht sowas von schwer zu wechseln da er im Gehäuse verklebt ist. Am besten kann man ihn heraus bekommen wenn man ihn mit einem Korkenzieher heraus zieht

    Tanja Schmidt -

    Wie geht das denn? Bloß nicht anstechen!

    VauWeh -

    Another vote here for WD-40 and pushing from the other side. I think my battery was bloated too - the aftermarket one was so much slimmer.

    Also, for the new battery, it was so much slimmer than the compartment that I added some felt pads on the speaker side to make it fit snugly, decouple from the speaker and avoid rattling or vibrating. Worked well.

    Benjamin -

    Ich hatte natürlich dasselbe Problem! Der Akku war ca. auf das Doppelte angeschwollen. Danke für den Tip mit WD40! Bei mir war es Ballistol, es geht jedes Kriechöl. Bei meinem Austauschakku war ein Toolset dabei incl. einem Blechstreifen. Der ist stabil genug um ihn oben und unten zwischen Akku und Gehäuse zu schieben, damit das Kriechöl dazwischen eindringen kann. Damit ließ er sich dann leicht herausziehen.

    Zur Sicherheit hier (nochmal):

    Den Akku niemals an/durchstechen, schon gar nicht mit einem Korkenzieher! Sicherheits/Schutzbrille tragen (auch wenn es komisch aussieht).

    Vor dem Zusammenbau überschüssiges Öl entfernen, sonst kriecht es u.U. in die Elektronik oder Lautsprecher.

    Apropos Lautsprecher: bei der ganzen Aktion liegen die Lautsprechermembranen offen! Die sind recht empfindlich und dürfen nicht beschädigt werden (irgendwie logisch), wäre schade.

    Wäre schön, wenn beim Austauschakku ein Satz neue Schrauben dabei gewesen wäre. Bei mir waren 3 Schrauben nicht wieder verwendbar, weil Kreuznut überdreht.

    christian karstens -

    My speaker has the plugs on the other end glued in place so I can’t get the charging port out and the battery feels like it’s practically glued in. Almost no wiggling possible and the cables to the battery that you pull on to get it out have pretty much pulled off of the battery itself. Not really sure how I’m going to get this bad boy out now. Just be aware that this is likely MUCH harder than these instructions make it seem.

    Melinda Rabenstein -

    Wenn die Gefahr besteht, dass der Akku beim Ausbau beschädigt werden könnte und infolgedessen in Brand gerät, kann man doch vorher dafür sorgen, dass dieser vollständig entladen ist. Also spielen bis Autoabschaltung (die geschieht bei Erreichen der Mindestentladespannung. Diese ist nicht gleich Null und die Zellen haben immer noch Spannung!) und nach Öffnen einen geeigneten Widerstand anschließen oder einen anderen Verbraucher direkt an das Akkukabel anschließen. Mehrere Male kurzzeitig kurzschließen geht dann sicher auch, wenn man dabei die Temperatur des Akkus überwacht und darauf achtet, dass dieser dabei nicht heißer als 80 °C wird. Wenn der Akku total leer ist, besteht auch praktisch keine Gefahr mehr, dass er in Brand gerät. Zu beachten ist aber der Akkuaufbau (Anzahl der Zellen, jede Zelle muss entladen sein, Voltprüfer erforderlich, jeden Anschluss testen). Das ist jetzt sicher kein Expertentipp, aber, wenn man schon unsachgemäß dran rum dengelt, dann doch bitte so sicher, wie möglich, oder?

    Ishana -

    De grosses difficultés pour sortir la batterie d'origine qui avait gonflé après 3 ans d'utilisation. Les fils se sont arrachés en tirant dessus et début de fumée et court-jus. Faut pas plaisanter avec le lithium. Obligé d'ouvrir à l'opposé de démonter le circuit et de pousser avec une tige et au marteau (en écartant une nappe) avec l'aide d'une giclée de WD40.

    Pour palier ce problème quand la nouvelle batterie sera morte, j'ai ajouté une bande de tissus sergé pour aider à l'extraction si elle venait elle aussi à gonfler.

    Voir photos ici: https://vu.fr/eAIr

    Frédéric ORAIN -

    In almost any case the battery will be bloated when it's "dead". Opening the other side and pushing the battery with a 8-10 mm screw was the solution for me. The risk of puncturing the battery is less than when pressing with a screwdriver. Be careful not to damage the ribbon cable that runs across the battery.

    JBL could have used standard-18650 cells instead - cheaper, higher capacity, and much easier to replace, but they prefer to sell us a new, incompatible (when it comes to pairing two of them) speaker. Shame on you, JBL :-(.

    Paul Sommer -

    As a commenter suggested, I used a little isopropl alcohol and a thin metal shim (actually, the tool that came with a replacement battery) to work in the alcohol between the battery and its housing. I put some alcohol on the shim and worked it down each side of the battery. I had to do this 6 or 7 times. Eventually, the adhesive on the tape loosened and I was able to wiggle the battery back and forth by the cables and pull it out using the cable. It came out quite easily at that point. I did NOT have to open the opposite end of the speaker to push. My battery was swollen as well, so that is likely the reason it was so difficult to remove. New battery is in place. Thanks for the suggestion to use alcohol.

    eepizzuti -

    den Akku kann man von der Gegenseite mit einer ca. 8 mm breiten und ca. 15 cm langen Schraube herausdrücken.

    Keine spitzen Schrauben verwenden!

    r2d2d2 -

    One way that helped me get the super fat battery out was sticking a butter knife in between the battery and plastic housing and then inserting oil. Stick it about halfway or as much as you can with moderate pressure. You then need to move the knife to the side to create a small gap of space and then you want to use oil. I used tea tree oil (the only thing I had). You then repeat this to the other side of the battery allowing oil on both sides. Allow the oil to drip to the bottom so leave your standing up so the oil can go down. You then want to open the other end of the JBL speaker so you can then stick a screwdriver or something with a flat dull end that way you don’t puncture the battery and create a fire. If you let the oil sit for long enough it will pop right out with moderate pressure. May take a couple of tries.

    Jesaiahs Macias -

Abschluss

Folge diesen Anweisungen in umgekehrter Reihenfolge, um die Box wieder zusammenzubauen.

Philip Pang

Mitglied seit: 08/10/18

1164 Reputation

47 Kommentare

Is the battery glued into the socket like the Flip 3?

Kenneth -

No it isn’t. but the black rubber around it makes it really hard to get out. try to push it from the otherside by removing the charging-port.

Be careful not to pierce the battery

Richardo Otros -

Yes with me the battery was glued

Diter Freeman -

Be careful and don’t do like me: my old battery was bloated, so I had to push from the other side, but when doing so, I ripped the ribbon cable from the power button… now trying to find a replacement cable

jmbarroso -

Did you find the cable of the power button?

mohamed da -

I bought a 13pin cable for the buttons from here, but make sure it's the same number of pins for your cable as well: FFC/FPC Flat Flex Cable 13Pin 23Pin 33Pin 43Pin 53Pin Same Side 0.5mm Pitch AWM VW 1 20624 20798 80C 60V Length 15cm 5PCS

Afthrast -

très bon tutoriel, toute l’opération réussie à un bémol prêt, ma batterie aurait chauffé (?) et demeure inextricable de son logement soit elle a gonflé sous l’effet de la surchauffe, soit la bande noire en caoutchouc des extrémités de la batterie ont fondu.

Philippe -

Va voir le truc du WD-40 dans les commentaires de l’étape 5, c’est comme ça que j’en suis venu à bout.

benoitbensimard -

Am I correct to assume that the speaker will no longer be water proof after performing this? or would it still be able to keep the water out even after the repair?
valenzonap -

Step 3 seems to be outdated, apparently in newer models the caps with the membranes can be twisted off, no more screws.

Other than that, thanks for the great tutorial! I too encountered the removal problems with the battery (which was on top of that somewhat bloated).

Philipp Wagner -

Yep, the new models only have two screws inside the body that connect the caps and the outer shell.

Two other points to consider, the screws are absolute trash so it is VERY easy to strip them out. It’s almost easier to take the speakers out by unscrewing them (no need to disconnect them, just pull them out and to the side) so you can get a straight shot at the screws. The other thing is that the new caps can also be quite hard to twist back on. Rather than break your wrists, the body or the caps by wrenching them on, apply a small amount of lubricant like evaporating silicone to the little clasps inside the cap rings. The caps will twist on easily from there

Ian Gun -

This was an excellent tutorial, but should be amended to note that, if the battery is swollen, you can remove the end cap from the other end, remove the USB port (carefully) , and push the battery out from the other side, instead of trying to pull it out.

Joshua Rector -

Achtung!

Bei mir war der Accu mit dem Gehäuse verklebt, was ein tausch durch einen neuen unmöglich macht.

Diter Freeman -

Das ging mir heute auch so. Der Akku ist dermaßen fest verklebt, was einen Austausch unmöglich macht.

Thumm78 -

Hola cuando me compra reglar jbl flip 4 battery replacement por favor que necesito que me ayuda muchas gracias

julian cruz -

Buenas noches, mi FLIP 4 luego de sonar un rato comienza a distorsionar el sonido y se apaga; será la bateria defectuosa?

Freddis Rivas -

Hola Freddis,

Sí, tuve el mismo problema y es por batería

Gabriel Sibaja -

My battery was very swollen so in the end I had to completely disassemble the speaker removing everything including pcbs, antenna, speakers etc. Finally I soaked the battery in oil and after a lot of very hard pushing with a big tool on the back of the battery it came out. My battery was so swollen that it curved the roof of the battery compartment.

Carl -

Battery is likely swollen. push it out from the other side. use something blunt long and strong. I had to force it. be careful ware safety glasses. good chance you will puncture the battery. I did it outside. bad smell came out but no fire or explosion. battery was badly damaged. safety concern about how to dispose of a punctured battery. works like new again though. Good luck.

Lioneye -

There is a data/power cable wrapped around the end of the battery preventing its removal. Can’t identify where this is Connected…

Chris Vincent -

Decided to ‘go for it’. It is a short length of ribbon cable Just securing the battery.

Chris Vincent -

This cable runs from the on/off switch, under the pcb, through a very fine slot in the speaker body & around the battery. So. This cable needs to be disconnected from the on/off switch pcb then partially fed back through the slot to allow the battery to come out. DO NOT PULL THE CABLE ALL THE WAY OUT. You’ll never get it back through the slot under the battery once the new one is in place. Hope this helps you…

Chris Vincent -

WARNING - power ribbon cable.

If, like me and many others, your battery is extremely swollen then force from the bottom is the only option to remove it. That said, please take care to try and avoid the power button ribbon cable. In successfully forcing the bloated battery out of my JBL Flip 4 I have severed the ribbon cable connection and the speaker is now unusable as the power button and charging lights do not work.

Now I have a new battery and a broken speaker!

If there is a way to fix the ribbon cable I’m all ears but it looks very busted to me.

Cheers

Cal -

Yes, my friend had the exact same issue and I almost did the same mistake when trying to remove mine. It would be nice to find a place where we can buy this flat cable. We are going to try to make one using a wider flat cable.

Ildefonso Zanette -

Use a non metallic screwdriver if possible. I ruined both side speakers when the magnates grabbed hold of the screwdriver poked holes in them.

Larry Alfonso -

for those who like me ripped out the ribbon cable that connects to the power button circuit board due to a bloated battery

i highly recommend salvaging your ribbon cable! there is excess ribbon cable that is tucked under the speaker (note that the ribbon cable is attached to the center port peel back the foam adhesive and you’ll have excess ribbon cable to route)

after which use a scissors to make a fresh straight cut followed by either a straight razor or a craft knife to scrape the plastic revealing the copper wires underneath. do about 2-3mm worth or just follow the ribbon cable that is still attached to the port on the circuit board.

a small note is to reuse the blue plastic piece to shim the newly exposed cable into the port and close the tab and it should work! (at least it did for me.)

Kiraely Adam -

Kompliment an den Verfasser! Das Ganze ist “laientauglich” :-)

Super erklärt…

Thomas Wick -

Screws are very glued and it got damaged, What to do in this situation?

Gaming Tabby312. -

It is still water resistant after replacing battery???

Aashish Shrestha -

The battery was stuck inside for me, I tried going at it from the other end and one screw head stripped on me, so I just took some goo gone an dribbled it on both sides of the battery, let it sit for a few minutes, dribbled some more in and slide a butter knife in on both flat sides, and that thing came right out when I pulled on the wires. Easy peasy.

cranktango -

Bis zum öffnen der Accuabdeckung alles iO. Nur ich bekomme den Accu nicht raus, der ist total fest im Fach . Warscheinlich aufgebläht?‍♂️ Gibt’s da Tips?

Mario Achilles -

Hallo, sehr gute Anleitung. Beim entfernen des Hauptgehäuses ist mir leider ein Clip abgebrochen. Aber das lässt sich wohl noch reparieren. Bei mir saß der Akku so fest, dass man ihn mit WD-40 nicht bewegen konnte. Es schien mir wie festgeklebt. Ich habe ihn mit einem kleinen Messer vorsichtig vom den Kunststoffwänden des Akkufachs gelöst. Trotz dem kam er mit ziehen am Anschlussdraht nicht heraus. Ich musste wie bei einigen anderen hier die Abdeckung auf der anderen Seite des Flip4 öffnen und dann mit einem im 3D Drucker selbst gemachten Druckstück von hinten herautreiben- Selbst wo der der Akku halb herau war, lies er sich nicht am Anschlussdraht herausziehen. Ich musste ihn komplett heraustreiben.

Frank

frank-solingen -

I also ripped the Controls Board ribbon cable on trying to remove a bloated battery, managed to get a salvaged replacement cable from eBay. Think it is a good idea to put a smear of lithium grease over the new battery to help with removal in the future.

Walt -

You can buy the torn part on eBay

find 0.5mm pitch 13 pin flexible flat cable ffc fpc

חרמון חרמון -

It seems to me that at least one screw per group has some kind of Loctite on it. Most screws were easy to remove, but there was always one per group that was really hard to remove. It basically would strip out if you weren’t super careful. I also could not pull the battery out by hand. The battery would wiggle back and forth a little, but the wires broke off after a bit. I tried to push the battery out from the other side, but I had no luck. My end caps were on very well and also did not pull off by hand easily. One of them cracked near the screw holes in a couple of spots. I wouldn’t say they are glued down, but I think the rubber seal sticks if it hasn’t ever been removed before.

This is the second time I tried to fix a FLIP speaker with a battery replacement and the second time I failed. Super frustrating since I know this would fix the problem, but JBL makes these speakers in such a way that it is not an easy repair. This comes from a guy who has been an Electronics Repair Tech for over 20 years.

Scott Aumann -

Die Anleitung zum Öffen funktionierte bei mir bis zum Schritt 4 schnell und unproblematisch. Das Problem war - wie oben mehrfach beschrieben - den Akku rauszuziehen, da die alten Akkus meist aufgequollen und zudem gegen Wackeln mit einem Isoband umwickelt sind.

Mein Vorschlag: den Ladeanschluss mit Aufdruck "FLIP4 entfernen (4 Schrauben) und rausdrücken. Dabei lösen sich wahrscheinlich auch die 2 kleinen Stecker. Diese bekommt man später aber wieder mit einigem Gefummele wieder rein.

Dann kann man von dieser Seite die Unterseite des alten Akku sehen und mit einen Schraubenzieher oder besser mit einem Bleistiftende durch Drücken und Ziehen am Kabelanschluss diesen rausbekommen.

Der Rest ist dann einfach.

Franz Maucher -

Nederlandse vertaling:

De instructies voor het openen werkten bij mij snel en probleemloos tot stap 4. Het probleem was - zoals hierboven meerdere keren beschreven - het eruit trekken van de batterij, aangezien de oude batterijen meestal opgezwollen zijn en ook omwikkeld zijn met isolatietape om te voorkomen dat ze wiebelen.

Mijn suggestie: verwijder de laadaansluiting met de opdruk "FLIP4" (4 schroeven) en druk deze eruit. De 2 kleine pluggen zullen daarbij waarschijnlijk ook los komen. Maar je kunt ze later met wat gepruts er weer in krijgen.

Dan kun je vanaf deze kant de onderkant van de oude batterij zien en deze met een schroevendraaier of beter met het uiteinde van een potlood eruit halen door aan de kabelverbinding te drukken en eraan te trekken.

Dan is de rest makkelijk.

Toon Konings -

English translation:

The instructions for opening worked for me quickly and without any problems up to step 4. The problem was - as described several times above - pulling out the battery, since the old batteries are usually swollen and also wrapped with insulating tape to prevent them from wobbling.

My suggestion: remove the charging connection with the imprint "FLIP4" (4 screws) and press it out. The 2 small plugs will probably also come loose in the process. But you can get them back in later with some fiddling.

Then you can see the underside of the old battery from this side and get it out with a screwdriver or better with the end of a pencil by pressing and pulling on the cable connection.

Then the rest is easy.

Toon Konings -

Deutsch: Ich habe das gleiche Problem gehabt und mein Akku hat sehr geklemmt. Ich habe erst versucht an den Kabel zu ziehen bis sie Abrissen. Dann habe ich den USB Port mit den 4 Schrauben entfernt und den einen kleinen Stecker innen an der USB Buchse entfernt damit man besser mit einem Schraubendreher von hinten schieben kann. Vorher noch wie oben beschrieben mit einem kleinen Schraubendreher den Akku zur Seite geschoben und WD40 reingesprüht. Auf die andere Seite geschoben und Nochmals eingesprüht. Immer wieder den Akku nach links und Rechts geschoben bis man merkt das es leichter wird. Anschließend neben dem USB-Port mit einem dicken Schraubendreher mehr oder weniger kräftig den Akku rausdrücken. Habe dazu den FLIP4 auf den Boden gestellt um genug Druck aufzubauen. Und zu guter Letzt hat der Akku verloren und ging dann wiederum von der anderen Seite rauszuziehen .

Carsten Manns -

Super Anleitung!

Mein Flip 4 hielt nicht mehr lange durch, klang komisch nach ein paar Minuten und die Akku-Anzeige hat auch rumgesponnen.

Da mein Akku etwas aufgebläht war, musste ich von der anderen Seite mit dem Schraubendreher etwas drücken, weil sonst wohl das Kabel abgerissen wäre.

Jetzt läuft er wieder ohne Probleme :)

Spillunke -

Dcdfrrfffdggef

Shamsad Ali Ansari -

don't waste your time. I can't get the end caps back into place. they must be aligned to correct screw holes else the spine will not fit back over them. I'm up to 4 hours and still can't get spine repositioned. total waste of money. Will have to toss away speaker and replacement battery.

Jumbeen B -

does anybody know where to get a set of replacement screws?

Heinz Ullmann -

Weiß jemand woher man Ersatzschrauben (gerne als "Set") bekommt?

Ich habe die Box geöffnet weil irgendwas innen geklappert hat. Nach dem Öffnen habe ich versucht die Kabel so zu fixieren, dass diese das Geräusch nicht mehr verursachen. Es war auch für kurze Zeit weg, kam dann aber wieder genauso.

Hat jemand dieses Problem schon mal gelöst?

Danke schön :-)

does anybody know where to get a set of replacement screws?

I've tried to get rid of a rattling noise, I opened it up tried to look after the cables, the noise was gone first, but soon came back anybody encountered that?

Thanks a lot :-)

Heinz Ullmann -

Sehr gute Anleitung! Der Akku ist nicht verklebt, aber etwas aufgquollen. 1 tropfen Silikonöl und kurz warten, dann herausziehen.

Karl Marx -

I did this repair successfully. Very happy. My battery was bloated so it took significant persuading to get it out. I tried some pushing from the other side but didn't want to damage things as others have commented. So ultimately needle nose pliers to pull and a screwdriver inside to pry more room while pulling worked. I did puncture the batt... but it didn't explode into a fireball.

Someone mentioned trouble with the end caps. I made sure to mark the two screw holes on each side from step 3. It helped line them up for reassembly. I will do it again with my second flip4. Good luck. It's not impossible but definitely intermediate job.

Jason W Wines -

Definitively hard to get the battery out. it feels like its glued stuck, but actually it might not have been. WD40 is your saviour for sure. remove the usb port and press it down/out of the way to reach the back of the battery (in the middle) just spray some WD40 around the battery using a thin spraytube.. then let it soak and after that try to wiggle the battery side to side using small firm flat screwdriver. When you feel the battery is sliding more smoothly, then press with the rounded back of a thin strong pen or pencil on the back of the battery. Be carefull here of the thin flat white cable, and push it to the side first. I got the battery out with a firm push. hurray. after this it's easy to put everything back together! thanks guys for this info.

Moo Shii -