Einleitung

Diese Anleitung zeigt, wie der Sicherungsriegel im Nintendo Switch Joy-Con durch einen aus Metall, oder auch einen neuen aus Kunststoff ersetzt werden kann.

Es gibt kleine Unterschiede zwischen dem linken und dem rechten Joy-Con. Diese Anleitung passt aber für beide Joy-Cons.

  1. O1ZbPBpc2REmgUlB
    • Drehe die vier 6,3 mm Tri-Point Y00 Schrauben auf der Rückseite des Joy-Cons heraus.

  2. oQGvJu5BLwTY5OkN
    oQGvJu5BLwTY5OkN
    1YNuROiQlc21Jq2Q
    mlcGHZESLlg3ZkwP
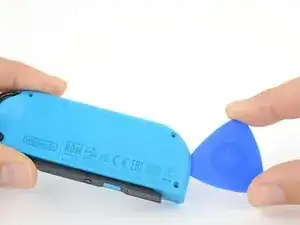
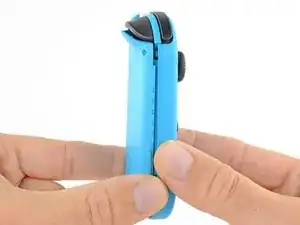
    • Setze ein Plektrum in die Naht an der Unterkante (gegenüber der L und ZL Taste) ein.

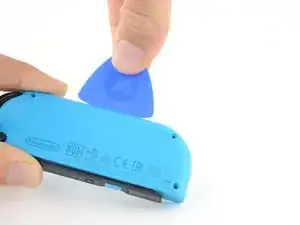
    • Schiebe das Plektrum mit der flachen Seite langsam an der Seite des Joy-Cons nach oben.

    • Achte darauf, dass das Plektrum nicht zu weit in den Joy-Con eingesetzt wird. Du könntest dadurch innere Bauteile beschädigen. Die Rückseite löst sich leicht ab, du brauchst dazu nicht viel Kraft.

  3. bIwmFjjTDWnefbWB
    bIwmFjjTDWnefbWB
    hL1IU34hedw2bBvG
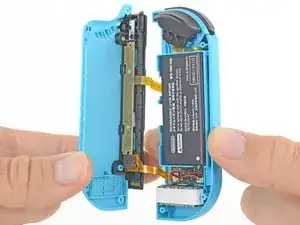
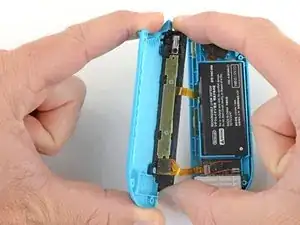
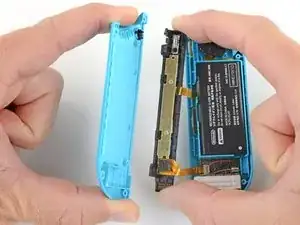
    • Halte den Joy-Con so, dass die Ladeschiene weg von dir zeigt. Klappe ihn dann wie ein Buch auf.

    • Versuche noch nicht, die Rückseite ganz zu entfernen. Die Ladeschiene ist immer noch mit zwei Kabeln angeschlossen.

  4. SGcA3fBqfcFMBgJb
    SGcA3fBqfcFMBgJb
    fAQLuUKIweTNOsxZ
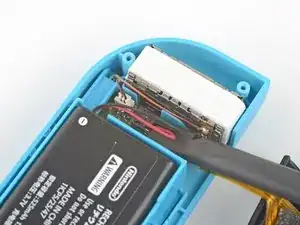
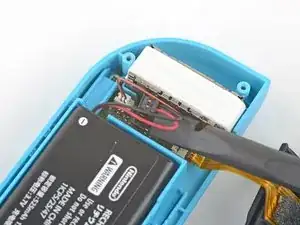
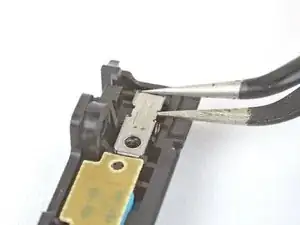
    • Heble den Akkustecker vorsichtig mit einem Spudger gerade aus seinem Anschluss auf der Hauptplatine heraus. Dadurch kann sich der Joy-Con während der Reparatur nicht versehentlich anschalten.

    • Heble den Stecker sehr behutsam hoch. Wenn er sich mit dem Spudger nicht leicht lösen lässt, dann versuche ihn ganz vorsichtig an den Kabeln aus dem Anschluss herauszuziehen.

    • Drücke den Stecker während des Zusammenbaus gerade nach unten in den Anschluss hinein, um den Akku wieder anzuschließen.

    This step is superfluous for buckle lock replacement—it only adds something to forget to reassemble.

    Jim Nugent -

  5. 3cyYvsusYkBVFglQ
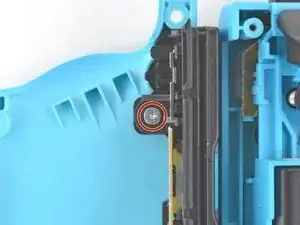
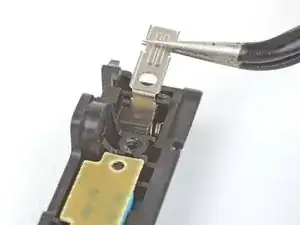
    • Drehe die einzelne 2,5 mm Kreuzschlitzschraube #00 heraus, mit der die Ladeschiene befestigt ist.

  6. 4ZnhTCwI1oARPjBq
    4ZnhTCwI1oARPjBq
    Je4P53cdQvJBmUFq
    • Ziehe die Rückseite gerade von der Ladeschiene ab und entferne sie.

    • Es kann passieren, dass die Entsicherungstaste der Ladeschiene aus der Rückseite herausfällt. Achte beim Zusammenbau darauf, dass sie wieder richtig eingesetzt ist, eine der Laschen an der Taste muss in die entsprechende Nutin der Rückseite passen.

  7. rnotNK25LBKnYG61
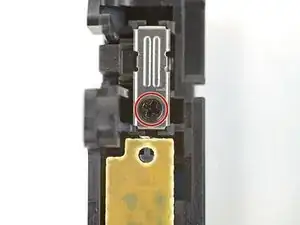
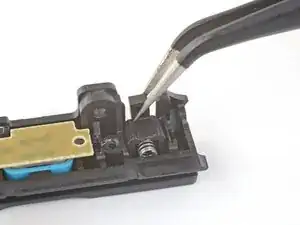
    • Drehe die einzelne Kreuzschlitzschraube #00 heraus, mit der die Halterung des Sicherungsriegels befestigt ist.

    Be sure not to over-tighten this screw on reassembly, or the button will stick. Test the button before reassembling the plastic shell.

    Andy Harris -

  8. Zt1dMbZukLPuJFs1
    Zt1dMbZukLPuJFs1
    biwRVco5tlLvTItU
    R4JOCHrCaRhZGX53
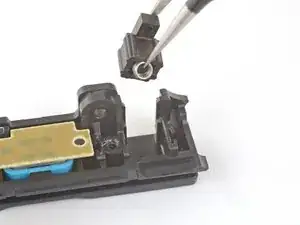
    • Nimm eine spitze Pinzette und schiebe eine der Spitzen unter den flachen Teil in der Mitte der Halter des Sicherungsriegels.

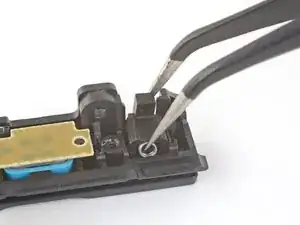
    • Ziehe die Halterung mit der Pinzette gerade von der Ladeschiene weg und entferne sie.

    This step takes some considerable force by the way.

    IkBenAnders -

    if you have trouble removing the silver bracket just pry with the tweezers then put the screwdriver under the bracket the pry and it comes of so much easier!!!

    Micah Hilbert -

  9. XKWUElv5X1kNPJiO
    XKWUElv5X1kNPJiO
    1Mw41ygiIuaSQUtS
    UaZMyW4ST54eDohW
    • Hebe den Sicherungsriegel gerade soweit leicht aus seiner Nut in der Ladeschiene heraus, bis die Feder gut mit einer Pinzette gefasst werden kann.

    • Packe den Sicherungsriegel so, dass die Pinzette an beiden Seiten des Riegels fasst und dabei die Feder im Inneren festhält.

    • Wenn du den Riegel herausziehst, kann die Feder herausspringen. Achte darauf, dass die Pinzette die Feder gut festhält.

    • Ziehe den Sicherungsriegel aus seiner Nut in der Ladeschiene heraus.

    • Achte beim Zusammenbau darauf, dass du die Feder des alten Riegels in den neuen einbaust.

    Upon reassembly of the buckle lock make sure the notch on the back is facing downwards.

    Kallon Lewallen -

    Dude, the shooting spring has to be a warning, PLEASE. I didn’t read the whole thing and it spring out once I lifted the buckle lock. I spent like 30 MINUTES finding it AND HAVING A MENTAL BREAKDOWN. I got so angry and once I found it it was AMAZING. So PLEASE AT ALL COSTS DO NOT LOSE IT PLEASE. I WAS GOING THROUGH THE STAGES OF GRIEF.

    Alexander Munoz Solis -

    ALSO be careful when screwing because I stripped the screw meaning the head of a screw has worn out from not pushing down enough and screwing it back in which ruined the screw. So BE VERY VERY CAREFUL, be sure you know everything you’re doing because if you don’t it’ll MESS you up.

    Alexander Munoz Solis -

    There used to be a photo and a procedure step showing the buckle lock orientation. Some important stuff got deleted here.

    Jim Nugent -

    Unbedingt darauf achten den richtigen Metallsicherungsriegel zu benutzen!

    Es gibt einen für den rechten Joycon und einen für den linken!

    Am besten genau mit dem alten aus Plastik vergleichen

    Peter Ullrich -

    don't tighten the metal buckle too tight. it stops the spring from working and the lock will not work

    sven coessens -

Abschluss

Um dein Gerät wieder zusammenzubauen, folge dieser Anleitung in umgekehrter Reihenfolge.

Entsorge deinen Elektromüll fachgerecht.

Die Reparatur verlief nicht wie geplant? Schaue in unser Forum, dort kannst du um Hilfe bitten.

Adam O'Camb

Mitglied seit: 11/04/15

178849 Reputation

32 Kommentare

I tried to do this carefully, but I ended up removing the side rail ribbon cables and I had to disassemble the whole thing just to try to get to the inside of these babies. However it seems I messed up, and now I could use some help here. I don't want to lose my left Joy-Con.

Francisco Q. -

It seems rather strange.. Its pretty easy to reattach. All I have is a $@$*!& ph00 + y00 that stripped the screws so I broke the cover. Technically not my fault. I have done multiple reshells.

[deleted] -

I tryed to do this but the 2nd at the bottom would not come out now my buckle is chiped

TAQI HASSAN -

You mean the screws? Break off the shell! A perfect opportunity to put some clear ones :))

[deleted] -

I bought this kit of replacement metal buckles, and they work beautifully: https://www.amazon.com/gp/product/B07BDH...

This kit comes with four buckles, two for the left Joy Con, and two for the right. If you happen to have two sets (or plan to get a second set) of Joy Cons, a whopping $9.00 will set you up right.

I did have a bit of trouble replacing the metal cover that holds the buckle in place, but that was my own stupidity as I was trying to do this repair with insufficient light. Once I shed some light on the subject and I could see what I was doing, everything went back together smooth as silk. I replaced the buckles on both of my Joy Cons, and they’re both rock solid now.

itpurchasing -

I just bent that and refitted it. Force INDEED works.

[deleted] -

i held the latch in one hand and gently pulled it out and the spring went flying! never found it again. just printed a shorter one with a pen spring.

Kobedie -

I saw a recommendation to remove the latch while holding the controller inside a zip lock bag, i thought that was pretty clever :)

Martin Refseth -

Strange.. I did both and never had such issues. I just do this trick; first I cover the area, 2nd I remove the energy by when raising at pushing slowly grabbing back if you understand. Kinda hard to explain.

[deleted] -

pretty easy solution, don’t think it’s fixed the wobbly joycon issue much but I feel safer in the knowledge that these new buckles shouldn’t wear out as easily (if at all)

thegreatcraftings -

It really shouldn’t. In my opinion, metal to metal is more prone to break, maybe the rail or the joycon, but yeah feels much sturdier. So worth it.

[deleted] -

Be careful with the small metal screw that attaches joycon shell to the black rail thingie - it’s very easy to damage the screw hole when reassembling the joycon by not properly aligning it with the shell.

Alexandr Oleynikov -

Followed this guide. Was super easy. I replaced the locks in both my joycons in under 30 minutes.

NOTE: Often the metal locks come with some tools when you order them. IN my experience these are not high quality and can damage the screws. I recommend getting ifixit tools.

Gavin McFall -

RIP my springs. IDK how you’re meant to take the latches out but I definitely didn’t do it right. Good thing Aliexpress sells replacements lol

UnicornsOnLSD -

I bought a kit of metal buckles and put them in using this guide and it worked perfectly. Thanks! :)

Alex -

If you drop your switch on the side the joycons would probably be the first thing to break… sooo by making a joycon component that makes contact with the console out of metal, wouldn’t that mean the mechanism in the console itself would break in case of a drop?

BadamAdam -

That’s almost certainly why the JoyCon latches are plastic to begin with… they’re probably engineered to give way under extraordinary circumstances.

Jim Nugent -

I can tell you from experience the joycons are sturdy enough to survive serious stresses. My granddaughter somehow managed to remove one by snapping off the mounting screws on the rails. Not easy to do, as the rails are mounted directly on the metal midframe. So I got the honor of pioneering the midframe replacement guide here.

Jerry W -

I also bought this kit of replacement metal buckles, and they work beautifully: https://www.amazon.com/dp/B08HPD3Z46/ref...

This kit comes with four buckles, two for the left Joy Con, and two for the right. If you happen to have two sets (or plan to get a second set) of Joy Cons, a whopping price will set you up right.

Ray Rivera -

So my joycon is loose, Should I buy a spring or just need to replace the buckle lock only?

yusuf afandi -

If the button still goes in and out when pressed the spring should be fine. That said, if you see a good offer that includes both it never hurts to have spares since they are very easy to lose.

David R. -

I replaced the buckles in my joycons but now my left joycon slides off more easily (without pressing the button) than before? Can someone help me with this?

Rick Houtzager -

Are you sure you’ve put the right buckle in? The buckles for each joycon are different and if you put in the wrong one, it’ll be hard to slot in but easy to remove (the opposite of what you want). It happened to me on my first repair lol

David R. -

Worked like a charm! Well, expect for that &!%& spring, which I almost lost twice. :)

Alfy B -

I was able to do this easily, and it works great! However, I did have to do it twice because the first time I put in the wrong side of buckle. For other people like me who might forget that these things are different whether left or right, I think a big disclaimer at the beginning could help, something like “Make sure you are installing the correct side of buckle for your joycon” for example. Thanks for the guide!

David R. -

Can the people who changed the original latches, to the metal ones, tell me if this repair ended up damaging the console, because it is no longer plastic? Thank you.

JELLERET -

It does not damage the console. The metal latch only interfaces with the metal bars on the side of the screen, which are very robust.

Jim Nugent -

Echoing David R’s comment; I did the exact same thing. The buckles are sided, meaning one’s for the left side and the other’s for the right. Be sure you’ve got them in the correct position before you button it all up again or like me you’ll be disassembling them again so you can swap the buckles to their proper positions. Once they were on the correct sides, the controllers latch down nicely.

Jerry W -

It should be made aware that each buckle is shaped differently for each joycon. I bought the pack thinking I could fix both my left joycons, then I realized I had to disassemble one again.

Daniel Cital -

Thank you very much! I was wondering why my joy cons was still unlatching. Turns out I inverted the buckles during the installation.

Emmanuel Marleau -

if you have trouble removing the silver bracket just pry with the tweezers then put the screwdriver under the bracket the pry and it comes of so much easier!!!

Micah Hilbert -

Don't be like me, get attention to the spring if you don't want to be directly hit in the face by it :D

Stray -