Einleitung

Es ist eine Qual, das MacBook mit der TAB Taste zu steuern. Diese Anleitung zeigt dir, wie du ein defektes Trackpad austauschen kannst.

  1. 2uMPhxrYSdfxumSQ
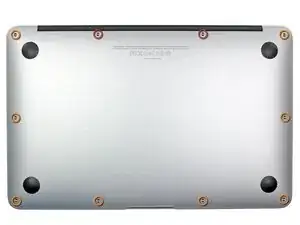
    • Schalte den Computer aus. Lege ihn auf eine weiche Oberfläche mit der Vorderseite nach unten.

    • Entferne folgende Schrauben:

    • Zwei 8mm 5-point Pentalobe Schrauben

    • Acht 2,5 mm 5-point Pentalobe Schrauben

    • Den speziellen Schraubendreher für die 5-point Pentalobe Schrauben findest du hier.

    When you say:

    Remove the following ten screws:

    Two 8 mm 5-point Pentalobe screws

    Eight 2.5 mm 5-point Pentalobe screws

    Do the 8mm & 2.5mm dimensions refer to the LENGTH of those screws, or the size of the pentalobe? That is, are there other sizes of pentalobe drivers like there are for hex, phillips and torx? When only one dimension is provided, it is usually the socket/driver size, not the screw length, maybe since the length cannot be seen when the screw is installed.

    Can I suggest that you clarify your instructions so folks are confident they are only in need of _one_ pentalobe driver?

    Nerdily yours,

    Larry (whose iPhone 4S can now get through a day without 6 recharges thanks to ifixit.com ;-)

    larryleveen -

    The 8mm and 2.5mm are the length of the screws. One pentalobe P5 screwdriver suffices for all the screws (P5 is implicitly the size of the pentalobe screw heads).

    Michael Welham -

    I sourced all the parts from ifixit, plus a magnetic project mat which I found to be very useful for organising the teardown and reassembly.

    Allen -

    The magnetic mat is

    GERARD SZAREK -

    Keep the 2.5mm tiny screws away from the MagSafe connector as they will be attracted and sucked in to the magnet.

    Frank O'Carroll -

    A tip an old bench tech taught me that has saved me many times: I put clear “Scotch” tape over the case screws as they became “free”. The tape kept them in place while I lifted the lid off, cleaned it etc.

    Michael Mee -

    Thank you for a really smart tip! I will be using that countless more times!

    Lilljedahl -

    I’m confused about internet recovery and installing MacOS. Is all of this done before placing in the new ssd card or after. I don’t have any files that I would like to safe/transfer, is all of this necessary, if I don’t do it before placing new ssd, will I still be able to instal/upgrade macOS afterwards.

    It’s an old Mac and now it won’t start or charge, I know I will have to replace battery and put new battery first and turn on Mac before doing the ssd stuff. Since it won’t effing start.

    I’m really clueless about backing up old ssd, since I don’t need any files, besides MacOS(software) ,and is that related to the ssd?

    AMG -

    The answer to your question: You need to insert your SSD into the computer before internet recovery. If you start the recovery before inserting SSD, it won’t affect the setup, you won’t damage anything. But your SSD will not be detected (as there isn’t one inserted.)

    Also, a little tip: If you bought a used SSD, go into Disk Utility and format the drive with the highest security level to permanently remove all of the previous files.

    Also a FYI: Internet Recovery will load up Mac OS X 10.9.5 Mavericks, so I would recommend making a recovery drive from a Big Sur (or desired version) through another Mac, and a USB. You can visit this support doc: https://support.apple.com/en-us/HT201372

    Hope this helps! -Dan

    danielwen -

    I got a macbook air with a damaged and swollen battery. I could remove all screws, except one 2,5 mm screw. I’m afraid it got damaged while attempting to remove it, I have no grip with the P5 pentalobe screwdriver. How can I proceed?

    Robert Hermans -

    Hi Robert!

    Try some techniques found in this stripped screw removal guide. Good luck!

    Arthur Shi -

    Hello I have a macbook air they are say they do not have parts for my laptop macbook air 11 inches 2013 mid need to replace battery which one to buy

    vensilver -

    Hello! This is the part you want—maybe we’re not able to ship it to you if you’re out of the United States. The battery in your MacBook Air should be the same for all 11” between mid-2011 to early-2015.

    Arthur Shi -

    The smaller screws went in more easily when I put back all the screws along the hinge edge first.

    Rachel Slatkin -

  2. yuZ5Ls2UHZLyfewD
    • Zwänge deine Finger zwischen Display und Gehäuseunterteil und ziehe nach oben, damit es sich vom Air löst.

  3. 5V1AATGRtjoScuEF
    5V1AATGRtjoScuEF
    XJSGQHJWPCbLQCtC
    • Setze das flache Ende eines Spudgers unter die kurzen Seiten des Akkuanschlusses und hebele ihn aus seinem Sockel auf dem Logic Board.

    • Biege das Akkukabel etwas weg vom Logic Board, damit der Verbinder nicht versehentlich wieder Kontakt zu seinem Sockel bekommt.

    I performed this on my MacBook Air (11-inch, Mid 2011), model A1370. Rather than using the spudger to un-attach the batter connector, I gripped either side with my fingers as the second photographs indicated, and gently pry/wiggled it up and out by initially pinching into the side gap with my finger nails. The reason I did it this way is that the spudger works by leverage and I was afraid to rest it against the components surrounding the connector. The photos and instructions are excellent and illustrate the maneuver perfectly.

    Allen -

    Hello there... In my case by battery exploded.... Can I still try to change it using these instructions?

    Fabio Matos -

    The instruction to lift the edges of battery connector before disconnecting is certainly not clear. In my case, the cconnector pins came off the board with the battery, requiring further costly repairs. I would suggest that this instruction be more specific and include a caution.

    Deirdre Rogan -

    It worked fine for me, but as others mentioned, you need to be careful to remove the battery connector from the motherboard connector and not accidentally remove the motherboard connector from the motherboard itself.

    Additionally, on reassembly, I found that quit a bit of pressure was needed to get the new battery's connector to snap in place. More than I was comfortable applying, but it was necessary and it worked without a problem.

    shamino -

    I just used my finger(nails), came off easily (even though i have a full iFixIt set).

    Dennis van der Pool -

  4. pBAijKIeiULMsQoN
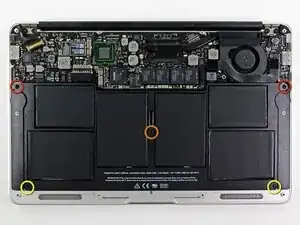
    • Folgende fünf Torx Schrauben befestigen den Akku am oberen Gehäuse. Drehe sie heraus:

    • Zwei 5,2 mm T5 Torx Schrauben

    • Eine 6 mm T5 Torx Schraube

    • Zwei 2,6 mm T5 Torx Schrauben

    In my case the screw points connecting the old battery the case had fractured or broken. The broken bits needed to be cleaned out of the case before installing the replacement battery. Didn't want any loose fragments rattling about inside.

    Allen -

  5. qCPSASReBDLIvyLQ
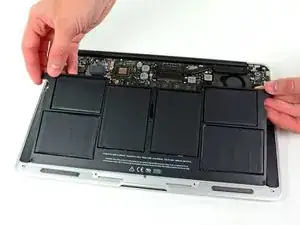
    • Wenn du am Akku arbeitest, musst du es vermeiden die sechs offenliegenden Lithium-Polymer-Zellen zu drücken oder anzufassen.

    • Hebe den Akku an der Kante in der Nähe des Logic Boards hoch und entferne ihn aus dem Gehäuse.

    • Wenn du einen neuen Akku einbaust, solltest du ihn nach dem Einbau kalibrieren:

    • Lade ihn auf 100% und lasse ihn mindestens zwei weitere Stunden am Ladegerät. Ziehe den Stecker und benutze dein MacBook normal, um den Akku zu entladen. Wenn die Ladeanzeige am Minimum ist, dann speichere ab und lasse den Laptop an, bis er von selbst ausgeht. Warte wenigstens 5 Stunden und lade dann ohne Unterbrechung auf 100% auf.

    • Wenn dir nach dem Einbau deines neuen Akkus etwas Ungewöhnliches auffällt oder Probleme auftreten, kann es sein, dass du den SMC deines MacBooks zurücksetzen musst.

    What if new battery comes with what looks like plastic around the 6 cells?

    Allison -

    I'm having trouble reconnecting the pins to the new battery cable. Any suggestions?

    Deirdre Rogan -

    The cable on my new battery needed to be massaged to reconnect with the pins. Use your old battery as an example for how the cable should sit in the empty space.

    Joe Ponce -

    In my case, the replacement battery cable was quite stiff. In order to properly connect it to the logic board, BEFORE screwing the battery into the board, I carefully bent the cable and I connected it to the board. AFTER connecting the cable, carefully move the part of the batter closest to the logic board into place, and take care of those screws first.

    Chris 1000 -

    Followed the instructions and everything went smoothly. Less than 20 minutes later everything assembled and my MacBook Air working very well.

    Thanks

    Luis Lopes -

    Two of the battery cells were “blown up” in my laptop. We simply removed it with these instructions and now it’s working again, when plugged in only, of course.

    bob -

    As with Chris 1000, the replacement battery cable is stiff. First position the battery loosely into it's slot, then align the cable connector over the pins & press gently but firmly to seat the connector. Secondly, seat the battery to line up with all of it's screw fasteners for the reassembly.

    Steve G -

    Instructions did not mention the plastic film on top of the battery. Similar to a peel away film on a new phone. But it had screws holes in it and does not peel away as easily as a phone Peels away from edge easily enough but had a little "pull" to it over the cells. For now I left it. Quick google searches did not clarify the issue. If anyone can confirm I should pull it off I'll open it up again and remove. The install is easy.

    Eric Strausser -

    I think I saw a note that said to leave it. But side-note, i'm glad to see someone replacing the battery more recently, as I just purchased myself a new macbook but my son asked if we can replace the battery and I honestly didn't even realize that it was possible for some reason. I think for the minimal cost involved and the fact that my 2011 still works flawlessly he'll enjoy it for a few more years to come as well. I hope the new ones are made as well quality wise!!

    Teresa Powell -

  6. seyUudqR1WdiAc4f
    seyUudqR1WdiAc4f
    6FkthkPJcOYbQyg2
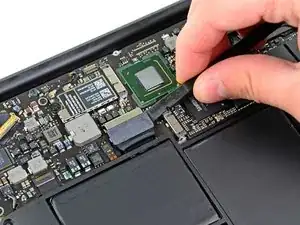
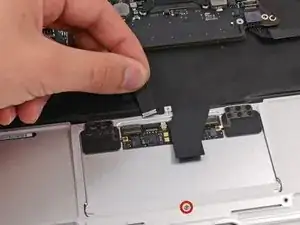
    • Klappe den Sicherungsbügel am ZIF Stecker des Trackpad Datenkabels mit der Spudgerspitze hoch.

    • Schiebe das Flachbandkabel vorsichtig aus dem ZIF Stecker heraus.

    • Justiere mit der Torx T5 Stellschraube für die Höheneinstellung der Empfindlichkeit des Trackpads. Entferne sie aber nicht.

    The Trackpad Sensitivity Screw in this model is a T6 Torx screw

    andresaldana -

    Need a description of why and how much to adjust the sensitivity screw. Do you need to put the screw back to its original position?

    blairweaver -

    I agree with andresaldana - it feels like just about all the T5 Torx screws in this model are actually T6 - a much snugger fit. Is there a more official record of whether these Torx screws are T5 or T6?

    ROBERT MOORE -

    If your problem is that clicking the trackpad is inconsistent from side to side (one side clicks and the other doesn’t), adjusting this tension screw may be all you need.

    matt -

    Use the T6 to adjust the Trackpad sensitivity screw: The screw adjusts the 'travel' of the trackpad button and the force needed to register a click successfully. Turning the screw clockwise reduces the required travel, and dampens the sound of the click itself. But be very careful not to turn it too tight. Turning the screw counterclockwise increases the travel, and makes the click louder.

    mulkey -

  7. 1AGofmx6dXAdeog1
    1AGofmx6dXAdeog1
    OJE5FoFcoOxbEBon
    6nwoJjytWuiHIgGb
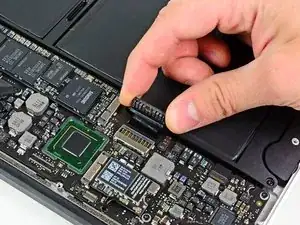
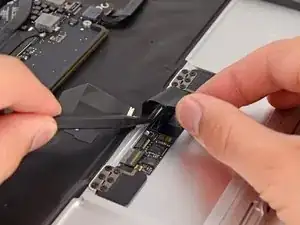
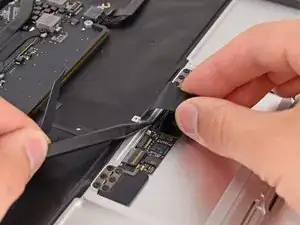
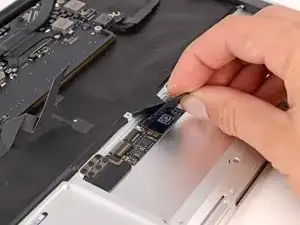
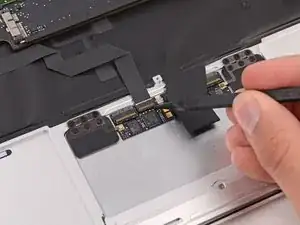
    • Schiebe mit einer Hand das Flachbandkabel zur Tastatur etwas hinein, um an den ZIF Stecker darunter zu gelangen.

    • Klappe mit einem Spudger den Sicherungsbügel hoch.

    • Lasse das Kabel vorsichtig aus dem Stecker gleiten.

    Be careful with the retaining piece on the ZIF connector, it released with a bit of a fight but then broke when I tried to close it after reinserting the cable. :(

    thea -

    Mine popped off too but I managed to get it back on. The clip has two very small bumps on the side that goes down the way so look for them when trying to re-attach it.

    David McKeitch -

    Mine broke too when re-inserting the cable, had to order a new trackpad because of this. Couldn't get it back in and broke off a small piece of plastic trying to fix the latch. I ordered a new trackpad. I really don't hope this happens with the new trackpad.

    Markus -

    Note on the two ZIF connections. The smaller connection has it's ZIF lock toward the front of the laptop while the wider ZIF connection faces the KB. I busted the keyboard connections thinking the ZIF was in the opposite direction. Had to replace it with a new trackpad.

    I have found that I was able to wiggle the cables out of the ZIFs carefully. idk if this works for all ZIF connections and I'd love to hear anyone who has an opinion on removing ZIF cables. But this makes it much easier to remove and not break the ZIF connections.

    Tim -

    I work with a Magnifier with a light. Blowing up the subject so you have it really magnified to a high degree helps enormously. I have removed and reattached many zif cables successfully without a hitch. Act like a surgeon.

    Paolo Alberto -

    Worked fine. Even the keyboard ZIF Cable. Reinserting it was bit tricky.

    hschreiber -

    I had a bit of trouble getting the keyboard cable back in before noticing that it needs to be off the surface of the trackpad to slide in. The whole arrangement is awkward; just be patient and take it slowly.

    mrsharumpe -

  8. p6uT2jGN3Usxd45N
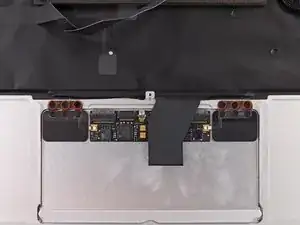
    • Entferne die sechs 1,5 mm Kreuzschlitzschrauben #00, welche das Trackpad festhalten.

    • Diese Schrauben sitzen ziemlich fest und drehen schnell rund. Sei vorsichtig, wenn du sie entfernst.

    Phillips #00 screwdriver should be added to the tool list

    brian -

    The trackpad sold to me by ifixit did not come with the little hinge plates. I had to remove the six other screws and transfer these to the new trackpad. If this is based on using the part as sold here then the photo needs to be corrected to show the six red circles on the phillips screws that are on the trackpad and not on the Mac itself. These are installed quite tightly and I nearly destroyed two of them (on the body side as indicated in the photo) using the correct tool. The six that screw into the trackpad are much more gently installed. I don't think you are generally supposed to remove the six to the chassis of the MBA. Please update this to correct this - UNLESS THE PART FROM APPLE INCLUDES THESE TWO HINGE PLATES AND SCREWS. In that case, please INDICATE THIS difference in the text of the article. It added work and a bit of stress when the two screws were nearly trashed and I realized the new part did not come with replacements. Not good. However, this was otherwise a very easy project. THANKS!

    Wade Rackley -

    +1 On this comment. The trackpad replacement kit from iFixit does NOT include the hinge plates. The hinge plates must be removed from the removed from the old trackpad (and the additional six screws holding in place). There is the need to replace 12 screws total in this step AND the removal of the old hinge plates to re-use, and re-install on the new, replacement trackpad assembly. This is a critical miss in this step's directions.

    coryss -

    If someone could please respond ASAP, i was removing one of these screws from the above picture and it was completely destroyed despite my best efforts. The other 5 came out no problem but i have one screw that is stripped beyond use and i have no clue what do to with it at this point

    jed falone -

    PH#00 was a size too large in my case. Had to use PH#000 instead.

    Stewart Johnston -

    When you’re putting it back together make sure that you don’t put the flatcable through the cutout and stick it between

    Dennis van der Pool -

  9. RjXLdVPTcjKgSPlR
    RjXLdVPTcjKgSPlR
    rfmIm1GT32kwmSYr
    3DlSiuK1AWIWrjBm
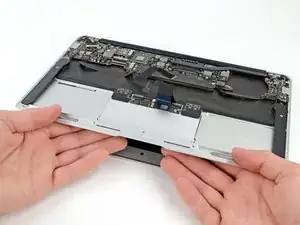
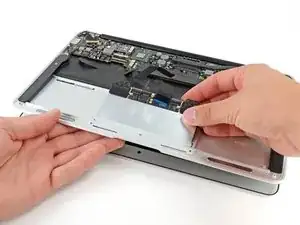
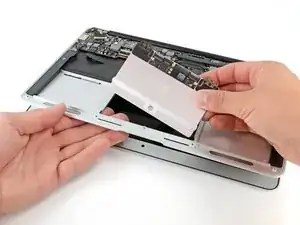
    • Öffne das Gerät etwa um 10°.

    • Halte die Unterseite des Trackpads fest und drücke gleichzeitig auf die Seite des Trackpads nahe am Logic Board, um es so vom oberen Gehäuse zu befreien.

    • Entferne das Trackpad vom Gerät.

Abschluss

Um dein Gerät wieder zusammenzusetzen, folge den Schritten in umgekehrter Reihenfolge.

Brett Hartt

Mitglied seit: 13/04/10

125814 Reputation

7 Kommentare

Bought a T5 screwdriver. Screws on my Macbook Air late 2011 won't turn. I thought one was unscrewing but as it turned out, I was just destroying the screw so it is now stuck forever and I'll never be able to open this thing. Great, I really do have an aluminium pile of trash now.

Andy Barratt -

In the tools list is missing the screwdriver Philips #00

John -

Thanks! Updated.

Andrew Optimus Goldheart -

Please remove this guide. It has errors that cause me to strip one of my track pad screws. (Good otherwise and thanks for writing it.)

There is an almost identical guide MacBook Air 13" Mitte 2011 Trackpad austauschen

that list the correct screw size #000 for the track pad and also shows the correct battery connector for my 2011 13" MacBook Air.

julie -
The case screws are P5 pentalobe and not torx T5. The battery screws are torx T5.

julie -

After replacing the trackpad on my Mid 2011 MacBook Air 11 inch, the function keys no longer work as designed. They seem shifted one position...

Anyone had the same problem and know how to fix it?

Ferdinand Vroom -

i did all this and now the computer won’t turn on. What could’ve gone wrong?

Carol Wolfe -