Einleitung

Folge dieser Anleitung, um ein defektes Festplattenkabel zu ersetzen. Das Kabel enthält außerdem die Power LED und den Infrarot-Sensor.

  1. ZK52UttcjBKbEiPT
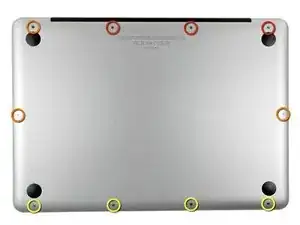
    • Entferne die folgenden zehn Schrauben:

    • Drei 14,4 mm Kreuzschlitz #00 Schrauben

    • Drei 3,5 mm Kreuzschlitz #00 Schrauben

    • Vier 3,5 mm Kreuzschlitz #00 Ansatzschrauben

    • Wenn du die kleinen Schrauben wieder einsetzt, neige sie ein wenig, wie auch das Gehäuse geneigt ist (sie gehen nicht gerade hinein).

    How much weight can I save by removing the optical drive?

    gunes314 -

    You can save a lot of weight if lets say your installing a solid state drive or putting in a second hard drive but if you know that you use the CD/DVD disc drive a lot then you might just want to leave the drive alone.

    Marshall WahlstromHelgren -

    Tip: Use one of those weekday pill holders to have a cheep way to store screws you remove and each day of the week can be for different sizes or parts. It has been handy to have (much less expensive than the magnetic mat.

    Robert Wacker -

    Hello, where can I buy the screws I need in case I lose one of them?

    taylornya -

    I have one stripped screw... How opening without drill it?! Any suggestions please?

    rodrigosady -

    I also stripped a couple screws. I wasn’t able to open it up without drilling. After drilling the heads and removing the cover it was easy to hacksaw the tip and unscrew with a standard driver.

    Michael Wilkens -

    My top tip - make sure you buy good quality Phillips screwdrivers and a magnetic holder. Cheap screwdrivers won’t get the screws undone safely. Without a magnetic holder you have no chance of getting the tiny crews in and out safely.

    jeremyyoung -

    A good Phillips 00 is your friend here. Also, when reinserting the screws, gently start anticlockwise and you wil feel a click at the start of the thread. This tells you you’re in the right place and less likely to cross-thread through force in the wrong place.

    Iain Boyd -

    I feel like these are 000 screws. Amazon sales describe them as such and my 000 screwdriver fits better

    cam2000deluxe -

    Before ordering a new Trackpad remove the existing battery and try clicking the Trackpad. If it clicks OK with the battery out the source of problem is likely a swollen battery, which should to be replaced even if it still works to some degree. From the side of the battery you will likely see the soft part of the battery bulging beyond the hard case.

    Patrick Langvardt -

    That’s absolutely correct as I can testify. With the battery removed I also adjusted the T6 set screw that adjusts the sensitivity of the trackpad click, evidently someone had cranked mine down tighter than the factory setting.

    Gary Register -

    Le quatrième paragraphe dans les instructions en français n’est pas correct : ce ne sont pas les 2 petites vis, mais les 7 petites vis qui sont inclinées. Et les 3 grandes sont bien verticales.

    Degeorges -

    Bonjour ! Merci de votre observation. J’ai corrigé la traduction. iFixit étant un wiki, n’hésitez pas à modifiez si vous remarquez une erreur :) Encore merci de votre attention et à bientôt !

    Claire Miesch -

    Tip: if you have a magnetic screw mat or similar, lay the macbook over the mat to make sure it catches any screws that may decide to fall of and hide under your table

    Moritz -

    Funny, it's not her hands that are doing the close ups. :)

    Cinemated Man -

    What's the difference between the shouldered and non shouldered screws? They look exactly the same to me.

    MLNLRD -

  2. vYHwhaRFGeCR2lAZ
    vYHwhaRFGeCR2lAZ
    RVKjhXW1CYSUnZk3
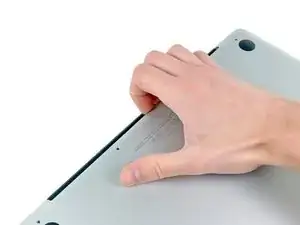
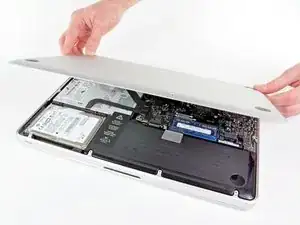
    • Löse mit den Fingern in der Nähe vom Ventilator die Gehäuse-Unterseite vom Hauptteil des Gehäuses.

    • Entferne die Gehäuse-Unterseite.

  3. Eyo2p2BYesPQBNEc
    Eyo2p2BYesPQBNEc
    BFghqfctKoeQMJon
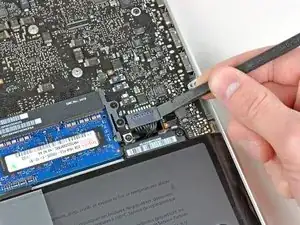
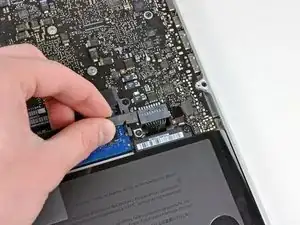
    • Löse mit der Kante eines Spudgers den Akkuanschluss nach oben, weg vom Sockel auf dem Logic Board.

    • Es ist hilfreich, beide kurzen Seiten des Anschlusses gleichzeitig nach oben zu hebeln. Sei vorsichtig mit den Ecken des Anschlusses, da diese sehr leicht abbrechen können.

    Is this step of removing the battery connector required?

    manodh -

    yes - as with disassembly of any electronic component you have to remove any power source. You don't want to accidentally turn the Mac on

    khull -

    Prying the battery connector off does not take much force. I did exactly what the guide suggested (walked it off back and forth) with the spudger without any problems. Just be very gentle, much like with anything inside laptops, they are very fragile and need to be worked with carefully. A+ instructions, battery replacement was a success.

    aekinaka -

    Be patient on disconnecting this one. It worked for me step by step, little by little.

    Phil Wagner -

    I used the nails of thumb and pointer finger simultaneously - worked pretty fine

    Reinhard Kaune -

  4. CACTEGtNtEikmgfJ
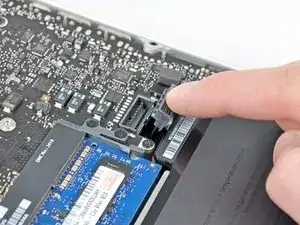
    • Biege das Akkukabel vorsichtig weg vom Sockel des Logic Boards, damit es sich nicht aus Versehen beim Arbeiten wieder verbindet.

    I put some tape between the connector and socket while working on the drive.

    Stephen Smith -

    That's a good tip

    Anrothan -

    Great tip, I did that too

    Ahmed Mahran -

    One other note: The screw heads fit flush with the curvature of the case -- which means that they aren't exactly horizontal. In other words, they aren't perpendicular to the table that the computer is resting on. Don't try to force them straight in vertically, because you'll risk cross-threading them. (nearly ruined one screw hole myself!)

    lelandjordon -

    On my MacBook Pro, the connector seems to be an integral part of the battery.

    Jerry South -

    I suspect it’s just like the special screwdriver required for seatbelts on cars – to discourage regular consumers from attempting repairs. Of course, this only encourages consumers to use the wrong tool to attempt to repairs

    colleenthompson -

    Dissambling my MacBookPro Premium Mid 2012 (i5-3210M 2.5Ghz) was easily, Careful with the screws, use screwdriver fitting exactly with the screws, you damage them very fast. Work very exactly, relaxed with time, consentration, good Tools and with feelings in your hands. Disconnect the Akku was easy if you take care, remove it to be safe, Two screws more, more space to work & haven`t to think about damaging someting. Apple use diffrent screws, you should have many difffrent scewdrivers. It is also good to clean everything inside, With time everything gets very dusty & dirty, don`t forget the sides and little fittings at the case. Use a pinsel, alcohol, soft peace stuff, it will look like new. If you have knowledge & experience, you can paint it in any colour or airbrushing for individualizing. You can also just polish it with a soft Politure (Sonax car Polish No1, NOT with wax or take an other light Politure you familiar & can do the job, A Laptop should serviced once a year, keeping it good working over years

    Stefan Lindner -

    First thing i do is open & cleanig everything inside,specially the cooling & fan, renew the thermal paste with an high quality product. Install the Nain System, clean up Bloatware and other unnecessary things, install standard software for daily use, additional change system components against better one (Edge to Firefox, Windows Media Player to VLC , an Office Suite and configuring everything for Data Protection, Privacy- & Indentety Protection, install Drivers from the component Manufactur (incedible effect, disable limitations, more functions, work better & faster, increasing performance, additional change the WiFi & Bluetooth Card to a better one a UMTS WWAN to an LTE Card, increase RAM with two Dual-Channel working SODIMMs, Use M2 or 2,5" SSD if no M2 Slot aviable) as System- and Software iDrive, a FAT32 formatted 32GB Partition to be safe of metaviruses comes with harmless downloads, and a big 2,5 HDD to store the user data. What does you guys think about this? Old Computer become a new life,

    Stefan Lindner -

    I livein Austria, near Vienna, if someone needs help or anything else, i would be glad to help. I always searching old or broken devices to bring them to new live. I also searching for spare parts, specilly a Bottom & Side Case and a 256GB or higher NGFF Storage Card for a Sony Vaio Tab 11 SVT1144HE (2014), some 14,1" Displays for a HP Probook 440G5 (2016), Elitebook MT 43 Mobile Thin Client, (2011), Dell Vostro 3460 (2012) Lenovo Thinkpad T440s (2014), and a Logic Board for an Lenovo Ideapad 330-15ARR (2017, damaged by Water i think) and a Logic Bord for an Alienware 17R4 with i7-6870HX & Nvidia 1080 (2018, CPU dead, maybe there is a repair Guide or workaround to bring it back to Life). I need always 8GB or 16GB DDR3 and DDR4 RAM Storage (perfectly two ident one for Dual-Channel use for Laptops, M2 SATA 6GB/s and NVMe PCIe SSDs 500GB or more and 2,5"SSD or HDD with 1TB or more and 3,5" HDD with 4GB or above. If you have some of this or other useful parts and doesn`t need them, please make me an offer, maybe

    2

    Stefan Lindner -

    an change something you need. This is not a Business what i do, it`s more a Hobby with challenging new Excercices.. Thats the best Point. Plase forgive me as a Newbie this very long Post in the wrong Section, but if you are start writing you cannot stop.... But now i have to come to an end and would be happy if someone wants to get in contact. My E-Mail is: udontknowme@gmx.at (the adress name is just a notice against Big Data and for Privacy Protection!

    Stefan Lindner -

  5. QNuiLQgFkQq4lHQX
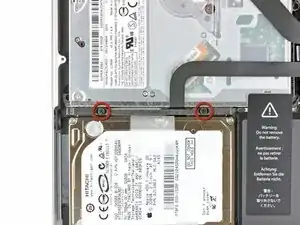
    • Entferne die beiden Phillips Schrauben, die die Festplattenhalterung an dem oberen Gehäuse befestigen.

    • Diese Schrauben lassen sich nicht von der Halterung lösen.

    These were Philips #0 screws in my computer.

    Church Tucker -

    FYI my used Mac didn’t have the bracket or screws. 3D printed the bracket someone did (it’s on Thingiverse), M2x10mm screws were short but worked.

    sbierly -

  6. XoZgBtijMGxLjWhh
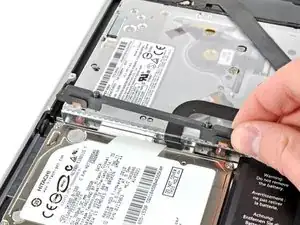
    • Entferne die Festplattenhalterung.

    • Die Festplattenhalterung hängt manchmal sehr fest am oberen Gehäuse.

    Don't miss this step: I almost did and of course couldn't get the disk out until I looked at the video !

    francistasset -

  7. vsRJ1GZKgUr2LdGt
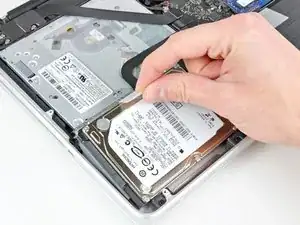
    • Hebe die Festplatte mit der Ziehlasche aus dem oberen Gehäuse.

    • Versuche nicht, die Festplatte komplett zu entnehmen, sie ist noch am Festplattenkabel befestigt.

  8. QIPPI6AGCpJFnMMH
    QIPPI6AGCpJFnMMH
    tgqxo1BVTnH6pBXk
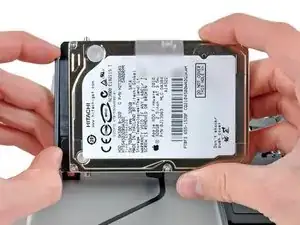
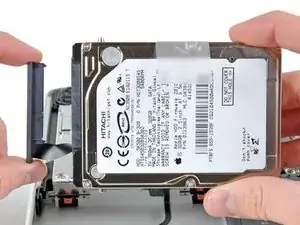
    • Ziehe das Festplattenkabel weg von der Festplatte.

    • Entferne die Festplatte.

    The hard drive cable is a recalled part on these machines. You may need to replace it before your drive will be read correctly. The Apple Store will replace your cable for free if it's problematic.

    Eric March -

    dont forget to save the torx T6 screws froom your old hard drive and install in your new one if you are replaceing the HDD at the same time

    Charlie -

  9. OAx4EBmMLu6YXuIT
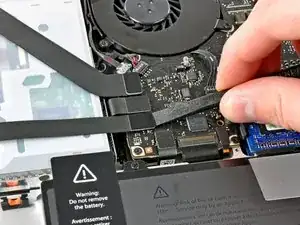
    • Verwende das flache Ende eines Spudgers, um den Festplattenkabel-Stecker aus seiner Steckbuchse zu hebeln.

  10. ZuXLPfB2BL5BF2Wb
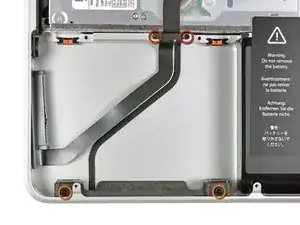
    • Entferne die folgenden vier Schrauben:

    • Zwei 3 mm Kreuzschlitzschrauben

    • Zwei 9,7 mm Kreuzschlitzschrauben

    I have a mid-2009 MBP. Removing the 3mm screws was nearly impossible. I read that Apple uses loctite glue to secure the screws. Someone recommended touching the hot tip of a glue gun (minus the glue, of course) to the screw head. Doing so heats the screw and loosens the loctite. It worked well for the first one, I rushed the second and striped it so badly that I had to use a drill to bust up the screw head. I didn’t have a bit small enough to breakup the entire the screw, but I was able to pulverize the head so that the mounting surface was flat, which enabled me to install the new cable. At the moment, my cable is held in on that side by just the one screw and the weight of the hard drive. I’d like to replace the missing 3mm screw but I’d have to drill out the rest of the broken screw to have hole to put it in. Not exactly looking forward to that….perhaps if I just use some electrical tape to secure it down? On the upside, the new cable is working and my mac is up and running again.

    Jo

    jojojo5683 -

    Replacement screws can be bought on Amazon - search 3mm laptop computer screw kit

    jojojo5683 -

  11. iGtDEOOAY2BMnXcQ
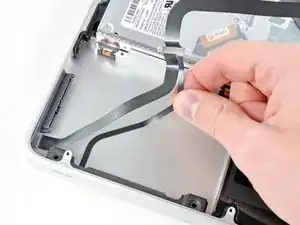
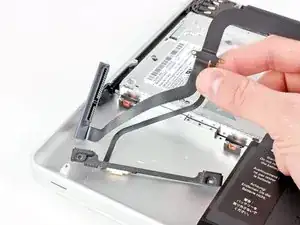
    • Ziehe vorsichtig das dünne IR-Sensor/Ruhezustands-LED-Flachbandkabel von dem Kleber, der es am oberen Gehäuse sichert, ab.

  12. dNYKSLbHVwVRa4qt
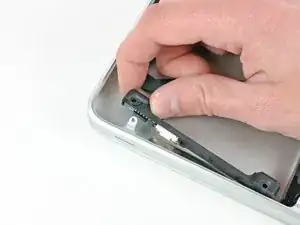
    • Ziehe die vordere Festplattenklammer, die den IR-Sensor/Ruhezustands-LED enthält, weg von der vorderen Kante des oberen Gehäuses.

  13. MKfMBYHZ2bLSHcXO
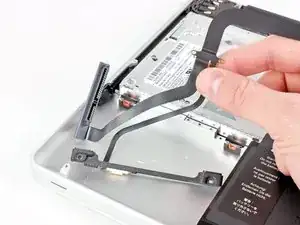
    • Entferne das Festplattenkabel.

    • Mit deinem Ersatzeil könnten mehrere selbstklebende Schaumstoffpuffer geliefert worden sein. Diese sollen einen sicheren Halt für Klammer und Festplatte gewähren. Nur bei Bedarf anbringen.

    The replacement cable comes without the sleep led attached. Thus you have to remove the flat cable of the sleep led from the socket of the old hd cable. Take your fingernail and lift the side of the socket opposite to the cable. It's really tiny! Afterwards insert the new cable and push gently on the part lifted up before.

    Skyynet -

    Hi. What is the purpose of the 5 black rubber pads that are shipped with the cable kit?

    coffeenow -

    Step 13 has the note: "Your replacement part may come with several adhesive foam bumpers. These are to ensure a snug fit of both bracket and hard drive. Apply only as needed." - This would be if the drive width had a gap and allowed it to move "sideways" in and out of the torx post holes. I didn't need them.

    prall -

    You can get the cable with or without the bracket and IR sensor assembly. Opt for with the bracket, makes it much easier.

    ** Note to iFixit, the install of the new cable would be much easier if the cable was pre folded where it bends up from the bottom where the two 3mm screw holes are. Thanks.

    Damian Holland -

    I followed the (as usual, excellent) instructions to the letter. Fortunately, my replacement cable came with the bracket and IR sensor assembly, so that was not a problem. But when I tried to boot the machine from the drive attached to the new cable, it just ended up with the flashing folder / question-mark icon again. I tried using a different drive - but the system still doesn't see it. The IR /sleep sensor works fine, FWIW. Is it possible that the new cable is defective - and/or: when the old cable shorted out thanks to worn away insulation, that something else got fried on the main logic board?

    Charles Ess -

  14. BNJtVOgHsMYIAYWY
    BNJtVOgHsMYIAYWY
    xTFtUVxYcqWcfiyM
    gJZH1PUPO25jCZHM
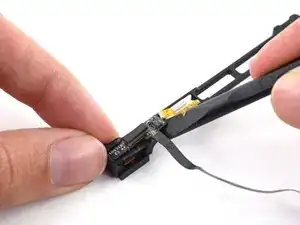
    • Die Front(sensor)klammer könnte bei deinem Ersatzteil mitgeliefert worden sein oder nicht. Falls nicht, musst du die alte Klammer an deinem neuen Kabel anbringen.

    • Verwende die Spitze eines Spudgers, um den "Hebel" am ZIF-Verbinder (links im ersten Bild) am Festplattenkabel zu öffnen. Der Verbinder kommt noch nicht heraus, siehe den nächsten Punkt.

    • Ziehe behutsam das gelbe Sensorklammerkabel aus dem ZIF Verbinder. ( Nach rechts, siehe zweites Bild)

    • Verwende das flache Ende eines Spudgers, um das Festplattenkabel aus der Sensorklammer, an der es befestigt ist, zu hebeln.

    • Entferne die rückseitige Klebeabdeckung von deinem Festplattenkabel, befestige es auf der Sensorklammer und verbinde das Sensorklammerkabel.

    • Viele Reparierer bekleben das dickere Kabel der beiden auf voller Länge auf beiden Seiten mit einem Stück Isolierband, da es sich an den Graten am Aluminiumrahmen scheuern kann. Dadurch kann ein Kurzschluss entstehen, oder einfach die Verbindung unterbrochen werden.

    Very nice set of close up photos of the hard drive cable IR sensor ZIF connectory are here: https://discussions.apple.com/thread/708...

    Mark Mikofski -

    I would recommend using tweezers that come with the ifixit tool kit to properly insert the sensor bracket cable back into the sensor bracket. I had trouble with my computer in which the solution was that this step was not executed properly in my repair of the hard drive cable installation. I encourage everyone to make sure the bracket is fully and properly put back in the bracket otherwise the hard drive will appear to malfunction.

    chasethomas642 -

    Thanks for this - yes, the final little detail about getting the yellow ribbon in is tricky indeed, I feared I’d bend it too many times and end up breaking it. Also, as there is no way to know if it’s placed far enough in, a bit of guess work. But, 3 mins to re-assemble, and hit power - booted up like immediately, perfect. Cheers - Pat

    Patrick Sgro -

    Great thumbs up for very hi-res photos for this section. This thing was THE hardest in this guide. If you haven’t got courage to do this, just buy the one with bracket. Even if you have - zoom into the picture. It will save the day.

    If you have hard time putting the cable back into the ZIF connector, try gently pushing the cable down against the bracket while pushing it into the connector. Simply pushing the cable into the connector doesn’t seem to work well.

    Collapsed PLUG -

    I just did this step and I’m concerned I might have bent the little yellow cable or not seated it far enough into the connector. More will be revealed.

    My suggestion might be to re-insert the cable before sticking the hard drive back onto the bracket. It might provide more flexibility and a better angle at getting the sleep LED cable back in the ZIF connector.

    This is just for the sleep LED? and the IR sensor? right so if we don’t care about the LED for sleeping hard drive and never use the IR sensor then it doesn’t matter, right?

    Adam Hechler -

    Good guide, great, thanks! It simply works like a charm.

    I’d extend Adam’s suggestion: insert the LED cable into the connector before glueing the connector plate onto the holder. This way you can use both hands, find the correct angle and fiddle the little thingy into place. If you do it behind a magnifying glass it’s even easier.

    Grix -

    Confirmed, it’s much easier to put LED cable into ZIFF connector before gluing the last one. Spudger helps to direct cable properly.

    Valentyn -

    Thanks for this useful guide that enabled me to do this job myself. I found the last step was the trickiest one, so much so that even though I was careful I managed to break the ZIF connector as I was trying to put it back in after also having some difficulty figuring out how to disconnect it. Part of the problem was that I stuck the new cable to the base of the holder before I tried to plug the ZIFF connector back in and did not manage at first attempt to get it close enough to the white housing to be easily within reach of the ZIFF connector that I think is why it broke when I tried to put it back in. It was not a nice surprise but fortunately when I completed the reassembly the hard disk started working again with no problems that was my reason for changing the cable, so losing an LED light and some sleep (pun intended) was worthwhile.

    hundredmeterskoven -

    I got the Prohibitory symbol for the 2nd time. This time re-installing the OS did not work and I tried everything. Researched around the net and it was suggested to replace the hard drive cable and it worked even though the cable looked good, but there is a small chip and board on the cable. Maybe something shorting out…the chip?…the board?…etc. Top notch company and service, instructions are clear and easy to follow. Thank you I Fix It!!!.

    Sterling Wong -

    When replacing the cable, it is helpful to pre-form the bends before taking the protective cover off from the adhesive portion of the slim cable (that leads to the LED sleep light). Turn over to view place to pre-bend. Be gentle - hands only.

    Gary Renick -

Abschluss

Arbeite die Schritte in umgekehrter Reihenfolge ab, um dein Gerät wieder zusammenzubauen.

Andrew Bookholt

578335 Reputation

15 Kommentare

Quick and easy fix a repair shop would have charged a small fortune for. The only thing I'd add is if your replacement has built in glue like mine did be careful installing it as it will stick anywhere and everywhere!

David Talbot -

We upgraded our hdd to an ssd and in the process must have damaged the sata cable. Macbook worked for a month before we got the flashing ? folder of death. Investigating we noticed the cable was partly ripped. This guide was perfect for replacing the cable, and now the macbook is working fine again! Brilliant! Just be careful to anyone replacing the hdd, the sata cable can tear easily.

lachlan -

I've replaced my hard drive cable twice now. The problem seems to be that the underside of the aluminum unibody has small ridges on it (you can see them, but they are small. The cable rubbed back and forth on these ridges, and you could see where the cable had shorted where it had worn away. It doesn't take much.

I found a youtube fix which involved only laying a piece of electrical tape along the underside of the cable (underneath the drive), and another piece along the body itself. A couple minutes and few cents worth of electrical tape later and all was working fine.

Jim Good -
I think i might have damaged the yellow ribbon that needs to be reinserted into the new sata cable because i recently installed one and had it fail 2 weeks later and just got a new one that isn't loading up the sign-in menu but at least begins to read the hard drive instead of going straight to the ' ? ' folder. However, it will just continue to read the hard drive and stay at the loading screen with the apple icon and a spinning gray loading wheel below it without any progress. Any thoughts? I was thinking the yellow cable could have somehow been damaged. Does anyone know the name of the part with the yellow ribbon? It is connected to the bracket that sits below the hard drive.

Mike -

Guide is easy to follow, successfully replaced the sata cable.

Unfortunately my Mac does not recognise the battery anymore now. Does anybody have an idea what went wrong? Or even better: how to fix it?

I unsuccessfully tried a PRAM as well as an SMC reset.

Florian -

Thank you for this. Bought the cable from you guys and got it running in 10 minutes!

Heydar Adel -

I placed my macbook inside the microwave to rebind the components and both are broken

Miguel Negron -

Two days ago MBP would not turn on at all, instead an error message (folder with blinking question mark) popped up on start-up. I stumbled onto this site on a search to buy a new cable, and I was surprised that ifixit also provide comprehensive step-by-step process! Since I know nothing about computers, I was super psyched and allowed me to purchase from the site without hesitation. I changed my cable and now my laptop turns on without a problem. ALSO- I went by Apple Store today on a whim to ask about fixing the hard drive cables- the guy said that it would costs approximately $130 with 3~5 days waiting period. :) This site is amazing!

Andie Lee -

This is the second time I've needed a replacement hard drive cable on my 2011 MacBook Pro, and it's been about the same amount of time since the previous one as that was after I bought the computer. Last time, though, I had to take it to an Apple store and have them do it; this time, I did it myself. Thanks!

ohinds8 -

It worked for me! Many thanks!

Malgorzata Szoc -

My macbook pro wouldn't boot one day, out of the blue.

After exhausting PRAM SMC resets, (attempted) booting into recovery, etc, this finally did the trick!

Removal wasn't too bad but it should be noted that you do have to remove the screws from the bracket that hold the IR sensor out and install on the new cable assembly.

Other than that, it was a piece of cake!

Thanks iFixit!

thebeez85 -

Just replaced my cable for the second time. Next time I’m buying it with the bracket, it’s only $5 more. And I buy everything I can from ifixit in order to support the site. Too much info here to not support it.

stevencbaldwin -

Thank you so much. This worked great.

Rob Coenen -

Thanks much for the instructions and support! My repair went like a breeze…..10-15 minutes and my 2011 MBP back alive!

Manoj Narayanan -

Hello,

I want to upgrade my MBP 13” early 2011 to a mid 2012 by replacing the Logic board. Do I need to replace the SSD cable too, and if yes why?

Andrea Pastore -