Einleitung

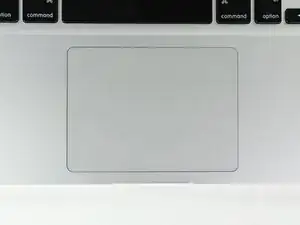
Folge dieser Anleitung, um ein defektes Trackpad zu ersetzen.

  1. ZK52UttcjBKbEiPT
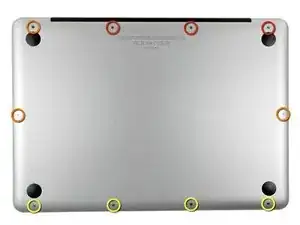
    • Entferne die folgenden zehn Schrauben:

    • Drei 14,4 mm Kreuzschlitz #00 Schrauben

    • Drei 3,5 mm Kreuzschlitz #00 Schrauben

    • Vier 3,5 mm Kreuzschlitz #00 Ansatzschrauben

    • Wenn du die kleinen Schrauben wieder einsetzt, neige sie ein wenig, wie auch das Gehäuse geneigt ist (sie gehen nicht gerade hinein).

    How much weight can I save by removing the optical drive?

    gunes314 -

    You can save a lot of weight if lets say your installing a solid state drive or putting in a second hard drive but if you know that you use the CD/DVD disc drive a lot then you might just want to leave the drive alone.

    Marshall WahlstromHelgren -

    Tip: Use one of those weekday pill holders to have a cheep way to store screws you remove and each day of the week can be for different sizes or parts. It has been handy to have (much less expensive than the magnetic mat.

    Robert Wacker -

    Hello, where can I buy the screws I need in case I lose one of them?

    taylornya -

    I have one stripped screw... How opening without drill it?! Any suggestions please?

    rodrigosady -

    I also stripped a couple screws. I wasn’t able to open it up without drilling. After drilling the heads and removing the cover it was easy to hacksaw the tip and unscrew with a standard driver.

    Michael Wilkens -

    My top tip - make sure you buy good quality Phillips screwdrivers and a magnetic holder. Cheap screwdrivers won’t get the screws undone safely. Without a magnetic holder you have no chance of getting the tiny crews in and out safely.

    jeremyyoung -

    A good Phillips 00 is your friend here. Also, when reinserting the screws, gently start anticlockwise and you wil feel a click at the start of the thread. This tells you you’re in the right place and less likely to cross-thread through force in the wrong place.

    Iain Boyd -

    I feel like these are 000 screws. Amazon sales describe them as such and my 000 screwdriver fits better

    cam2000deluxe -

    Before ordering a new Trackpad remove the existing battery and try clicking the Trackpad. If it clicks OK with the battery out the source of problem is likely a swollen battery, which should to be replaced even if it still works to some degree. From the side of the battery you will likely see the soft part of the battery bulging beyond the hard case.

    Patrick Langvardt -

    That’s absolutely correct as I can testify. With the battery removed I also adjusted the T6 set screw that adjusts the sensitivity of the trackpad click, evidently someone had cranked mine down tighter than the factory setting.

    Gary Register -

    Le quatrième paragraphe dans les instructions en français n’est pas correct : ce ne sont pas les 2 petites vis, mais les 7 petites vis qui sont inclinées. Et les 3 grandes sont bien verticales.

    Degeorges -

    Bonjour ! Merci de votre observation. J’ai corrigé la traduction. iFixit étant un wiki, n’hésitez pas à modifiez si vous remarquez une erreur :) Encore merci de votre attention et à bientôt !

    Claire Miesch -

    Tip: if you have a magnetic screw mat or similar, lay the macbook over the mat to make sure it catches any screws that may decide to fall of and hide under your table

    Moritz -

    Funny, it's not her hands that are doing the close ups. :)

    Cinemated Man -

    What's the difference between the shouldered and non shouldered screws? They look exactly the same to me.

    MLNLRD -

  2. vYHwhaRFGeCR2lAZ
    vYHwhaRFGeCR2lAZ
    RVKjhXW1CYSUnZk3
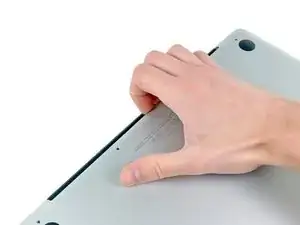
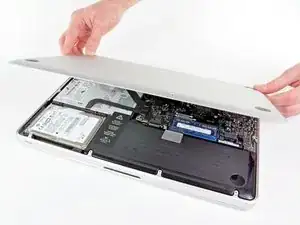
    • Löse mit den Fingern in der Nähe vom Ventilator die Gehäuse-Unterseite vom Hauptteil des Gehäuses.

    • Entferne die Gehäuse-Unterseite.

  3. Eyo2p2BYesPQBNEc
    Eyo2p2BYesPQBNEc
    BFghqfctKoeQMJon
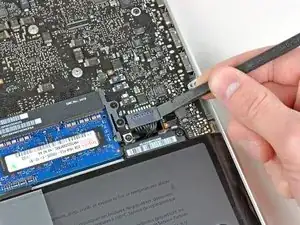
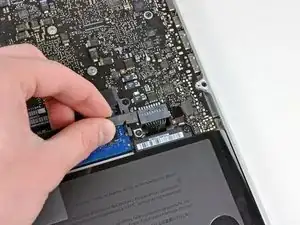
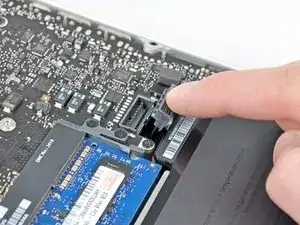
    • Löse mit der Kante eines Spudgers den Akkuanschluss nach oben, weg vom Sockel auf dem Logic Board.

    • Es ist hilfreich, beide kurzen Seiten des Anschlusses gleichzeitig nach oben zu hebeln. Sei vorsichtig mit den Ecken des Anschlusses, da diese sehr leicht abbrechen können.

    Is this step of removing the battery connector required?

    manodh -

    yes - as with disassembly of any electronic component you have to remove any power source. You don't want to accidentally turn the Mac on

    khull -

    Prying the battery connector off does not take much force. I did exactly what the guide suggested (walked it off back and forth) with the spudger without any problems. Just be very gentle, much like with anything inside laptops, they are very fragile and need to be worked with carefully. A+ instructions, battery replacement was a success.

    aekinaka -

    Be patient on disconnecting this one. It worked for me step by step, little by little.

    Phil Wagner -

    I used the nails of thumb and pointer finger simultaneously - worked pretty fine

    Reinhard Kaune -

  4. CACTEGtNtEikmgfJ
    • Biege das Akkukabel vorsichtig weg vom Sockel des Logic Boards, damit es sich nicht aus Versehen beim Arbeiten wieder verbindet.

    I put some tape between the connector and socket while working on the drive.

    Stephen Smith -

    That's a good tip

    Anrothan -

    Great tip, I did that too

    Ahmed Mahran -

    One other note: The screw heads fit flush with the curvature of the case -- which means that they aren't exactly horizontal. In other words, they aren't perpendicular to the table that the computer is resting on. Don't try to force them straight in vertically, because you'll risk cross-threading them. (nearly ruined one screw hole myself!)

    lelandjordon -

    On my MacBook Pro, the connector seems to be an integral part of the battery.

    Jerry South -

    I suspect it’s just like the special screwdriver required for seatbelts on cars – to discourage regular consumers from attempting repairs. Of course, this only encourages consumers to use the wrong tool to attempt to repairs

    colleenthompson -

    Dissambling my MacBookPro Premium Mid 2012 (i5-3210M 2.5Ghz) was easily, Careful with the screws, use screwdriver fitting exactly with the screws, you damage them very fast. Work very exactly, relaxed with time, consentration, good Tools and with feelings in your hands. Disconnect the Akku was easy if you take care, remove it to be safe, Two screws more, more space to work & haven`t to think about damaging someting. Apple use diffrent screws, you should have many difffrent scewdrivers. It is also good to clean everything inside, With time everything gets very dusty & dirty, don`t forget the sides and little fittings at the case. Use a pinsel, alcohol, soft peace stuff, it will look like new. If you have knowledge & experience, you can paint it in any colour or airbrushing for individualizing. You can also just polish it with a soft Politure (Sonax car Polish No1, NOT with wax or take an other light Politure you familiar & can do the job, A Laptop should serviced once a year, keeping it good working over years

    Stefan Lindner -

    First thing i do is open & cleanig everything inside,specially the cooling & fan, renew the thermal paste with an high quality product. Install the Nain System, clean up Bloatware and other unnecessary things, install standard software for daily use, additional change system components against better one (Edge to Firefox, Windows Media Player to VLC , an Office Suite and configuring everything for Data Protection, Privacy- & Indentety Protection, install Drivers from the component Manufactur (incedible effect, disable limitations, more functions, work better & faster, increasing performance, additional change the WiFi & Bluetooth Card to a better one a UMTS WWAN to an LTE Card, increase RAM with two Dual-Channel working SODIMMs, Use M2 or 2,5" SSD if no M2 Slot aviable) as System- and Software iDrive, a FAT32 formatted 32GB Partition to be safe of metaviruses comes with harmless downloads, and a big 2,5 HDD to store the user data. What does you guys think about this? Old Computer become a new life,

    Stefan Lindner -

    I livein Austria, near Vienna, if someone needs help or anything else, i would be glad to help. I always searching old or broken devices to bring them to new live. I also searching for spare parts, specilly a Bottom & Side Case and a 256GB or higher NGFF Storage Card for a Sony Vaio Tab 11 SVT1144HE (2014), some 14,1" Displays for a HP Probook 440G5 (2016), Elitebook MT 43 Mobile Thin Client, (2011), Dell Vostro 3460 (2012) Lenovo Thinkpad T440s (2014), and a Logic Board for an Lenovo Ideapad 330-15ARR (2017, damaged by Water i think) and a Logic Bord for an Alienware 17R4 with i7-6870HX & Nvidia 1080 (2018, CPU dead, maybe there is a repair Guide or workaround to bring it back to Life). I need always 8GB or 16GB DDR3 and DDR4 RAM Storage (perfectly two ident one for Dual-Channel use for Laptops, M2 SATA 6GB/s and NVMe PCIe SSDs 500GB or more and 2,5"SSD or HDD with 1TB or more and 3,5" HDD with 4GB or above. If you have some of this or other useful parts and doesn`t need them, please make me an offer, maybe

    2

    Stefan Lindner -

    an change something you need. This is not a Business what i do, it`s more a Hobby with challenging new Excercices.. Thats the best Point. Plase forgive me as a Newbie this very long Post in the wrong Section, but if you are start writing you cannot stop.... But now i have to come to an end and would be happy if someone wants to get in contact. My E-Mail is: udontknowme@gmx.at (the adress name is just a notice against Big Data and for Privacy Protection!

    Stefan Lindner -

  5. s35fTCrZtE3dGoPY
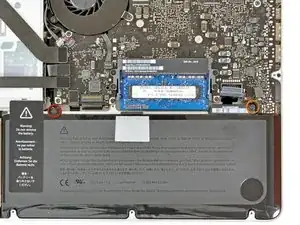
    • Entferne die zwei folgenden Schrauben:

    • Eine 5,6 mm Tri-point Schraube

    • Eine 13 mm Tri-point Schraube

    Something isn’t right here. On my MacBook Pro, the connector is an integral part of the battery.

    Jerry South -

    Verify that this is the correct guide for your specific model—if not, we’ve got guides for all the other models, too.

    Jeff Suovanen -

    And which Apple “Genius” decided that a tri-wing screw would be just perfect for the job of holding the batter in place? Not smart for a genius.

    Jerry South -

    These tri-point screws are Y0 size. You’re welcome :)

    Rossi Macri -

    The 13 mm Tri-point screw was very tricky to screw back into place. I had to make several attempts, unscrewing and realigning the battery to get it right. The rest of this fix was very easy, but this one screw was the hardest part.

    Raymond Rinaldi -

    As per Rossi Macri’s comment, I also observed for step 5 that both screws are Tri-point Y0 for my MacBook Pro 13 inch mid-2012 model.

    Tim Telcik -

  6. guJyf6vvZEZVZjyh
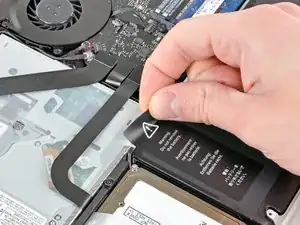
    • Ziehe vorsichtig den Akku-Warnhinweis zwischen dem Akku und dem optischen Laufwerk von der Gehäuse-Oberseite.

    • Entferne den Warnhinweis nicht vom Akku.

    What is the reasoning behind not removing the label from the (old) battery?

    tom -

    Probably to help you remove it? Not sure, but I used it along with the clear tab to pull the battery out. Worked pretty good.

    aitorrecalde -

    One of the main thing is that it can weaken an already old battery which is never a good thing, especially if people try to remove the label using a pointy device and piercing the battery (can explode !). Also it is not useful to remove it and it allow tracking of old parts (recycle, dispose, …).

    Cajuteq -

  7. 4NcoT6JVsZVFkPlG
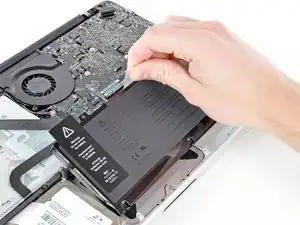
    • Entferne den Akku durch Ziehen am Plastiketikett aus der Gehäuse-Oberseite.

    • Wenn du einen neuen Akku einbaust, solltest du ihn nach dem Einbau kalibrieren:

    • Lade ihn auf 100% und lasse ihn mindestens zwei weitere Stunden am Ladegerät. Ziehe den Stecker und benutze dein MacBook normal, um den Akku zu entladen. Wenn die Ladeanzeige am Minimum ist, dann speichere ab und lasse den Laptop an, bis er von selbst ausgeht. Warte wenigstens 5 Stunden und lade dann ohne Unterbrechung auf 100% auf.

    • Wenn dir nach der Installation deines neuen Akkus etwas Ungewöhnliches auffällt oder Probleme auftreten, kann es sein, dass du den SMC deines MacBooks zurücksetzen musst.

    My replacement battery came with a clear protective film that should be removed before installation. Be sure not to overlook the film on the bottom of the battery as it covers only a portion of that side and might be easy to overlook.

    Do not over-tighten the bolts holding the battery in place. One of the tabs on the original battery was broken, presumably due to over-tightening.

    Patrick Langvardt -

    The calibration suggestion given in this guide differs a bit from what iFIXIT sent with the battery. What came with the battery went like this…

    For optimal performance, calibrate your newly installed battery. Drain battery below 10%, then charge it uninterrupted to 100%.

    Daniel Lavelle -

    I recommend disregarding those instructions and following the steps in this article:

    1. Charge it to 100%, and keep charging it for at least two more hours.

    2. Unplug your laptop and use it normally to drain the battery.

    3. Save your work when you see the low battery warning.

    4. Keep your laptop on until it goes to sleep due to low battery.

    5. Wait at least five hours, then charge your laptop uninterrupted to 100%.

    Sam Omiotek -

    would it be dangerous to use the macbook without a battery in the meantime?

    724 F -

    It’s not dangerous (assuming you have put the back cover back on), though the computer will run slower. The charging assembly cannot supply as much amperage as the battery, so the processor will be throttled.

    Sam Omiotek -

  8. ECPvZBslmXdfVx4A
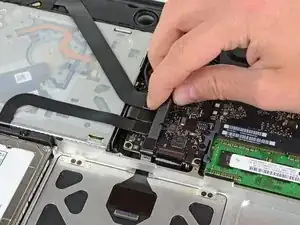
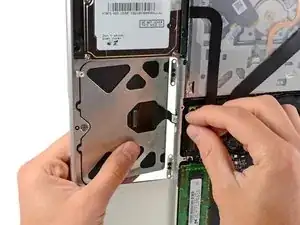
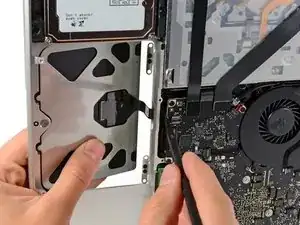
    • Hebe vorsichtig mit dem flachen Ende eines Spudgers den Anschluss des Trackpads vom Sockel auf dem Logic Board.

  9. BKbVYeNj2LT1dM2L
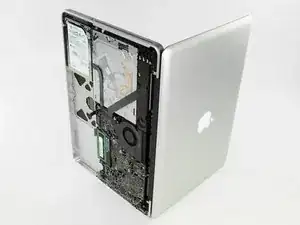
    • Öffne dein MacBook und stelle es wie dargestellt auf einen Tisch.

  10. fQOaRKtLVVUVSUBU
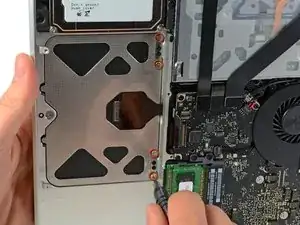
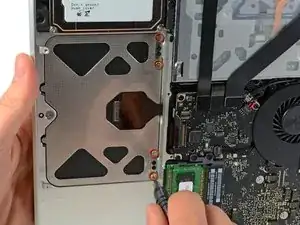
    • Halte das Trackpad an der Kante, die dem Logic Board am nächsten ist, mit einer Hand fest, und entferne die vier rot markierten 1,2 mm Kreuzschlitzschrauben.

    A word of caution if you are replacing your trackpad due to a bulging battery. This guide assumes that the original mounting tabs are not damaged and it does not look like the iFixit trackpad replacement kit comes with new tabs. My MBP had a bulging battery, which pushed up on the bottom of my trackpad, deforming one of these tabs. Now that I have removed the battery, the trackpad still works, but it is not flush with the case and the physical clicks are not as responsive as I would like. Does iFixit sell just the replacement tabs?

    Matt Marchese -

    Same here luckily the trackpad still works but the taps have deformed. Anyone find a place to pick up just those tabs? Edit: found them MacBook Pro Unibody (Mid 2009-Mid 2012) Trackpad Mounting Screws

    iAndrewC -

    Be careful with this step. The very tiny screws are very hard to remove with a #00 screwdriver. I tried with mine and I mashed the srews heads, it was then very very hard to remove it. Better to use a #000 screwdriver. If the heads are mashed like me, I suggest you use a 0.1 flat screwdriver, it worked well in my case.

    Jonathan -

    I couldn't even begin to use the #000 as the edges were not deep or narrow enough for the condition of the screws from factory install. The .1 flat screwdriver worked like a charm though and didn't mess up the screws further at all. I was getting nervous that I'd need to get another screwdriver beyond what's in the iFixit toolkit, but this worked as a better solution.

    Thom Merrick -

    I used a #0 screwdriver, and it worked fine.

    TIP: Remove and insert the screws over a large, clear work surface. The slightest pressure off center an the screws will suddenly fly off and vanish.

    ALAN VOORHEES -

    Yes, I have found a very small flat head screw driver works brilliant.

    Cary B -

  11. K6JpC6YYO2IFtS6n
    K6JpC6YYO2IFtS6n
    bNiHrMCqOppGXnvq
    A1UtIgrfgmOygx46
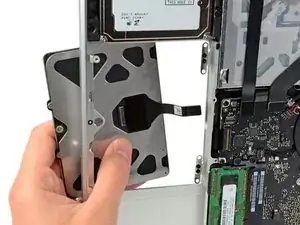
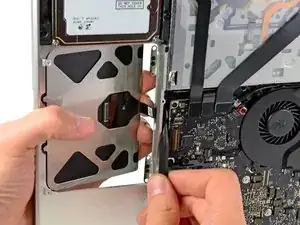
    • Wenn notwendig entferne vorsichtig die Ecke das Trackpads neben der Tastatur aus ihrer Vertiefung im Gehäuse-Oberteil, indem du sie von den Klammern des Oberteils wegdrückst.

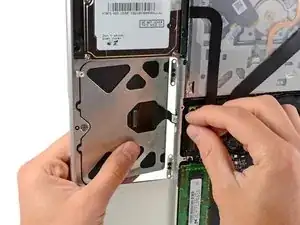
    • Drücke vorsichtig den Anschluss und das Kabel des Trackpads nach unten durch den Schlitz im Gehäuse.

    • Es könnte nötig sein, den Anschluss des Trackpads mit einem Spudger an der Ecke des Logic Boards vorbeizuschieben.

    • Wenn das Kabel komplett durch den Gehäuseschlitz gezogen wurde, ziehe das Trackpad weg vom Gehäuse-Oberteil und entferne es aus dem Laptop.

  12. DcQg2evIGPQY3APf
    • Wenn dein Ersatztrackpad ohne das Verbindungskabel geliefert wird, musst du das Kabel deines alten Trackpads nehmen.

    • Um das Kabel vom alten Trackpad zu lösen, öffne erst den Verschluss des ZIF Verbinders. Dann erhitze das Kabel mit einem Fön oder einem iOpener, um den Kleber zu lösen und entferne dann vorsichtig das Kabel.

    • Beim Installieren deines neuen Trackpads musst du das Kabel durch das obere Gehäuse führen, was nicht ganz leicht ist. Es hilft, die Spitze eines Spudgers zu nehmen und damit den Anschluss auszurichten, während du mit der anderen Hand das Kabel durch das Loch führst.

    If your replacement trackpad comes with the cable separated and loose, the connection to the trackpad needs to have a tab pressed down which keeps the connection snug. It won't work without it. It's a tab on the trackpad part of the connection. Tab might be the wrong word; the connection has to be in all the way, then clamp it closed with the tab... oops! LOL

    Mark -

    Tip: Getting the cable nicely through the slit to the top is much easier, if you take a tiny cable binder, form half a loop in that little space the cable has to come up and lift it gently with it.

    Plum Pudding -

  13. AMdE51g2GhsDSKeu
    AMdE51g2GhsDSKeu
    dxkM5oQnfEdYXw3k
    • Befestige als nächstes das Trackpad mit den vier 1,2 mm Kreuzschlitz-Schrauben am inneren Rand des Touchpad.

    • Befestige alle Schrauben komplett und löse sie dann ca. eine 1/4 Umdrehung.

    • Prüfe die Ausrichtung des Trackpads im Gehäuse-Oberteil an der Seite der Tastatur. Wenn du das Touchpad perfekt im Oberteil ausgerichtet hast befestige die vier Kreuzschlitz-Schrauben wieder komplett.

    trackpad still doesn't click. I've tried two separate parts.. but what makes it pop back up after depressing the pad? It just lays there. I've taken it apart four times to adjust the tork screw... nothing. HELP!

    Gail -

    two options here :

    _adjust the screw which control the deepness of the click

    or

    _the back panel put pressure on the battery which prevent the movement of the trackpad

    Sebastien CHAPUIS -

    My trackpad was driving me up the wall, bouncing all over the place. Ifixit Trackpad comes with extra screws, hinge and adjuster. You won't believe how tiny these screws are! If one falls in the carpet-it's GONE! Bless you Ifixit! To center when re-installing adjust by sliding a thin piece of paper (scotch tape?), under bottom of trackpad, let Trackpad rest on it's own weight and then tighten one top and bottom screw a little bit, and eyeball it, just the tiniest crack of daylight on each side. I strongly suggest the highest quality magnetic screwdriver you can find. The little torx screw disc is an adjuster. If too tight, trackpad won't 'click.' On a Mac, click is not really essential as long as tap and slide are working right. Needs a small amount of clearance. When properly installed you can 'feel' the click if it's right. Probably won't need to mess with it at all. Now my trackpad works like it should, I am a happy camper!

    ovenwally -

    I replaced the trackpad with a new one: the arrow moves but was not possible to click. I putted back the old trackpad and it works with. The solution: the eleventh picture shown a gray Torx type screw to the left of the connector where there is the recess in the back of the mouse. This screw is used to increase or decrease the depth of clicks. in my case it was too screwed and it was as if I held continually pressed the truckpad: therefore, it was enough to loosen it. At this point I ask myself since in the old truckpad I had problems with the physical click, I probably would have been enough to adjust the screw.

    caronte88 -

    Vielen Dank, dies hat mir sehr beholfen :-)

    Frederik Häger -

    ifitit is once again amazing. My trackpad just stopped working on my four year old machine. Bought a new trackpad from iFitit, followed the guide and now I have a functional laptop again. One thing to note. 1.2mm is small very, very small. The screws for the trackpad *will* get lost if they fall of the table. Make sure that doesn't happen.

    Jerry -

    I was having trackpad issue on my 2010 machine, did the replacement from ifixit which arrived broken (bummer) but they replaced it no problems. It worked great for just under a year but now I'm having the same issues again of poor finger tacking, jumping, and lack of sensitivity. I've tried cleaning the whole unit, rebooting in safe mode, refreshing code, and anything else the web has provided. I'm starting to wonder if it's something else on my machine or if the trackpads just don't hold up well enough. Overall I'm super frustrated to have a newer pad crap out this early.

    eastern117 -

    I don't have a magnetic head driver so I had a terrible time trying to get the screws in. I found getting the screw on the table Phillips side up, I pushed my finger tip into the head til it stuck and placed the screw into the thread that way. The screw stayed in long enough for me to tighten with the driver ! Oh, what a relief! I only lost one screw; thank god for replacement screws! Order your trackpad with screws! They fall and get lost easy! Now I'm happy! :)

    Mark -

    Next time rub the tip of the screwdriver against a magnet about 10-20 times in the SAME direction (A fridge magnet works)

    Karan Kakkar -

    For some reason the black material under the tabs were enough to stop the track pad from being able to click. I removed that material and now have a track pad that clicks.

    blrmisc -

    I installed the trackpad, but it was not behaving correctly. Took it apart again and reinstalled, using the 2 new foils that go under the trackpad keeper screws (my old ones were kind of mangled, probably from all the force I had to use on the old trackpad). I also made extra sure the trackpad was precisely lined up this time. Voila! A nice, sensitive new trackpad.

    Thanks, iFixit!

    Felix -

    I found it difficult to adjust the trackpad’s position so that it had just the same amount of space on every side to move freely when being clicked.

    What worked for me was putting all four screws in - but a little loose as suggested - and then putting the button case back on (without screws) for protection. Turn the laptop in normal position, open it, adjust the trackpad, fix its position with one large strap of of easy to remove tape - approximately 15 x 4-5 cm e.g. masking tape.

    This will hold the trackpad in position while turning the MacBook Pro around and tightening the screws.

    Jörn von Spreckelsen -

    Watch this Youtube, it shows an additional issue with the click mechanism pressure contact that may be causing the Track Pad to not register clicks. https://youtu.be/awihkz3aYkg

    Macrepair SF -

    I installed my trackpad and am having trouble getting it to work properly. At first it wouldn’t click at all but I readjusted it and now I can use it mostly, but there seems to be small portions of the trackpad that don’t register my touch (mostly noticeable when I try to scroll with 2 fingers - it just wont). Can you give me some pointers?

    bea -

    Still having this same problem with no reply. I sometimes can’t use the zoom function on my laptop because the trackpad doesn’t recognize that I am touching it at all. In certain parts of it my touch is not being recognized. I have tried to readjust several times without success. Would love some recommendations if anybody has any.

    bea -

    I have followed every step of this guide, word for word, and my for some reason the new replacement trackpad is unresponsive. Any tips?

    andrescruz -

Abschluss

Arbeite die Schritte in umgekehrter Reihenfolge ab, um dein Gerät wieder zusammenzubauen.

Andrew Bookholt

578335 Reputation

17 Kommentare

I couldn't be more pleased with myself or ifixit right now. I went to the Apple service centre to find out about getting my trackpad fixed and was told it would take 2 weeks to diagnose what the problem was and up to another 2 weeks before they could fix it. Luckily, I stumbled upon ifixit - got a tool pack and parts delivered in 5 days and I was just able to replace the trackpad easily in 30 minutes. I did find that I wasn't able to get the screws from the back of the trackpad out with the Phillips 00 screwdriver though - I had to use the 000. I am weirdly looking forward to something else breaking now just so I can fix it:-)

rebeccanorris -

Why did I not do this earlier! I wasted 2 years of my laptop life struggling with the trackpad and external mouses. This was pretty easy.

Omkar Danke -

Just installed my new trackpad and it works like a dream. Thanks!!
Judy MacDonald -

Thanks!! This worked perfectly. (Almost... I stripped a couple tiny screws on the trackpad before it was perfectly placed so I have a dead spot about the size of a quarter in the upper right corner where it won't click, but it's much better than the previous one.)

patrisha.wells -

I was scared to this project until I found this site! I've never opened up any of my computers until now and this manual made it so easy!

Rachel Wilkosz -

Awesome! Such clear instructions, in the end it was so easy.

Derek van Someren -

My replacement part (third party) did not fit quite right. I found the clicker was depressed upon installation. I was also unable to loosen the clicker screw (not sure why it was so tight). I was successful trimming some plastic off the trackpad clicker which did the trick!

emholden -

I had a fairly rough drop of my Macbook Pro recently. Ordered new glass for the screen and the necessary tools since that appears to be the only part that “needs” to be replaced since everything else seems to work. The one thing I noticed is the trackpad is raised up above the body of the computer in certain spots. If I attempt to lightly push it back down it just pops up on the diagonal corner. Does anyone think I’ll need to order any additional material before I open the computer (as I’d like to only get into it once) or is it just the tabs the trackpad is screwed into being bent?

lcubbin -

As you can see in the photo for step 10, the trackpad is held with screws that attach along the side of the trackpad that is adjacent to the spacebar. The other long side is held by the two tabs along the bottom. Once you open up the computer you may find that one of the tabs on the trackpad is bent/broken, or that some supporting part of the lower case is cracked. As far as I know, there’s no easy way to tell until you get in there — sorry.

One other thing that you may find once you get inside is that your battery has started to swell. The battery is directly beneath the trackpad, and when it swells it pushes up on the underside of the trackpad. Since the battery may not swell evenly, this may create a high spot that the trackpad teeters on when you’re pressing on it. Another symptom of a swelling battery will be if the trackpad works intermittently or only in some areas, or will track but won’t click. This will require replacing the battery - which if it has started to swell, you want to do anyway.

captainvector -

You may need to adjust a clicker screw at the bottom. It’s a silver hex screw to the left of the thumb in step 11. Once the trackpad is in, back it out or turn it in until the clicking action feels correct.

George Coffey -

Before you replace the entire trackpad or/and battery you might want to look at this video tutorial … at least if your issue is related to the hardware click. I fixed both my 2009 and 2011 MBPs trackpads with this https://youtu.be/23s7Te7DaG8

Christian Bender -

Just completed the trackpad replacement , Guide was easy to follow, this was my first attempt at repairing an apple product, I usually work on windows machines but my daughter had a macbook pro with a battery that expanded breaking the trackpad. The only difficulty I had was after the trackpad was replaced it would not click. After figuring out the adjustment screw, everything works great. Awesome guide!!

Mark Walker -

Thank you! Perfect. Great to have my computer working again. Turned out to be easy with these clear instructions.

harvey -

Thank you! With these clear instructions I was able to make the repair more easily than I thought would be the case. all good. Thanks.

harvey -

The guide is perfect. Replaced trackpad without problems.

Also found a spudger is very helpful to guide connector back at step #12.

Valentyn -

Fairly easy if you don’t count breaking the latch off of the ZIF socket just by looking at it wrong. Even under a jeweler’s loupe and slight movements I managed to break the latch off. It didn’t feel like I was doing anything at all and suddenly the latch came completely off. *sad face* BE VERY CAREFUL with that part. I ultimately used scotch tape to keep the ribbon cable in. The track pad (with some adjustments to the adjustment torx screw slightly) needed to be set for a good feel. IMO, the “moderate” difficulty comes into play with that darn ZIF socket latch. VERY easy to break. I might just replace the scotch tape with an iFixit sticker just to hide my embarrassment. LOL

Ryan Martinez -

I did this job along with replacing the battery -I figured since I was in there, might as well do as much as I could.

A WARNING: Be VERY careful when re-installing the four screws holding the trackpad in. They are being installed on a spring, essentially, and are about the size of a piece of glitter.

One false move and BOING! - off a screw goes into the abyss . . .And one did!

I work on clocks, so a keep a VERY tidy workspace, but after a half hour searching, I gave up. The trackpad works fine (for now) with just three screws.

But please be EXTRA careful re-installing those four tiny screws!

Paul Friese -