Einleitung
Wenn du die Festplatte tauschst, musst du die vier Haltestifte von der alten Festplatte auf die neue übertragen. Dazu benötigt du einen T6 Schraubendreher.
Werkzeuge
Ersatzteile
-
-
Entferne die folgenden 10 Kreuzschlitz-Schrauben, die die Gehäuse-Unterseite des MacBook Pro 13" Unibody befestigen:
-
Sieben 3 mm Schrauben.
-
Drei 13,5 mm Schrauben.
-
-
-
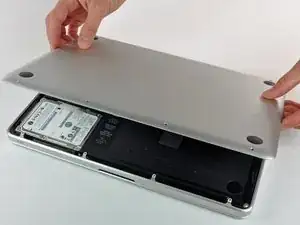
Hebe die Unterseite vorsichtig an und drücke sie Richtung Rückseite des Laptops, um die Halterungsclips zu lösen.
-
-
-
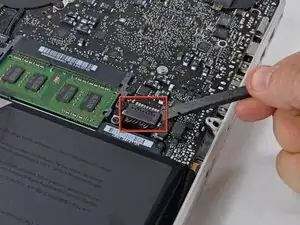
Löse mit der Kante eines Spudgers den Akkuanschluss nach oben, weg vom Sockel auf dem Logic Board.
-
-
-
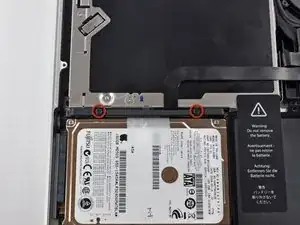
Entferne die beiden Kreuzschlitzschrauben, die die Halteklammer der Festplatte am oberen Gehäuseteil sichern.
-
-
-
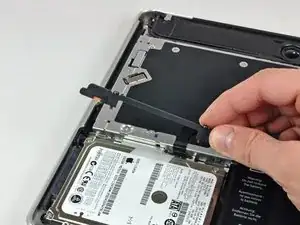
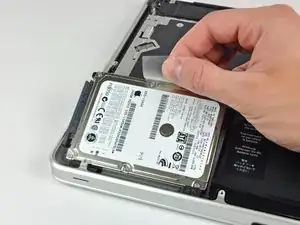
Hebe die Festplatte aus ihrer Halterung indem du an der Zuglasche ziehst. Achte dabei auf das Kabel mit dem sie am Computer angeschlossen ist.
-
-
-
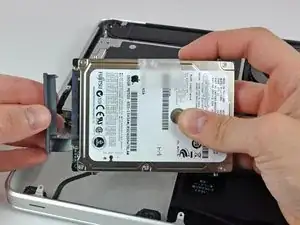
Entferne das Festplattenkabel, indem du seinen Verbinder gerade aus der Festplatte heraus ziehst.
-
-
-
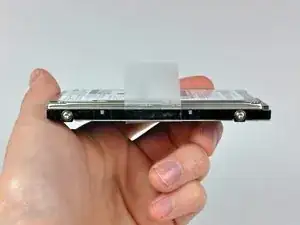
Entferne die beiden Torx T6 Schrauben auf jeder Seite der Festplatte, also vier insgesamt.
-
Um dein Gerät wieder zusammenzusetzen, folge den Schritten in umgekehrter Reihenfolge.
15 Kommentare
I'd suggest using the free software "Super Duper" to clone the hard drive. It worked wonders for me and after the 2 hour clone, I was up and running in 5 minutes!
I wholeheartedly agree. Super Duper! made the task effortless.
The T6 torx screws on the side of the existing Hitachi drive fit my Crucial M500 240GB replacement perfectly. Be aware that they were originally installed into the HDD with blue Loctite, so it takes a bit of effort to break them loose.
Thanks ifixit for excellent guidance!
What do you do when your laptop doesn't read your new hard drive?
If your hard drive dosent connect. you might need to change your hard drive connect cable . The second option is that you need a strip to replace your hard drive with DVD rom.
If your hard drive doesnot connect you need to change your connecting cable
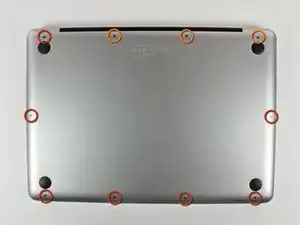
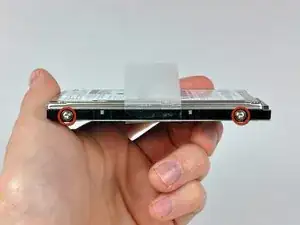
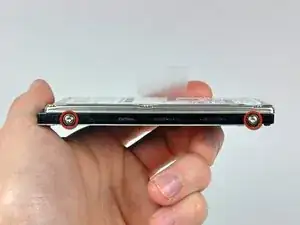

Compare the short screws carefully before reinstalling them. The shouldered screws go in the holes on the front edge.
David Kilbridge -
Before I started removing any screws I took a piece of paper and drew the bottom of the laptop and put a piece of double-sided tape in the spot where each screw goes. That way when I took out the screws, I could put them on the tape so I knew exactly which screw went in which spot. I did the same thing for dismantling the inside on another sheet of paper, then a third sheet for the screen after getting the front glass off.
mastover -
I use a similar technique: I print out the iFixit manual for the job, and Scotch-tape down the screws/brackets/cables I remove at each step next to the component descriptions. That way, when I'm reassembling, the bits are taped right next to the photo of where they came from.
adlerpe -
That's exactly what I do for all my repairs! It's the best way to keep track of all of the parts ' original location and to make sure that you don't miss any parts during reassembly.
joyitsjennie -
Great idea and one I use often
Thomas Overstreet -
Excellent idea! Thanks for sharing it here.
Laura Sharkey -
I used a 00 that fit but the screws were very tight so I used a tiny paintbrush with some wd40 on it and put it around the edges of the screws. Worked like a charm
valentinedhdh -
I use a magnetic mat and place the screws in order on that :)
Cary B -