Einleitung

Diese Anleitung zeigt dir, wie du das Display austauschen kannst.

  1. 2ycdtRrTgDZgPtCG
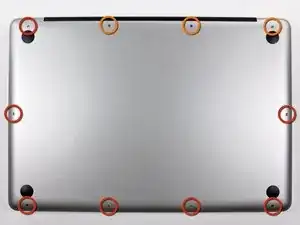
    • Entferne die folgenden zehn Schrauben, mit denen das untere Gehäuse am oberen Gehäuse befestigt ist:

    • Sieben 3 mm Kreuzschlitzschrauben

    • Drei 13,5 mm Kreuzschlitzschrauben

    May be helpful to have more distinct colors to identify the different screws.

    Victor Caamano -

  2. wyETETuUDDGNPgIh
    wyETETuUDDGNPgIh
    vLOGRGZI2eygR2sJ
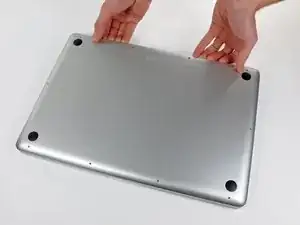
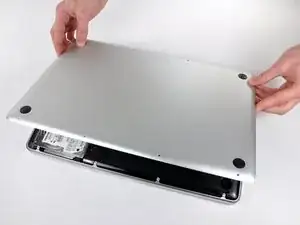
    • Hebe das untere Gehäuse mit beiden Händen in der Nähe der Lüftungsöffnung an, damit sich die beiden Clips lösen, mit denen die beiden Gehäuseteile verbunden sind.

    • Entferne das untere Gehäuse und lege es zur Seite.

  3. fBWga2JEZT2tmqRt
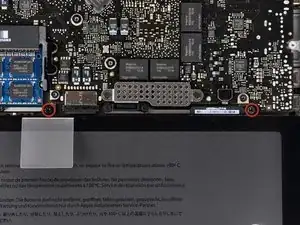
    • Entferne die beiden 5-Punkt Pentalobe Schrauben an der Oberkante des Akkus.

    • Wenn du die Festplatte austauschen willst, musst du nicht unbedingt den Schritten 3-7 folgen, um den Akku auszubauen. Allerdings ist es empfehlenswert, vor Reparaturen oder Wartungen immer alle Stromquellen von Elektrogeräten abzutrennen.

    Question: why do you remove the battery? According to Apple's official manual, this is not required (not for the mid-2009 and not for the mid-2010 15-inch MacBook Pro) - see pages 37 ff:

    http://manuals.info.apple.com/en_US/MacB...

    http://manuals.info.apple.com/en_US/MacB...

    alexkli -

    Zitat von alexkli:

    Question: why do you remove the battery? According to Apple's official manual, this is not required (not for the mid-2009 and not for the mid-2010 15-inch MacBook Pro) - see pages 37 ff:

    http://manuals.info.apple.com/en_US/MacB...

    http://manuals.info.apple.com/en_US/MacB...

    I'm interested by your experience.

    Did you have removed the optical drive without removing the battery ?

    I'm just in this step now and if it is possible I would proceed like you because removing the battery void the warranty (and there is a sticker).

    Thanks in advance.

    youyou -

    Looks like my note to step 3 appears on all repair guides that have the same step. I meant that in the context of the hard drive replacement only.

    Did you have removed the optical drive without removing the battery ?

    I haven't yet done anything, waiting for my MacBook Pro 15 inch mid-2010 to arrive.

    alexkli -

    I missed the notes and went ahead and purchased the 5 point driver for the battery before I realized it was not necessary.

    I've edited the repair guide to remove the section on the battery, but I don't have the points to approve the changes.

    Chris Davis -

    Please note - the step about removing the battery is part of a pre-requisite guide, that is used for many of the guides, most that do require removal of the battery. Also, working inside a disassembled laptop with the battery still connected risks damaging/shorting out very expensive parts.

    Eric Essen -

    Absolutely. To be clear -- ALL of the above discussion is ONLY in reference to replacing the hard drive.

    Chris Davis -

    I replaced a hard drive in a MacBook Pro of an earlier model than this without removing the battery. The hard drive wasn't right. It only worked at about half speed, and I had to replace it once more. The second time I removed the battery and all went well. The recommendation by the iFixit staff to remove the battery before working on electronic equipment is a good one.

    doug -

    What is the size of those screws... I have rounded off the socket on mine and would like to replace them.

    Ghatothkach Yadav -

    I measured the screw size, using a micrometer, its about 1.523mm in diameter and 3.186mm in length. Not sure what screw size that is. They are not easily available I guess, unless someone is selling used ones on ebay

    Ghatothkach Yadav -

  4. 51GhiHAUMgp3IL1V
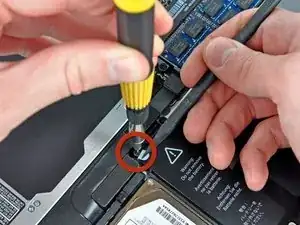
    • Biege die Ausbuchtung am Aufkleber "Warning: Do not remove the battery" mit der Spudgerspitze hoch, um die dritte Pentalobe Schraube darunter zu entfernen.

  5. DxGirDoRhQVXvY1S
    DxGirDoRhQVXvY1S
    iCPMLfZ6gsvCV1Gm
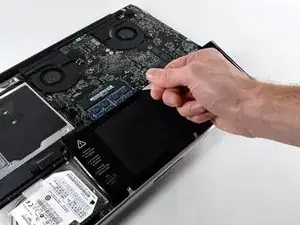
    • Hebe den Akku an seiner Plastiklasche hoch und schiebe ihn von der langen Kante des oberen Gehäuses weg.

    • Versuche noch nicht, den Akku ganz zu entfernen.

    Removing the battery is not necessary for the hard drive removal/replacement procedures.

    Erik -

    My T6 (appears to be same screw driver you have - $6 on amazon for 20piece set) did NOT fit int he battery screws...not sure if I had the wrong screws or what, but I went ahead w/o battery steps and it was pretty easy.

    Anthony Ettinger -

    I also noticed that the new SDD (from crucial) didn't have the 4 screws, so I had to move those off the old HD and onto the new one.

    Anthony Ettinger -

    Just had the same issue: T6 does not fit the battery screws ;-( ... but with a little bit more preassure it was possible to remove the screws.

    dirkvloenwagner -

  6. XfHIrygDNgEDWQtJ
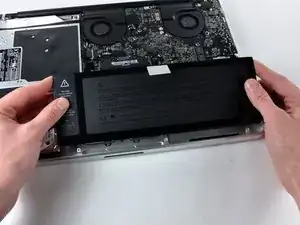
    • Kippe den Akku soweit nach hinten, dass du an den Akkukabelstecker herankommst.

    • Ziehe den Akkukabelstecker aus seinem Anschluss auf dem Logic Board und entferne den Akku aus dem oberen Gehäuse.

    • Wenn du einen neuen Akku einbaust, solltest du ihn nach dem Einbau kalibrieren.

    Excellent guide

    Kola Ajibade -

  7. e6ACMjR4RwNbvOU2
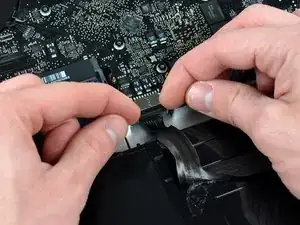
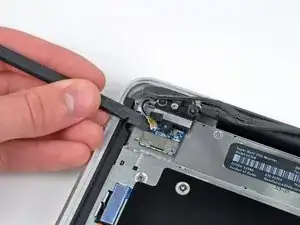
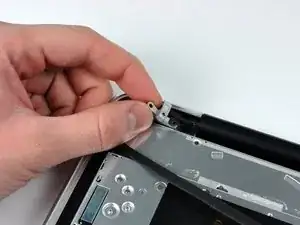
    • Apple hat ein kleines Stück durchsichtigen Kunstoffs auf einer Seite des Logic Boards hinter den Stecker des Kamerakabel geklebt, damit der Stecker im Anschluss drin bleibt. Achte beim Entfernen darauf, dass du keine oberflächenmontierte Bauteile auf dem Logic Board beschädigst.

    • Drehe den Kunstoffhalter mit der Spudgerspitze vom Kamerakabelstecker weg.

  8. egu2ZAPLAxrSAklX
    egu2ZAPLAxrSAklX
    Hih3LXym2gKoPOKB
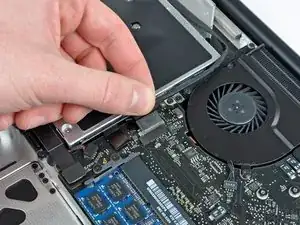
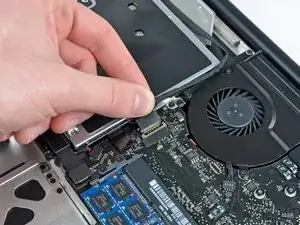
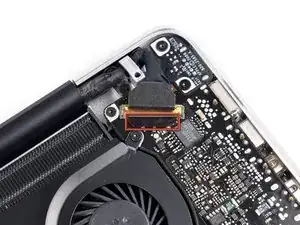
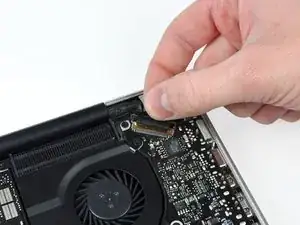
    • Ziehe das Kamerakabel aus seinem Anschluss auf dem Logic Board heraus.

    • Ziehe den Stecker parallel zur Oberfläche des Logic Boards, nicht senkrecht zu ihr.

  9. MMq6rZB44lRK3qme
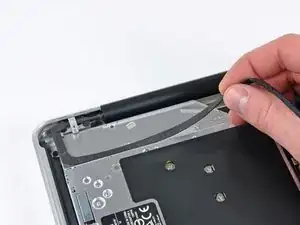
    • Löse das Kamerakabel aus der Klebeverbindung zum optischen Laufwerk.

  10. tUYelyy4dFWd2PgR
    tUYelyy4dFWd2PgR
    6Pxqo6QXisUH3BLG
    • Dieser Schritt ist nur für das entspiegelte Display nötig. Wenn du ein glänzendes Display hast, gehe gleich zu Schritt 12.

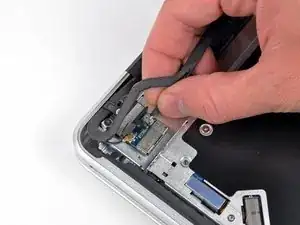
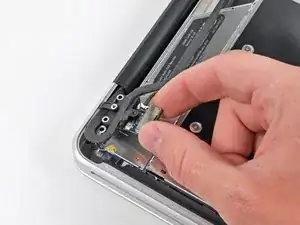
    • Ziehe das männliche Ende des Bluetooth-Kabels gerade aus seinem Anschluss heraus und trenne das Kabel ab.

    • Ziehe den Stecker parallel zur Oberfläche des Logic Boards, nicht senkrecht zu ihr.

    • Heble das Bluetooth-Antennenkabel mit dem flachen Ende des Spudgers aus seinem Anschluss auf der Platine.

  11. 4fgVR6B1BkdXcIV1
    4fgVR6B1BkdXcIV1
    gMhPMSLu3GUwog6V
    • Dieser Schritt ist nur für das entspiegelte Display nötig.

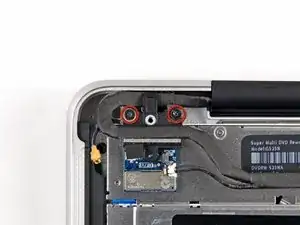
    • Entferne die beiden 8 mm Kreuzschlitzschrauben, mit denen der Halter des Bluetooth/Kamera-Kabels am oberen Gehäuse befestigt ist.

    • Eine der Schrauben bleibt möglicherweise in der Erdungsöse des Bluetooth/Kamerakabels hängen. Wenn du das Display austauschst, musst du diese Schraube auf dein Ersatzteil übertragen.

    • Hebe die Haltereinheit für die Bluetooth-Karte/Kabel aus dem oberen Gehäuse.

  12. OMInEMkJcFJmi1Ue
    OMInEMkJcFJmi1Ue
    TAhl3uIf5FPGwfRG
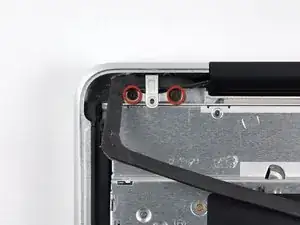
    • Dieser Schritt ist nur für Geräte mit glänzendem Display nötig. Überspringen ihn, wenn dein Display entspiegelt ist.

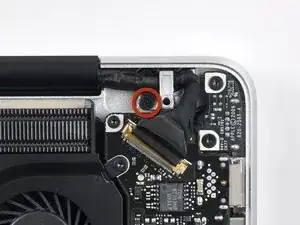
    • Entferne die beiden 8 mm Kreuzschlitzschrauben, mit denen der Halter des Kamerakabels am oberen Gehäuse befestigt ist.

    • Eine der Schrauben bleibt möglicherweise in der Erdungsöse des Bluetooth/Kamerakabels hängen. Wenn du das Display austauschst, musst du diese Schraube auf dein Ersatzteil übertragen.

    • Hebe den Halter des Kamerakabels aus dem oberen Gehäuse.

  13. jagEtZZLMqTrSTxC
    jagEtZZLMqTrSTxC
    qUJE1PcUsitmgSEK
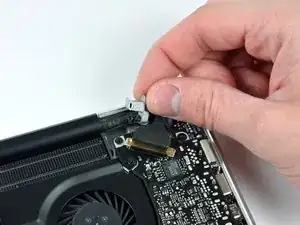
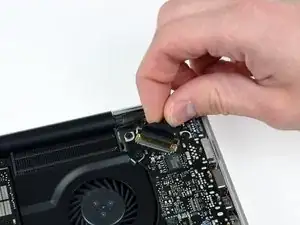
    • Fasse die Plastikzuglasche an der Verriegelung des Displaydatenkabels und drehe sie zur Seite mit der Gleichspannungsversorgung am Computer.

  14. rlRaHhJone5TIxnj
    rlRaHhJone5TIxnj
    hU1WhmGLVyJYV5FZ
    • Entferne die einzelne 7 mm Kreuzschlitzschraube, welche den Halter des Displaydatenkabels am oberen Gehäuse befestigt.

    • Diese Schraube bleibt möglicherweise in der Erdungsöse des Displaydatenkabels hängen. Wenn du das Display austauschst, musst du diese Schraube auf dein Ersatzteil übertragen

    • Entferne den Halter des Displaydatenkabels vom oberen Gehäuse.

  15. QRSpZlYcPYBbCrvD
    • Acht darauf, dass der Sicherungsbügel am Datenkabel wirklich in Richtung der Gleichspannungsplatine geklappt ist, bevor du weiterarbeitest.

    • Ziehe den Displaykabelstecker gerade aus seinem Anschluss heraus.

    • Achte darauf, dass du den Stecker parallel zur Oberfläche des Logic Boards ziehst, nicht senkrecht zu ihr.

  16. BJqRy2UvRXewsnMl
    BJqRy2UvRXewsnMl
    SGOq2aOaaoVSI3hv
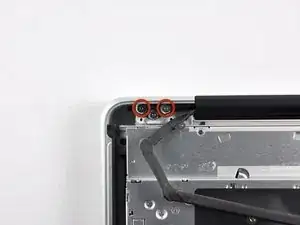
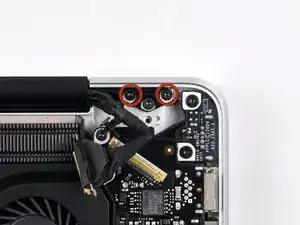
    • Entferne die beiden äußeren Torx T6 Schrauben, mit denen beide Displayscharniere am oberen Gehäuse befestigt sind (insgesamt vier Schrauben).

  17. 4IEufBYVCKFa5THl
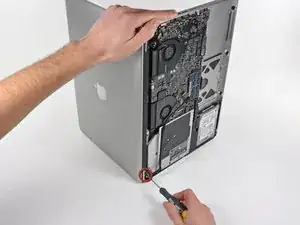
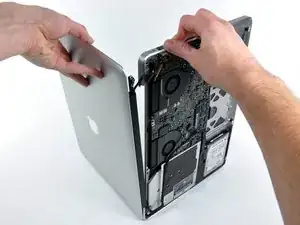
    • Öffne das MacBook, so dass das Display senkrecht zum Gehäuseoberteil steht.

    • Stelle das geöffnete MacBook so wie gezeigt auf den Tisch.

    • Halte das Display und das Gehäuseoberteil mit der linken Hand fest. Entferne dann die letzte Torx T6 Schraube von der unteren Displayhalterung.

  18. aZVA2GxaNBWCgDFa
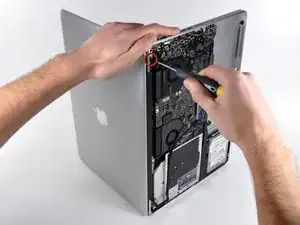
    • Achte darauf, das Display und das Gehäuseoberteil gut mit der linken Hand festzuhalten. Wenn du dabei einen Fehler machst, könnte das Display/ Gehäuseobeteil hinfallen und dabei jedes Bauteil beschädigt werden.

    • Entferne die letzte Torx T6 Schraube, welche das Display noch am Gehäuseoberteil festhält.

  19. SwsWvRDemQNlHrtC
    SwsWvRDemQNlHrtC
    Qjr35mVTnAbYiVXI
    IN3HUVrULpTNAVNM
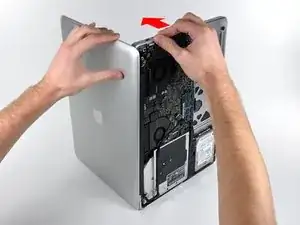
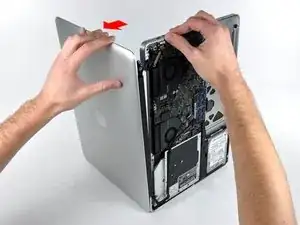
    • Fasse das obere Gehäuse mit der rechten Hand an und drehe es etwas in Richtung Oberkante das Displays, so dass sich die obere Displayhalterung vom Rand des Gehäuseoberteils löst.

    • Drehe das Display ein wenig vom Gehäuseoberteil weg.

    • Hebe das Display hoch und weg vom Gehäuseoberteil. Achte dabei darauf, dass sich keine Klammern oder Kabel verfangen.

Abschluss

Um dein Gerät wieder zusammenbauen, folge den Schritten in umgekehrter Reihenfolge.
Andrew Bookholt

578335 Reputation

0 Kommentare