Einleitung

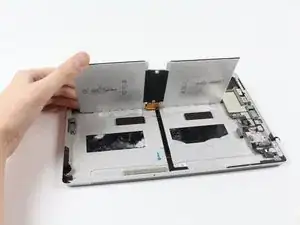
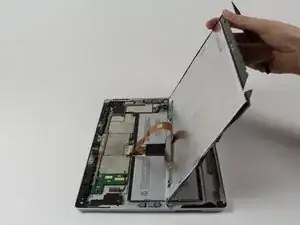
Zum Ausbau des Akkus musst du erst das Gehäuse öffnen, den Kleber unter dem Akkupack lösen und zum Schluss den Akku entfernen und ersetzen.

  1. i3gUIJqKOV24tRAa
    i3gUIJqKOV24tRAa
    4hMYe1pSQOSBwrBy
    • Erwärme einen iOpener, wie in der iOpener Anleitung angegeben.

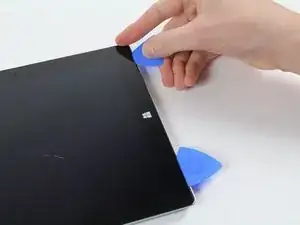
    • Lege den warmen iOpener auf die Kanten des Bildschirms. Die Wärme verringert die Klebekraft des Klebers zwischen Display und Gehäuse.

    no, I didn't break the screen upon removing batteries.

    Robert Hale -

  2. DVPciF4CvQJmoTBb
    DVPciF4CvQJmoTBb
    Slju3QQMa2gfLGZP
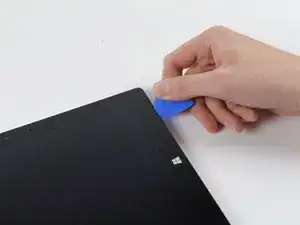
    • Schiebe ein iFixit Opening Pick (Plektrum) unter die Kante des Bildschirms bei der Lausprecherbuchse.

    • Die erfordert relativ große Kraftanstrengungen. Ein Fingernagel hilft am Anfang beim Anheben.

    • Wenn du das Plektrum gerade nach unten an der Kante hineinschiebst, wird er durch das Lautsprechergitter gehen und eventuell den Lautsprecher beschädigen. Versuche das Plektrum in einem flachen Winkel hineinzuschieben.

  3. qBJP5nD4H5yRZr3T
    qBJP5nD4H5yRZr3T
    usiC5WA6MiTnetEY
    • Arbeite dich vorsichtig um das Gerät herum, dazu brauchst du Plektren, einen warmen iOpener, und Glück.

    • Sollte das Glas auf einer Seite gebrochen sein, versuche es erneut von der anderen Seite, damit du auf dieser Seite eine saubere nicht gebrochene Kante hast.

    • Auch wenn das Glas dieses Displays keine scharfen Kanten hat, wenn es gebrochen ist, bleibt es doch zerbrochenes Glas, mit dem man vorsichtig umgehen sollte.

    Be very careful on the top edge where the front-facing camera is. The antenna’s for all wireless components are pressed into the adhesive on both the right and left of the camera. I tore off a piece of my wifi antenna here.

    Adam Pyle -

  4. QWQbliwkeU6baZER
    • Drehe das Display um, so dass die darunter liegenden Teile gut zugänglich sind.

    • Nimm das Display nicht heraus, denn es ist noch immer mit der Hauptplatine verbunden.

    • Falls du das Display ersetzt, oder es einfach aus dem Weg haben willst, fahre mit den in den Schritten der Anleitung zum Ersetzen des Displays fort.

    Please note that the WIFI antenna can become stuck to the display. It is located on the black plastic to the right of the camera and can be easily disconnected accidentally. Excellent guide otherwise.

    Gary Gleeson -

    I second this comment. Didn’t know it was there. The surface 3 pro guide clearly warns of this in the takeapart.

    Brian Carlson -

  5. KDBRoSE6iN3PTXbl
    • Wenn du das Gehäuse geöffnet hast, kannst du den Akku austauschen.

  6. yiIDVBKeTGZlFf5p
    yiIDVBKeTGZlFf5p
    TrZExppRRJHiDLFo
    MS2MPN6WVZx4LSl5
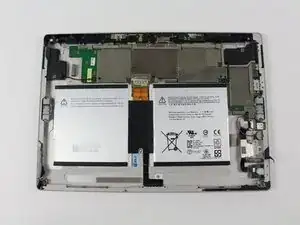
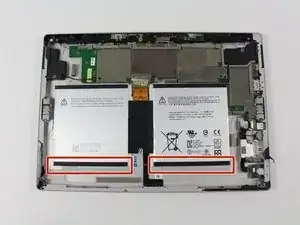
    • Schiebe Plastikkarten unter die Teile des Akkupacks.

    • Schiebe die Karten um den Akku herum, damit sich die Klebeverbindung darunter löst.

  7. xclcRAaoZYCxIVcu
    xclcRAaoZYCxIVcu
    fFLCOmbQTxXsiSLK
    jWt3VlUGYlBQjkXm
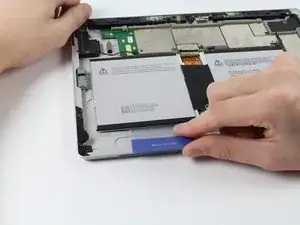
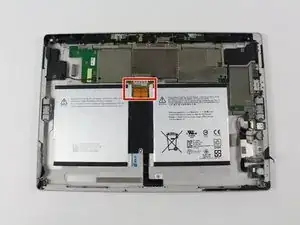
    • Schiebe vorsichtig den Flachverbinder für Versorgung und Daten des Akkus aus seinem Anschluss heraus.

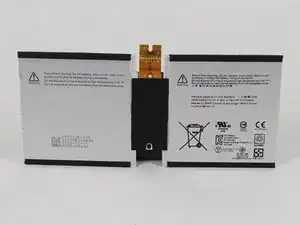
    • Nun kannst du den Akku durch einen neuen ersetzen.

    When replacing the battery, the connector will not slide back in where it came from easily. There are small “fingers” that press down on the top of the connector from the bottom of the logic board, they are pressed down against the back of the casing so firmly that the connector will not slide under them, instead the cable will ride up them and jam into the back of the logic board. I’ve found the best solution is to remove the screws from the logic board and use a spudger to gently lift the logic board to make a space under the fingers to allow the connector to slip back in.

    Brad Perkins -

    Be aware of the fragility of the battery connector and ensure that the replacement has got the cut out on the leading edge. I’ve managed to break / snap the connecting cable on the replacement battery :-( so will have to order another and try again (at £25 its worth trying again IMHO).

    Gary Gleeson -

    If one of this pins holding the ribbon breaks does the mother board still work, with a new battery. Do i need to remove motherboard to instsll battery ribbon. Its hard not to break.

    Ana Rios -

    I took out the six (torx 3) and two (torx 2) screws near the battery terminal. Then used a spudger on the left side of the logic board to get it high enough off the frame to sneak in the battery connector. Worked great. Helps to have an extra hand too.

    Corey S -

    I want to ask that do I need to fold the battery's flat power and data connector first before I slide connector into its insert?

    It does not work when I slide it in, or I just not slide it deep enough?

    tsengkt -

    I installed the battery but it was shorting. Examine a picture of the backside of the motherboard (ebay). There are THREE rows of connector pins to the battery, not just the row you see, and you’ve got to get under all the rows it’s supposed to connect to or it shorts. Only way to do this is to get some screws out and lift the motherboard enough to get it under.

    kevin messerschmidt -

    It’s a very important point mentioned a couple of times above concerning the contact fingers. As the top edge of the circuit board seems to be stuck into the back case you have to prise up the bottom of the circuit board enough to slide the connector under and over a plastic stud. The problem is that there are three rows of fingers on the circuit board which connect to the battery connector and it’s very easy to lift the connector over the plastic stud and then not get it down again to get under the third row of fingers.

    maytrees webmaster -

Abschluss

Um dein Gerät wieder zusammenzusetzen, folge den Schritten in umgekehrter Reihenfolge.

Johann Cayaban

Mitglied seit: 01/10/15

641 Reputation

11 Kommentare

I followed these instructions without a hitch but now that I'm trying to put the new battery in I can't slide the connector for the new battery back in. It seems like the teeth that are supposed to grab the connector for the battery are too tight so I can't side the director for the battery in. Do you have any advise for this issue that I'm having?

John Salazar -

Recently had to complete this repair for a customer. Was in the same boat, couldn’t figure out how to plug the battery back in. And wasn’t paying attention to how the connection was originally, when i pulled the battery. The connector has to slide UNDER the teeth, not above. Meaning loosen the board screws and lift the board slightly, then slide the battery connector in. hopefully this helps others that a stuck with this issue, and iFixit will update this guide.

Marno Junta -

Great pictures and tools shown.

philbu -

Hab’s versucht und es hat leider nicht mal in Ansätzen geklappt. Genau wie beschrieben hab ich den iOpener 30 Sekunden lang in der Mikrowelle erhitzt und dann auf die rechte Seite des Geräts gelegt. Nach ein paar Minuten war ich der Meinung es kann losgehen und hab wie beschrieben an der Einbuchtung des Lautsprechers das Glas leicht angehoben und mit dem Plektrum in flachem Winkel angesetzt. Bevor ich noch groß Kraft anwenden konnte hatte ich schon den Sprung und ein ordentliches Stück Glas ist mir weggesprungen. Zunächst dachte ich dass es halb so schlimm sei, denn es hat “nur” den schwarzen Rand erwischt, nicht jedoch das Tochscreen selbst. Naja nach kurzer Zeit ist der Riss gewandert und nachdem die Tochfunktion nicht mehr ging, kamen danach die bunten Streifen…. 300€ kostet der Displaytausch und noch mal 90€ der Akku tausch. Hätte ich gewusst wie unfassbar leicht das Glas springt, hätte ich sofort den Akkutausch machen lassen und nicht selbst Hand angelegt -.-

Elias Aminger -

Anyone know where to find a photo of the motherboard?

Frank Ho -

Hi Guys. Any idea whether we can replace the SSD in Surface 3. My Surface 3 goes to BSOD loop and i tried resetting and it dint work. Tried memtest86. it passed too. Then used the surface drive eraser tool to wipe the drive clean. but still it goes to bsod while installation reaches some percentage. Tried all possible things with in my resourses. Dint try opening the surface yet. if the ssd is replaceable please let me know whats the ssd model to be bought

Jacob George -

Hi Guys. Any idea whether we can replace the SSD in Surface 3 (1645) . My Surface 3 goes to BSOD loop and i tried resetting and it dint work. Tried memtest86. it passed too. Then used the surface drive eraser tool to wipe the drive clean. but still it goes to bsod while installation reaches some percentage. Tried all possible things with in my resources. Dint try opening the surface yet. if the ssd is replaceable ? please let me know whats the ssd model to be bought. Thanks a lot in advance Stay Safe

Jacob George -

Got it all back together with no issues except…. it won’t power up. How long do I need to wait for it to charge the batteries before I can use it. Should I not be able to use it while it’s plugged in and charging?

sam mendolia -

What’s the battery part and where do I order it?

Mark R Krebs -

OK here are few more things to know. First unless you’re incredibly lucky, or have done this before you ARE going to crack your screen. This is especially true if its under pressure from battery swelling. Do yourself a favor and buy a new screen and tape as well.

Second, you don’t slide the battery connector into place. Take a close look at it, that hole in the top center goes over a peg, you need to take out enough screws from the motherboard to lift it out of the way enough to be able to lay the ribbon in place. I would suggest to go as far as to fully remove the motherboard so that the battery can be laid in place correctly and the board replaced over it.

The speaker connectors are also not just pull straight connectors to remove, they require an slight up and out movement to keep them intact.

The primary screws are T3 torx however there are two T2 torx screws, T2 isnt included in as many hardware packages.

Doug Moore -

I figured out, using a heat gun or a blowdryer all the way around the display for about 5 minutes, to where it's hot to the touch, use the plastic picks and slowly insert one into each side, or just two of the sides. Then work your way slowly while still blowdrying ahead of the pick, and eventually you will work your way around without any damage to the screen if you are patient enough :) hope it helped!

Cole Webber -