Einleitung

Nutze diese Anleitung, um den kaputten oder schwachen Akku deines Motorola Moto X Pure Edition zu entfernen oder zu ersetzen. Wenn dein Akku aufgebläht ist, musst du entsprechende Vorsichtsmaßnahmen treffen.

Entlade den alten Akku aus Sicherheitsgründen vor der Reparatur auf unter 25%. Das verringert das Risiko eines Feuers, falls der Akku während der Reparatur versehentlich beschädigt wird.

  1. HLdluIWpkOFNwt6L
    HLdluIWpkOFNwt6L
    ukfDNVWwefKGB5CB
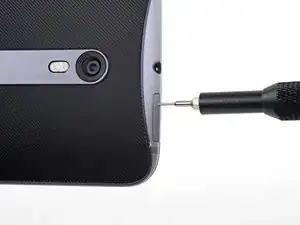
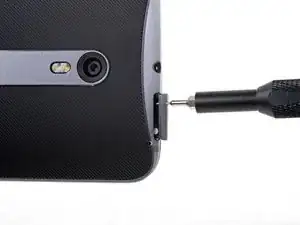
    • Setze ein SIM Karten-Auswurfwerkzeug, ein Bit oder eine aufgebogene Büroklammer in das kleine Loch im SIM Karteneinschub.

    • Drücke darauf, um den Einschaub herauszuholen.

    • Das kann durchaus etwas Kraft erfordern.

  2. WtECpKZPuZDeuCJP
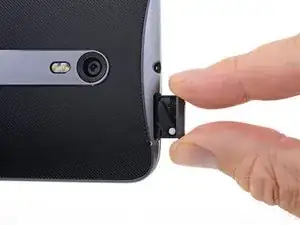
    • Entferne den SIM Karteneinschub vom Smartphone.

    • Die SIM Karte lässt sich leicht herausnehmen.

    • Achte beim Einsetzen der SIM Karte darauf, dass sie in der richtigen Richtung in den Einschub eingelegt wird.

  3. I1VFOoKklSWOU1TX
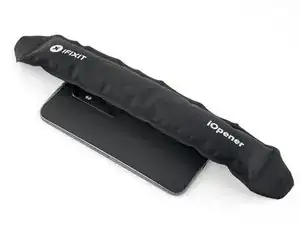
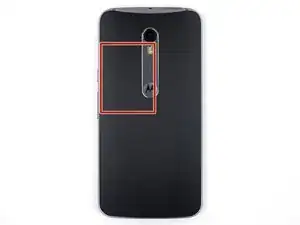
    • Bereite einen iOpener vor und erwärme damit etwa fünf Minuten lang die rechte Kante auf der Rückseite des Smartphones. Dadurch wird der Kleber, mit dem die Rückabdeckung befestigt ist, aufgeweicht.

    • Unter Umständen musst du den iOpener mehrfach erwärmen und auflegen, damit das Smartphone warm genug wird. Folge den iOpener Anweisungen, um eine Überhitzung zu vermeiden.

    • Du kannst auch einen Fön, eine Heißluftpistole oder eine Wärmplatte benutzen, aber achte darauf, das Smartphone nicht zu überhitzen. Das LCD Display und der interne Akku sind beide sehr hitzeempfindlich.

  4. 4ITIIfrt26JXPIxU
    4ITIIfrt26JXPIxU
    OHtsmlqMpbdFj1iT
    HoXl4feVInrdRIed
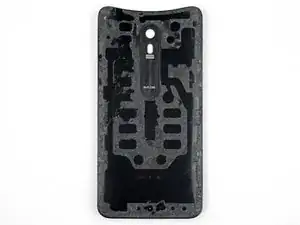
    • In den folgenden Schritten wirst du den Kleber durchschneiden, mit dem die Rückabdeckung befestigt ist.

    • Auf dem ersten Bild siehst du, wie der Kleber auf der Innenseite der Rückabdeckung verteilt ist.

    • Schneide nicht in diesem Bereich, sonst könnten empfindliche Flachbandkabel beschädigt werden.

  5. BbSSSWONko31DNI2
    BbSSSWONko31DNI2
    45SkQkVXlySQoSYl
    aexbJkJH2nZvLCAu
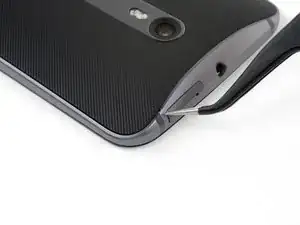
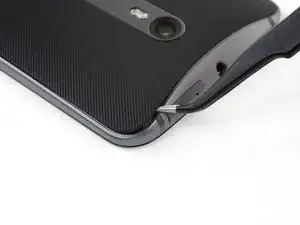
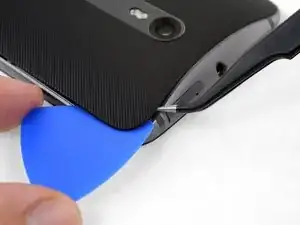
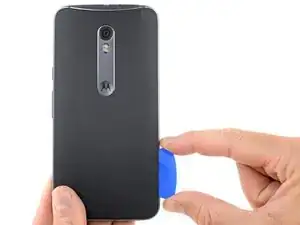
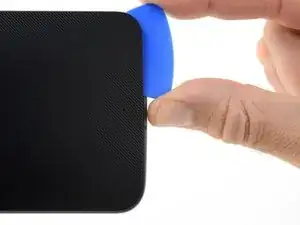
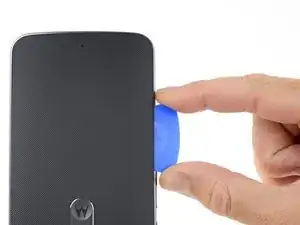
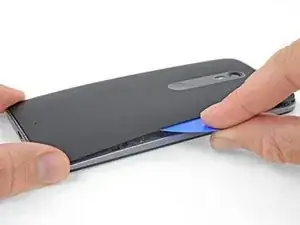
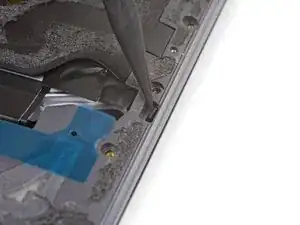
    • Drücke die Spitzen einer Pinzette zusammen und setze sie in das kleine Loch auf der Kante der Rückabdeckung neben dem SIM Kartenslot.

    • Hebe die Abdeckung leicht mit der Pinzette an und schiebe ein Plektrum in den Spalt zwischen Abdeckung und Rahmen.

    Insert only one of the tweezers’ point into the hole. Once the rubber backing is lifted high enough, slip a corner of the opening pick under the rubber backing. Leave the first pick near the corner while you use a second pick as directed in Step 6.

    Levi Asuncion -

  6. WfD6WDXBDtObiGgN
    WfD6WDXBDtObiGgN
    p5KZsRrrfyjQLHJA
    SoGbtZZolDdnMPjA
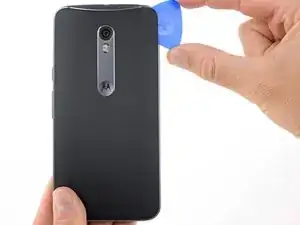
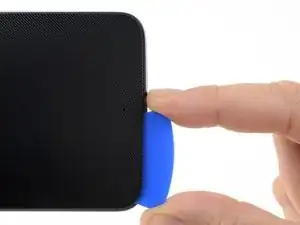
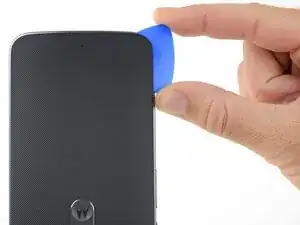
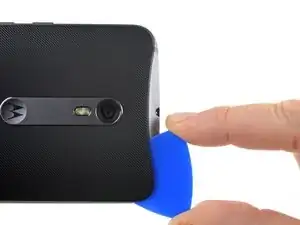
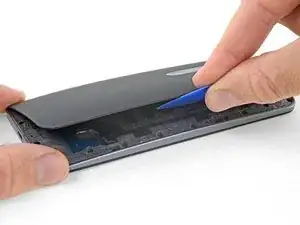
    • Schiebe das Plektrum an der Kante entlang, um den Kleber der Rückabdeckung zu durchtrennen.

    • Versuche, das Plektrum so tief wie möglich unter die Abdeckung zu schieben in die Mitte der Abdeckung. Dort befindet sich eine dicke Schicht Kleber, die durchtrennt werden muss.

    • Lasse das Plektrum stecken und mache mit dem nächsten Schritt weiter. Das Plektrum verhindert, dass sich der Kleber, den du eben abgetrennt hast, wieder verbindet.

    I did not have a pick, used a few old credit cards, leaving them in place to keep the phone back separated.

    Used a hair dryer to heat up a little, one section at a time, was enough to remove. Pulled apart slowly.

    Left adhesive on the back and on the phone, where possible, using a tiny screw driver to separate. Reused whatever adhesive remained to reattach.

    Natalie Hursky -

  7. IxCNPhJWutPrxXdc
    • Bereite einen iOpener vor und erwärme damit etwa fünf Minuten lang die linke Kante der Rückabdeckung. So wird der Kleber, mit dem der Rest der Rückabdeckung befestigt ist, aufgeweicht.

    • Unter Umständen musst du den iOpener mehrfach erwärmen und auflegen, damit das Smartphone warm genug wird. Folge den iOpener Anweisungen, um eine Überhitzung zu vermeiden.

  8. YXJApJG1xQgPLQeZ
    YXJApJG1xQgPLQeZ
    1MoP2YItFZBf2CFY
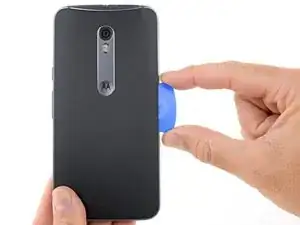
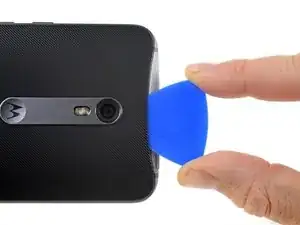
    • Durchtrenne den Kleber an der Unterkante des Smartphones.

    • Erwärme die Rückabdeckung gegebenenfalls erneut, damit der Kleber nicht abkühlt und wieder fest wird.

  9. tZMViRwW2kFwmdoq
    tZMViRwW2kFwmdoq
    QmkNYhL1Kuscm5Kp
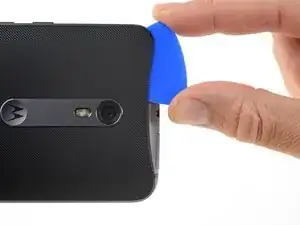
    • Durchtrenne den Kleber an der linken Seite.

    • Versuche, das Plektrum so tief wie möglich unter die Abdeckung in die Mitte der Abdeckung zu schieben. Dort befindet sich eine dicke Schicht Kleber, die durchtrennt werden muss.

    • Höre mit dem Schneiden auf, sobald du an die Kante der Lautstärketasten kommst, sonst riskierst du, die Flachbandkabel unter der Abdeckung zu beschädigen.

  10. cjcZoKkITldAUNXJ
    cjcZoKkITldAUNXJ
    mVOBOBxnhTNDTDQp
    lWHNArHdFiVwUwM4
    • Durchtrenne den Kleber an der Oberkante, führe dabei das Plektrum vorsichtig um die Rückkamera.

  11. QOZOuWRIwJsVmUWg
    QOZOuWRIwJsVmUWg
    hEVyVJoDTCWe1GRK
    TRBGiOQqSjZR15NL
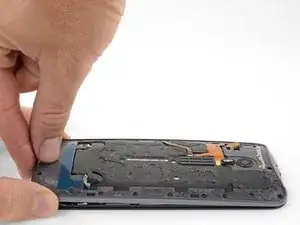
    • Heble die Abdeckung vorsichtig vom Smartphone ab.

    • Das kann einiges an Kraft erfordern, falls der Kleber in der Mitte nicht ganz durchtrennt ist. Unter Umständen musst du beim Abheben den restlichen Kleber in der Mitte mit einem Plektrum durchtrennen.

    • Um die Rückabdeckung wieder einzusetzen, gehe folgendermaßen vor:

    • Entferne zuerst mithilfe einer Pinzette und einem Spudger alle Klebereste von der Rückabdeckung und vom Rahmen.

    • Reinige dann die Klebebereiche mit hochkonzentriertem Isopropylalkohol (mindestens 90%) und einem fusselfreien Tuch. Wische nur in eine Richtung, nicht hin und her. Die Oberfläche wird so für den neuen Kleber vorbereitet.

    • Die Ersatzklebestreifen werden mit den exakt vorgestanzten Kontouren der Rückabdeckung geliefert. Ansonsten kannst du Klebeband wie Tesa 61395 benutzen. Bevor du die vorgestanzte Klebefolie auf der Rückabdeckung anbringst, musst du den Metalleinsatz entfernen. Bringe den Klebestreifen an, dann wieder den Metalleinsatz.

    • Nach dem Einbau der Rückabdeckung solltest du mehrere Minuten lang festen und gleichmässigen Druck auf dein Smartphone ausüben, damit sich der Kleber gut verbindet.

    • Du kannst die Rückabdeckung auch ohne Kleber wieder einsetzen. Entferne dazu vorher größere Klebestoffklumpen, die verhindern könnten, dass die Rückabdeckung gut aufliegt. Erwärme die Rückabdeckung nach dem Einbau und drücke sie gut fest.

    Had the pre-cut adhesive sheet for reinstalling the Moto X Pure’s back cover. It seemed like the most “original” option at the time. I tried and tried to get it aligned inside the back cover, but found it virtually impossible to do. You pretty much have to get it perfectly aligned and then stick it down all at once. If it makes contact with the cover before it’s perfectly aligned, it’s all over. You’ll never get it back off without destroying it.

    After failing with the pre-cut sheet, I resorted to the die-cut strips and corner pieces. This worked just fine.

    Jeff Carleton -

  12. ah4W6JLwrZGvTHTw
    ah4W6JLwrZGvTHTw
    1t1x4EddN5225Miw
    Lv2tFWVD2TuCcHma
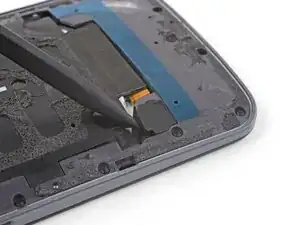
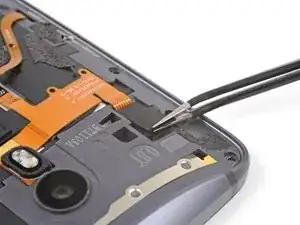
    • Heble die Gummiabdeckung über dem Akkustecker mit der Spitze eines Spudgers hoch.

    • Entferne die Gummiabdeckung.

  13. nDX2pqVCgHMiHA1C
    nDX2pqVCgHMiHA1C
    AxdJRLYT3cLwwmLU
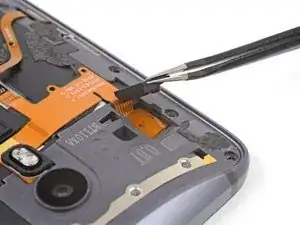
    • Heble den Akkustecker mit dem flachen Ende des Spudgers aus seinem Anschluss heraus nach oben.

    • Heble nur an der kleinen Lasche auf dem Ende des Steckers gegenüber vom Flachbandkabel. Drücke nicht zu fest gegen den Stecker, da du sonst unter Umständen den Anschlussstecker auf dem Motherboard beschädigst.

    Reconnecting the battery was difficult, did not align exactly. Note there are 2 slots that line up and 4 pins. Used a 10x magnifying lens with LED light, purchased to do this job. This step (reassembly) is where the magnifier came in handy. Had to move battery around a bit to get it to line up. Ended up removing adhesive tape from battery, so I could get in place to attach the connector. Battery held in place with screws and phone case, so far so good.

    Natalie Hursky -

    this is the difficult part. I find it is easier to remove this connector as the midframe and phone screen are separating (see step 19). Be also careful in prying this mine got broken luckily it is connected to the old battery which I replaced anyway

    Neil Catalan -

    Broke the battery plug right off the motherboard! Trying to do a 2nd battery replacement. Only push up gently on the edge of the tab and straight up. Shopping for a new phone.

    Natalie Hursky -

  14. 6csWJbhBacko22VM
    6csWJbhBacko22VM
    pUdEueRhCjxB3A3d
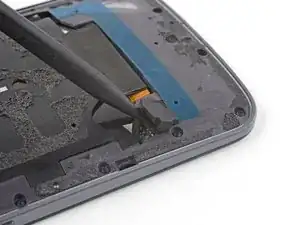
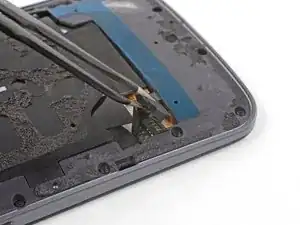
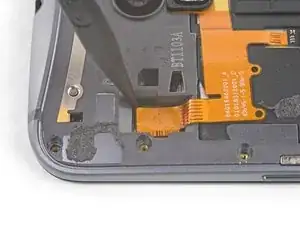
    • Hebe die Gummiabdeckung über dem Stecker des Blitzes mit einer Pinzette ab.

  15. gX4tqtZjxamLkswY
    gX4tqtZjxamLkswY
    oMsPvZpCQUtOqbbB
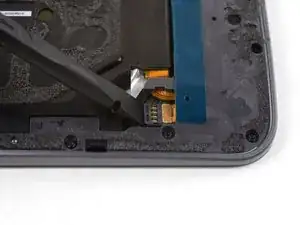
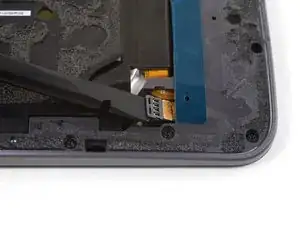
    • Setze die Spudgerspitze gegen die Ecke des Blitz-Steckers , um den Stecker aus seinem Anschluss heraus nach oben zu hebeln.

  16. cuuTufVE1SKP3nu3
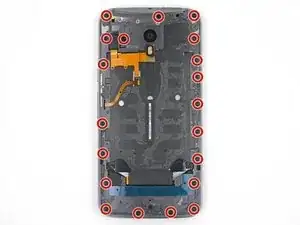
    • Entferne die zwanzig 2,4 mm Schrauben mit einem T3 Torx Schraubendreher.

    Need to add a step for removing the bar holding the buttons in place. Step 5 from the tear down. Still can’t take the mid frame off though.

    Pieter Richards -

    I stripped the threads on one of the 20 screws, had to drill it out. (Managed to do this without cracking the screen, completed battery replacement, all ok.)

    Careful removing the screws, be sure of tight grip. I saw T4 torx suggested on another site for Moto X Pure, this might grip better? Try both.

    Natalie Hursky -

    I did not have to remove the screw holding the volume buttons bar in place. These stay attached, not needed for replacing the battery. Just the 20 screws shown.

    Natalie Hursky -

    DO NOT REMOVE THE SILVER SCREW HOLDING IN THE VOLUME AND ON-OFF BUTTON. If these buttons fall out there are 4 very small springs that will pop out and are very hard to reinsert. If they do pop out do not use tweezers to reinsert but use a magnetic screw driver bit to reinsert.

    Michael Bedwell -

    This is extremely easy to overlook. This screw is a different color (silver versus black) but when you’re in the swing of removing all the screws it’s tempting to just remove ALL the screws. I goofed, had the buttons fall out, could only find 3 of the springs. Put two back in the volume rocker and only one in the power button since it’s smaller, seems like it wouldn’t need two as much. Everything still works, maybe just slightly less tactile than before. Even without the the springs, there’s still some mechanical return to the buttons, so if you do lose them don’t despair.

    Michael Decker -

    This is not working, got two out. Most just strip.

    Christina Denboer -

    Update. The driver provided is not the right size. I had some tools laying around and found one that fit. This allowed me to get all the screws out except the six I stripped using the driver provided by ifiixit. Turns out they come out pretty easy if you have the right size bit. Would have been an easy fix had I not bought the tools…. go figure.

    Christina Denboer -

    What is the right size bit?

    Marlon Nelson -

    The T3 Torx Driver was bundled in the bag with the Alcohol Prep Pad, not with the rest of the drivers! So look before you there before you call support like I did.

    pixilated1 -

    T4 works better, T3 also works. Try both and proceed carefully, get a good grip before turning.

    Natalie Hursky -

  17. TDl2WjeUJqcmYVIZ
    TDl2WjeUJqcmYVIZ
    V4RwIievwOLpDWQJ
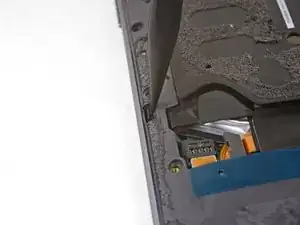
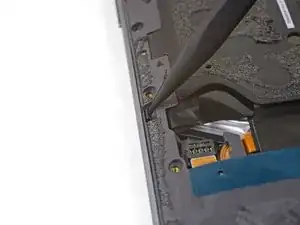
    • Drücke die kleine Klammer, mit der die linke Seite des Mittelrahmens befestigt ist, zur Kante des Smartphones, um sie zu lösen.

    On reassembly, these did not really click back in place. Held tight when reattaching the 20 (19 in my case) screws).

    Natalie Hursky -

    I had to push rather hard to release both clips. The tip of the spudger bent under the pressure I had to apply. But the the clips did finally release without damage.

    Thomas Bartol -

  18. e2MUxBsMTQjxcoVc
    • Wiederhole den vorherigen Schritt, um die Klammer an der rechten Seite des Mittelrahmens zu lösen.

  19. DbVyTklTFsoQH5y3
    DbVyTklTFsoQH5y3
    5gCGwlFmBVlDXTQD
    d3d3HCBhe3bklqDM
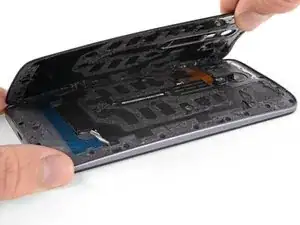
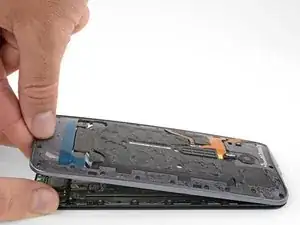
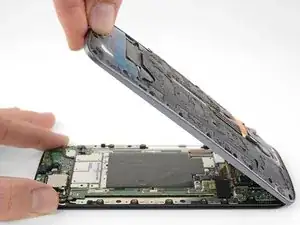
    • Halte das Display an den Kanten fest und hebe den Mittelrahmen vorsichtig vom Display.

    • Entferne den Mittelrahmen vom Display.

    My mid-frame and display were separated on the long sides but seemed a little bit stuck on the top and bottom. I used the flat end of the spudger to carefully pry the two assemblies apart at either end.

    Gary Herber -

    In my case, stuck in the middle. Pulled apart very slowly, giving the adhesive a chance to separate, and not tearing whatever it was in there. Kept an eye on the inside middle, and very SLOW let it separate. Or was that the battery? In either case, go slow on all steps.

    Natalie Hursky -

    Yeah, everything went according to the guide until this step. I lifted the midframe away from the screen assembly as shown and something in the center didn’t separate at all. I spent a good half hour terrified that I had missed a step or a screw or that there was something different about my phone. In the end I read the comments and very slowly and patiently lifted the midframe until something uncoupled and the two parts cleanly separated. I was certain that permanent damage must have been done, but upon reassembling everything seems to be working perfectly.

    Brian Horne -

    Note to self - check that ALL (20) screws have been removed… especially if midframe is stubborn lifting up - i (almost) forgot about the one near the display cable (and it’s threaded into the motherboard instead of the frame) :)

    John Riselay -

    In my unit, the midframe released from the display nicely just as described in the instructions.

    Thomas Bartol -

  20. J1K52W5bkjLuu1aX
    J1K52W5bkjLuu1aX
    MvchkgooIbJ4QUoS
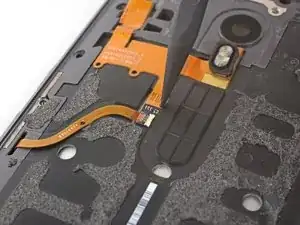
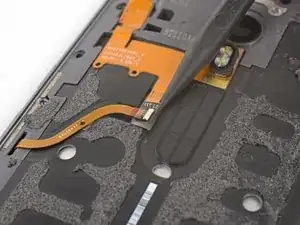
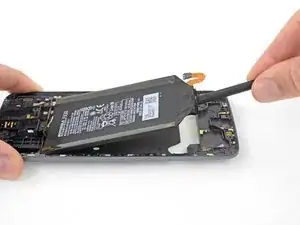
    • Schiebe die Spitze eines Spudgers vorsichtig unter die Ecke der am Akku angebrachten Platine des Lautstärkereglers.

    • Hebe die Platine leicht an, um sie vom Akku zu lösen.

    • Achte darauf, den Akku nicht mit der Spudgerspitze zu perforieren oder das empfindliche Flachbandkabel, das mit der Platine verbunden ist, zu beschädigen. Arbeite sorgfältig und übe keinen Druck auf den Akku aus.

    The entire copper assembly shown next to the spudger is glued to the battery. It will detach with light force.

    Michael Bedwell -

    The flash is adhered to the battery as well. Be careful when pulling the battery away, or detach the flash first.

    Jeff Carleton -

    thanks that is very helpful i will sure to be carful

    Emily Vanderpool -

    The starting point for lifting it off is the top of the pad that’s glued to the battery, not the one coming from the side.

    Greg Bandy -

    what if I broke the cable? could this be the reason my phone won’t turn on?

    Nicholas Dingman -

    I am not sure if I damaged anything during the process. After I replaced the battery and tried to charge the phone, the phone’s screen just kept flashing on and off and the battery did not seem to be charging. John Kang

    John Kang -

  21. YJCq2NV1hTIselgO
    YJCq2NV1hTIselgO
    CE4qhXMF6e2OfRmR
    1KEMcBPUZtDoAtEL
    • Versuche, die Klebestreifen glatt und faltenlos zu halten, da verdrehte oder verknitterte Klebestreifen zusammenkleben und reißen, statt sich leicht entfernen zu lassen.

    • Vermeide es auch, beim Herausziehen der Klebestreifen auf den Akku zu drücken, da sonst die Klebestreifen durch den Druck hängen bleiben und reißen können.

    • Fasse eine der Akku-Klebelaschen mit den Fingern und ziehe sie langsam vom Akku weg in Richtung Unterkante des Telefons.

    • Ziehe gleichmäßig und mit konstanter Spannung am Klebestreifen, bis er zwischen Akku und rückseitigem Gehäuse herausrutscht. Das gelingt am Besten, wenn du den Klebestreifen in einem möglichst flachen Winkel herausziehst, jedoch ohne dass er sich an anderen Bauteilen verfängt.

    • Der Klebestreifen wird sich auf ein Vielfaches seiner ursprünglichen Länge dehnen. Ziehe immer weiter und fasse, falls nötig, den Klebestreifen am Akku nach.

    • Wenn die Klebelasche bei diesem Verfahren reißen sollte, dann hole das restliche Stück des Klebestreifens mit den Fingern oder einer stumpfen Pinzette heraus und ziehe weiter.

    • Wenn einer der Klebestreifen unter dem Akku abreißt und nicht mehr herausgeholt werden kann, entferne zuerst den anderen Klebestreifen und fahre dann wie im Folgenden beschrieben fort.

    When re-assembling, I wasn’t sure how to properly place this connector. I could see where it supposed to connect on the other panel, so I just tried to measure from the nearest screw hole. But how does one know if this part was placed properly?

    Nicholas Price -

    Had to use pliers to grip the black ends of the adhesive strips on mine; not enough room to grip well with fingers and even with the pliers I had to pull daaamn hard on these strips. Glad they didn’t tear though.

    Z3tr0 -

    Thank you all, couldn’t have done it without you….

    Kevin Lankford -

  22. jrHj4uPT2XkZmJnQ
    • Wiederhole den vorherigen Schritt, um auch den anderen Klebestreifen zu entfernen.

    The adhesive strips can be removed from the old battery and stuck to the new battery.

    Jörg R. -

    The thin, orange ribbon cable from the three buttons disconnected from its connector when the battery was removed. I don’t know if anything could have been done to prevent this, especially since the adhesive pull tabs never come out completely. So it was touch and go there for a few minutes until I figured out how that cable reconnects to its connector. (small white tab on connector needs to be lifted up and then the cable reinserted.

    boblienhart -

    the nfc adhesive antenna is attached to the battery, between the battery and the back plate. there are two black tab pulls at the bottom of the battery that protect the nfc antenna. any break to the protective strips for the antenna (while pulling the battery off the back plate) will destroy your nfc. pry from the back plate very slowly and carefully, from bottom, up. to reattach, place the antenna in its cutout well in the back plate, then place the battery on top. NB: you will need to carefully bend the edges of the new battery to match the curvature of the back plate. compare with your original battery.

    pic gla -

    when reinstalling the nfc antenna, use the two pinholes on the back plate, and their matching pin holes in the nfc antenna backing to properly allign the nfc antenna. next, place the battery on top of the antenna and carefully match the placement of the antenna contacts on the battery to ensure they connect with their contacts on the motherboard when the back plate is placed back on the display board.

    pic gla -

  23. ulBgxOPMwrilekmS
    ulBgxOPMwrilekmS
    LiCFJcTlarDGGRMg
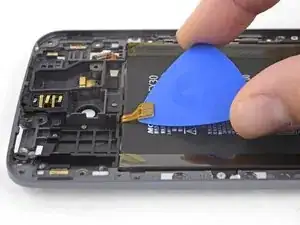
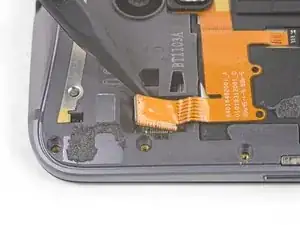
    • Schiebe ein Plektrum unter den NFC-Stecker, um ihn vom Akku abzulösen.

    • Merke dir die Ausrichtung des NFC-Steckers, da er genau so wieder auf dem Ersatzakku eingebaut werden muss. Wenn der Kleber nicht mehr gut haftet, kannst du ihn entfernen und durch ein Stück starkes Klebeband, wie zum Beispiel Tesa 61395 ersetzen.

    The position of the NFC connector is really critical. Before removing the NFC connector from the old battery, make measurements from some reference points on the midframe, so you can reinstall it in the EXACT original position. If it’s not in the right spot, it won’t make contact with the two pins on the motherboard.

    Jeff Carleton -

  24. 1O6SPLEhdlXZwSdF
    1O6SPLEhdlXZwSdF
    mwtFUFwGNUrbFIAy
    rqomV5UIpXxaqFlK
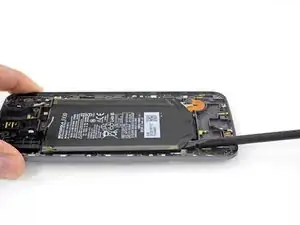
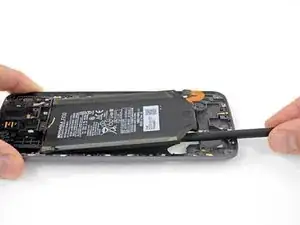
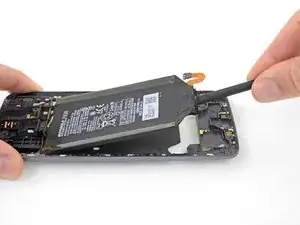
    • Benutze das flache Ende eines Spudgers, um den Akku aus dem Mittelrahmen herauszuheben.

    • Kontrolliere, ob noch irgendwelche Flachbandkabel am Akku kleben und entferne sie gegebenenfalls vorsichtig.

    • Falls der Akku noch festklebt, heble ihn vorsichtig vom Mittelrahmen weg, und achte dabei darauf, den Akku nicht zu verbiegen.

    • Der Akku lässt sich leichter ablösen, wenn der Kleber zuvor durch ein paar Tropfen Isopropylalkohol an jeder Seite aufgeweicht wurde. Hochkonzentrierter Alkohol (90% oder mehr) schadet den Komponenten deines Smartphones nicht.

    • Alternativ kannst du auch den Mittelrahmen erwärmen, um den Akku-Kleber aufzuweichen, achte aber darauf, den Akku nicht zu überhitzen.

    • Vermeide es, den Akku zu verformen oder zu perforieren, er kann Feuer fangen und/oder explodieren, falls er beschädigt wird.

    • Baue nie einen beschädigten oder verformten Akku ein. Du musst ihn ersetzen.

    • Befestige den Ersatzakku mit ein paar Streifen dünnem doppelseitigem Klebeband, wie zum Beispiel Tesa 61395, oder mit einer vorgestanzten Klebefolie.

    The volume ribbon connector mentioned in step 15 is adhered to the back of the battery. You must separate these two carefully with either a thin flat tool or a thin tweezer set. Pulling on the battery without doing this could damage the ribbon connector.

    Danny Post -

    Before you use adhesive on the new battery, be sure to check the position of the battery and cable with respect to the battery cable socket. My replacement battery was a touch shorter than the OEM so the initial placement with the new adhesive left the battery cable in a position where it would not go into the socket.

    Joel Kreitzberg -

    To form a replacement battery that comes completely flat, place the new flat battery on the curved side of the OEM battery. Make sure yo have the cables matching. Then very gently with your fingers/hand, flex the new battery down on the edges until it has the same shape as the old battery. After I did this the new battery fit perfectly in the phone.

    Joel Kreitzberg -

Abschluss

Vergleiche dein neues Ersatzteil sorgfältig mit dem Originalteil. Entferne alle Schutzfolien, bevor du deinen neuen Akku einbaust.

Um dein Gerät wieder zusammenzubauen, folge den Schritten dieser Anleitung in umgekehrter Reihenfolge.

Nach Abschluss dieser Anleitung solltest du deinen neu eingebaute Akku kalibrieren

Bitte entsorge deinen Elektroschrott fachgerecht.

Lief die Reparatur nicht wie geplant? Auf unserem Antwortenforum kannst du Hilfe finden.

Adam O'Camb

Mitglied seit: 11/04/15

178849 Reputation

39 Kommentare

Rayan thank you, although I am not yet ready to replace the battery (about a year to go) yet, I would like to know if there are better batteries than those that came with the unit from the manufacturer? An upgrade that holds a better charge on a daily basis? Marty

marty damskov -

Do you have a link to buy a battery? I've been looking but I'm still not confident with me results. Preferably one that includes the necessary tools, but so long as it's definitely the correct battery. I need to replace my battery, NOW!

Chris DiMisa -

Battery now available. Please see link on this page or here:Motorola Moto X Pure Edition Akku (Original-Ersatzteil)

Jason Clark -

Has anyone bought a 3rd party battery for this phone? I got one from Germany brand name "vhbw", however it is not curved and so will not fit. It is quite soft and so am wondering if it is safe to bend such batteries? Not sure if I should risk it, though.

Alex Damien -

Alex, I bent my new battery to make it fit. It seems to be working just fine.
Nicholas Price -

I found a Motorola brand FX30 battery labeled as "new" on ebay for $30 from a seller with good reputation. Reading the amazon reviews for 3rd party batteries I saw a lot of comments complaining the battery isn't curved like the original and only sort of fits. The FX30 battery I bought is exactly like the one I took out and so is a perfect fit.

New Lithium Ion cells require 5 or 6 charge cycles to properly condition so I won't know if this truly is a good battery for a few days. But at least it fit like a glove!

[deleted] -

I replaced the screen+digitizer and they both seems to work allright. But after that, I'm facing a battery problem: It can't charge to 100% and is continously discharging the battery. I changed the battery, but the problem continued. I think that the battery and charging connector are both ok. Any ideas???

dal -

I have same problem as dal, something “infected” my battery information partition and I suspect it is the same manufacturer malware pushed by apple to sell more phones. In their mindset they think that what they are doing is justified by some forced legal agreement and on the money side of things they think that purposefully obsoleting equipment will force you to purchase newer models.

Something is storing my battery information and I can’t seem to fix it. Also the charging icon is forever stuck on and NO QUICKCHARGE device works with it. It only happens on Nougat!!! And the quick-charge icon is permanently on.

I force downgraded to Marshmallow and problem gone! So it could be a developer oversight or it could be Apples agenda set in software now.

Apple pushes battery degrading malware right before a new release like clockwork, so it is how they got caught, but because of legal agreements that you are forced to accept no one can do anything about it.

I suspect Motorola is doing the same thing here.

QuadrampleEquation -

I have the same problem as dal and I suspect malware, manufacturer sponsored malware to be the culprit.

I know asking for information on here is like going to a church and praying for help but I would like to know WHERE the battery information is stored, in what partition on the emmc? It is NOT store on the data partition that is for sure. There is a special partition designed just for charging and it is a heavily striped down version of android, it also is the PRIMARY target for malware and CENTRAL OPS targeting.

For MTD and EMMC devices, the partition layout and the partition names can be retrieved by reading the /proc/mtd and /proc/emmc files .

So can anyone tell me where the actuall battery informatio is store on motorola devices? I would really like to know as I suspect something needs to be checked here.

QuadrampleEquation -

I oredered a battery from Bigupgadegts on this page.

https://bigupgadgets.com/battery-fx30-sn...

Rick Menzel -

If you are taking the back off, which you need to do to replace the battery, or replace the screen. Then you will need a new adhesive for the back. I have found one: https://amzn.to/2F6nFY5

Clayton Hofrock -

Are you sure the reassembly is simply these steps in reverse order? Will the adhesive from the back plate reattach, or must you really have to buy new a new adhesive sheet for the Moto X?

Alex Cummins -

Hi Alex, I just went through this procedure. As for the adhesive, I used mineral spirits to completely remove the old adhesive off the phone’s plastic backing. Clean w/alcohol after. Then used new adhesive from Amazon—around $5-6 for 2-3 sets of adhesive. The old adhesive sort of splits between the plastic backing and the inside of the phone leaving behind a velvety kind of texture that isn’t very sticky. It may work w/o new adhesive. BTW I found a Motorola branded battery for $35 on Amazon via a Marketplace seller, too, for anyone shopping around. Sort of difficult to find one (Ebay is all China stuff)

Aporia Yixara -

Just completed this replacement. Screws in ours were a great fit for a T4 bit , and came out with just gentle rotational force. A potential issue: There was some adhesive on the back of the battery that adhered to the thin ribbon cable that runs from the Power and Volume buttons to the black connector in the center of the photo for Step 4. When I had the frame flipped over and lifted out the battery, it tugged that cable out of the black connector. The cable fell back on top of the connector so it was not apparent that it was disconnected. When plugged into a charger, the screen worked and the battery indicated it was charging, but the buttons would not power up the phone. It was only after close inspection of the buttons cable that I could see that the end of that cable had been disconnected and had to be reinserted into that black connector in the center of the phone body. I then put the small piece of orange tape back over the connection to secure it. All was great after those uh-oh moments!

John Fink -

that was super helpful. thx so much.

I thought my phone was bricked until I read your comment.

tom -

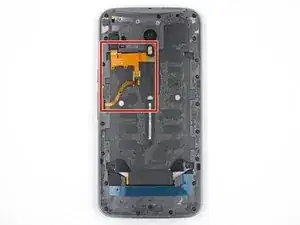
The guide was perfect, except, it failed to mention that the connection junctions, shown in the first image of step 3, is glued to the battery. It should have been circled also. It will be pulled when the battery becomes unseated. The risk of damage is high.

Patrick Williams -

In regards to the adhesive, if you use a heat gun prior to removing the backing it doesn't destroy the adhesive too much. Also prior to reassembly if you heat the backing and the remaining adhesive material on the phone itself it all goes back together pretty well. At least in my experience

Jason Nonya -

I would not have known where to even begin the change out this battery without these instructions. My replacement was successful but it was touch and go for a few minutes since the small ribbon cable from the 3 buttons was disconnected when the old battery was removed. The new battery was a perfect fit and it seems to be well secured even without any extra adhesive.

boblienhart -

This is what motorola chat told me this morning

Rosanna: Please be informed that the battery for Moto X Pure edition is not removable.

.

Ha, I’ve seen a few youtube videos and this website that shows it can be replaced.

Very sad that the people working for the company that made the phone aren’t trained enough to realize this battery can be changed.

Now I need a screen replacement that is already connected to the frame, if any knows where I can get a real OEM one, please let me know.

tz78620 -

You’re in luck! Our screen replacement kit includes all the tools you need, plus an OEM part! We don’t yet have a complete guide, but we’ll let you know when it’s available!

Sam Goldheart -

Hi Rosanna, good news! We have an updated screen replacement guide, as well as a kit with an OEM part! I know Motorola also offers repair solutions on their support site. Thanks for the comment and good luck with your repair, let us know how it goes!

Adam O'Camb -

Was pretty good and I replaced my battery. I do recommend recounting the amount of screws, since the one in sim tray doesn’t actually exist, and maybe a better why of explaining on how to remove the adhesive.

Vladimir Paramzin -

Hello, the kit that I recieved came with a T5 bit but not a T3 one that the guide calls for.

Never mind, it was packaged in a different part of the kit

Sarah Doggett -

I got the battery installed and the phone charges but the phone won’t power on. I suppose I broke something. Wish I didn’t even attempt this. I went from a phone with a weak battery to no phone at all, and I’m out $50 to boot!

pmkeating -

Just finished the battery replacement in my MXP. Went smoother than I anticipated, I always have a screw left over when I fix stuff, but not this time. Also satisfied with the battery itself - appears OEM and not recycled third party. A few notes, 1. watching a few other youtube vids helped fill in any gaps, even with dumb stuff like how to align/apply the new cover adhesive, 2. the pointed spudger is pretty soft and doesn’t hold up well when pushing side tabs, 3. the adhesive is a PITA, I tried using alcohol, but ultimately just patiently pushed in a single direction with a finger until it all pulled up (about 80% of project time spent pushing adhesive), and 4. my new battery ribbon was kinked out of the package but still worked. Replacement took all of 30 to 45 mins, most of it wrestling with adhesive. I’m satisfied with the iFixit solution and will return when I need another non-fixable item fixed.

Jim Kelley -

John Fink - thank you so much for your tip. otherwise, I thought my phone was bricked.

You saved the day. the little connector doesn’t look like it’s out, but mine was. once I figured out how to reinsert it, the phone would turn on.

YEA !

tom -

thank you thank you thank you. Bought the battery replacement kit & I couldn’t be more happy with the results. My Moto is like new showing 90+ battery after being on all day. I was ready to lay down another 400 bucks for a new phone. 2 comments I will make: time line is longer than 45 min to 1 hour as removing all the original adheasive takes time but MUST be done as you will have a better result when you re-attach the back cover. Also pay extra attention to step 23 that cable MUST be re-attached in EXACTLY the same location/position as it mates up with a pair of conductors on the MB & your phone will not work if it’s not

Eric Carlson -

Just completed the battery replacement. Two things to remember - take your time teasing the adhesive back away (I agree with Eric Carlson). I took an hour and change. The advantage was that I didn’t have any glue on either back or frame when I was done. The second thing was that a jewelers loop came in very handy to see and set the connectors (I tried feeling / fit and it didn’t work well ;-) ).

My only issue was aligning the adhesive back and that was a pain.

mfa -

Successful battery replacement. Similar to many other reports on here, removing the adhesive takes a very long time. It took me more than 2 hours, but I was trying to be as careful as possible and I’ve only ever replaced one other battery in a phone. I would also caution everyone to be EXTREMELY CAREFUL on steps 17 and 18. I think I damaged one of the clips and could’nt get both to ‘catch’ when I reassembled the phone. I’m not really worried about it because both clips have screws on either side of them. Phone has been in intermittent use for 14 hours and is at 67%, a huge improvement.

Geoffrey Gibbons -

The connector in Step 13 does not pry up to disconnect as in the picture. When I pryd it, the contacts broke off from the board. Now there is no way to reconnect the connector with the broken contacts. So the phones a brick now and this kit was a waist of money. Thanks

Bill -

Thanks to the author for this disassembly guide! And thanks, also, to several of the commenters—especially John Fink on 05/16/2018 and Bill on Feb 16, 2019—for helping me avert disaster getting my old battery out for replacement. Unfortunately, there is a significant short coming in calling this a replacement guide: Reassembly requires more detail than just “…reverse the steps of disassembly.” I was fortunate enough to have found a good YouTube video with a sufficiently detailed description of that aspect, so I made it through just fine, but I don’t think that that video is detailed enough for the disassembly portion of the task either!

One final comment is that if you’re going to be replacing the glue with the sheet that’s in the iFixIt battery replacement kit, removing all of the old glue itself took me far longer than an hour, so take that into consideration before starting this little undertaking.

john red horse -

Just a helpful note: When I was taking my phone apart, the rear plastic underneath the rear cover (where the adhesive is attached to) cracked a bit, as I pulled my rear cover out at a sharp angle, and it had stuck to the plastic. So just be careful. Thanks for the great guide!

Manu R -

Great review, thank you! The only thing I’d add is to emphasize that it’s 30 screws plus the silver one. I couldn’t figure out why the frame wasn’t coming off until I read some reviews, then everything fell into place perfectly.

Terry Harroun -

I had no problem following the instructions. The Torx screws were very hard to open, the Torx drivers that came with the battery were not good enough. Bought a set of Eklind drivers from Home Depot, they did the job. Had a hard time reconnecting the battery connector, everything else was fine, thank you.

Hal Best -

Wonderful! Some notes by step:

3) The iOpener's great! 30 secs in a 1K-watt micro + gel side down (cloth’s not as hot) = back off fast: used a pick at the top only, then grabbed and patiently pulled for maybe 10 secs. No need to heat the left. Gently scraped all adhesive off the back and chassis with the blue opening tool, which proved best at this (tweezers too sharp, spudger too slow).

16) All but one screw came out easily with the T3. The one was stripped (obv during assembly); used my own T4 on that one and it came right out.

20) Thought the volume connector was socket based like the flash and battery connectors. No! Annoying until I realized it's glued onto the battery (like the NFC in Step 23). Deserves mention in the guide, as I'd have gone at it differently. Instead, I accidentally removed the tiny white guard. Didn't include it at reassembly (too tiny to work with, and the orange tape was plenty), and all’s fine.
1 hour and 15 mins later (25 mins on adhesive removal alone), my MXP is like new. Thanks!

Greta Schmidt -

Completed the procedure yesterday. The T3 bit was included in my kit, which is the screw head size on the MXP.

Three comments:

1. Whatever you do, do NOT remove the silver screw anchoring the silver bar that holds the power & volume rockers in place. One video on-line showed this, so like a dummy I removed it. There are 4 extremely fine springs (<1mm x 4mm) that tension the rockers; they will fly out and are very difficult to find.

2. Soak the inside of the back cover with Goo-Gone or similar, and let sit for 30 minutes, then use the blue case-cracker tool to push the gunk off. Letting it sit longer would be better still, as it will dissolve the adhesive to a greater degree.

3. I use a SupCase Unicorn Beetle on the phone, so I skipped the step of adhering the back onto the phone. The case holds it in place, and will be easy to get into the phone the next time for other maintenance.

Dave B -

Thank you all, couldn’t have done it without you….

Kevin Lankford -

This worked fine. The hardest part is getting off the old sticky tape. Took me about a little over an hour, but I wasn’t in a rush. Be very careful about keeping track of the 4 springs that go into the volume and power buttons. So tiny. Easy to lose.
Erik Rimes -

I’m still using my Moto X pure after all these years. Yes it has huge bezels but it still gets the job done. What wasn’t getting the job done was the battery. I googled how to do it and came across this site. I studied it and decided it was doable. But before I ordered the kit and battery I decided to check out the price to have it done for me. I was quoted $69 plus tax. So I chickened out and had it done. Well the $69 turned into $98 total. The battery is now good to go but the wood back is coming off and the volume rocker is loose. Should’ve done it myself. Don’t be like me give it a try. If it doesn’t work at least you learned something.
JAMES BIGGS -