Einleitung

Damage to the charging port of the New Nintendo 2DS XL (MODEL NUMBER) may render the device to eventual power failure. Any poor charging connections or inability to insert the cable into the port may suggest for the removal of the port from the device. This guide offers a suggested coarse of action in safely removing and replacing the charging port.

Inspect the port for any foreign debris that may be desturbing the connection between charging cable and port. Also, inspect the charging chord to ensure that there is no considerable damage to that may affect its performance. Please ensure that the port is the most possible problem before attempting to remove from the device.

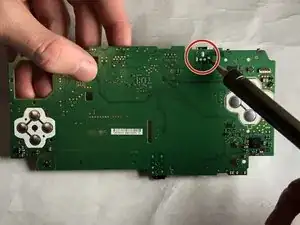
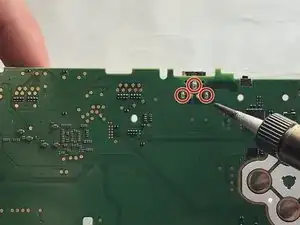
Step 7 does require soldering of three pins that allow for the mounting of the charging port onto the circuit board.

Before beginning disassembly, fully power off the device and disconnect any chargin ports or input devices.

  1. R3WrHkdaFuZjfZ3d
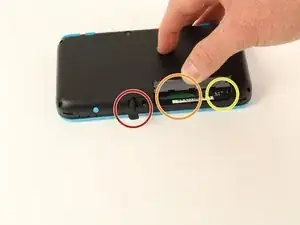
    • Before starting the disassembly, remove

    • The stylus

    • Any game cartridge

    • The SD card

    This is a great repair instructional, but I would advise also looking at the below video link. (I used both.) Sometimes watching 2 repair guides can help when you think you think you’re stuck. For example, I had a really hard time getting the hinge off!

    https://www.youtube.com/watch?v=Zuu_T2ls...

    (HINT: Works best if you rotate it 180 degrees, so that you are repairing it from the same perspective as the technician)

    skat1140 -

  2. qInyERKyTGMKUtxf
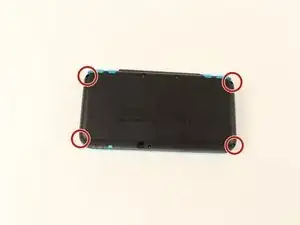
    • Unscrew the four 6mm tri-point screws located at the four corners of the bottom panel.

    The Y0 was too big; I ended up using a Y00 and that worked fine

    Christopher Gilmer-Hill -

    Would not recommend using a Y000 like I tried to do

    Daniela Magaña-Ochoa -

    gotta use Japanese Industry Standard YOO (blunt end)- I did not, and accidentally stripped two of the screws… still trying to figure out how to remove them -_-;

    Yanko Artidiello -

    Yeah I can confirm, the y0 does not work.

    Arc Turus -

    I'm using the Y-0.6 and seems to only unscrew 2 of the screws on the right side of the handheld, the other 2 aren't moving

    Xx_Definity_J0rd4n_xX -

  3. FUiabbAOYVaNjG4X
    FUiabbAOYVaNjG4X
    MiHqoVbAY3mST6Ls
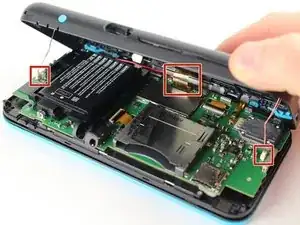
    • Be careful when separating the bottom panel from the front casing to avoid breaking the three cables connected to the motherboard (two on each side and one in the rear).

    • Using a spudger, separate the back panel from the front casing by gently prying around the panel.

    • There are many clips along the hinge of the case, so it is recommended to work your way along one short side and the two long sides before finishing the last short side.

    You need to be super careful separating the top from the bottom at the rear end. I got stuck there, applied a lil more force and ripped the right shoulder button straight off the pcb!

    Dominik Leicht -

  4. hN4JmkBHkaqtRlxN
    hN4JmkBHkaqtRlxN
    sLnMpviSoWENSJQk
    CxaLwKZ2IuAS5cAV
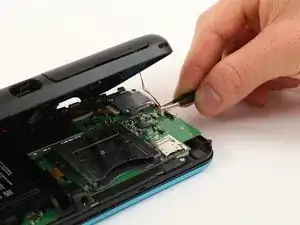
    • Using tweezers, disconnect the two cables that connect the rear buttons on either side to the motherboard by gently pulling them upwards.

    I unfortunately took off the base of one when trying to pull apart. Is there a fix or will it not be broken?

    Phoenix Typhoon -

    Did you manage to fix this at all?

    Owen McKay -

    When you are putting these cables back, make sure to check the orientation of the cable. You have to match the cable head to the entry point, so you may have to turn the cable around. I spent a bit too much time trying to connect the cables just because I didn't realize that I had to turn the cable around.

    Hongda Wang -

  5. 6AT5OJ1MuuBaICeA
    6AT5OJ1MuuBaICeA
    ua4Ruiu5ewlgVKlO
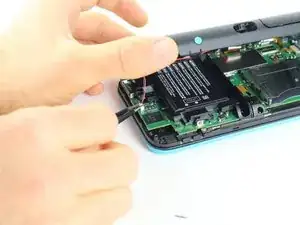
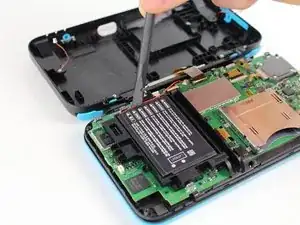
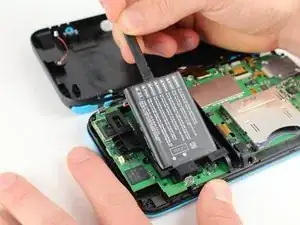
    • Using a spudger, lift out the battery.

    • Be aware that there is a sticky pad holding the battery into its tray. It may be necessary to use multiple tools to gently pry the battery away from the tray and motherboard.

    Some might see this as an optional step. But you probably do NOT want to skip this. I did, and now I have malfunctions on the Nintendo (touch screen functionality not working, possibly as a result of shorts from skipping this step.)

    skat1140 -

    Personally, I skipped this step and everything still works fine. I wasn't able to take the battery out because the adhesive was too strong.

    Hongda Wang -

  6. SSMvQDgl1DwcocIH
    SSMvQDgl1DwcocIH
    mDsPxLStvgmPJlHp
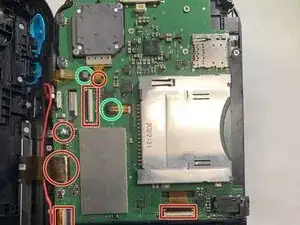
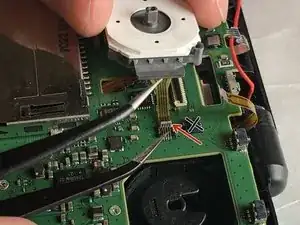
    • There are 8 ribbon cables that need to be removed as shown in the picture.

    • 2 of connectors (in green) are friction fit, unlike the rest of the connectors. Remove the cable by pulling it out gently. Do not attempt to open or unlatch these connectors in any way. Doing so will break them.

    • For the remaining 6 (in red), use a pair of tweezers to flip the latches up and pull the ribbon cable out.

    • Note that the second picture shows a broken ribbon connector next to the joystick ribbon connector (to the right of the red arrow). Do not attempt to unlatch this connector as shown in the picture!

    Do not just pull up “latches”, two of these are not zif connectors and pulling the top off will break it! I now have a dead 2DS XL because I followed this guide.

    Pressing the ZL button on device turns system off.

    Dunnymeister -

    I made the same mistake. The guide is now updated.

    Mike -

  7. lENbxc1owHxJd2B5
    lENbxc1owHxJd2B5
    Ty63qp3gtGSWq2Df
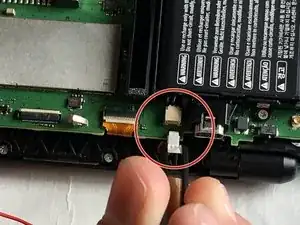
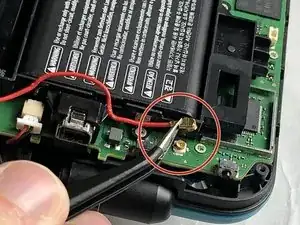
    • Unplug the following wires from the motherboard using a pair of tweezers.

  8. GqvOCteO2iYPDwUf
    GqvOCteO2iYPDwUf
    AfDTdwEG1IjHHCef
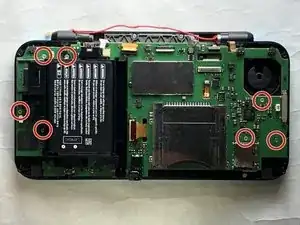
    • Remove the following screws using a J00 Phillips screwdriver bit.

    • Remove the motherboard from the device.

    Step 8 motherboard screws are J00 Phillips.

    Joseph Costello -

    Thank You!!!

    Zach -

    Guide has been updated.

    Mike -

  9. EV5nGFPL2dCOHqWK
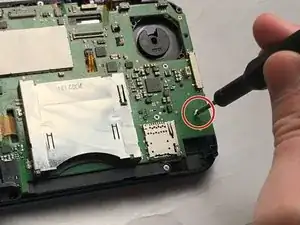
    • Remove the motherboard and locate the charging port. Flip the the motherboard over.

  10. bNwTUX6qEHv1tZFk
    bNwTUX6qEHv1tZFk
    DPO2odthOFXY5uGL

    Great tutorial, Abolee! I am trying to find a place to get a 2ds xl power jack replacement, but seems almost impossible to find it. Do you have any idea where to find it?

    joao.marco.ismart -

    Not ideal, but you can use replacements for DSi and (not-new) 2DS which are very common. This worked for me. They seemed identical except for 2 features:

    1. New 2DS has a single centered leg in the front. DSi has two in the front on the sides.

    2. New 2DS has plastic on the bottom that sets it about 1mm off the PCB. DSi does not.


    You have to remove the extra 2 front legs (don't simply bend them inward, this blocks cable insertion) and use something as a spacer to prop it off the PCB about 1mm. I used thin cardboard. You can compare it to the existing port before you remove it. Worked like a charm for me.

    Mike -

Abschluss

To reassemble your device, follow these instructions in reverse order.
Abolee Diwate

Mitglied seit: 04/11/19

109 Reputation

0 Kommentare