Einleitung

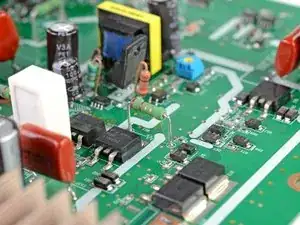
Neuere Generationen von vielen elektronischen Geräten haben Akkus, die direkt auf die Platine gelötet sind. Dies macht den Austausch zu einer größeren Herausforderung als bei Modellen mit Steckern. Diese Anleitung stellt verschiedene Schwierigkeitsgrade beim Löten vor, und erklärt drei verschiedene Typen von Lötverbindungen, die bei elektronischen Geräten üblich sind:

Schritt 1: Einstieg —Große durchgestecke Komponenten wie Kondensatoren

Schritt 7: mittleres Niveau — Kleinere durchgesteckte Bauteile wie Batterieanschlüsse oder Widerstände und

Schritt 11: Fortgeschritten — Kleine oberflächengelötete Bauteile (SMD).

Arbeite nur in gut gelüfteten Räumen. Wenn du an empfindlichen elektronischen Bauteilen lötest, dann achte auf einen ESD-sicheren Arbeitsplatz (also gegen elektrostatische Entladungen gesichert) und benutze ESD-sichere Werkzeuge.

  1. SSOAQGa6lbgTGncc
    • Als Anfang, löten wir ein größeres Bauteil auf eine Platine mittels der Durchsteckmontage.

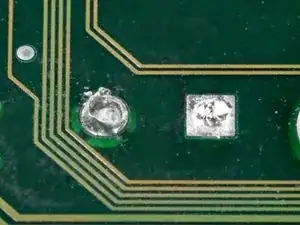
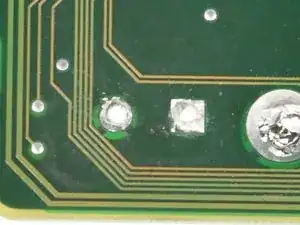
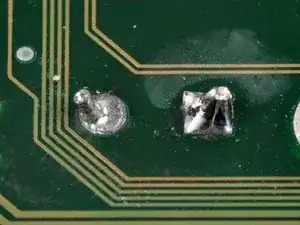
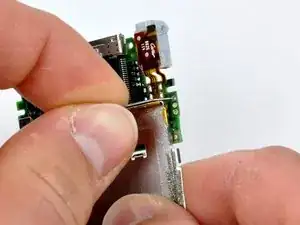
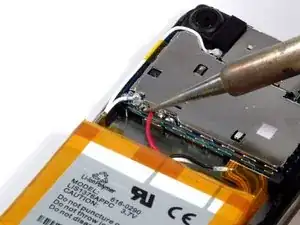
    • Ein Kondensator wurde schon von den zwei Lötaugen entfernt. Dazu wurde jede Lötstelle erhitzt und der Kondensator von der Platine weggezogen.

    • Beachte dass beide Lötaugen noch komplett mit Lötzinn verschlossen sind. Sie zu öffnen erleichtert das Verlöten eines neuen Kondensators sehr.

    This is for "Introduction" but didn't see how to comment there.

    Says "newer generations" have soldered batteries but there's no reference as to when this was written so that's not very meaningful. Request clarification.

    Joe -

    加熱してハンダが融けたことを確認してから、部品をゆっくり引き上げて外してください。

    n s -

    Are we to assume that “ESD” stands for “ElectroStatic Discharge?” Keep in mind that newbies (like me) don’t commonly see or use these abbreviations.

    ronherrmann -

    That is correct! I’ll adjust the introduction to clarify that.

    Arthur Shi -

  2. dXL1LxDlB1RJ6uat
    dXL1LxDlB1RJ6uat
    DCNCeyhMFPA23Aja
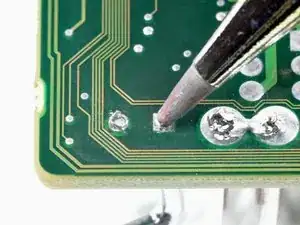
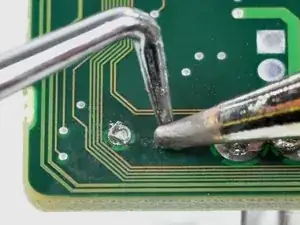
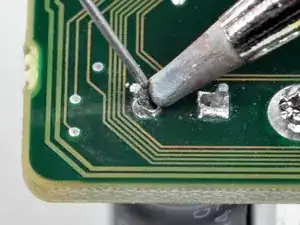
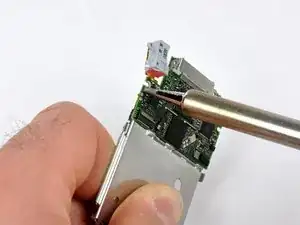
    • Um das durch Lötzinn verstopfte Loch zu öffnen, musst du die Lötstelle mit der Spitze des Lötkolbens erhitzen. Wenn das Lötzinn schmilzt stößt du von der anderen Seite eine Nadel oder Heftklammer durch.

    • In unserem Fall benutzten wir eine rechtwinklige Stahlspitze. Lötzinn haftet nicht auf Stahl, deswegen kann praktisch jedes spitze Teil aus Stahl verwendet werden.

    • Es könnte sein, dass du mehrfach erhitzen musst, um das Werkzeug ganz durchstossen zu können. Als Faustregel gilt, dass man gerade soviel erhitzen soll bis das Zinn schmilzt und dann die Lötspitze wegzieht. Zu viel Hitze kann elektronische Bauteile beschädigen.

    Why not use a simple pump-action desoldering tool which can be obtained cheaply from ebay?

    Chris Jackson -

    They are not as easy to use especially for beginners.

    Mike Gross -

    Desoldering wire is much better and also much easyier to use for beginners

    Giuseppe R -

    ¿plomo? lleva prohibido años, espero que sea estaño. 8(

    Ignacio Bilbao Zenitagoya -

    For god’s sake buy a cheap solder sucker. They are trivial to use. This is a tutorial after all. It’s certainly easier to use a solder sucker than to make a clean solder joint.

    Pro tip here - if you are having a hard time taking out solder, USE MORE SOLDER. Yes, it sounds counter-intuitive, but I’ve found that adding a dash of new solder to the troublesome blob you’re working on really helps get out stubborn old solder. Works even better with a solder sucker!

    J. A. Gonzalez -

    こういう説明が必要な方は、基板のパターンを壊してしまう前にソルダーサッカーやソルダーウイックを使ってください。

    コテ先の操作だけでホールを修正できるのは手慣れた人だけです。

    n s -

    i would use some flux and then some solder wick. flux makes like easy with soldering!

    Logixal -

    Absolutely get some liquid flux involved here. Flux prevents the hot solder from oxidizing and keeps the liquid metal flowing - either into solder wick or a vacuum sucker.

    Sonar Tech -

    reccomended tempature?

    Travis Gann -

    Usually around 300 - 350° C gets the work done.

    Daniele Carminati -

    good god thank you. finally someone asked & answered. a tutorial for this kind of extremely difficult, heat sensitive work - yet no mention of a safe, recommended temperature.

    these tutorials are for beginners after all , aren’t they?

    lexxrossini -

  3. DAum3QBIHIqhfR2A
    DAum3QBIHIqhfR2A
    qNdjBf3HaWyUKOfl
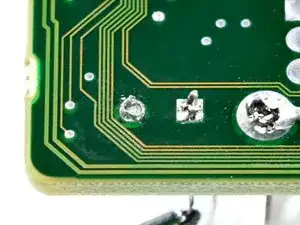
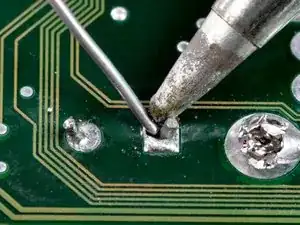
    • Wenn das Werkzeug ganz durch das Loch gedrungen ist, erweitere das Loch, indem du es jetzt von oben ansetzt und das Lötauge dabei erhitzst.

    • Die Löcher sollten jetzt groß genug sein um die Anschlussdrähte deiner Bauteile aufzunehmen.

    Using a solder sucker will make it a lot safer to the board/copper traces than using a needle or paper clip to clear the hole.

    J. Goodenough -

    Yes, please use a solder sucker, or even solder wick.

    If you don’t have some flux laying around, add a tiny bit of new solder if the old solder is being stubborn and not going away. Sounds odd adding more solder to remove solder, but it works!

    J. A. Gonzalez -

    Yikes. This is a horrible step. It risks tearing the pad and the via, and it also stretches the FR4 which would create microfractures in the internal layers. Use a lead that the same size or smaller than the hole if you absolutely have to clear it like this. Jamming a scribe into the hole is no bueno!

    Sonar Tech -

  4. eItCkuYBWuxPt22B
    • Bereite deine Bauteile vor, indem du etwaige Reste von Lötzinn von den Anschlussdrähten enfernst. Sie müssen sauber genug sein, um durch die Löcher des Lötpads zupassen.

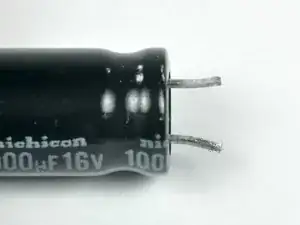
    • Fahre mit der Lötspitze an den Anschlussdrähten entlang, um den Lötzinn abzuwischen. Säubere zwischendurch die Spitze an einem feuchten Schwamm.

    • Zu viel Hitze schadet den elektronischen Bauteilen, halte deswegen die Lötspitze nicht zu lange darauf.

    Don’t use a moist sponge if you can avoid it. Water from a moist sponge will get into your tip’s micro-fractures and oxidize it rapidly. I’ve lost many tips to moist sponges.

    Use a cheap solder scour pad instead. They are made of copper, which is soft and will scrub solder away without damaging your tips. If you can’t afford a proper scour pad, make one yourself. Go to the dollar store and buy a copper wire scrubber for like 50 cents. I use the dollar store scrubbers to replace old worn out scour pads.

    J. A. Gonzalez -

    ADD LIQUID FLUX before doing this step. No mention of flux yet and we’re at Step 4? Maybe we need a guide for the guide!

    Sonar Tech -

  5. eYO311ePtygKo5VZ
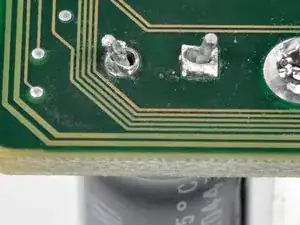
    • Schiebe die Drähte durch die frei gemachten Löcher in der Lötstelle.

    • Um das Löten zu vereinfachen, biege die Drähte ein bisschen um, so dass sie sich in den Löchern festklemmen.

  6. YsxLapIQtqjAi1T1
    YsxLapIQtqjAi1T1
    MXgJkeS63AacQqk6
    r44EIVJpI2wfIJGe
    • Um jede Verbindung zu verlöten:

    • Halte die Lötspitze auf das Lötauge.

    • Lasse grade so viel Lötzinn schmelzen, dass der Draht schön fest sitzt.

    • Entferne sowohl die Lötspitze als auch den Lötdraht wenn genug Lötzinn auf der Lötstelle ist.

    Using a little electronic soldering paste on both the components leads and board traces will eliminate the need for excessive heat build up, there by making a sound electronic connection.

    J. Goodenough -

    Not everyone has soldering paste handy unless they are going to do a lot of soldering.

    Mike Gross -

    Solder joint on the left is not good. Solder should be shiny and be shaped like the Atari logo.

    Solder joint on the right is very good, they should all look like that.

    J. A. Gonzalez -

    The lack of solder flux here is the reason these joints wouldn’t get anywhere close to being passed by QA. Add flux and try again.

    Sonar Tech -

  7. F5XZXdrNWOxZuYux
    • Als Nächstes werden wir eine etwas schwierigere Lötarbeit durchführen. In diesem Fall werden wir sehr dünne und empfindliche Anschlüsse auf eine Platine mit kleinen Lötaugen verlöten.

    • Kleine elektronische Bauteile, einschliesslich Drähte, können die Hitze nicht so schnell ableiten wie grosse Bauteile. Deswegen überhitzt man sie schneller. Achte darauf, sie gerade so lange zu erwärmen, bis das Lötzinn schmilzt.

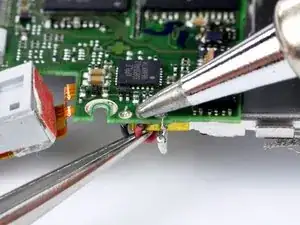
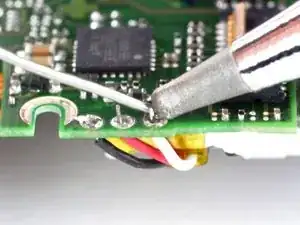
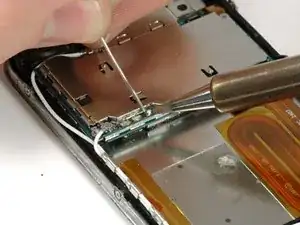
    • Die Anschlussdrähte wurden aus den Lötstellen entfernt, indem die Lötstelle erhitzt wurde und gleichzeitig auf der Gegenseite mit einer Pinzette daran gezogen wurde.

  8. JnlAjYDdZBeG4NU6
    JnlAjYDdZBeG4NU6
    krVuG2VEeATgn41H
    • Meistens bedeckt das Lötzinn die Lötaugen noch ganz. Es erleichtert die Arbeit sehr, wenn man die Löcher öffnet.

    • Öffne die Löcher indem du z.B. eine aufgebogene Heftklammer von der Gegenseite durch das Loch drückst, während du die Lötstelle von der anderen Seite her erwärmst.

    • Ein "dritte Hand" Werkzeug oder ein Freund kann diese Arbeit sehr erleichtern.

    Again, if you force any metal object through these holes you increase the chance of damaging circuit board traces on both sides of the board.

    J. Goodenough -

    Take a green or yellow injection needle. Make the solder hot and push the needle through the hole. Injection needles are made of stainless steel and are not liable to the solder.

    Nimm eine grüne oder gelbe Injektionsnadel. mach das Lot heiß und stoße die Nadel durch das Loch. Injektionsnadeln sind aus Edelstahl und haften nicht am Lot.

    Mike Kaleu -

  9. 33djnRHODxBgxaJH
    33djnRHODxBgxaJH
    xZsr6PTpXfQWZBmr
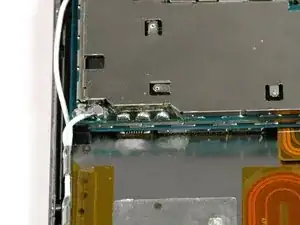
    • Wenn alle Löcher frei sind, schiebe die blanken Enden der Drähte mit einer Pinzette in die Löcher.

    • Um die Drähte am Platz zu halten, könnte es hilfreich sein zuerst die Kabel in ihre endgültige Form zu biegen und dann erst hineinzustecken.

  10. GMIcpfWnYVVujRsH
    • Um die Stellen zu verlöten:

    • Halte die Lötspitze gegen das Lötpad.

    • Schmelze gerade soviel Lötzinn, dass die Anschlüsse gut fest sitzen.

    • Entferne sowohl Lötspitze als auch Lötdraht sobald genug Lötzinn auf die Lötstelle geflossen ist.

    Add liquid flux to each pad before inserting the wires.

    Sonar Tech -

    Ok, you love liquid flux, we got it (i agree with you that flux is your best friend while soldering)

    Daniele Carminati -

  11. O5xTMLNErDOhHxZ2
    • Im letzten Abschnitt werden wir Batterieanschlüsse auf oberflächenverlötete (SMD) Stellen anbringen. Diese Verbindungen sind schwierig, weil die Anschlüsse keinen festen Haltepunkt wie bei der Durchstecktechnik haben.

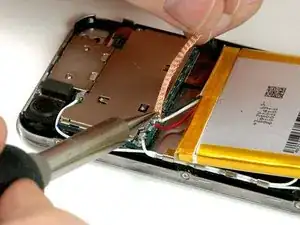
    • Um die Verbindung zu entlöten, musst du eine Entlötlitze auf den Lötstelle halten und mit der Lötspitze darauf drücken.

    • Sobald das Lötzinn schmilzt, saugt die Litze es auf, du kannst sie dann wegziehen.

    • Wiederhole diesen Vorgang für alle Anschlussdrähte.

    • Wenn ein Ende der Entlötlitze vollgesaugt ist muss dieses abgeschnitten und weggeworfen werden.

    Könnte heiß werden an den Fingern

    Maik Nousch -

    flux flux flux its your friend! use it!

    Logixal -

    Halleluiah! Liquid flux in a needle bottle is almost as important as the solder itself. Also, you need to tin that soldering iron tip!

    Sonar Tech -

  12. okkWDFdTgwBgQagl
    • Wir empfehlen die Lötstellen mit einem weichen Tuch, Schwamm oder einer Zahnbürste und ein bisschen Alkohol zu reinigen.

    • Um einen kleinen Tropfen Lötzinn auf jede Lötstelle zu bekommen:

    • Halte die Lötspitze auf die Lötstelle.

    • Schmelze das Lötzinn, so dass sich ein kleiner Tropfen auf der Lötstelle bildet.

    • Wenn genug Lötzinn auf dem Lötpad ist, entferne den Lötkolben und das Lötzinn.

    Using a solder wick requires using too much heat and will damage your surface mount component

    J. Goodenough -

    But what do you use instead?

    arno -

    A solder sucker.

    Paul Hudson -

    …or a vacuum removal tool. Ceramic caps are absolutely notorious for cracking when overheated. Cracks=shorts in MLCC.

    Sonar Tech -

    MLCC stands for ? Sorry, I’m french

    Gilles Guérin -

    Bonjour Gilles, voilà l'équivalent en français "condensateurs céramiques multicouches"

    Claire Miesch -

  13. IASCwD4gXgjnMLJf
    • Die Lötperle sollte eine kleine Halbkugel formen. Wenn sie flach oder rauh ist, halte einfach nochmal die Lötspitze drauf, bis die wieder schmilzt. Eventuell musst du noch etwas Lötzinn zugeben.

    Better still, apply some flux and touch it with the soldering iron and it will then flow properly.

    Chris Jackson -

  14. O1hekNWQXt2JMECe
    • Um die neuen Anschlüsse auf die Platine zu löten, lege das blanke Ende des Drahts auf die Lötperle des entsprechenden Lötpads.

    • Halte die Lötspitze auf die Lötperle bis sie schmilzt.

    • Ziehe das blanke Ende des Drahts in die Mitte der flüssigen Lötperle und entferne dann den Lötkolben.

    • Fahre mit den anderen Anschlüssen in gleicher Weise fort. Achte besonders darauf, keine Lötpads miteinander zu verlöten.

    The pronunciation of soldering - the whole rest of the world apart from the USA pronounces it like it is spelt - with a hard “l”. That weird pronunciation goes with all the non SI units, and using volume measurements to cook recipes - I can go on……

    markradnor -

Abschluss

Um dein Gerät wieder zusammenzusetzen, folge den Anweisungen in umgekehrter Reihenfolge.

Andrew Bookholt

578335 Reputation

34 Kommentare

This is a great guide with awesome clarifying pictures.

Thanks!

Martin -

TIP: Another method which works well for clearing solder from holes (especially on repairs like AC Jacks on laptops) is to use compressed air to clear melted solder from holes. A quick blast with a duster can works well (I have even used a drink straw in a pinch and blown out with a blast of air from mouth). Heat the solder until it liquefies, put the duster straw right above the solder and quickly hit the melted solder with an air blast to instantly clear the hole of solder. This works well on very small holes as melted solder does not always push out cleanly with metal tools. You have to be quick with the air blast because the solder re-hardens rapidly.

GURUmicro -

just be careful doing this lol, flying molten solder can and will burn you or other components.

Logixal -

This is not IPC standards but for the ghetto approach, it will get the job done. I solder in manufacture settings, run my own shop. This is wrong to a degree but will do. If ifixit would like tips from ILLFIXIT then your more then welcome!

Tony Stark -

yeaaaa….. i was going to say something along these lines lol. itll get the job done but its by no means the right \ best way to do the job.

Logixal -

A very good guide to soldering.

I have never soldered anything (I'm a girl you see), but your clear and detailed guidance inspired me to give it a go.

I was well prepared in advance-it could be difficult-and that helped a lot.

I have now got a new battery soldered into my Palm TX and I'm as happy as Larry (or Lorraine in this case)..

geeklynews -

Go Gurl! I'm a gurl, too. I worked in my dad's machine shop for 13+ years. I hit the ground running. Programmed, set up, and fixtured, retro-fitted CNC Mills, using SurfCam and G Code programming. We used Master Cam for the wire EDM. My fave was running a standard lathe. I guess I enjoy cylindrical objects. We held tolerances of .005+/- .001, all the way down to .0003+/-.0002. That…is very microscopic. lol

…add to that, Public Relations, Inventory, Inspector, Fixing Crashed tools, Shipping, Document Control, and so on. All I know is, if it needs to be done, it can be done, if your sharp. And, sometimes we gurls, have a different “feel” for delicate or fine work, as compared to some of the guys. There is nothing we cannot do, as well as anyone else, if we want to, and are willing to learn, and practice. I'm ready to try a little delicate connecting, myself.

Happy Trails and Tablets,

PoniGurll, or

DIY Gurll, otherwise, it won't get done!!

cherihashorses -

Using a solder wick braid is a good thing to do every time you are trying to remove solder from the thru-hole and pad. This is because after you use the solder wick you have a clean hole and a clean pad with just a slight film of solder on it and you have a nice open workspace without any old solder in there. Old solder doesn't have solder flux anymore -it's burned off-and won't "flow" around the component or wire leads and leaves an icy-looking "cold" solder joint, a dull grey glob of solder that is weak and doesn't conduct electricity very well. By wicking it off, the new solder, which does have solder flux, will be shiny, smooth, quite strong and conductive. I've been soldering since the early 70's and solder wick is a good friend if you use it right. No need for staples or picks, either.

Clarkness -

Also, to help the solder wick pickup the solder faster and to help clean the solder pad at the same time, put just a little flux on the wick before applying the iron to the wick, then wipe the area clean with some alcohol, works great.

C.Vos -

One more thing about having your solder iron on the pads for too long. If you get them too hot the pad will actually separate and lift up off the PC board, tearing the delicate copper trace, and the PC board will be useless.

Clarkness -

Perfect Illustrations, Thank you.

semi bariche -

I found this to be a clear and easy tutorial on how to solder to remove and install small electrical components. Excellent for beginners and useful for experts in teaching situations.

Allan Ryle -

Very good guidance

allwin2abbas -

another tip is if you do not have a soldering station and your iron gets too hot just unplug it and continue and never ever dunk your soldering iron in flux if it is excessively hot because it will take the conductive coating off the tip of your soldering iron. also dont dip touch the tip of your iron (while its off) because the oils from your hand can burn through the tip like the flux.

ps: this is from my personal experience and its just some things to look out for

Blair McLeod -

Nice job!

Well done,,,,

midatlantic.midatlanticmarine -

This is a good job thanks.

Ivette Carlier -

Nice post describing PCB Repair soldering with images. It is quite easy to understand also.

Solder Training -

What is the best diameter of solder to use on iPod Shuffle batteries? Lead-free? Please be very specific. Thanks much!

plantae13 -

Sooo just bought a soldering iron, never used one before in my life, re attaching wires to a little motherboard for a light switch and dimmer, this page literally just taught me exactly what i needed to know and success the first try! Thank so much! finally someone knows they’re stuff instead of me having to go through 30 different pages of nothing on google lol respect dude! keep it up!

mistynoel85 -

Great guide! It also helps to use a bit of flux on the points to aid with adhesion of new solder to the contact points, and to help with heat transfer from the solder tip onto the solder pad.

arfan_nazar -

I need to solder my wifi it came loose on my insignia tablet. All i need to know is where its located on mother board. Please guide me

Valerie Callahan -

Don’t forget to use plenty of flux!

pohlman357 -

I was quite surprised that flux wasn’t mentioned anywhere in this guide - and the pictures are proof that none was used.

Sonar Tech -

Really great photographs with excellent descriptions.

I believe any soldering procedure should start with selecting the right wattage soldering iron and tip for the task. Common small wattage soldering irons commonly used to solder small electronics are 15 to 45 Watts.

Second is tinning a new soldering iron tip. Tinning means the first time the tip is heated you melt solder onto the tip until solder sticks to the tip. Even if a tip is factory tinned you’ll want to tin it yourself. Solder needs to stick to a tip to correctly aid in the transfer of heat from the iron to the component.

Another (cheap) way to clean solder off connections is to use a squeeze bulb with a silicone tip. The squeeze bulb creates a vacuum when it is squeezed and the vacuum sucks the melted solder up into the bulb.

Jim Fogle -

“Appreciated” Marvellous photos /snaps also nicely & thoroughly explained. Bravo.

BBN -

Plug in the soldering iron. Wait for it to heat up… test by tapping solder on to the soldering iron tip. Having ‘tinned’ the soldering tip, apply the tip to the component leg and PCB. If the component leg is comparatively ‘thick’, apply more heat to the leg than the PCB. Tap the solder jointly on the component leg and the iron tip. If the component leg is at the right temperature, the solder will flow and make a sound electrical connection. If the component leg is not at the right temperature, the solder will melt on the iron tip and ‘drip’ onto the component not making a good connection.

I’d never do any soldering without a solder sucker e.g. https://www.amazon.co.uk/Draper-23553-De... but be careful when using it on delicate PCBs as the suck can lift circuit tracks where too much heat has been applied.

Davo -

I’m a little late with my comments but just had to brag about my younger days with Heathkits and other companies! I learned how to solder the hard way (without any instructions) and put together a B/W TV, a color TV, an AM/FM receiver and various other little projects. I understand Heathkit is coming back and encourage you younger people to enjoy the hobby of putting together their kits after doing these soldering lessons.

Mike Gross -

The girl is so proud of soldering her first new battery into herPalm TX and is probably not interested in retro-fitted CNC Mills and tolerances of .005+/- .001, all the way down to .0003+/-.0002 and so am i….

Thumbs up for geeklynews

arno -

Absolutely. I’ve worked alongside women in the US Navy. Most of them are very competent, excellent technicians. Like guys, though, you have your whiners and slackers. We are all the same.

Paul Hudson -

Some information in the top title area was misleading, as the iPod isn’t sold anymore (except for the touch with a soldered battery) and the iPhone has had a socketed battery since 2008. I fixed it in the latest unverified version.

DistroHopper39F -

Hello, thanks for this tutorial what kind of soldering wire, especially regarding the diameter, would you advise to use?

Bonjour, thanks for this tutoriel. Quel diamètre de fil à soudure préconiseriez-vous ?

Da Moun -

Bonjour! mon nappe de batterie de telephone est cassé au milieu et j’ai une idée de relié avec de fil , qu’est ce qu’on va faire?merçi

Tahiantsoa Rajaonarison -

and where/how do we post future questions ?

James Walker -

practice on eWaste first

Lindsay Alford -