Einleitung

  1. HOyAUdTf4TPkM4C1
    HOyAUdTf4TPkM4C1
    1tFt4heuTLaSCXDo
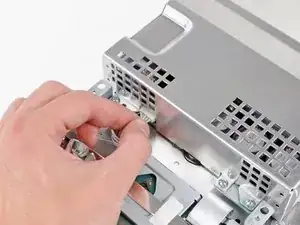
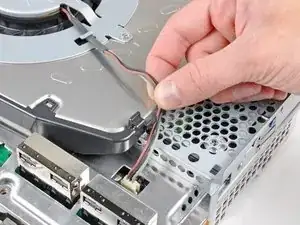
    • Entnehme das Lüfterkabel aus der Halterung am Kühlkörper.

    • Ziehe das Kabel aus dem Anschluss auf der Hauptplatine.

    • Achte darauf, den Stecker gerade nach oben herauszuziehen.

  2. dtMlYNqdVr2ISNBq
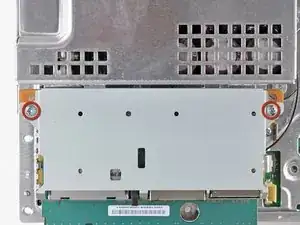
    • Entferne die zwei 9 mm Kreuzschlitz Schrauben, welche den Speicherkartenleser im Gehäuse befestigen.

    Only the very first release of the PS3 used to have the memory card reader. Most recent models do not have it (such as my PS3 model CECHG04). In this case just skip steps 22 and 23.

    markp -

    Also, these screws should be removed in step 5 to prevent breaking the clips that secure the card reader to the top shell.

    screech -

  3. AaMp5W2SDhPLWjON
    AaMp5W2SDhPLWjON
    tTYOxpUaPFQOYGDj
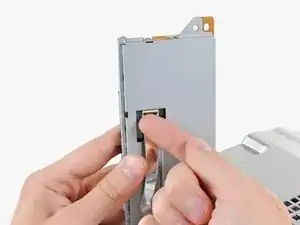
    • Hebe den Speicherkartenleser soweit an, dass du das Flachbandkabel herausziehen kannst.

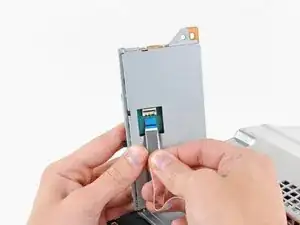
    • Klappe den Bügel hoch, der das Flachbandkabel des Speicherkartenlesers befestigt.

    • Stelle sicher, dass du nur den Bügel nach oben klappst, nicht den Anschluss an sich.

    • Ziehe das Flachbandkabel aus dem Anschluss und entferne den Speicherkartenleser.

    I have a CECHA01 and the card reader is attached to the top cover. Per comments at step 5, the 2 screws mentioned at step 22 are removed at step 5. The ribbon cable mentioned here in step 23 should be removed at step 5.

    Jon Tyre -

    If leaving card reader attached to top shell this step should be part of step 6.

    screech -

  4. OTnnIGdXxhQRIEdZ
    • Ziehe die Stromkabel aus der Vorderseite des Kühlkörpers.

    • Ziehe den Stecker Richtung Vorderseite der PS3.

  5. gPUND35OSiSGrNVe
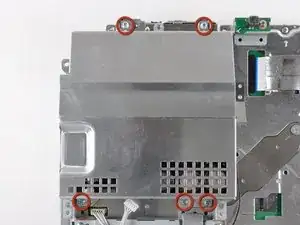
    • Entferne die fünf 9 mm Kreuzschlitz Schrauben, welche das Netzteil im Gehäuse befestigen.

  6. EOlHOqPhCdcX4WOM
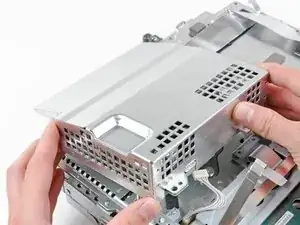
    • Hebe das Netzteil an der vorderen Kante an, um die beiden Stifte freizulegen, die es mit dem Motherboard verbinden.

    • Entferne das Netzteil.

    I had a small black wire taped to the side of my power supply. If you have this - remember to remove the tape, first, or you run the risk of pulling the wire out.

    Oliver Clare -

  7. OLZ2uFatyPysN2qo
    • Entferne die vier 16,5 mm Bundschrauben, welche den Kühlkörper auf der Hauptplatine befestigen.

    • Entferne die zwei Bügel, die von den Schrauben gehalten wurden, die du gerade entfernt hast.

  8. RBXS1euymxJTE3sU
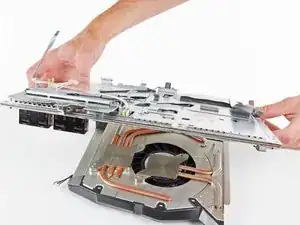
    • Hebe die Motherboard Einheit vom Kühlkörper an.

    • Der Kühlkörper könnte noch von der Kühlpaste gehalten werden. Sollte dies der Fall sein, sei sehr vorsichtig beim Abziehen des Kühlkörpers. Achte darauf, dass du nicht die Kupferrohre verbiegst.

    • Achte darauf, dass du eine neue Schicht Kühlpaste aufträgst, wenn du den Kühlkörper wieder einbaust.

    • Noch nie selber Kühlpaste aufgetragen? Unsere Anleitung zum Auftragen von Kühlpaste macht es dir einfach.

    • Wenn du gerade dabei bist, die YLOD-Anleitung zu befolgen, achte später darauf, wo genau du sie aufträgst.

    so do we apply arctic silver 5 thermal paste to the heat sink pads that attach to the CPU GPU,Or do we only apply thermal paste to the chips /pads CPU GPU ?

    David -

    In some PS3 versions, such as my PS3 model CECHG04, the heat sink is attached to the lower half of the motherboard shield, so in order to remove the motherboard you have to lift the top cover and detach the motherboard from the heat sink.

    markp -

    Yeah, on mine (which is the very first revision of the PS3), you have to add a SUPER heavy amount of thermal paste, for it to even make contact. Odd.

    Christopher -

    Can someone confirm what material the heatsink is made of for those wanting to apply liquid metal (I'm sure as !&&* not taking the risk) but might be of interest to others…

    Jjj -

Abschluss

Um dein Gerät wieder zusammenzubauen, befolge diese Anleitung in umgekehrter Reihenfolge.
Walter Galan

685540 Reputation

0 Kommentare