Einleitung

Benutze diese Anleitung, um den abgenutzten oder kaputten Akku in deiner Samsung Galaxy Watch3 zu ersetzen.

Falls dein Akku aufgebläht ist, musst du entsprechende Vorsichtsmaßnahmen treffen. Entlade deinen Akku aus Sicherheitsgründen auf unter 25 %, bevor du dein Gerät auseinanderbaust. Falls der Akku während der Reparatur versehentlich beschädigt wird, ist so das Risiko geringer, dass er sich entzündet oder explodiert.

Für den Zusammenbau werden Ersatzklebestreifen benötigt, um den neuen Akku zu befestigen.

  1. a63LjGHbMHP6JGH2
    • Trenne deine Uhr vom Ladegerät und schalte sie aus, bevor du mit der Reparatur beginnst.

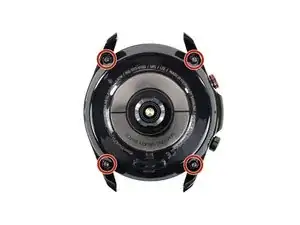
    • Benutze einen Tri_point Y00 Schraubendreher, um die vier Schrauben auf der Rückseite der Uhr zu entfernen.

    • Mach dir beim Entfernen der Schrauben keine Sorgen, sie bleiben in der Rückabdeckung hängen.

  2. AYFpCm45IBcsXE1V
    AYFpCm45IBcsXE1V
    iwckjD1whPf3Q5wO
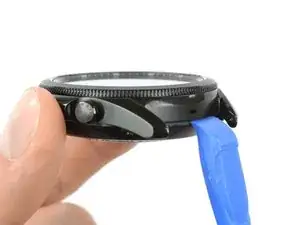
    • Setze ein Öffnungswerkzeug zwischen die Rückabdeckung und das Metallgehäuse.

    • Verdrehe das Werkzeug, sodass ein größerer Spalt entsteht.

    • Entferne die Rückabdeckung noch nicht ganz, da das Sensor-Flachbandkabel noch mit dem Motherboard verbunden ist.

  3. dHpTdiX6DQSZMSxm
    dHpTdiX6DQSZMSxm
    hYr6SZILNpmEg5Tp
    kouxAHaTH1IZYyUV
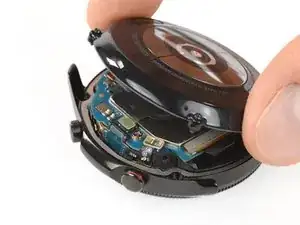
    • Lege die Uhr mit der Vorderseite nach unten ab.

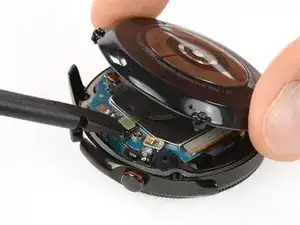
    • Hebe die Rückabdeckung vorsichtig von der Kante mit den Knöpfen her an, um an den Sensor-Stecker heranzukommen.

    • Benutze das flache Ende eines Spudgers, um das Sensor-Flachbandkabel hochzuhebeln und vom Motherboard abzutrennen.

  4. E2pyOpJJBim22SJB
    E2pyOpJJBim22SJB
    pREbiCwhYedi16f1
    • Entferne die Rückabdeckung.

    • Achte darauf, dass die Gummidichtung (rot markiert) in Ordnung ist. Falls sie beschädigt ist, ersetze sie beim Zusammenbau durch eine neue, damit die Uhr wasserdicht bleibt.

  5. yxOtK4R5urwlhnHB
    yxOtK4R5urwlhnHB
    R3xPGMkppJhplQhI
    VlVXtBKoHARZHANJ
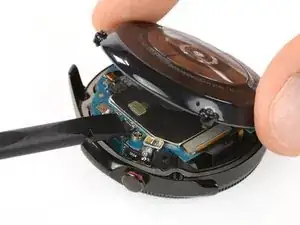
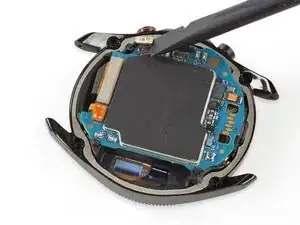
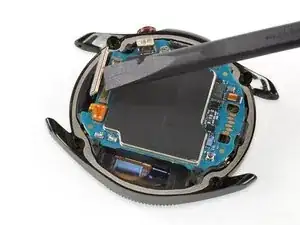
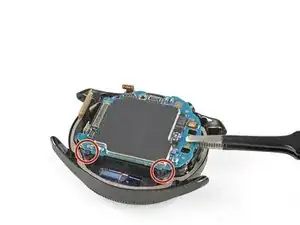
    • Benutze das flache Ende eines Spudgers, um die Flachbandkabel der Seitenknöpfe, des Displays und des Hall-Sensors abzutrennen.

  6. eEPDoZnCliCpfm22
    • Entferne die Kreuzschlitzschraube #00.

  7. WOryYayvEVkZPoof
    WOryYayvEVkZPoof
    coPhyfyjHEenLOES
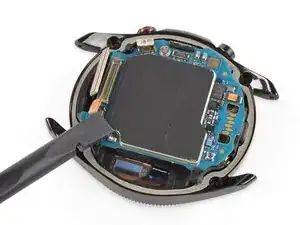
    • Das Motherboard wird von zwei Kunststoffclips gehalten.

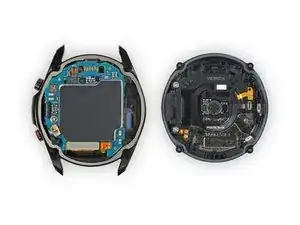
    • Benutze eine stumpfe Pinzette, um das Motherboard unter den Kunststoffclips heraus in Richtung der Knöpfe zu heben.

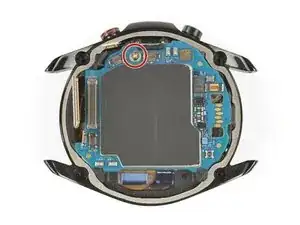
    • Entferne das Motherboard.

    Question, I had a demo Watch3. I tried to swap out the software and ended up putting it into Odem Mode. It’s bricked right now, any idea or help to fix it?

    Lucas Economy -

  8. TaarIShZHFuntIqH
    TaarIShZHFuntIqH
    NutM1JCmWUr1HgNl
    DH324ucJ3HIEANUc
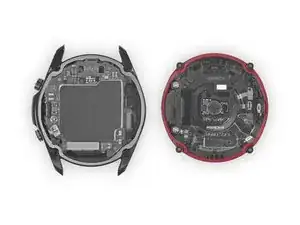
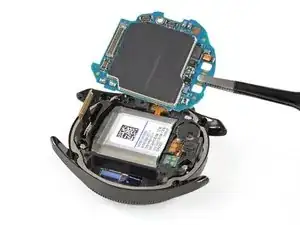
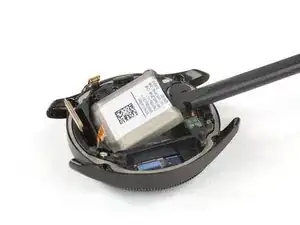
    • Setze das flache Ende eines Spudgers in den kleinen Spalt gegenüber vom Displaykabel zwischen dem Kunststoffrahmen und dem Akku ein.

    • Heble den Akku vorsichtig aus seiner Vertiefung heraus.

    • Der Akku ist leicht an der Kern-Baugruppe festgeklebt, gehe also langsam vor.

    • Versuche nicht, den Akku ganz zu entfernen, da sein Stecker noch an der Kern-Baugruppe festgeklebt ist.

  9. qmXVGZLPidPo1CBh
    qmXVGZLPidPo1CBh
    Q5FyK4oTbgCDLOX5
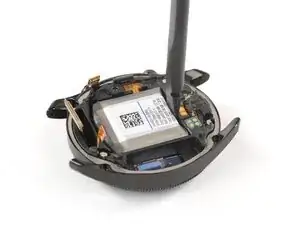
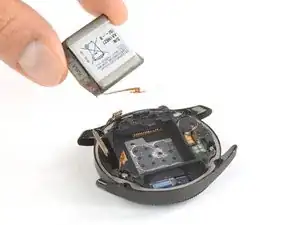
    • Hebe den Akku etwas an, um an das festgeklebte Steckerkabel heranzukommen.

    • Hebe den leicht festgeklebten Akkustecker mit einer stumpfen Pinzette hoch.
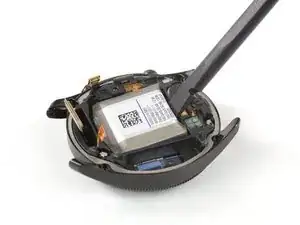
    • Du kannst den Kleber wahrscheinlich zum Befestigen des neuen Akkus wiederverwenden. Falls nicht, ersetze ihn durch doppelseitiges oder vorgestanztes Klebeband.

    • Entferne den Akku.

Abschluss

Schalte dein Gerät wenn möglich ein und teste deine Reparatur, bevor du neuen Kleber anbringst und es wieder versiegelst.


Befestige deinen neuen Akku mit vorgeschnittenen Klebestreifen oder doppelseitigem Klebeband. Um ihn richtig zu positionieren, bringe das Klebeband im Gerät an, nicht am Akku. Drücke den Akku dann fest an.

Um dein Gerät wieder zusammenzubauen, folge den Schritten dieser Anleitung in umgekehrter Reihenfolge.

Für eine optimale Leistung solltest du deinen neu eingebauten Akku kalibrieren: Lade dein Gerät auf 100 % auf und lasse es zwei weitere Stunden am Ladegerät. Benutze nun dein Gerät, bis der Akku leer ist und es sich von selbst ausschaltet. Lade es dann ohne Unterbrechung wieder auf 100 % auf.

Entsorge deinen Elektromüll sachgerecht.

Hat die Reparatur nicht ganz geklappt? Versuche es mit ein paar grundständigen Lösungen, ansonsten findest du in unserem Forum Hilfe bei der Fehlersuche.

Tobias Isakeit

Mitglied seit: 31/03/14

108055 Reputation

14 Kommentare

Once I had the correct tools and replacement battery, fixing was easy. Tyvm!

Jeremy Salazar -

One question, where can I find an authorized battery for this watch? or one that you highly recommend. Thanks.

**Edit - Your store doesn’t have a 45mm battery for my Galaxy Watch 3. Only 42 and 46.

Gilberto Garcia -

The 42 and 46 mm models are the first Galaxy Watch sizes. We ’re working on getting the Watch3 batteries and parts but it may take some time.

Tobias Isakeit -

Hi, is it possible to put the battery from samsung watch 472mAh, on samsung watch 3, instead of 340mAh?

Andrey Irnazarov -

Hi Andrey, short answer is no—although basically a good idea. But even if you cut the battery contact plate to fit (cut off the part with the alignment hole) its polarity is inverted. The Watch3 contact plate has -/+ (noted under the cable) whereas the original has +/-. Also the original Galaxy Watch battery is much bigger than the one in the Watch3. So it won’t fit inside the recess. Here is an image with the Watch3 battery on top of the original battery.

Tobias Isakeit -

Hi Tobias, thanks for the reply, I don't think the pins are a problem, the wire can be turned over and the tab with the hole, cut off. the pins will be pressed by the motherboard. I'm more interested in the size of the 472mAl battery and the inside of the battery compartment of the Watch 3?

Also I wonder if it would be a problem if the battery has a 472mAl, 1.27Wh and the 340mAl, 1.8Wh ?

Unfortunately, I don't have the opportunity to measure and test it myself.

Thanks.

Andrey Irnazarov -

Here’s a photo for you with some measurements. I’m afraid you won’t be able to fit the bigger Watch1 battery inside the Watch3 frame

Tobias Isakeit -

Great instructions which were easy to follow. Side note is I was doing the battery replacement on the 41mm instead of the 45mm (did not find one specifically for the 41mm version) and the battery it uses is the same one in Samsung Galaxy Watch Active2 40mm (EB-BR830ABY). Just in case anyone else was wondering.

Bradley Avery -

Do you mean that the battery EB-BR840ABY for the 45mm is compatible with the EB-BR830ABY for the 41mm. So I could put the 840 in my 41mm?

R.J.G. Beerten -

Are there batteries for the smr850 yet??

scott park -

It is nice that they give instructions on how to remove the battery with the right tools it can be accomplished. However reassembly should be addressed for people who have never done this before. I had difficulty making the last connection on to the motherboard with the connector that is attached to the back cover. I tried using my dominant hand several times to no avail. Apparently you need your dominant hand to hold the cover steady while you use your fingers from your non-dominant hand to press down to connector. My Water Seal adhered to the watch and I had to carefully reuse a spudger to remove it and then reshape it so it would fit back onto the back cover. And then during reassembly I had to carefully make sure that that part of the water seal was carefully in place before screwing the the cover down.

Coy D Davis -

Tienen la batería disponible para el modelo de Samsung watch 3 de 41mm modelo de la batería: EB-BR830ABY

rodrichucho rodrichucho -

Is the battery EB-BR840ABY for the 45mm is compatible with the EB-BR830ABY for the 41mm. So I could put the 840 in my 41mm?

R.J.G. Beerten -

I guess what Bradley was saying is, that the battery from the Active 2 (40mm) is the same battery used in the Watch 3 (41mm).
You very likely can NOT use the battery from the Galaxy Watch 3 (44mm) in the smaller Galaxy Watch 3 (41mm) model.

Tobias Isakeit -