Einleitung
Beim Kauf des iMac 27" von Ende 2015 war ich nervös, denn es gab nur sehr wenig Informationen zu diesem Gerät. Ich konnte nur ein paar Videos spezifisch zum Teardown finden und sehr wenig Informationen über das Aufrüsten mit einer SSD. Es gab einen Haufen Informationen über das 2014 und Anfang 2015 Modell, aber nichts zum Ende 2015 Modell.
Also, los geht's.
Ich stecke das SATA und das Stromkabel der HDD ab und setze eine 2,5" SSD ein. (Die HDD bleibt an ihrem Platz).
Werkzeuge
Ersatzteile
-
-
Das Öffnen eines iMacs ist knifflig, geht aber mit den richtigen Werkzeugen. Du benötigst einiges Material zum Öffnen des Gehäuses und die SSD korrekt einzubauen.
-
Hier ist ein iFixit Teardown, der dir zeigt, wo du rein musst. iMac Intel 27" Retina 5K Display Teardown
-
Unsere Freunde von OWC haben ein Video, das zeigt, wie die Festplatte entnommen und durch eine SSD ersetzt wird. Diese Anleitung hier zeigt dir aber, wie du die Festplatte einfach lassen und eine SSD dazufügen kannst. https://vimeo.com/139364064
-
Benutze zum Öffnen gute Werkzeuge, wie z.B. Pro Tech Toolkit and Jimmy Ich selbst habe ein Skalpell benutzt, ich fand ein Plektrum zu schwach. Mit einem Jimmy müsste es auch gut gehen.
-
Du benötigst auch den OWC In-Line digitalen Thermosensor. Damit kann der iMac weiterhin die Temperatur kontrollieren. Anderenfalls werden die Lüfter mit Höchstdrehzahl laufen. Dieser Reparatursatz enthält auch das notwendige Klebeband. https://eshop.macsales.com/item/Other%20...
-
-
-
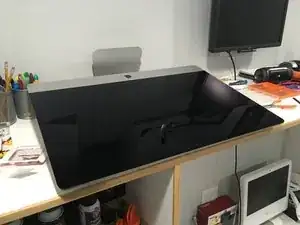
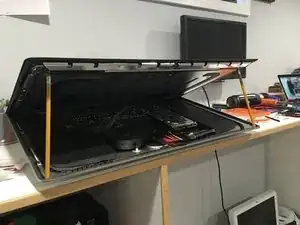
Bei den aktuellen Anleitungen von iFixit und OWC werden die Displaykabel abgelöst. Bei dieser Anleitung hier ist das nicht nötig. Ich habe meinen iMac waagerecht hingelegt und dann das offene Display einfach mit zwei ganz normalen Bleistiften auf zwei Seiten abgestützt.
-
-
-
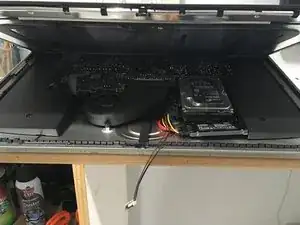
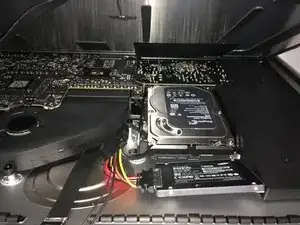
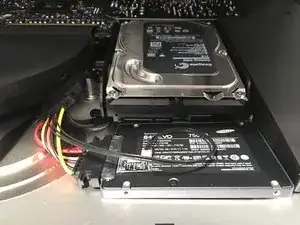
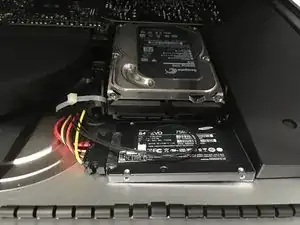
Hier kannst du sehen, wie ich das SATA Kabel von der Festplatte abgelöst und das OWC Thermosensorkabel angeschlossen habe. Auch die SSD ist schon angeschlossen.
-
Das OWC Kabel ist ein wenig steif, ich musste es ein bisschen verdrehen, so dass die SSD flach im Inneren des iMac liegen kann. Diese Einbuchtung, wo du die SSD sehen kannst, ist normalerweise leer und der perfekte Platz für eine dünne SSD.
-
-
-
Als nächstes habe ich den Thermosensor an der SSD angebracht und dabei die Kabel so ordentlich und kompakt wie möglich gehalten.
-
Ich habe die SSD an dieser Stelle mit einigen Klebepads von 3M befestigt. Genau an dieser Stelle ist der iMac ein wenig gekrümmt und ich brauchte etwas Dickeres als die üblichen Klebebänder. https://smile.amazon.com/dp/B00O1WFF8U
-
Ich habe insgesamt vier dieser Quadrate in Doppellagen verwendet. Je einer dieser Doppeldecker befindet sich hinten links, der andere vorne rechts.
-
-
-
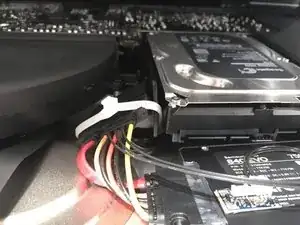
Zum Abschluss habe ich das Thermosensorkabel mit einem Kabelbinder ordentlich an der Festplattenhalterung befestigt.
-
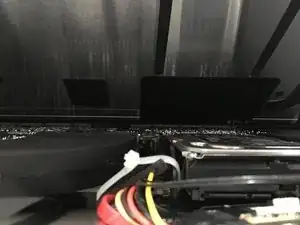
Ich wollte auch das OWC Kabel so weit wie möglich vom Display entfernt halten. Auf dem zweiten Bild kannst du sehen, dass noch genug Platz ist; das OWC Kabel und der Kabelbinder sind weit genug unter der Festplatte und dem Abluftkanal.
-
-
-
Das war's! Ich kann zwar nicht die 2 TB Festplatte benutzen, könnte aber mit kleinem Aufwand eine SSD installieren, ohne Display, Displaykabel, Festplatte und Lautsprecher zu entfernen.
-
Als Bonus kommen die Festplatten des iMacs als "Fusion Drives", haben also auch eine PCIe SSD. Meine hatte eine von 128 GB, die kann ich jetzt als weiteres Laufwerk nutzen. Ich plane, darauf Windows über BootCamp zu installieren.
-
Um dien Gerät wieder zusammenzubauen, folge dieser Anleitung in umgekehrter Reihenfolge.
122 Kommentare
Hello, in the last part of closing the iMac, what is the adhesive that you use? I bought some on ebay but its not strong enough. thanks.
PCosta -
My link was in the post: https://eshop.macsales.com/item/Other%20...
It includes the thermal sensor and the tape.
If you are installing an SSD to replace the HDD on iMac 2013 and later, you don't even need the thermal sensor cable from OWC because the heat info will be read through S.M.A.R.T. I think that OWC thermal cable for iMac 2013 and later is a scam. The reason why you need the thermal sensor is that Seagate HDD has a proprietary thermal port back in 2010. The thermal info cannot be read by SMART back then. The new iMac from 2013 (probably 2012 included) will no longer need the thermal sensor cable.
Evan -
Well, unless someone has a definitive answer on if it's needed or not I'd still recommend it. Plus it comes with the tape needed to secure the iMac.
Doesn't the newly installed SSD block the fans natural airflow path being placed there?
@chrisray No. The new 5K iMacs have the external fan hole coming out the center of the back of the case. The older iMac's had a thin vent that ran horizontally along the top third of the back case, and that might have been blocked. But on the 5K iMac the plastic fan in the middle pushes air straight out that vent on the back. The SSD does not impede on that at all.

Can you use SSD Fan Control app to keep the fan at the normal speed?
A VIEW -
Why would you want to? Just use the thermal sensor and the fans will stay in check, no need for a piece of software. https://eshop.macsales.com/item/Other%20...
Justin Winchester -
So this guide basically shows you how to install a regular non Apple SSD in a imac that already has a “fusion drive”?
So now you have the hdd that was not moved and the Apple pcie ssd and now the new non Apple ssd right?
gleeglee217 -
Correct. The big take away is that I didn't have to move or remove anything. I was able to add my own SSD, and use Apple's built-in SSD. However I did lose the 2TB Fusion drive, and I'm not the least bit sad about that.
Justin Winchester -
Thanks for the guide, One question though. Did you find or have experience any issues being the fusion drive still in there? Not sure how the two SSD's would behave and work, but i want to make sure there are no conflicts between them. Also, I am assuming you must have seen lot of improvements in terms of performance, read/write, speed etc after the SSD replacement, right? Mind sharing the before and after if you have recorded something?
Mohit S -
The fusion drive is completely disconnected, so it does nothing but take up space.
Modern computer can handle multiple drives, doesn't matter their type. The SSD are two different drives so the iMac just mounts as such. The iMac (or any computer) can really handle as many drives as you could connect to it, internally, or externally. So no there would be no conflicts between SSDs, HDDs or any mix thereof.
Yes, SSDs are insanely faster and better in every way. I did not run any benchmarks because I never even booted this iMac with the Fusion drive. I installed the SSD before I even booted it up for the first time. But you can look up any benchmarks for my SSD vs a standard WD 7200RPM drives
Justin Winchester -
In Justin’s case, the boot time would probably not change all that much since the operating system is effectively on the ssd part of the “fusion drive.” The big performance improvements will start to show up when you put more than 128 GBs of data on your system.
Rick Harman -
Can someone explain why the existing hard drive doesn’t need the OWC thermal sensor? Why can’t you just disconnect the cables from the HDD and reconnect them to the replacement SSD?
Copywriter Ben -
This config just leaves the HDD in place unused, Instead of removing it. All you are doing here is saving a few bucks for the 2.5” to 3.5” adapter frame and fully removing the HDD.
The original Apple HDD has a build in thermal sensor which Apple leverages. When you replace the drive with either a HDD or SSD you need to replace the now missing sensor Apple uses to manage the systems cooling. Thats why you need to add the OWC in-Line sensor.
Dan -
As Dan stated, any drive other than Apples requires the thermal sensor. And yes it only saves you a bit of money ($15 dollars) but it saves you A LOT of time, makes the SSD addition WAY easier, and you are FAR less likely to damage your iMac since you don’t have to remove any components.
Justin Winchester -
Bonjour, question de novice mais peut-on ajouter plutôt un SSD M2 sur l’iMac 27" (fin 2015) ? Avec la même procédure ?
Vincent -
No you cannot.
Justin Winchester -