Einleitung

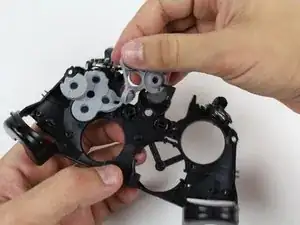
In dieser Anleitung erfährst du, wie die Tasten entfernt werden.

  1. nCPWIVIPPnPioQek
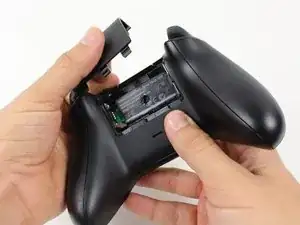
    • Entferne den Akkudeckel

    • Entnimm den Akku

  2. BCoOrGwESawovJpX
    BCoOrGwESawovJpX
    CYTch3arFkuHOaol
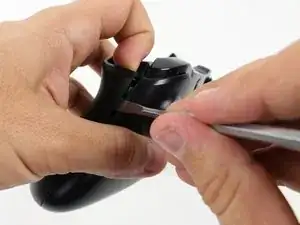
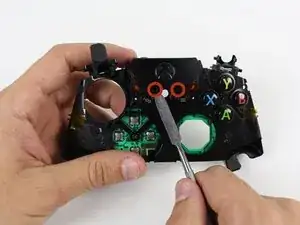
    • Im Foto ist ein Metallspudger zu sehen. Wir empfehlen einen Spudger aus Plastik.

    • Nimm den Controller fest in die Hand um die Seitenteile abzunehmen. Heble mit einem Spudger in die Naht zwischen Front- und Seitenteil.

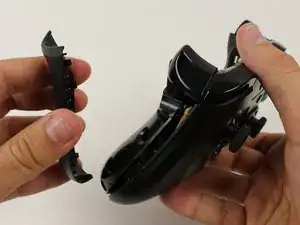
    • Ziehe das Seitenteil ab indem du den Spudger vor und zurück bewegst. Das musst du entlang der ganzen Naht durchführen.

    Start prying the side plate off underneath the trigger, this makes it easier to disconnect the other clips connecting the side plate to the backplate.

    Brandon -

    One you take it off, is it possible to click it back in?

    Aiden Bear -

    As long as you don’t exceed the couple tons you need to take it off you should be able to put it back.

    Brandon -

    I don’t have a squdger

    TimidFerret4982 Gaming -

    getting those handles back on seems impossible, they just dont fit as well, a gap remains even after snapping into place.

    Dont think ill be doing this in the future

    Spoutin Wyze -

    edit: wiggled the bo9ttom middlewith the handles off and somethign finally “clicked” into place for that extra 1/4 mm for the down arrow on my D-Pad to click back up into place!.

    Spoutin Wyze -

  3. NIQhMF4yRuvR3EOl
    NIQhMF4yRuvR3EOl
    JPprWqFDRTUcXoCS
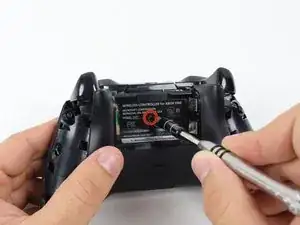
    • Hinter einem Aufkleber in der Mitte des Controllers ist eine Schraube verborgen.

    • Mit einem Schraubendreher kannst du ein Loch direkt in die Mitte des Aufklebers stoßen.

    • Wenn du den Aufkleber nicht verletzen willst kannst du ihn auch vorsichtig anheben.

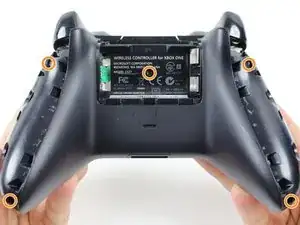
    • Entferne die fünf 10 mm Schrauben auf der Rückseite mit einem T8 Schrauber.

    i damaged my screws. how do i get the screws out?

    tenzin -

    wait. i just watched a video guide on ifixit's youtube channel about damaged screws. i'll try those methods.

    tenzin -

    It's a t8 or t9 security bit btw, I got the top two out with a regular T8, but the bottom two and middle needed a T9 Security bit.

    David Loper -

    All five faceplate/backplate screws in the controller I disassembled were T8 security fasteners.

    John Dziedzic -

    Am I doing something wrong because I got the tool it said I needed and got the middle screw out but the others have a bump or something in the center of the screw and it won't fit.

    kolton77 -

    The T8 is only good for the middle screw on my One S controller. The others require something bigger

    Matej Skelo -

    These requires SECURITY Torx bits (they have a cannulated hole in the driver). I don't believe the iFixIt branded driver is cannulated but you can buy a set of bits from DeWalt DWAX200 which is overkill but has what you need.

    jhighsmith -

    The driver that iFixIt sells is cannulated.

    jhighsmith -

    where do you get this dumb ass screw driver

    Jake Zweier -

    iFixit Store #IF145-027-3

    VauWeh -

    You can bypass it with a 1.5mm flathead.

    Marianne Sandling -

    thank you for this. worked for me

    Mr Anderson (Evolluisionist) -

    These screws required a T10, not T8.

    Armand -

    TR9. A $10 kit from Walmart has the bit/driver in it and extra goodies to make life simple.

    Matt Martin -

    As weird as it sounds, the top 2 came out for me with a flathead- but the bottom two and the middle one wont

    macybrooksevans -

    If you damage the middle part of the screws you can still take it out with the same screwdriver.

    Kev God -

    Thank-You :)

    Isaiah -

    needed a T8H, not easy to see.

    on a grey green xbox one controller

    Michael -

    You need a T8 and the kit is not $10 it’s $13.88 Hyper Tough Electronic Kit. In the hardware section at WalMart it a T8 because I tried everything and only a T8 fit it like a magnet. And the dumbass that wrote the article there is only 1 freaking screw.

    Bear Darazs -

  4. CN1rEMvQC3myRLyq
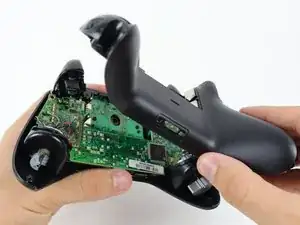
    • Nimm die Rückseite ab.

  5. hWBUR3YZiAAiU3As
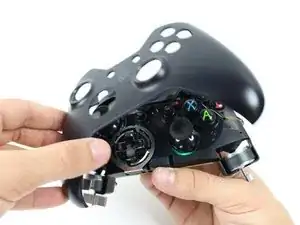
    • Entferne die Frontplatte.

  6. NF1M5HTNtuRwQV66
    NF1M5HTNtuRwQV66
    YPrTGnbbQiLpdCcS
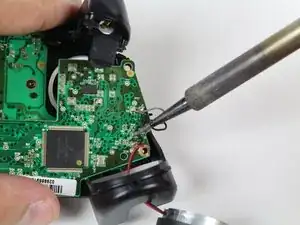
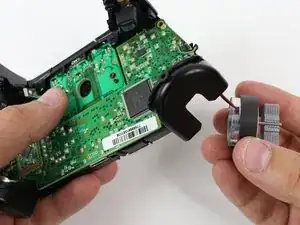
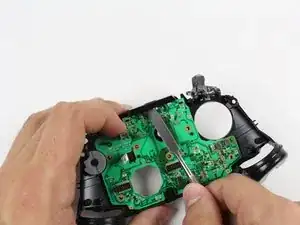
    • Du kannst die Vibrationsmotoren frei aus ihren Sockeln hängen lassen.

    • Entlöte die Lötstellen, während du die roten und schwarzen Drähte auf der oberen Hauptplatine hälst.

    • Entlöte die schwarzen und grauen Kabel, die am oberen Motherboard befestigt sind.

    • Entferne die Vibrationsmotoren und lege sie beiseite.

    • Sei bei der Verwendung des Lötkolbens vorsichtig, damit du andere Komponenten nicht zu beschädigst oder dich selbst verletzt.

    • Informationen zum Löten findest du hier.

    Steps 6-8 aren't completely necessary, and are very risky if you aren't good at soldering. It would seem the only reason to remove the motherboard and mess with all this soldering is just so you can reach both screws on the trigger in step 10. However, you can reach them already with a small-bodied screwdriver. Although you might have to rest the screwdriver on the black square processor to reach the bottom screw, it shouldn't damage the processor or motherboard to jimmy that screw out.

    Robert Rapier -

    like mentioned by ‘Robert Rapier’ you can skip the de-soldering in most cases,

    for example cleaning or changing the buttons is doable, but the grey and black wires are pretty short

    and wired through the inner case so it can get a bit fiddly and you have to be careful not to damage them in the process.

    If you have a soldering station around i would still recommend using it.

    yKekS Yzz -

  7. BY2UC6W4D1LECNDH
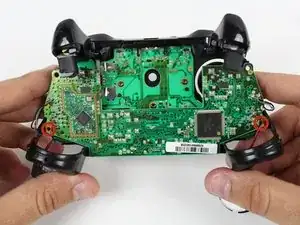
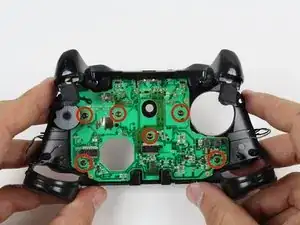
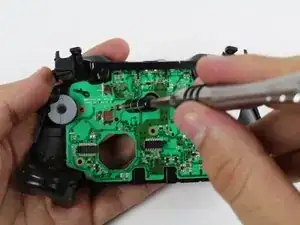
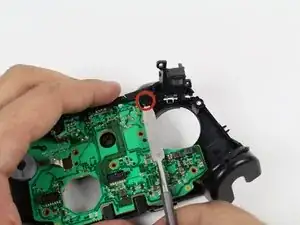
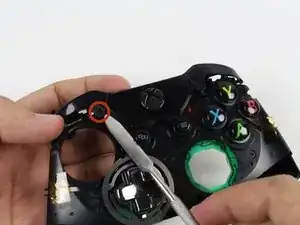
    • Löse die beiden 7mm T6-Schrauben in der Nähe der Vibrationsmotoranschlüsse.

    Are these just T6 screws or Torx security T6 that is cannulated?

    Kenan Vickstrom -

    The outer screws are security screws. The ones on the system boards are Torx.

    Rongwey -

  8. haVbje2oHVch2uMH
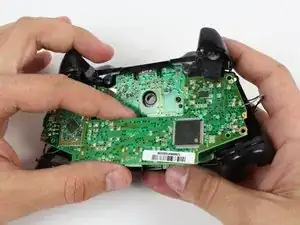
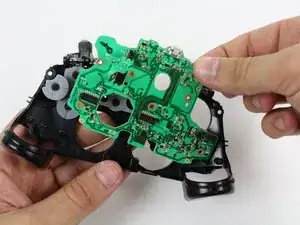
    • Fasse die Seiten des Motherboards fest in der Mitte.

    • Hebe das Motherboard nach oben, während du es leicht vorwärts und rückwärts wackelst.

    • Das Anheben des Motherboards erfordert etwas Kraft.

  9. UsaBcmkMJRAaUqC4
    UsaBcmkMJRAaUqC4
    M4H2r4164KJvDEMY
    • Drehe die sechs T6 Torx Schrauben auf der unteren Platine heraus.

    Where can I find the connectors at for the motherboard??

    lillarrypimp1993 -

    This guide completely skips the part about removing the trigger buttons. There are 2 screws per trigger that need to be removed so there are actually 10 T6 screws to remove.

    Navy Vet 2015 -

    There’s also 2 small rumble packs under the trigger buttons that no one mentioned. Someone got lazy when writing this step.

    Navy Vet 2015 -

    Hey @jasonasnes good catch! It looks like maybe they forgot to add the trigger/trigger rumble motor prerequisite, so I went ahead and added that in there. That guide makes no mention of how the rumble motors are attached, but I think they’re soldered to the motherboard, so I added a note to desolder those wires prior to removal. I think you could probably also just desolder those wires and leave the triggers in place when removing the motherboard, but I’m not certain! Hope that helps!

    Sam Goldheart -

    @sam I was able to complete this with the missing information but thank you for updating it for those to come in the future. Minus these couple of discrepancies and it’s a great guide. Yes, all 4 of the rumble motors are soldered onto the upper motherboard. Step 6 actually highlights this with the exception of mentioning the 2 small rumble motors in the triggers. You bring up a good point, it might be possible to leave the triggers in place during this process. I used this guide as a teardown instead of as a replacement so I could refurbish the plastic shell and clean the interior of my day one controller so I completely stripped mine. However, I believe that the triggers could remain in place if your goal is to get to the lower motherboard.

    Navy Vet 2015 -

    You can lift off the top motherboard without desoldering the black/red wires to the large rumble motors, just be careful because the wires are delicate enough that you can break them off at the solder joint. It’s not a huge deal if you do, because they’re long enough that you can strip the ends and have plenty of room to resolder.

    You can even very carefully remove the lower motherboard without desoldering the black/gray wires, and without removing the trigger assemblies, but there’s almost no room to work in there if you choose to go this route, because the wires will leave you only at most an inch of space to get in there under the lower motherboard. Also, leaving the trigger assemblies in place makes it very difficult to get the lower motherboard back into place without pinching or moving the conductive rubber button pad.

    Talia Margherita -

  10. Y4ScikhYpe6alShJ
    Y4ScikhYpe6alShJ
    ePMCPHLVsAahjODF
    • Entferne die Stoßdämpfer, indem du sie aus aus den Stiften auf denen sie angebracht sind mit einem Spudger herausschiebst. Sie sind vorne und hinten am Controller zu finden.

    • Für diese Arbeit ist ein Nylonspudger empfohlen. Mit einem Metallspudger könntest du leicht die Platine beschädigen.

    At some point I had 2 little white pieces come out and I didnt see them till the very end. Does anyone know where these are spossed to go? They kinda look looe shims? Thank you.

    myles bartlett -

    They go behind the trigger buttons on the board against the metal. Narrow side towards the button.

    Rongwey -

  11. XgGEjIXarQBOhD2s
    XgGEjIXarQBOhD2s
    juf5yTFyN3TaCeIn
    • Hebe das Teil um die Home-Taste aus ihren Stiften.

    • Ziehe es zur anderen Seite hin ab, heble mit einem Spudger an den Stiften.

    • Auch hier wird ein Plastikspudger empfohlen, mit einem Metallwerkzeug könntest du die Platine beschädigen.

    • Um dieses Teil zu lösen brauchst du recht viel Kraft.

    2 things missing in this step:

    1) You will have to press down on the power button in order to release the plastic retaining piece.

    2) The button that syncs the controller to the system completely separates from the plastic frame. If you're not careful you could lose the thing.

    Navy Vet 2015 -

    Thanks NavyVet2015!

    The sync button fell out on me and I was pondering what it was for a while.

    Nothing is holding that little guy in so watch it!

    CrazedCanuck18 -

    カバーを戻す前にsyncボタンを本体側に付けてから被せた方が良い

    xbox_user -

  12. YPAmqNqOVVuSGQQT
    • Entferne die untere Platine.

    That’s the TOP motherboard.

    Ken D. -

  13. 6ASALbxMv1vkLxcj
    • Entferne die Gummiabdeckungen der Tasten

  14. tAq5JA3pVAOAiQ4N
    • Lege die Tasten so, dass sie nach unten zeigen. Drücke sie dann nach oben aus ihrem Sitz heraus und entferne sie.

    Who the !&&* came up with this?

    You could do this in a fraction of the time and a very tiny fraction of the steps!

    All you have to do is remove the outer case and you don't have to desolder anything, you simply lift it up flip it over and swap the pieces out!

    Anybody that needs help, watch a couple of YouTube videos until you find something that looks easy, do NOT follow these instructions to replace the buttons, as you can do this start to finish in 10 minutes without doing over half of this crap…

    Malone R -

    My sync button doesn't work, I need to replace it. Any guide on where to buy and how to replace said button?

    Camilo Rangel -

Abschluss

Befolge die Anweisungen in umgekehrter Reihenfolge, um das Gerät wieder zusammenzubauen.

Garrett George

Mitglied seit: 22/01/15

5775 Reputation

29 Kommentare

do you have a URL for the repair parts (rubber pads) ect. for the wireless controllers

kendixon69 -

For all of my Xbox One controllers, I needed the tamper-resistant Torx bits. They're the ones with the hole in the center, like these: http://www.amazon.com/Pro-Grade-13pc-Tam.... Any tamper-resistant or Torx security bit set should do as long as it has the sizes listed in the Tools section of this FixIt article.

Frank Wilson -

Just an FYI you can use a flat screwdriver against the post and side and it will either work or break the post which is what happened to me and allowed me to use a normal torx screwdriver.

sid f -

Looking to replace the switch on the right bumper, can't find any parts or numbers. Looking for help please.

sid f -

you could buy a broken controller and take it a part to use that bumper. Just make sure to get it out and put it in carefully because you could break that.

David Gardner -

I have parts, what do you need

Christian Orgel -

I have parts for

Christian Orgel -

Has anyone else had trouble with keeping the sync button in place while trying to do step 11 in reverse? I think I'll never be able to use the sync button, but I've got the A button functioning again!

Derrek James -

I kept mine mostly put together and just held it upside down slightly. did you actually desolder the connections and the rest of the crap that it said to do?

I am genuinely curious as to whether or not people did this! LOL so much of this is not required…

Malone R -

So I have these tiny white square pieces that fell out while I was trying to remove the bottom mother board to clean out the buttons and I don't know where they go... help?

JRellevant -

I gotcha brotha,

The little white rubber pieces sit in the small square slot behind the "tact switch"

*borrowed picture, not mine.*

http://m.imgur.com/gallery/ZAHh4

Hope that helps

SUBRWHO -

Link to image was bad so I found this one for anyone wondering what the white square bits are supposed to go

https://goo.gl/images/nuS3rt

Floyd Fernandez -

I just tore my controller down and can't get the buttons out. It's like they are superglued. Which is why I took it apart in the first place. Any ideas?

Jd -

Use a qtip and some peroxide on them. Then just slowly push them out. Kinda like you would with liquid wrench on a tough nut. Just broke mine down because a friend spilled a beer on it. Works like new now. Just clean it several times. And don't forget to clean the heck out of the faceplate openings where the buttons sit too.

Mishka -

WOW.. Thanks for this. Just took mine apart to clean out a coffee spill. I can say that this was a little on the difficult side as I didn't unsolder everything, so it can be done without the soldering - unless you are changing a board.

Now to test it to make sure it works!!

Rob -

I can confirm That this procedure is spot on and it can done without much difficulty WITHOUT any soldering/unsoldering on Both Xbox one and Xbox One S wireless controllers.

I've just done button replacements on 3 ONE S Controllers and 1 Xbox One controller this week without unsoldering anything. All are working fine. The One S controllers have a bit more slack in teh soldered cables than the gen 1 controller so they were easier but basically you can twist the top board in place without straining any connections and have plenty of room to remove teh motherboard screws and do the button swap. The big trick here is controlling teh Rumble motors. I just used some Painters tape to hold them in their receptacles while i worked to keep them from falling out and straining the soldered connections.

Also regarding the time estimate the first one took me about 30 minutes by itself but once I had the process down it was a 15 minute process to tear down and reassemble.

John Poniske -

I wish I would have read this first. My right rumble motor fell and snapped wires as I was tightening last motherboard screw before housing…..

Melissa Roth -

Perhaps you can answer this for me i have a similiar problem in most elite controllers from what i understand my rb and lb bumpers broke basically in a months time anyway i also have a xbox one s controller that looks exact to the elite. What i want to know is can i take the bumpers from the one s controller and trade them out with the elite. Thanks

john Noneya -

you can not swap them out. The controller bumpers are different. The S bumpers are their own separate buttons with no bar connecting the two like in the elite. I just tried that and it was easy to take apart but they are two separate types of buttons.

Jesse Richardson -

Hey, thanks for this guide. I think I must have done something wrong, though. My xb buttons press just fine, but my at buttons are super stiff. Do you possibly know where I went wrong? Tighten the screws too much or something?

Cheyanna -

Most likely the buttons didn’t line back up quite right. Happened with my x button the first time I started to reassemble. They have a set of groves and tabs that line up to get them to sink into the holes perfectly if they are even off by a little they won’t go in right.

Melissa Roth -

I Just tore mine down and replaced the buttons and now the thing will not turn on. When i use the battery I get nothing, when I plug it in USB the light just flashes. Any thoughts?

Preston Holder -

There is a connection between the two boards, it's a plug type, black in the second generation controllers. If it isn't reconnected then you can see the issues you're experiencing.

Bryse Taylor -

Probably because you use the directions off of this wackadoo site lol I can't believe they tell people to remove the wires and mess with soldering at all!

All you have to do is remove some screws!

Malone R -

I attempted this tear down to clean up a sticky sauce spill and got all the way to the end of reassembly without soldering at all. Then the two of the wires came off their place as I started to put the outer housing back on. Can it be done without soldering/desoldering? Yes but have an iron handing Incase what happened to me happens to your remote. I dont have a good one and as the one I’m repairing is the one linked to my account I’m not about to risk completely ruining it so this repair is going to take a while.

Melissa Roth -

Thanks so much! I used this guide to clean up my ABXY buttons that had gotten sticky due to build up. My controller is cleaned up and very happy. Though I’d like to note that when you’re putting it back together: the backplate has to be screwed in bottom screws first and then top screws second.

Annie Duffield -

Salve. Io avrei un problema, mentre ero in gioco ho riscontrato un problema suo tasto RT che si muoveva ma ho lasciato stare ma dopo si è semi-staccato cioè che una porte è staccata è un'altra parte è attaccata cosa posso fare.?

AtomicZoda -

Is it possible to do this without desoldering the boards? I have a pad and I just want to clean it & switch the buttons out for new ones.

Ripley -