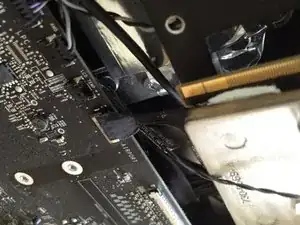
Einleitung

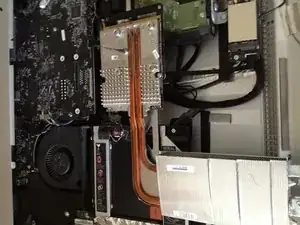
Um einen 27" iMac (Ende 2009 oder 2010 Modell) für Spiele zu nutzen, solltest Du vielleicht deine Grafikkarte mit einer der 6er-Serie aus dem letzten 2011er Modell hochrüsten.

  1. sQYsHCwlim2WOs5y
    sQYsHCwlim2WOs5y
    wHiunt5LEPRI6Df1
    olRVCyJ2KOMrOshW
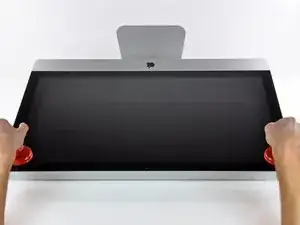
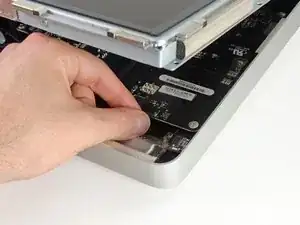
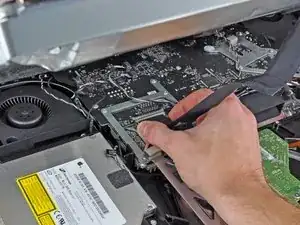
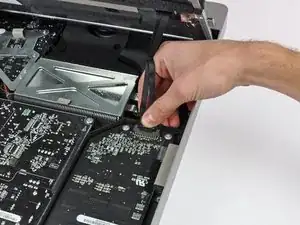
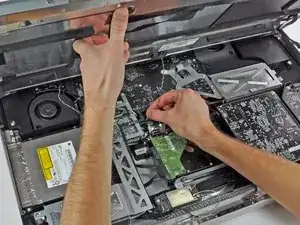
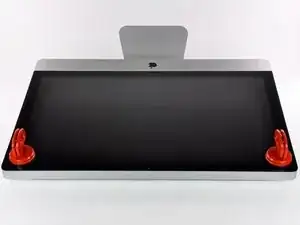
    • Befestige je einen Heavy Duty Saugheber in den beiden oberen Ecken der Glasscheibe.

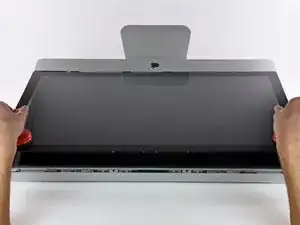
    • Um die Saugheber zu befestigen, platziere sie erst mit dem beweglichen Henkel parallel zur Glasscheibe (wie im zweiten Bild gezeigt).

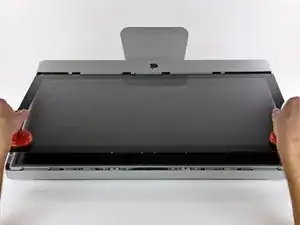
    • Halte den Saugheber leicht an der Scheibe und hebe den beweglichen Henkel bis er parallel mit dem anderen ist (wie im dritten Bild gezeigt).

    • Wenn deine Saugheber sich nicht befestigen lassen, reinige sie und den Bildschirm mit einem angefeuchteten, fusselfreien Tuch. (Am besten verwende destilliertes Wasser und, wenn das nicht hilft, ein 50/50-Gemisch aus weißem Essig und destilliertem Wasser.)

    • Hebe die Glasscheibe nicht nur an den Saughebern hoch, da sie dir sonst runterfällt, wenn ein Saugheber sich löst.

    • Die Originalverpackung des iMacs ist ein guter Ort, um die Glasscheibe abzulegen. Andernfalls tut es auch eine weiche und ebene Fläche, zum Beispiel ein Handtuch auf einem Tisch.

    You can easily lift the glass panel off the magnets with only your fingernails (or something thin like a credit card or a guitar pick). No need to buy suction cups you will only use once.

    Nick Caron -

    Yes, you don't need the specific suction cups to remove the display cover - it's held on by magnets, and if you start at the center by the iSight you can work out to the edges and remove it. I had an iPhone screen suction cup around and it helped with balancing the screen when you pull it out fully, but by no ways is it required.

    jtowner -

    Great guide and pretty straight forward the only thing that took me ages and I didn't manage to undo were the power btn cable (step 28) and the thermal sensor (step 25) Seemed like they were glued on! Very difficult to remove and obviously conscious so I didn't break anything!

    Eddie -

    Thanks!!! Worked excellently.

    I used a plunger (clean first ;-) to get the screen off, and http://exirion.net/ssdfanctrl/ for fan control.

    Then, i did not take out the whole display and left it in the hinges on the bottom side and held it up with two small cardboard boxes. Easy enough to disconnect the hdd then.

    I replaced with an ssd, put that into a ssd enclosure. Had to drill an extra hole in it to fasten the pins that hold it in place.

    Used Carbon Copy Cloner to make an image from the old hdd, with the sad connected via usb. Checked it of it booted via System Preferences > Startup Disk. It worked so the took the imac apart and replaced the disk. Booted, everything was working as always, only faster!

    Frank303 -

    I'm replacing my optical drive too. what exactly needs to be plugged into the SSD? I don't have the kit - as I am not sure one is required if I buy something like this: http://www.amazon.com/gp/product/B0056OB...

    Can you please advise? Can I do it with this piece, or do I need to get the entire bracket kit?

    Allen Borza -

    My display data cable forks, with a smaller section going up near the camera board. Where it forks, it is attached to the aluminum plate that attaches around the cpu board. I haven't seen any images that look similar, and I'm stumped at how to remove this second section of the cable. 2010 i7 build to order

    Awolf -

    Agree with the other comments here. Despite buying suction cups, not sure they were necessary as the screen removed very easily. A sat nav suction cup would do the job fine.

    Stuart Bloomfield -

    I can confirm that it is possible to remove the front glass using fingernails rather than suction cups. It isn’t easy, but if you try you should be able to pry off the glass.

    I did this twice: once at the beginning of the procedure and once again at the end, when I realized that a big pice of lint was trapped under the glass.

    gordonhamachi -

    Don’t use suction cups. totally unnecessary. screen pops off with fingernails.

    Kieran Hobbs -

    The reason for caution about suction cups tends to be making sure you don’t apply uneven pressure on the edges of the glass and crack it in the process of removal. I do agree however that some pretty small suction cups would do fine. These suction cups can be had at your local princess auto (Harbor freight) for a few bucks and are useful elsewhere as well. if you use your fingernails or other items just try and do it evenly :)

    Abirinder Brar -

    good duct tape or gaffer tape wrapped around your hands makes an excellent glass removal 'tool'. Even clear packing tape works a charm.

    Stu Blair -

    A great first step that minimizes that first gust of dust migration when the glass is lifted is to clean the glass, sides *and the back* before lifting the glass, and then lift SLOWLY. Most of that dust is already trapped inside and pulled up as the screen lifts, but with care you can keep it there (or gently vacuum out with a micro vac…).

    John -

    before starting any of this…there is a device that you can use that comes with the IFixit kit to format and either clone or restore your hard drive to the new drive…it will save you a lot of headaches..it is a SSD enclosure that you can plug into your existing computer …

    Tom Richter -

    Thanks for the instructions. Before doing this the first time, suggest to everyone, read through at least twice. This is the easiest step, as you’ll soon see. As for removing the glass, USE suction cups, either the ones the sell here, or others. DON’T skimp. Also wear gloves when handling the glass. Don’t take chances.

    ECJohansen -

    Duct tape works too!

    Dani -

  2. XBLBbPNDcxRAYYWS
    XBLBbPNDcxRAYYWS
    xMmDfMTyn4Ac1SkA
    mqbuAnq3Mon1YWiD
    • Hebe die Glasscheibe rechtwinklig so weit vom Display weg, dass sich die metallenen Befestigungsstifte an der Unterseite der Oberkante lösen.

    • Ziehe die Glasscheibe weg von der unteren Kante des iMac und lege sie vorsichtig beiseite.

    • Trage die Glasscheibe nicht nur an den Saughebern, da sie dir sonst runterfällt, wenn ein Saugheber sich löst.

    • Löse die Saugheber, nachdem du die Glasscheibe sicher abgelegt hast, da der Unterdruck auf Dauer das Glas beschädigen kann.

    • Denk dran, den Bildschirm und die Innenseite der Glasscheibe vor dem Wiederzusammenbau sorgfältig zu putzen, da eingeschlossener Staub oder Fingerabdrücke deutlich sichtbar sind, sobald du das Display einschaltest.

    you should do this mac up, because, for me, one of the suction cup failed, and the glass fall into the lcd screen. Now there is a big hole in it...

    Lau -

    do you still have this panel?

    Alpha Dimension -

    Reassembly: After powering on and running for a few minutes, found a large whitish patch on the screen. Persists after powerdown.

    Turned out to be condensation, though it didn't look like it - more like fine white powder rubbed in. Humidity is very high this time of the year. Fix: start airconditioner in a room, leave it running a while, take iMac in, prise open the glass again. Condensation vanishes instantly. Keep it out for a ~15 minutes running infinite loops to get iMac nicely heated up and fans running. Snap glass back.

    ganesh -

    I used a Swiffer dry cloth to get all the dust off the screen while just blowing with my mouth at a steep angle. I know I didn't get every speck, but the screen looks perfect once assembled and lit again. Removing the glass from the screen is pretty easy if you need to re-clean it.

    Jay Gillibrand -

    I used a microfiber cloth instead, which worked well. The same type as yo use to clean eye glasses, but in a larger form factor.

    Daniel -

    The Swiffer idea worked great! I just brush it over the LCD and glass panel lightly, and all dust particles are gone quickly. The screen after boot up looked beautiful. Thanks!

    dtsai2 -

    I strongly recomment to detach the suction cups while working at the rest of the steps. In my case after half an our i heart a crack noise behind me on the table... The vacuum of one of the suction cups braked the glass! maybe there should be a warning in the Repair guide

    shippe -

    I didn't crack the screen, but it popped out of the shims and then popped back in, as if the glass edge is magnetic or has steel in it to connect to magnets. Be careful with this step — it is pretty nerve-wracking, but doable!

    Alex Reynolds -

    You need a big clean surface free, or at least 2 or more free surfaces because the iMac, the glass and the LCD display are quite bulky. You'll also probably need space for a tablet or a laptop to read this guide while you are working. And don't forget room to work on the optical unit and for the tools you are going to use. I covered a large table with a double layer of bubble wrap. In my opinion it's better to put the glass face down to limit powder sticking on the internal surface.

    Roberto Blandino -

    Thanks good advice! I was wondering exactly about the working space issue!

    matteoslataper -

    I am doing this repair now. After successfully lifting off the glass panel (yay!), dust blew out of the lower open edge. So I sprayed a can of air around edges. But a poof of the “air” condensated on the LCD. Does anyone know if I can clean the LCD same as how the glass is cleaned (damp cloth with equal parts white distilled vinegar/distilled water) and if not then how?

    Amy C -

    Hi Amy,

    To clean the LCD panel, I would suggest using a clean microfiber cloth and rubbing alcohol. Distilled water can be used, but avoid regular water, which contains minerals. Make sure the microfiber cloth is absolutely clean and has no hard particles sticking on the surface, which will scratch your LCD when you wipe it.

    Wet the surface with some alcohol and gently wipe with the microfiber cloth. Wipe in one direction.

    Arthur Shi -

    I find that the LCD is not as fragile as we all think. they are very much like any LCD on a tv or monitor. There is no extra glass on the front of a monitor. Not the 23 HP Pro Displays I have anyway. I know this because I punctured one moving my video wall. so I took it apart to know how its put together. I will say, there are several 'lens’ like sheets and a reflective (silver} sheets that are the same size as the panel. and a 1/8”piece of acrylic, all behind the LCD panel. Take care with them and clean as you would your monitor.

    My suggestion is to stand the iMac up after the panel is secured back into the body of the iMac and clean while its vertical. took me 3 attempts before I realized that while laying flat the surface is large and collects dust with mind blowing speed.

    Stu Blair -

    If the LCD glass is badly cracked and broken you need to be extra careful removing as the sharp shard of broken glass can scratch/harm the underlying screen as they may “fall in or onto” the screen below.

    I found that strategically putting sheets of 8x11 paper(s) under the sharpest, largest broken sections help protect the underlying screen. A vacuum was also helpful removing some of the small glass shards.

    Mark Hilliard -

    Be advised: I did a perfect replacement of the hard drive, temperature sensor to the SSD, LCD screwed in, glass cleaned. I went to put back the final glass, I set the bottom edge in place and as I slowly moved to have the magnets take hold, they pulled the screen out of my gingerly held fingers, and smacked into place……cracking the glass! Ugh! So, on this last step, hold tight as you put the glass back in slowly. It will cost you about 40-50 bucks for a new glass (mine is on it’s way).

    R R MOOS -

    Yikes... that sucks. thanks for sharing this information. I took everyone's advice and removed and placed this back very very carefully.

    iSeeU ChilinHomie -

    Don't trust the suction cups after you remove the screen cover. Used both hands to hold this piece carefully!

    iSeeU ChilinHomie -

  3. gykuFKp3jcvy5WbA
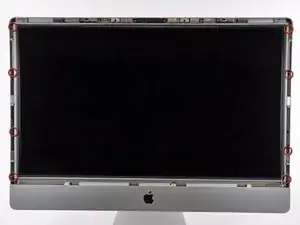
    • Entferne die acht T10 Torx Schrauben, die das Display am Rahmen befestigen.

    The replacement display I received did not have a bracket around the edges so I can reinstall it. On the old display, it seems the bracket is screwed in, but even with all screws removed, I cannot get it to budge. Is there a trick? Is this even possible?

    wooten1138 -

    Reassembly: be careful with the screws! The magnets attract them and the screwdriver as well! Better to use a screwdriver without replaceable end insert. I had to use one of this second type and I struggled a lot!

    Roberto Blandino -

    https://m.youtube.com/watch?v=nB172HJeM0...

    Try this easy GPU fix before buying a new graphics card! It fixed the white screen issue on my EMC 2374.

    adamg5 -

  4. MyNbYmDLlCVGIaEV
    MyNbYmDLlCVGIaEV
    aGmDjkY1acMNXiJW
    e1yysSwMNh6o4xqh
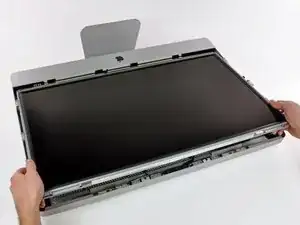
    • Lege den iMac vorsichtig mit der Rückseite flach hin.

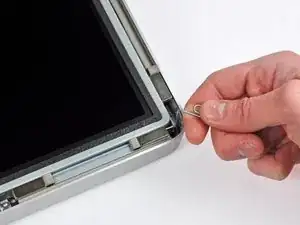
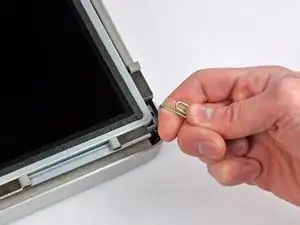
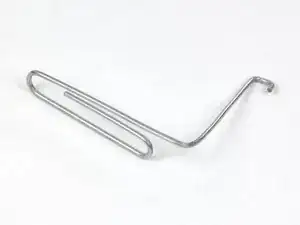
    • Da zwischen dem Display und dem Rahmen sehr wenig Platz ist, benötigst du einen dünnen Haken, um das Display anzuheben. Wie im dritten Bild zu sehen haben wir uns einen aus einer Büroklammer gebastelt.

    • Hebe eine der oberen Ecken des Displays mit einem dünnen Haken am Metallrahmen leicht an.

    • Nach dem Anheben einer der Ecken halte das Display kurz und hebe auch die andere Ecke mit einem dünnen Haken leicht. Um die angehobene Ecke zu stabilisieren kannst du einen Stift von der Seite zwischen das Display und den Rahmen schieben.

    • Hebe das Display nicht zu weit aus dem Gehäuse, da die beiden Teile noch durch einige kurze Flachbandkabel verbunden sind.

    Be careful with any tool while lifting the edge of the display. Under the top left edge of the display sits the bluetooth-antenna-connector. I pulled it out while lifting. It was not such a great problem, cause i could just plug it in again. But maybe you could cut the small cable depending on the tool you use to lift.

    Gee -

    The display is quite heavy, an is fitted with a tight tolerance. I found it very difficult and dangerous, lifting it with any tool in one corner while the iMac was lying down. Instead, after removing the T10 screws, it was quite easy pulling the display out of the iMac with my fingers on both sides, while the iMac was in the upright position. By doing that, you can easily hold the display with one hand and reach for the connecting cables with the other

    Georg P -

    I broke the short ribbon cable that attaches to the inner top of the display but all the pics show the display completely removed after all cables are disconnected without the short ribbon cable intact. Does this short ribbon cable have a purpose and does it need to be reconnected? If so, how? Or is it just some worthless control put in by Apple to show its been messed with when brought back for repair? Thanks

    alligator69 -

    Simple tool to use here is long nose pliers on the corners. safer, better control.

    Kieran Hobbs -

    I just used my suction cup and pulled it out.. Slowly. No need to dig. We have to clean the screen anyway.

    Joseph Collins -

  5. EYck6cdEBnuRmGUo
    EYck6cdEBnuRmGUo
    5HRPIsqGeZBaWXMB
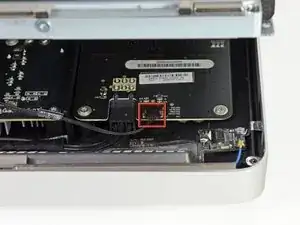
    • Ziehe vorsichtig mit deinen Fingern das vertical Sync-Kabel aus der Steckverbindung auf dem LED-Treiberboard nahe der oberen linken Ecke deines iMac.

    • Achte darauf die Steckverbindung parallel zum LED-Treiberboard, gerade nach oben aus der Fassung/Buchse zu ziehen.

    This cable is very small and fiddley to remove if you don't have much in the way of finger nails. The cables are very thin and fragile.

    James York -

    It took me a bit of work to remove this cable, it was a hassle actually. What worked for me, without any tools, was to use your index and middle fingers' nails and pull it. That worked better than the index and thumb. Took me like 15 minutes, more than what it should take.

    thefinalzeta -

    Yes, me too! It stuck terribly hard and I spent most of the time for the repair for this s**** little connector. I thought all the time, I'm gonna break it or tear off these tiny cables... All the other cables were *rather* easy-going. In the end I finally got a new SanDisk Ultra II 480 GB SSD working.

    And thanks to the SDD Fan Control app it is sooo silent. Thanks to Exirion!

    Nick van Hill -

    When the cable comes out, make note of which side has the gold contacts visible. On my cable, you could only see them from the "top" side (aka, as you look down on it). From the "bottom" or back side of the cable, you could NOT see any gold contacts. This will help to orient the cable when reconnecting it.

    markcerv -

    In my case, all the cable connectors were oriented having the golden contacts, as seen from the wide side of the connectors, oriented facing away from the board

    Georg P -

    From this point onwards I found very useful a flashlight to illuminate inside the iMac.

    Roberto Blandino -

    Take care not to pull off the socket off along with the connector as happened to me.

    Fortunately there are used pull on eBay. Even saw one that had the same socket ripped off also.

    Joel Yang -

    FYI; Cable in 27 EMC 2390 I just worked on looked different. Was simple flat connecter with nothing other than blue coloring on end. Just flat gold connectors on bottom side. These kinds are very tricky to extract and even trickier to reinsert as there is too much flex and not enough slack/room for finger/tool to get back in.

    My solution is unconventional but works. I do not remove the cables (!). I work on the floor, lying on my belly. I open slowly and carefully only as far as the cables inside will allow. Use a flashlight so you can really see clearly. Then I prop up the both sides of the display using anything the right size (box, a pair of boots…) It is crucial of course that you have things propped up securely so screen can stay a few inches up without hands! I use a very short #10 Torx so I can remove the old HD. There is barely enough room to work but it is do-able with care (and light!). As I am usually putting in an SSD these days, I simply use electrical tape to secure it. Close slowly. Test

    Jed Wevaer -

    READ ABOVE ^^^. Don’t risk the other cable removals, just remove and replace drive here. Saved me a ton of worry

    Roger Dewsbury -

    Perfect Idea. Even better if you use a table, quite traditional but still today useful invention: you don’t have to work lying in the floor. Makes it a lot more comfortable. To keep the screen propped up I used two wooden sticks of about 20 cm length with small feet made out of cork to make the construction more stable. I only removed the vertical Sync-cable, otherwise you cannot lift the screen that high.

    The rest was quite easy. Thanxalot.

    jozip renk -

    My cable was also taped to the inside of the case which made the cable VERY tight. Make sure to pull the cable loose from the case before lifting the display much at all.

    Rob Winchell -

  6. 6GY6c2vWvWfwXekt
    • Drücke die beiden Pins des Displaykabels zusammen, um es aus seinem Anschluss auf dem Logic Board zu befreien.

    • Ziehe den Stecker des Displaykabels aus dem Anschluss auf dem Logic Board.

    This connection is very fragile, and many people have broken the display connector on the logic board. You need to carefully pull the connector out, and when putting it back together, you need to carefully push the connector back in.

    pmah -

    i did break mine. do you know where to buy that component?

    Cris -

    In my iMac the cable was stuck to the structure of the computer with a piece of foam tape. Pulling it very gently, gradually it detached with no damages.

    Roberto Blandino -

    I pulled a bit too hard and metal cover over the module attached to the logic board came off from one side exposing metal teeth. To my surprise I managed to put it back. Even bigger surprise Mac works just fine!

    Wojtek -

    I managed to damage mine also .. but, it was probably already damaged by Apple when they replaced a recall hard drive. I managed to fix it like Wojtek. had to re-solder tabs to the logic board. Would like to find a dead logic board and de-solder the connector for a spare; however, I think all the little pins fall out if you try that … SIGH!

    Michael Lambert -

    I also broke this socket. I am able to fit it back over all the pins correctly and reattach the thing using electrical tape to hold i down. However, I see no display (nor backlight) when I turn on the computer. It does chime. Not sure if I got contact with the outer tabs (non pints). Should the backlight turn on even if this cable is unplugged since there is a separate back light cable?

    max -

    I had the exact same thing happen. Were you able to get it working?

    meburt02 -

    Be VERY CAREFUL when removing this cable and also putting it back.

    DistroHopper39F -

    Attention avant de déconnecter la prise de la carte mère, le câble peut être collé sur la partie métallique de la carte vidéo (le bras en aluminium avec des croisillons). Le mieux (de mon point de vue) est de chauffer avec un sèche-cheveux la colle sous de la nappe pour la faire ramollir, tout en insérant un médiator afin de décoller la nappe petit à petit en descendant vers le fond du mac (du haut vers le bas) puis d’exercer une pression sur les deux bras du connecteur pour le libérer de la prise sur la carte mère.

    Cancan -

  7. HDlF3Lf2BwfQatkT
    • Hebe das Display weit genug aus dem Gehäuse, um das Kabel der LED Hintergrundbeleuchtung vom LED-Board zu trennen.

    You need to squeeze the connector top to unlatch, then pull it parallel to the LED backlight board.

    Charlie -

    Here I used the flat end of a spudger to unlatch the connector top.

    Roberto Blandino -

  8. qwnragCSy3xNxZtP
    • Hebe das Display weit genug an, um das Kabel des LCD-Temperatursensors von seinem Anschluss auf dem Logic Board trennen zu können.

    • Wenn dein Lüfter nach dem Wiederzusammenbau mit voller Geschwindigkeit dreht, überprüfe dieses Kabel und das Kabel des Festplatten-Temperatursensors.

    Before you take/remove the LCD thermal sensor cable connector from its socket, make a note of which color cable is on the left, and which is on the right. When I removed the cable, the black cable was leftmost, and the grey cable was rightmost.

    markcerv -

    I replaced hard drive and added a second SSD on a 2010 27" iMac. Everything seemed fine for about a year, and now the fans run continuously. I think it's this cable in Step 8; I'll get around to opening it up to check.

    pigeonf16 -

  9. JFBQ6Vj2TBZOJi4B
    • Ziehe das Display vorsichtig Richtung oberer Kante des iMac und hebe es aus dem Gehäuse.

    And if the panel has no frame? How you unattach the frame from the old panel to place it on the new one?

    Daria Drozd -

  10. Wp4gbIEWEGZ4YNXo
    • Nimm das Kabel zum Temperatursensor von der Festplatte ab, so dass die Festplatte entfernt werden kann.

    • Sei sehr vorsichtig mit den Displaykabeln, sie gehen leicht kaputt.

    • Merke dir die Lage dieses Kabels! iFixit-Tipp: Es muss später wieder direkt neben dem SATA-Verbinder installiert werden. Das schwarze Kabel muss nach oben, zum LCD hin, zeigen.

    In my case, the cable was originally installed the other way round. The black cable was at the lower end, followed by the white, followed by two empty slots. The empty slots sit next to the SATA Connector.

    EDIT: which is, btw, idiot proof because the connector only goes in one way...

    Ben Beckers -

    https://m.youtube.com/watch?v=nB172HJeM0...

    Try this easy GPU fix before buying a new graphics card! It fixed the white screen issue on my EMC 2374.

    adamg5 -

  11. TRKF1uLN2oJpMMXF
    TRKF1uLN2oJpMMXF
    tOGHNOyF3dKIVGSD
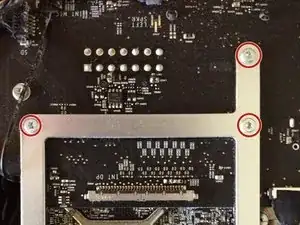
    • Entferne nun diese drei Torx T9 Schrauben von der Halterung der Grafikkarte.

    • Finde den großen Kühlkörper der Grafikkarte. Er sollte sich genau über dem DVD-Laufwerk befinden.

    • Entferne die einzelne Schraube mit der er befestigt ist.

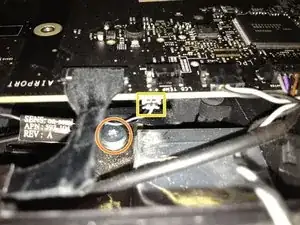
    • Hole vorsichtig das Kabel des Temperatur-Sensors unter der Hauptplatine heraus.

    • Merke dir die Position, da das Ersatzteil auch hier eingesteckt wird.

    *Use Hemostats or tweezers when it comes time to remove the graphics card temperature sensor cable from underneath the motherboard make sure you grab it by the top and bottom of the plug and not from the sides. For example if your pinching at the plug make sure your thumb is on top and other finger is on the bottom, not from the sides! Look at your imac like your using it and either hold the unattached heat heat sink/GPU in your left hand while you reach around the back and behind the mother board to find the temp sensor. I used a pair of hemostats and pulled the plug by the top and bottom and it pulled right out.

    mattier303 -

    Locating the Graphics Card Temp Sensor and removing it/replacing it was the part I found most difficult. It's located UNDERNEATH the motherboard on the opposite side to where you removed the LCD Temp sensor in Step 6. I couldn't find it for ages until finally I gave up looking and just pulled the graphics card out very slowly until it became obvious there was a cable still attached. This is the one we're removing.

    Using a pair of eyebrow tweezers you need to pull the sensor DOWN towards the back casing of the imac. This is incredibly fiddly and the cable is very delicate so take your time and be prepared for the tweezers to slip a few times as you work it loose. Don't ask me how to replace it yet because my Graphics cards is currently in the oven.

    drgonzo400 -

    I find it puzzling and extremely annoying that these sorts of details are glossed over in guides. Removing this cable was a nightmare. I have damaged the plastic of the plug on different sides. Could have used a second pair of hands to hold the GPU+ heatsink as I was doing that. Thanks guys for the additional comments!

    Jeroen Stapper -

    The sensor cable plug was so limited in access that I found it easier to loosen the motherboard so I could raise it just enough to get my fingers in underneath. The plug came off easily then. See https://m.youtube.com/watch?v=Xm4FU1Ek7B... for a video on how to locate all the screws that hold the board down.

    Fuzzy Bo -

    Customer’s A1213 has the graphics card mounting screws “upside down”, as in, you can’t loosen the screws without removing the motherboard.

    Pat Trainor -

    It’s too bad this guid went public when not complete. To remove the graphics card the main board MUST be removed. A rare miss by fix it.

    Cam S -

    Uh no - that is not true of the late 2009 iMac 27” - no need to remove the motherboard.

    Chris Smith -

  12. 4cg3yqGI1VyvNOI1
    • Hebe die Grafikkarte vorsichtig an und entferne sie vom Mainboard.

    • Stelle sicher, dass die Metallfassung der Grafikkarte nicht das Mainboard zerkratzt!

    • Nachdem du das Kabel des Temperatursensors entfernt hast, solltest Du die Grafikkarte leicht entfernen können.

    Notice how the heat sensor plug comes out, please!!! It will save you hours on putting it back. It unplugs by pulling it towards the rear of the case, away from the screen side

    Mike Sebastian -

    The graphics card needs to be pulled out rather than up. with the top of the iMac nearest you, pull the whole card/heatsink rig towards you and you'll feel the card coming out. Once it's all the way THEN pull up.

    drgonzo400 -

  13. 6T1GMIqtBEs5Plx2
    6T1GMIqtBEs5Plx2
    Lqc6UvOo6ObJeBBC
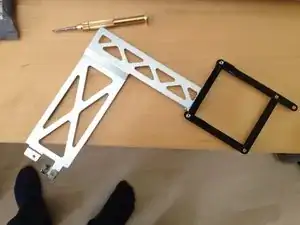
    • Entferne den Metallrahmen von der Grafikkarte, nur ein paar Schrauben halten ihn fest.

    • Bewahre deine Grafikkarte sicher auf, falls Du sie wieder brauchst oder wieder einsetzen willst.

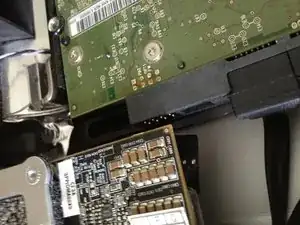
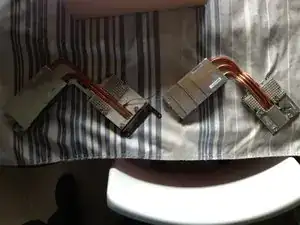
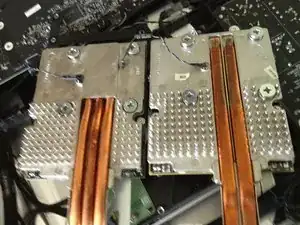
    • Das zweite Bild zeigt die Serien 4 und 6 nebeneinander. Ein kleiner Unterschied in der Höhe erfordert etwas Zusatzarbeit (siehe nächster Schritt).

    the increase in heat emission is 85W -> 250W! use Macs Fan Control to speed up your fans and while you're at it, replace thermal compound on the card.

    jes ta -

    • Du musst das optische Laufwerk entfernen, um anschließend das Plastikteil aus dem nächsten Schritt entfernen zu können. Das Laufwerk ist mit 4 Torx Schrauben befestigt.

    • Wenn diese Schrauben entfernt sind, lässt sich das Laufwerk anheben und zur Seite schwingen, ohne irgendwelche Kabel entfernen zu müssen.

    where is te image???

    Luis Manrique -

    Sorry to be so bland, but +1: Where is the image?

    socklint -

  14. yKIRHd2cWlDXOCtR
    yKIRHd2cWlDXOCtR
    HgccATveLjn2QmXS
    G3WueJXlkUkgkfg6
    • Da die Serie 6 ein wenig höher ist, müssen wir auf dem Kunststoffhalter unterhalb der Karte etwas Platz schaffen

    • Entferne das Kunststoffteil auf dem zweiten Foto, indem du eine Schraube entfernst und sie vorsichtig von dem Aluminiumgehäuse ziehst

    • Das Teil ist mit Klebestreifen befestigt, also keine Sorge! Du kannst nichts kaputtmachen.

    • Nachdem du es ein wenig hin und her bewegt und von den Kabeln weggeführt hast, solltest du das Teil schließlich in den Händen halten.

    • Du siehst nun die rechteckige Fläche, durch die das große Kabel führt (Bild 3). Nimm eine Multifunktionswerkzeug ("Dremel"), um sie ca. 5 mm breiter und 2-3 mm tiefer zu machen.

    • Im dritten Bild siehst du, wie es zum Schluss aussehen soll.

    • Der Hauptgrund für diesen Schritt ist das Wärmeableitrohr ("Heatpipe") der Serie 6, das mehr Platz benötigt.

    • Hinweis: dieser Schritt ist NUR beim späten 2009er Modell nötig, 2010er Modelle haben bereits genug Platz!

    Had to do this on a 2010 i5, not enough room otherwise!

    - removed 2x3mm piece on the left corner of the gap

    - made the gap 4-5mm deeper

    jes ta -

    I have an early 2011 iMac 27 whose video is starting to die. I installed smc fan control and have extended it's life about a month or so. First Panic Crash in my logs was back in April 9 2015 (4 years after purchase) It turns out the AMD Radeon 6970M has a known manufacturing defect and Apple has extended warranty for four years. The first authorized Apple Repair Center I went to Tirosys in Georgetown has declined to do the repair. I'm now down at Austin Genius Bar waiting to review the issue with the other Genii on staff. :)

    xstek99 -

    Does the 2010 5750 heatsink fits on the 6970? On ebay there are many 6970 card without heatsink at good price, and if the heatsink fits it would be nice.

    mchigioni -

    I was wondering the same thing. I would like to use the heatsink from my 2009 4850-512 card. Does anyone know if the 4850 heatsink fit the 5670, 6770 and the 6970? They look very similar, the only difference I see is that the 6970 has a third heat pipe which might only be for the 2gb version

    Jose Rodriguez -

    Hi, did you get an answer?

    I've ordered a 6970m card but I think it doesn't have the heatsink... :/

    http://fr.aliexpress.com/item/for-AMD-Mo...

    Or should I buy this too?

    http://fr.aliexpress.com/item/New-Best-G...

    Thanks a yon for your help

    Mathieu

    Mathieu Terzian -

  15. rvwdCkI1iWydNsiB
    rvwdCkI1iWydNsiB
    gboOKYKoPGdRogHF
    • Bringe die Metalleinfassung an der neuen Grafikkarte der Serie-6 an. Stelle sicher, dass sie korrekt ausgerichtet ist.

    • Setze nun vorsichtig die Grafikkarte der Serie 6 ein.

    • Achte beim Wiedereinsetzen darauf, dass du nicht die Oberseite des Motherboards beschädigst.

    • Sobald sie richtig platziert ist, fixierst du die Grafikkarte mit den 3 Schrauben.

    • Nun setzt du das Kabel vom Temperatursensor wieder ein. Du brauchst geschickte Hände oder ein gutes Werkzeug dafür. Dieser Schritt braucht Geduld.

    connecting the temperature sensor cable was quite challenging. It helped to stand the computer up right, use tweezers, prebend the wires so the tip was in approximately the right position to be reinserted. I realized after having someone hold a flash light for me that I had been attempting to insert the cable facing the wrong direction. I shouldn't take to much force or effort to get the cable to plug in. Best of luck.

    Lucas Scott -

    HI all,

    Yesterday I build in a refurbished Radeon 4850 512MB in my late 2009 iMac 27". It's an upgrade form the original 256MB which has broken.

    The installation of the card went good so i took it for a test and everything seems to be running perfectly. After about 15 minutes of idle the mac goes in standby, when trying to wake up, the display stays black. A cold restart (holding powerbutton for 10 sec) the mac reboots (I can hear the chongsound) but even then display stays black. I tried serveral things but nothing really worked so I turned it off to try it in a couple of hours. I started the mac and voila, my display works again. My guess is that there is a cooling problem so I installed iStat to boost up the fans tot 1800. This worked cause the display didn't turn black.

    does anyone know what could be de problem that the mac doesn't managed the cooling it self?

    Jochem -

    I'm really interested in do this upgrade as well. To solve the problem of the temp sensor cable I'm thinking to cut the cable, and solder in an extension that give me lots more wiggle room. That way I can leave the tiny motherboard connector where it is.

    I also use MacFansControl, but you could base the OOD fan speed on the GPU diode temp, so the heat sink sensor is redundant.

    I also base the CPU fan on the PSU temp. Both are set to start at 45degC and be at full speed at 65degC. Ok it's a bit noisey, but everything runs cool, and the in game sound usually masks it anyway.

    joldemans get MacFansControl, there is a mac version and a windows version for bootcamp.

    pgleesonuk -

    Your post is dated 11/20/2015 and it is now 09/06/2016. Did you ultimately perform the upgrade? If so, with what card and how did it go?

    James Wages -

    That little heat sensor plug! On mine, the two pin holes needed to be facing away from the top edge before I could reseat the plug. A real pain needing good tweezers and lots of patience

    Mike Sebastian -

    &&^&^$^ !&&* that little heat sensor is the most annoying piece of crap I've had the misfortune to run into. Took me 45 mins to plug the little bastard in.

    drgonzo400 -

    Doing this one I felt like doing surgery :-). Ended up going to beauty shop buing bended tweezers. With this it was quite easy.

    Wojtek -

  16. dlvhbZNWOiakhibw
    • Baue nun das LCD -Display nach der Anleitung auf iFixit wieder zusammen.

    • Es stehen keine weiteren Arbeitsschritte mehr an. Da du das Stromkabel entfernt hast, sollte sich der SMC zurücksetzen. Dies ist der Chip, der deine Hardware konfiguriert.

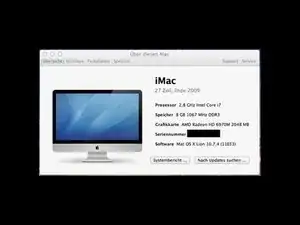
    • Wenn alles gut läuft, solltest du mit einem Startbildschirm begrüßt werden und das links gezeigte Bild "Über diesen Mac" sollte angezeigt werden.

    • Hinweis: Ich habe zusätzlich das DVD-Laufwerk mit einer 256 GB SSD ersetzt, was leicht beim Installationsprozess getan werden kann.

    • Letzter Tipp: Wenn du das optische Laufwerk mit einer SSD ersetzen willst, leg am besten vorher eine kleine Boot Camp Partition an und installiere Windows drauf. Es wird dir viel Ärger einsparen, falls du mal eine brauchst. Glaub mir, mach es einfach! Boot Camp ohne optisches Laufwerk zu installieren ist sehr mühsam.

Abschluss

Um dein Gerät wieder zusammenzubauen, folge diesen Anweisungen in umgekehrter Reihenfolge.

teut986

Mitglied seit: 24/04/11

2170 Reputation

124 Kommentare

works perfectly ;-) just be slow and precised

franckmichotey -

Just be noticed that this upgrade not work for iMac 27 late 2009 equipped with core 2 duo CPU, but only with the i5 and i7 CPU one!

Paolo -

Did you know you can add an additional SSD drive WITHOUT needing to remove your Optical drive? It installs vertically just to the right of your HDD. I just performed this upgrade last weekend. I believe you can do this to 2009 and up models.

bistroengine -

Regretfully Not on the iMac late 2009, because the motherboard has only 2 SATA ports, not 3 like the 2010 and later models...

Andrea Turriziani -

Just a question: with this mod, are you able to use Airplay Mirroring in Mountain Lion? Since the inhability to use it on these macs is GPU-related, virtually with this Graphic card you may be able to enable it... Let me know please!!

Andrea Turriziani -

I read somewhere that AirPlay mirroring uses a technology on the processor called Intel Quick Sync Video, ant it is present only in the 3rd+ generation of Intel Core ix processors. So if this is true it explains why some Macs do not have AirPlay mirroring and why you do not get AirPlay Mirroring after updating the graphics card.
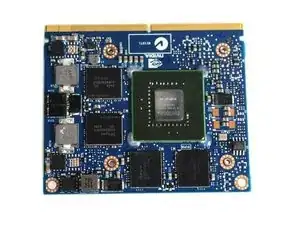
ivanfacil -

If your system didn't support Airplay before the upgrade it won't do it after the upgrade - I think. I never tried but I doubt it works.

teut986 -

I think the same... But don't know, maybe the system recognize the updated graphic card and unlocks airplay... Someone that have tried this mod, can confirm please?

Andrea Turriziani -

I have a mid 2010 imac. Have upgraded the hd to ssd. Also upgraded the ram. I would love to upgrade the video card to a 6970m.

It appears to be compatible?? Also, it seems that these video cards are insanely expensive. You can almost buy a whole computer for what they are asking for the card by itself. Are you aware of any good sources for these cards?

poberman66 -

This looks like a great upgrade for a late 2009 iMac - but what about swapping the logic board at the same time, with an i7 board from either 2009 or 2011? Has anyone successfully done this upgrade?

Jamie Lodberg -

Done perfectly on my friend's 27" mid 2010. (5670 out 6970 in)

Do you know if 6770m is also compatible? (I've another Imac 27" with burnt 5670 and owner want replace with 6770m).

Antonio -

I just did this upgrade on my iMac using a 6770 and it was easy. I didn't need to make any modifications to anything. The 6770 and heat sink fit the existing mounting bracket perfectly.

kbwell -

Worked on my EMC2309. Premiere Pro lets me use the Mercury Playback Engine now.

stuartjporteous -

Rendered a file in Premiere after upgrading - back of the case is almost too hot to touch now.

stuartjporteous -

You said it was super hot??? You installed the iMac 2011 Radeon 6970 2GB graphics card??? I am thinking about doing this so I can use Premiere and After Effects. Would you recommend it? Did you end up using this for video editing?

Travis -

I installed the iMac 2011 Radeon 6970 1GB graphics card. It's hotter than the old card and I can hear the fan working, but not too much. No crashes, nice and stable. Yes, I ended up using this for video editing: Premiere and After Effects - the Mercury Playback Engine uses it. Recommended upgrade.
stuartjporteous -

i already have an mid 2011 imac, and im wondering if i could still upgrade the gpu to a newer one and what my options are like which amd cards work and will any nvidia cards work?

Freddie Wright -

Is it possible to upgrade EMC 2309 with 2GB Graphic Card? It is not recommended by WeLoveMacs.com, but I really want to try it. Anyone has done it?

31150 -

Done on a 2010 i5 2.8. I also did the following improvements while in there:

- i5 2.8 -> i7 2.93

- installed extra SSD

- RAM 4Gb -> 16Gb

What i found:

The 6970 2Gb emits 250W of heat compared to 85W of the original 5750 (in my machine).

Since the ODD fan cooles the GPU heat sink but the sensor used to control the fan is the ODD temp sensor, the card will get REALLY HOT (97.5°C tops) and fall back into power safe mode to conserve energy and cool down.

What i did:

I put the SSD in between the original HDD and the Optical Drive so it doesnt block air flow from the ODD fan to the GPU heat sink.

I applied new thermal compound to the card. Old one was really thick and not well spread.

I installed, and HIGHLY RECOMMEND this programm (both in windows 7 and OS X): Macs Fan Control

It lets you set the sensor, the base temp and the top temp for all three fans individually. Set the ODD fan to use the GPU heat sink as temp source and set temps to min:35 max:70. I'm getting a max of 78° which is fine for the card.

Bam, problem solved.

jes ta -

Above TDP are for standard cards. iMacs have the mobility version.

Radeon 5750m emits 25W, 6970m emits 75W.

Still three times as much.

jes ta -

I have a late 2009 imac 27" model, and found that my graphics card is bad so. My question is since this thread hasn't Ben updated to this year. Where is the best place to purchase a graphics and what is the best recommended card to get now?

Tdog -

I have one that was used briefly, until my HD crapped out too. Should still be fine, if you are interested. Otherwise I found it through EBay, I can PM you the seller.

Milw -

Hey Milw,

im having the same problem now and saw your post to Tdog, was just wonodering if i could get more details about the part. would appreciate it. thanks

gyaki -

This sounds amazing!

Just to confirm though, is the heat problem for any model including the EMC 2374? So did the author have to change fan settings and thermal and apply thermal compound? Or is it only for the 2010 i5 2.8 only that needs this?

The EMC 2374 has an ATI Radeon HD 4850 512 MB. I'm not sure about its emittance.

Gato -

I have a 4850 on 2009 imac emc 2374 which is all most dead.I was looking to replace it with another card but i am not totally sure which ones are compatible.Are the 6770's from the 21 inch imacs ok or any nvidia cards?A list would make things loads easier as these cards are scarce enough as it is.

Christian Ivey -

I have a replacement video card, but every instruction I've seen shows the graphics card with already attached heat sink. What special problems should I look for when removing the video card from the heat sink and attaching a new one(already have a thermal compound)? I've fixed quite a few machines, but this is my first Mac repair.

William Glazier -

Any recommendations where to purchase this card now?

hellohogo -

I got an iMac 27" late 2009 with a AMD Radeon HD 4850 and I NEED to change it.. Is it possible to replace it by an Nvidia GeForce GTX 760M or better ? Cause i really don't know how to do it. And if that's not possible tell me which graphic card could be great to play battlefield 3 at least and battlefield 4.... I'm lost with this theme... Please

Vanya Karamehmedovic -

The hardest step is reinstalling the temp sensor connection under the main processor board. Almost impossible but got it with extreme patience.

Nick Martello -

Good evening, I own a 27 inch imac late 2009 to more than I can not use it, since I have appeared hialle vertical lines on the screen. Mac fails to boot! What can it be? can you help me ???

Antonino Leandro calafiore -

Hope this will help you.I had the same problem but could still boot in to safe mode which loses functions such as sound and playing videos.A temporary solution if you can boot into safe mode is to delete all the graphics kexts. This then allows you to boot normally but you with reduced graphics performance.You will not be able to play videos in full screen smoothly ect but you can still use your mac.You will probably need to change the card or get yours repaired.

Christian Ivey -

In my case, the video card had to be removed a different way. My particular model (A1312) required the removal of the power supply, IR port, DVD drive and fan, and finally the logic board. The card could then be unscrewed from the metal frame, and the replacement put in. After that, everything had to be reassembled, and plugged back in. Works fine, but it sure was a pain!

jkurrle -

Great guide.

I just upgraded my late 2009 iMac 27" (iMac11,1) replacing the HD4850 with HD6970/2gb yesterday.

I did have to cut out the plastic bezel underneath the video card as shown in the iFixit guide where there are a bunch of cable, to allow the card to slide underneath the PCB into the connector.

Connecting the heat sensor of the video card is a pain. And after the install in iStat the GPU die temp does not show up. however since i am controlling the fans manually I am not to worried (i still have GPU heatsink info and all the other temped indicators)

I bought the HD6970 from macpremiumparts on ebay. They were great, fast shipping to Australia. The card works great!!!

yoshinobukawahara -

Hi,do you get the card with the heatsink or you can use the one that have fhe 4850?

lupu irinel -

does nayone know if the mid 2011 27 inch imac has an intel hd integrated graphics card as well as the amd radeon 6970m?????? i always thought that was the only gpu i had(amd radeon6970m) until i used a temperature monitor app and it displayed BOTH the amd radoen 6970m and also an INTEL HD 200 grahics card(integrated) iam going to attempt to disable the integrated card so that it only uses the radeon 6970m. But i dont want to mess with the bios if it isnt true. I cant find anywhere online where somebody has confirmed that the 27 inch 2011 mid imac has both cards built in. please le tme know if you can help. thank you very much in advance.

ilovecocoakrispy -

hey did you ever figure out how to replace the GUP on the 27 inch imac? I've got the same issue, it works great but i want to upgrade the GPU . Thanks - email me at jamesdaley1@gmail.com

James Daley -

It's spelled *bezel* ... otherwise, impressive work.

redin575 -

are you able to install a m4000 or a m6000

sidebee s -

Hello,

is it possible to use a 6970m intended for a Dell laptop? visually I don't see any differences.

Regards

nicovanunen -

Have you seen that one?

GPU update iMac 2011

Looks that it will work, i'll try soon.

edukaz1 -

This is an old post, but just FYI. From everything I have read, it sounds like you definitely can not just buy a generic Radeon MXM card with the same model number. That will only have the BIOS for a generic PC (like, the kind that you would install Windows on). You need a card that came from a Mac so it will have the Mac firmware on the card. Otherwise, it will not be recognized. There is apparently a way to "flash" a generic card with the Mac firmware, but I have no idea how to do that and what special equipment is needed.

Matt G -

Hi Guys,

is it complicated to replace Graphic Card/Video Card ATI Radeon HD, 4850 512MB in 27" iMac (Late 2009) Serial Number:VM022CDA5RU. Really need help!

Thanks !

Dawid Otta -

Hi Guys,

is it complicated to replace Graphic Card/Video Card ATI Radeon HD, 4850 512MB in 27" iMac (Late 2009) Serial Number: VM022CDA5RU. Really need help!

Thanks !

Dawid Otta -

Nope, did this a few days ago. Works perfect!

thenewemailforpsn -

Was wondering if Heatsinks are interchangeable? The cards are cheaper without the heatsinks. Would like to use the heatsink from my 2009 4850-512 card. Does anyone know if the 4850 heatsink fit the 5670, 6770 and the 6970? They look very similar, the only difference I see is that the 6970 has a third heat pipe which might only be for the 2gb version

Jose Rodriguez -

I'm in the exact same situation, except I already bought the card not realizing it didn't come with a heatsink. I don't know the answer, but I'm pretty sure that third thermal pipe IS important for keeping the card cool. Otherwise it'll just shutdown your computer every time it gets close to overheating (the issue I'm currently having).

Did you ever get this resolved?

Josh -

I picked up a late 2009 iMac 27" from a kerbside pick up in fairly new cond.. lucky me, I'm thinking not,it turns on all sounds are there but black screen..

Can someone please explain to me why an what's needed to fix this problem , I can teardown and fix almost everything I put my mind to but this black screen has got me

Mario fucuto -

How does the 2009 iMac 27" monitor "glass" screen come off if I have suctions will it come off or do I need to help peel the monitor "glass" around the outside please help I can't seem too find a explanatory/instructions teardown

Mario fucuto -

$@$* just cracked the f*#&ing screen

Mario fucuto -

Ahh I think I'll wait for some commonsense

Mario fucuto -

I'm sorry it cracked! It's just held on by magnets, so the iFixit suction cups should work pretty easily. It's possible to open it up with knife/fingernails, but maybe that risks the cracking you experienced.

rothbamberg -

What I am wondering, is it possible to add any mobile graphics mxm 3.0 card? Why would the 6970 be the best card possible?

Jort -

My Experience:

- Late 2009 iMac previously with 4850 512mb card

- Upgraded to 6770 512mb; i was scared to go up to the 6970 due to the recalls and over heating..

- the late 2009 is the magnets so it's actually pretty easy with an iphone suction cup or strong fingernails.

- the cable for the temp sensor was actually easy; i got a little lucky. With tweezers i just got it up close so it rested with the pressure of the wire; then used the back(flat side) of the teasers and gently pushed up.

- about 1.5 hrs to do; tops

- When you first power up; takes longer than normal. I suppose to recognize the new card and install drivers, etc.

Why did i do this?

- woke up the computer and the screen froze; except mouse.

- reboots would show apple screen boot and then stay on a white screen.

- safe mode booted; but strange colorful bards (about 1" thick and vertical) across the screen every few inches.

- booted straight to windows 10; after boot logo it would just stay on a black screen.

Campinator -

I'm seeing these on eBay for ~$250; am I looking at the right thing? I'm also having crash/boot problems that I thought were HD but maybe are GPU, but this is getting expensive and time-consuming.

rothbamberg -

In the process of trying to upgrade my Late 2009 iMac's ATI RADEON HD 4850 512MB with an AMD Radeon HD 6970M 2GB.

The 6970M I ordered didn't come with a heatsink, JUST the card. My friend helped me install it yesterday and every time I try to run a game in Windows 10 (boot camp) the computer shuts off instantly.

Based on this, does it sound like I need to get the heatsink that comes with the 2011 iMac's GPU? Or could it be something like not enough thermal paste, or a software issue?

Josh -

Try that Macs Fan Control utility. In addition to being able to set the fans to come on earlier, you can also see all of the temperature readings. You could monitor the GPU heatsink temp and see if it seems to spike before the machine shuts down.

Matt G -

This worked perfectly for the mid 2010 model! There wasn't quite as much room as I thought there would be. As for slotting the card I recommend loosening the motherboard screws to give a little more wiggle room to prevent the bracket scraping the motherboard. I didn't tighten the mobo and heatsink screws in 100% as it was tweaking the board over the cables they sit on. Otherwise works great!

One suggestion is to plug the the power cord in every few steps to make sure everything is plugged in properly. Having to take the screen on and off is simple, but time consuming and annoying.

Zachary Keogh -

Attempting this on a late 2009 27-inch iMac. It had a 4850 in it. I got a 6770 on it's heat sink from eBay for $60. I moved the card over to the original heatsink and reinstalled it last night. When I turn it on black screen. No chime. Major fail. Ugh.

One comment above mentions the orientation of that tiny flat ribbon cable. I have to check to see if I reinserted it upside-down. I am not sure what else I can do if that is not the problem.

I tried starting up with the LCD completely disconnected and with an external monitor connected. Anyone know if this should be possible. It would help with troubleshooting if I knew it should start up without carefully plugging those 4 cables every time I want to check. Or does having those LCD cables disconnected hose the whole machine?

Matt G -

Update! I guess I didn't have the card seated properly, because I took it out and re-plugged it in and now it is fine. In the process of playing with it, I put the card back on it's original heatsink since it was smaller and fit in the machine. I should have just left it to begin with...

Secondly, I WAS able to plug in an external monitor and start it up with the LCD monitor completely removed. That's good to know in the future. So, my late-2009 27" iMac now has a Radeon HD 6770M 512MB GPU in it that was pulled from a 2011 model. I can swear that the machine is running much cooler now. The new GPU must run cooler or all the dust I vacuumed out was really blocking all the air flow.

Matt G -

Matt, can you please tell me something: I have a machine similar to yours (a late 2009 27'' iMac with the 4850 card and the larger, two-pipe heatsink), and I was wondering if the 6770M you put in there ever worked with the 4850's heatsink after reseating it, or if it only worked after you put it in its smaller heatsink *and* reseated it? It's just that what you said sounded ambiguous, and I was thinking of buying the card only (as it's cheaper than the whole kit).

The mounting points on both cards seem to be similar and the 4850's heatsink is larger and has the same number of pipes (unlike the one from the 6970M), which should help, but I'm wary that it would hit some components or that it wouldn't make proper contact with the ICs (as I can't be sure just how smooth/continuous its contact surface is without disassembling the machine, nor how tall are the surface mount components on the 6770M without, you know, buying one and looking at it/measuring it/trying it on with the 4850 heatsink first).

Thank you!

mainyehc -

Also, cutting a piece of the 4850's heatsink is a bit too irreversible a procedure for my taste… Any way you put it, it all seems a bit risky, and I'd love to hear from someone who actually did this procedure (and I googled around and you seem to be one of the few, if not the only one). I'd love to go straight for the 6970M with heatsink and cut a piece of that plastic bracket, no biggie, but it's 3x the cost for an old machine.

I'm not doing it for performance reasons, really, but mostly because my iMac was one of those that exhibited weird graphics glitches early on (which Apple apparently fixed with some firmware updates) and was crashing up until recently (and maybe it still will, there's still time for that :P ) because of that weird Safari/Mail/WebKit/WindowServer/ATI bug.

mainyehc -

Oh, and another thing: my iMac also has a 2.93 GHz Core i7-870 upgrade instead of the stock 2.66 GHz Core i5-750 or the then top-of-the-line 2.8 GHz Core i7-860. I hope its higher TDP combined with the upgraded card isn't too much for the machine…

But I guess that if one of these iMacs survives a 6970M alone, this combination should work, too, no? The 6770M is more power-efficient than the 4850 anyway, right?

mainyehc -

Sorry, I didn’t see you questions. I have not checked here in a while. But, in case someone else has the same quesitons.

It has been a while, but I believe I went right to moving the card back to the heat sink it came with and then carefully reinstalled it. I believe the problem was just that it was not pushed in all the way and seated correctly. In theory, I don't see why the card moved to the other heat sink should not work. The cards are the same size with the mounting holes in the exact same place. There didn’t appear to be any difference in how the card sat on the heat sink.

Matt G -

does anyone have the idea if it's possible to replace radeon hd6970m 1gb in mid 2011 on any other mid range graphics?

i've done the swap for radeon 5750 512mb but it doesn't give any signs of life. not sure if it's the graphics faulty or in any way it's just not compatible. so basically is it possible to downgrade the graphic or should i expect any problems?

Mike -

You can basically only put in a card that was pulled from (or made for) a Mac. Look at the specs of other models to see what cards were used. You can't just buy a generic card as it won't have the Mac firmware on it.

Matt G -

It's not generic, it was pulled from iMac 27 mid 2011 too but it's just different model of the card so it fit's physically but nothing else. Black screen and no sign of life. I've made a mistake in previous post, the card i wanted to put in is radeon hd5670 not the one stated above.

Mike -

I have a iMac27 late 2009 with a 3.05 Core 2 duo and a Radeon HD 4670 256.

This machine is barely used but my son wants to use it for concept art. I am upgrading the RAM and replacing the original drive to SSD.

My concern is the 256K on the video card will not be sufficient to run Photoshop and Illustrator effectively.

All of the comments I have read here have been about late 2009 i5's or ii7's, I believe. Can I upgrade to the Radeon HD 6970M 2GB with the Core 2 Duo? Thanks for any help please!

steves77 -

Hello,

I have the same question... :) I need to replace the video card with another more better. Do you have found the solution? Thanks

iMac 27" Late 2009 - 3,06 GHz Intel Core 2 Duo

craparo -

same question here! i've 256mb video card on imac 27' core 2 duo, late 2009.

Tiago Lima -

Same question too!!! Please somebody help, thanks.

Paolo -

Did ANYONE ever answer this? Apple told me only the 4650 and 4850 are compatible with the Core 2 Duo model. Did anyone try any of the later cards in the Core 2 Duo model?

makeasceneak -

Hi

I am happy owner of mid 2010 iMac 27".

I want to upgrade my GPU from Radeon HD 5750 1GB to AMD Radeon HD 6970M 2GB.

My question is can I keep heatsink from Radeon HD 5750 1GB and replace just a card ( as this would save me around 100 euro) ?

dominiku -

I spoke with some Apple specialist and he clams its ok to keep old heatsink:D

dominiku -

steves77, craparo, Tiago Lima,

YES u can. late 2009 3,06-c2d. changed the ati4670-256mb to a non apple gtx660-2GB.

lost the bootscreen the brightnescontrol and the mini-display port. when using non Apple-EFI nvidia cards, make shure to install the latest- nvidia-web drivers an make them the default drivers. the BIG downside with non appleEFI pulled cards is: after updating the systems os- osx will use the osx drivers again as the main default drivers. this will leave you with a black screen and no idea how to change the drivers... had to change the card back again to make this operation. if the money, go for a appel-GPU. i guess almost any apple EFI gpu card (pulled from a Imac) will work just fine without worrying about lost boot screen- brightnescontrol and 2nd monitor out and update issues. have to say, it made rendering much easyer but the CPU speed is still the botlehead of this. so dont overdo it. gtx 660m is almost to much for my c2d- no need for more. hope that helps my brave friends.

cheers, m

martinmusic -

Thanks @martinmusic for this information, - really interesting...

Okay, what's the situation regarding an Apple MXM GPU upgrade at the 2009 C2D (Core 2 Duo) based iMac range? Can someone confirm here that this works at least for the 27" C2D iMac models? I am somewhat skeptical because the Core i5 & i7 (late 2009) iMac models have most likely a different Apple EFI revision. Well, I can confirm that an early 2009 24" iMac refuse to boot up (stuck on black screen) with an original Apple Radeon HD 6770M MXM card. Interestingly there is no "Error-Beeping", - so the iMac seems to accept the card. It looks that this is the same issue like @mattfromphlly had. Well, he was able to resolve it. Will buy a miniDP to HDMI cable and try out if the external display connection is working.

Clemens -

Did you determine if the later 2GB card works with the Core 2 Duo model of iMac?

makeasceneak -

Is it possible to use a PC laptop AMD 6970M video card in place of thc Apple version video card, by soldering the Apple firmware chip from a 6970M to a PC version video card.

brian303monkey -

hello mac experts! I have an iMac 2010 which isn't working- probably a failed graphics card. Can anyone fix it, and if so for what cost? Apple said it is 'vintage' and ready for the bin!
SMM -

I Installed this in my Imac late 2009 the old video card was a ati radeon hd 4855 with 512 mb of vram. now I installed this new one, an amd radeon 6970m with 2gb of vram, all my games are running ALOT slower than before!!!! I would like to know how to fix this issue If someone could help me.

my mac has the maxed out 2.80 ghz intel i7 processor and 16 gb of ram so I don't ubderstand why it would be slower!!

Antony Courteau -

I want to do the same upgrade to gain higher preformance in games.

Please let me know if you figure out what to do with the problem.

Nlunde -

Same problem here.. upgraded my 27" late 2009 with a 6970M 1024 MB. Works ok, but games performing worst :/

Opened it up, checked all the cable's.. nothing. Not a clue.

Casper Smit -

I think I know the problem. In iStat the GPU Die sensor is not showing any temperature . So I put the fans on max, blowing loudly and ran a game. Smooth all the way. So I guess the new GPU 's temp is not being monitored so therefor runs hot, with the fans running low.

My tip: Use an app to control your fans speed before playing. Good luck!

Casper Smit -

Hi all,

just replaced the graphics card and heatsink in my Late 2009 iMac 2.66. When i turn on the machine now, i get the startup chime and the Apple logo & progress bar. But it never finishes: the progress bar stops at the very end and seems unable to finish and to move on to show the login etc...

Tried Safemode, same story.

Fans run normally (are quiet and barely noticeable).

Does anyone know what may be the problem, and hopefully how to make it get to the login screen?

_____

I just checked my wifi, and the iMac is actually logged on.

I read somewhere that the tiny battery inside may be worth changing, but can this be my problem?

I have previously upgraded to 512Gb SSD + 32GB memory, and everything worked fine. Except for when the purple lines showed up :-P

Rune LH -

Hi again,

i opened up the iMac again t make sure all cables etc. were connected and they were.

But again - iMac won't boot up past progress bar. Even tried replacing/downgrading to the original Ram slots, no luck...

Is there somebody who can help me?

Rune LH -

3 times the charm right?

For no apparent reason, the machine suddenly booted up in safe mode. Ran disk utility; all seems fine. Powered down & fired up again: No problem!

Happy!

Don't know what caused this. But i was able to single user + fsck last night. Maybe that did the trick.

Anyways; happy Pappy now :-)

Rune LH -

I disassembled my late 2009 iMac 27" in order to fix the AMD Radeon HD 4850 video card. The "oven bake" method worked to reflow the solder balls under the GPU chip. I made a rather comprehensive video (1 hour) of the process here:

https://youtu.be/v1DXBLkiqFM

The video shows opening, cleaning, re-application of solder paste, closing and testing.

James Wages -

My sincere thanks and compliments to teut986 and the other contributors. This repair guide works great. Just be patient as you go and double check your work each step. The only challenge I had was removing and replacing the temperature sensor cable under the motherboard.

I replaced the graphics card and maybe I'll get another year or so out of this 2010 iMac.

Best regards,

Greg Strick April 8, 2017

Greg Strick -

Hey guys, I found a Radeon HD5450 1GB in an MXM format for a Lenovo AIO, any idea if it will work on a 2009 27" iMac? I currently have a dead Radeon HD4850 and I don't care GPU performance much, computer is only used for work.

This is the part - much cheaper than the Apple GPUs available: https://www.aliexpress.com/item/New-DDR3...

Stephen De Tomasi -

Hi Stephen, wondering if you ended up buying the card from AliExpress? If so, did it work? Any other advice?

John -

I just tried an Nvidia GT230 MXM GPU that was leftover from another system and got the startup sound but a black screen, but it should work in theory. Is there any way around this issue? I guess this is Apple's way of saying "screw you" because it's a non-apple GPU?

Stephen De Tomasi -

You can only use a card from another Mac. Those cards have Mac-specific firmware on them that is NOT there on a generic graphics card.
Matt G -

Hi , the iMac mid 2011, 27" graphic card problem caught up with mine also a couple of days ago , [ flickering white screen on booting , and nothing beyond ] , and the 'oven bake' method really got it right and the iMac is working as good as new at the moment . Many thanks to the video of James Wages [ https://youtu.be/v1DXBLkiqFM ] which covered all the aspects of the whole exercise . To all those who face the same problem , I strongly recommend to try out the 'oven bake ' method before going for a replacement graphics card .

Sunil Tytus -

https://m.youtube.com/watch?v=nB172HJeM0...

Try this easy GPU fix before buying a new graphics card! It fixed the white screen issue on my EMC 2374.

adamg5 -

I replaced a broken Radeon HD 4850 with a working HD 5750 card (iMac 27" 2009). It was not necessary to remove the DVD drive.

Peter Schneider -

Hello. I have a iMac 27” midle 2010 with 2,93 GHz Intel Core i7 and GPU ATI Radeon HD 5750 1024 MB

Is posible upgrade my GPU to AMD Radeon HD 6970M 2GB? Any information?

Thanks in advance

Alex GH -

If you can find a 6770M or 6970M that was pulled from a 2011 model iMac, I would bet that would work just fine. As mentioned above, you can definitely not just pick up any random 6970 (or other) GPU as it will not have the Mac firmware on it.

If you see my post above, I got a 2011 iMac 6770M GPU off of eBay and was able to put it in my 2009 iMac and it is still running great. Actually it runs a lot cooler than it used to.

Matt G -

Hi this guide saved my butt! I baked the card, clear the dust, installed Macs Fan Control. Now the mac works very well!

Chi Lam -

Hello, is it possible to remplace video card ATI HD 4850 512Mo in iMac late 2009 core I7 2,8 Ghz by ATI HD 4670 256Mo from iMac late 2009 core 2 duo 3,06Ghz ? Thanks for informations

Tetiana Boudin -

FYI, I tried to downgrade an HD 5750 with a working 4850 I pulled from another iMac and it didn’t work. Now I’m wondering if the 5750 can be replaced with the 5670. Anyone know?

applerepairshop -

This upgrade is not possible in iMac late 2009 intel core 2 duo, isn't it?

Paolo -

I don’t see why that wouldn’t work. Read all the notes above before trying…

Matt G -

New 6770M & 6970Ms are quite expensive…

Is it possible to bypass the internal broken gpu by using an eGPU (with an external screen)?

Daniel Albert -

I do not believe that is possible.

Matt G -

For anyone checking here about doing this upgrade, I have an update. I upgraded the GPU in my late-2009 27” iMac (see posts above for details) and have been happy with it. I am running El Capitan on it.

I recently tried upgrading to High Sierra and have not been able to do that. After trying to upgrade and then having to roll back to a backup, I tried a clean install on a blank partition and it still does not work. The problem appears to have something to do with the graphics driver. I am wondering if it has to do with the upgraded GPU. Just something to look out for. I have basically given up on upgrading the OS and I guess I will just stick with El Cap until the machine dies.

Matt G -

I got an iMac late 2009 (i7, HD4850 512Mb) runnin latest macOS and my graphic card just died. I can find cheaper HD6970 than the exact replacement for my card.

Has anyone done the upgrade recently? Will it work with High Sierra?

marcozima -

DOES ANYONE KNOW IF THE 6970 2GB card will work with the Core 2 Duo iMac 2009 27”, or just the i5 and i7 models?

I see conflicting information out there. Apple told me only the 4650 and 4850 cards will work with that model EMC 2309 model. Is that true? Can I use a latter card with the CORE2DUO EMC2309? This tutorial is for an i7…

makeasceneak -

Hi @mattfromphlly, thanks a lot for the update. The GPU card in my Late-2009 27” iMac has just died so I am going to try this upgrade. I just want to know if you were able to get your iMac works with High Sierra or I have definitely to use El Capitan.

Heiner Sarmiento -

Sorry for the delay. I haven’t been on here in a while. For anyone interested, I have not been able to upgrade the OS in my machine. It appears there is a problem with having a newer graphics card in the older machine that causes some kind of conflict when upgrading.

Matt G -

Can anyone help me? I’ve got an iMac (27-inch, Mid 2010), ATI Radeon HD 5750 1024 MB, Serial: QP044011GWQ. Want to replace the video Card. Will the 6970 2GB fit on it for good?

thealexparr -

Will this allow an upgrade to Mojave?

Jagdeep Bhaura -

Hi guys, I have an iMac 2009 27” i7 and my grafic card ati Radeon hd 4850 512mb is broken (vertical lines). The question is: where can I buy a new ati Radeon hd 4850 or ati Radeon hd 6970 2Gb for e normal price? On eBay I find only used cards for a lot of money….Thanks :)

Simone -

I can recommend the “bake the graphics card in the oven” fix https://m.youtube.com/watch?v=nB172HJeM0... which worked for me. Very happy!

stevefb -

if i put a 6970 2gb in my late 2009 i7 16gb (soon to be 32gb) already running 2 ssds with the owc chip inside - will i be able to run mojave?

also, how likely is it that 10.15 and subsequent OS releases will be even hungrier and leave me behind again… i love my 27inch imac! on careful owner for nearly 10 years!

Alex -

I replaced videocard with AMD Radeon HD 6970M 2048 MB, placed SSD and upgraded tot 16 gb, but could not upgrade tot Mojave. Then it must be the motherboard i think. Keeping the mac running as a use for video, work etc. But def gonna buy a new Macbook Pro 16 with HBM2.

Joey Schreuder Peters -

Anyone having power draw issues with this upgrade? Imac runs just fine until I toss a video on or run a GPU stress test. A few minutes into either and it shuts down. Temp readouts are fine so I dont think its a heat related issue.

Anthony Hoopes -

Just completed this guide for a mid 2010 27’ iMac that was having graphical distortions in both OSX and windows! I hesitantly bought one of the AU$350 cards off ebay (with no cooling equipment attached) but it seems to be running great! Just a note of warning for people upgrading using the individual card (ie with no cooler plate attached) - you might want to reapply the thermal paste to the new card and beware the old X bracket on the back of the card will not fit directly onto some of the newer compatible cards (I went from a 5970M 1GB to a 6970M 2GB for example).

Kyle Brown -

Thanks for this guide. Once again I was able to successfully repair a computer. Some times, some details could be a little better highlighted, anyway excellent work. Ty

Marco -

Do you have to use the 2011 heat sink or can you use the original one from the late 2009?

nicholasryandent -

Possible to swap out stock ATI Radeon 4670 to 5670 512MB?

I am currently rebuilding my dead 27” iMac mid-2010 and have dissected it all the way to the GPU. I noticed that a bunch of old hardened clay was on it so I suspect this to be my problem for it not being able to chime/power on.

I found a used ATI RADEON 5670 512MB video graphics card and for some reason it is cheaper than the stock card so I wanted to swap it out with the new one. Would it be compatible and would I have any problems doing it or should I spend the extra and just buy the same GPU that I have in my system?

xxdaz316xx -

You can also replace it with a: AMD Radeon HD 6970M 2048 MB. I just did that and it works super nice. Got my card on Ali Express and paid like 145 euro for it, but was really worth it. Also installed a SSD and 16GB intern, really nice.

Joey Schreuder Peters -

Hola es compatible con Catalina?

Javier Sánchez -

e stata utilissima

walter placuzzi -

Hello,

I changed the GPU. Unfortunatelly now the iMac is not starting at all. The screen stays black and the fans don’t start. Did I forget to reconnect something? Or it is dead?

Pierre-Adrien Mongin -

try checking if you havent reconnected something. or check if the graphics card is connected properly.

Joe Davidson -