Einleitung

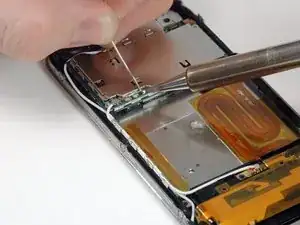
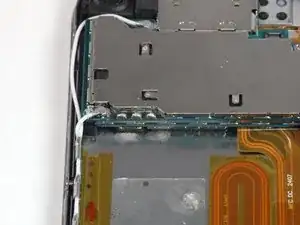
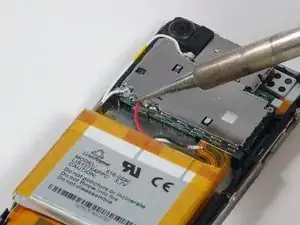
Der Akku hält nicht lange? Dann tausche ihn aus. Bei dieser Reparatur muss gelötet werden.

  1. kYQbjXiPj3QR52nQ
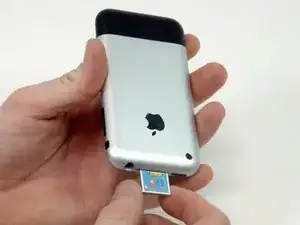
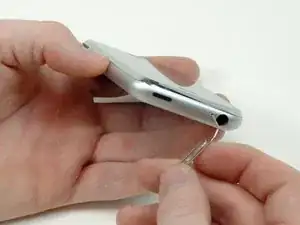
    • Stecke zum Entfernen der SIM-Karte ein Werkzeug oder eine Büroklammer in das kleine Loch neben der Kopfhörerbuchse.

    • Drücke vorsichtig, bis der SIM Karteneinschub herauskommt.

    To remove the SIM, insert the end of a SIM eject tool or a small thin paper clip into the hole on the SIM tray. Press firmly and push the tool straight in until the tray pops out.

    http://support.apple.com/kb/ht1438

    neuronetix -

    I put the SIM card back in, and the slide to unlock does not work.

    dean -

    The only carrier to accept this iPhone was AT&T, they have discontinued use of that baseband. Nobody else in the world except for early renegade reverse engineers such as Geohot can get the device to work as a really old iPod no use unlocking the device because the technology inside the most recently OEM sold/refurbed iPhone 1st gen fails universally. You should only buy a screen assembly and snap it onto the back and call it a dummy phone and put it in a museum.

    Alexander Weinhart -

  2. EAoVyltI36jgdQY1
    • Ziehe den Einschub für die SIM Karte aus dem iPhone heraus.

  3. OylfJVUojJTlqpSX
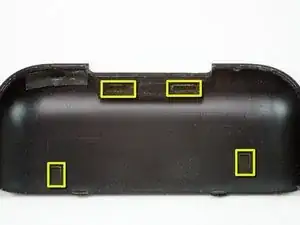
    • Das Bild zeigt die zwei Klammern und die zwei Rasten an der Unterseite der Antennenabdeckung. Die beiden Klammern oben im Bild müssen in Richtung der schwarzen Abdeckung gedrückt werden, um gelöst zu werden.

    YOU NEED TO PUT THE OPENER TOOL BETWEEN THE ANTENNA COVER AND THE DOCK CONNECTOR FIRST, THEN YOU WILL HAVE SPACE TO OPEN IT.. MY 2 CENTS

    riversde -

    You better lay off the caps.

    lol SPLAAT -

    Very hard to remove and the plastic is very fragile

    Take care when removing

    miguelvillela -

    When you get stuck follow this guy guide

    http://www.youtube.com/watch?v=sYHnr89HM...

    miguelb -

    Great Guide.

    My dad banged his iPhone in a table after arguing with someone and got the aluminum cover next to the volume control bent in such a way as it got the volume control stuck in the max position. I used this guide to remove all parts out of the way so I can get the shape of that region and corrected it the "Han Solo" Way. It was an excellent opportunity to get the phone cleaned up as well

    The biggest problem I had was screwing some of the screws back. The screwdriver that I had was not magnetized, so I used a little bit of superglue to bind the screw and the screwdriver until I had it screwed tightly.

    The second biggest problem I had was that I lost a screw twice, but was lucky enough to find it quickly on the floor next to me.

    I am very happy as I waited more than a month to get the confidence to get this iPhone repaired.

    lantinian -

    how do i know what part is in my phone? There are 2...

    Ivanfrost -

    Zitat von Ivanfrost:

    how do i know what part is in my phone? There are 2...

    Once you have the phone apart and have gently unplugged the power ribbon, read the part number on the ribbon. If it's in the 821- family, you can safely use corresponding 821 headphone assembly. If it is the other part number, use the newer replacement. Many sites list both parts and let you order the appropriately numbered part. Otherwise (if you order the wrong part) it won't work or you'll have to [unnecessarily] hack the part to get it to work.

    Steve -

    Zitat von Steve:

    Once you have the phone apart and have gently unplugged the power ribbon, read the part number on the ribbon. If it's in the 821- family, you can safely use corresponding 821 headphone assembly. If it is the other part number, use the newer replacement. Many sites list both parts and let you order the appropriately numbered part. Otherwise (if you order the wrong part) it won't work or you'll have to [unnecessarily] hack the part to get it to work.

    I bought the wrong one.... how do I hack it?

    Rune Smistad -

    My iPhone is very first model. It doesn't have any of the four tabs shown.

    gameplayer2 -

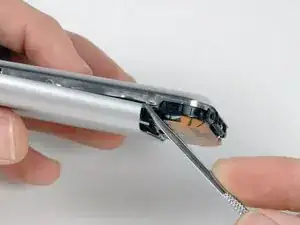
    The very first model does not have the four tabs. To open this version, use a plastic opener tool and push it into the middle of the tiny space between the rectangular dock connector and the antenna cover. Move the tool to the side and push it in a little deeper. A small gap should open up at the bottom of the antenna cover, where it meets the metal. Continue using the plastic opener tool in there, pushing it in and forcing it around the edge so that the antenna cover further separates. Then repeat this on the other side. To me it seems like a very brittle piece of plastic, so be careful. But now that it's loose at the bottom you can lift it with your fingers and work it off.

    Alexander Ljungberg -

  4. jUHvjBbogjKT4LWn
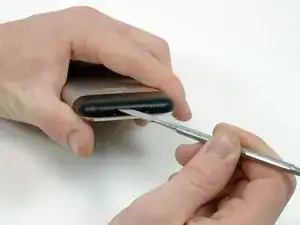
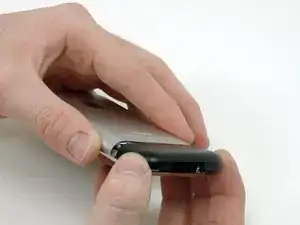
    • Achte unbedingt darauf, den Metallspaten zwischen Dockanschluss und Antennenabdeckung zu schieben, und nicht in den Dockanschluss selbst.

    • Führe den Metallspudger in den Spalt zwischen Dockanschluss und Antennenabdeckung. Schaffe vorsichtig mit einer leichter Drehbewegung in der Nähe der beiden Klammern einen Spalt zwischen Antenneabdeckung und der silbernen vorderen Einfassung.

    Take heed to the note about getting the spudger between the dock connector and the cover. The dock connector is black plastic, as is the antenna cover, so it's difficult to see any gap between them. Putting the spudger between the metal shielding of the connector and the plastic is incorrect.

    Michael Lance -

    Rens' duct tape technique (see comment in step 6 section below) worked very well. No need to risk breaking the antenna with a spudger.

    jbshoe -

  5. IbJomOddGpq5nMuJ
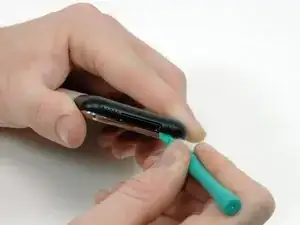
    • Schiebe ein iPod Öffnungswerkzeug in den Spalt zwischen Antennenabdeckung und vorderer Einfassung. Der Keil des Werkzeugs sollte zur Antennenabdeckung zeigen. Schiebe das Werkzeug um die Ecke herum und dann nach oben bis zur Metallrückseite.

    • Wiederhole diesen Vorgang auf der anderen Seite des Dockanschlusses.

  6. KexceVTpHPS2SSEy
    • Fasse die Antennenabdeckung auf beiden Seiten und schiebe sie nach oben und weg vom iPhone. Das erfordert etwas Kraft. Falls sie sich nicht lösen lässt, kontrolliere, ob die Antennenabdeckung ausreichend angehoben wurde, so dass sie von den Rasten gelöst wurde.

    It was released very hard on my iPhone 2G but the problem comes when i have to put it back.

    It remains a little more space between the dock and the Antena cover and maybe that's because the two tabs between the mic and the speaker are not entered under the gold board?

    If someone knows please tell me how to put it back.

    Thanks

    infomihai -

    There is a very easy way to remove the cover by simply sticking duct tape on it and pulling the tape away of the phone.

    It will leave no marks and it didn't damage my antenna cover as much(my "chinese" repair tools were to weak).

    rens -

    Thanks, using the tape was quick and easy, no damage at all.

    Roeland -

    Brilliant. Works perfectly. 20 seconds of work.

    koenatclaes -

  7. 2hJwIgKUTkSgmJjG
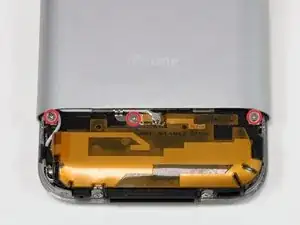
    • Entferne die drei Kreuzschlitzschrauben #00, die die Rückabdeckung am iPhone befestigen.

  8. WTBObyY1AVtcVDTC
    • Das iPhone zu öffnen ist eine ziemliche Herausforderung, entmutige dich also nicht. Atme tief ein und achte darauf, dass du viel Zeit hast, um diese Arbeit durchzuführen.

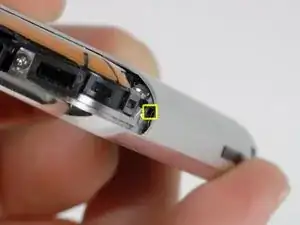
    • Das kleine eckige Loch ist der Ort, wo du im nächsten Schritt einen Zahnstocher hineinschieben musst.

    Be sure to use the square hole, more to the inside, not the one between the outer shell and the little piece of metal. The Outer shell is attached to the metal.

    Gyuri Ordody -

    You guys show this is vanilla dessert. And it's more difficult than building a DIY space shuttle. I wonder why Apple did the iPhone so problematic to disassemble. It's just the battery!

    Sebastian Di Mateo -

    I've seen some instructions recommending using a knife to open up a space between the back cover and trim. Using the dental pick as shown here, it is very easy to break off the screw attachment near the edge of the cover.

    Bill Parquet -

    Agree with Bill, I did break off one of the screw attachments. In retrospect, using a small putty knife between the cover and battery (which I'm replacing anyways) to apply force against the cover while prying at the hole would have helped.

    Michael Lance -

  9. 4Og6SPw1nhNowVyp
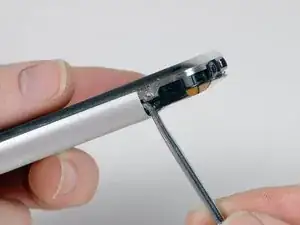
    • Fange an, die Rückabdeckung auf der Seite mit den Tasten zu entfernen.

    • Schiebe den Zahnstocher ganz in das eckige Loch. Unter Umständen musst du das Werkzeug hin-und herruckeln und ziemlich kräftig drücken, um es ganz hinein zu bekommen.

  10. SKRluDogTQcXyFwC
    • Heble die Rückabdeckung hoch, indem du den Zahnstocher mit eine schnellen Bewegung gegen den Uhrzeigersinn ziehst. Wende Kraft senkrecht zur Oberfläche der Displayeinheit an. Du hast vielleicht Angst, die Bewegung so schnell auszuführen, aber durch eine langsame Bewegung ist das Risiko höher, dass das Gehäuse verbogen wird.

    ugh. i totally mangled my case. snapped off the 2 outer screw brackets... broke my dental pick, too. and my small screwdriver. thank goodness for craftsman tools! ;)

    i was pretty disheartened by the whole thing, but i keep it in a hard shell anyway so it's not that noticeable.

    umopapisdn -

    Like others - this is where I am stuck. No dental pick, so I search for alternatives. Good the get reminded - if I mangle the case too, hey, my speck cover will hide the scars!

    Spikey2 -

    What material is that dental pick made of? Adamantium?

    Sebastian Di Mateo -

    I could NOT get this method to work. I tried three different picks and all bent when I tried to lever them this way. I did break one of the frame screws off in the process as well. I ended up going back to my old standby... The Exacto Knife and a 1/8 inch flat head screw driver... I used the exacto to get the flat head started, then worked my way up one side toward the top of the phone slowly and carefully wiggling the screw driver until it popped open on that side. Then I did the same to the other. That worked well for me. These plastic openers and dental picks just bent and broke on me. GOOD LUCK. My Advice: Get a 3G or 3GS, I can break one down in under a minute!

    Adam Susong -

    I didn't have a dental pick. I used a narrow, flexible hobby putty knife. The button side edge popped right off. The blank side required me to slowly wiggle along, continually pushing the putty knife up to 2" to detach each of the clips.

    dennishodge -

    I can’t get past here… I ruined 3 screwdrivers trying to do this, but failed

    Nick75704 -

  11. M1WJSCuYr5oFd1l5
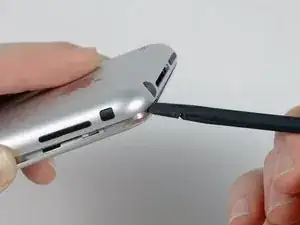
    • Benutze einen Spudger, um die Rückabdeckung an der Ecke und entlang der Oberkante vom iPhone zu lösen.

  12. sLsggipm4ET4AhNr
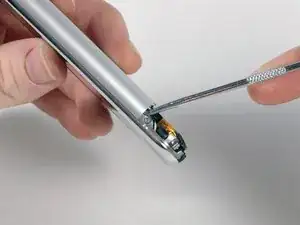
    • Wiederhole diesen Vorgang auf der anderen Seite des iPhones. Schiebe den Zahnstocher ganz in das eckige Loch. Unter Umständen musst du das Werkzeug hin-und herruckeln und ziemlich kräftig drücken, um es ganz hinein zu bekommen.

    wich dental pick should I use? I´d bought some but they twist or didn´t fit on the scare... thx in advance and really good guide!!

    Chad720 -

    I know this is old, but I've had some success. Rather than the dental pick, which I bent too, I ground down a very small "L" bend hex wrench. Worked like a champ. Also: If you have an iPhone 4 and are looking to use the microSIM in your 1st gen iPhone with the use of a microSIM adaptor... DO NOT put the empty adaptor in the SIM slot. That's what I did and had to dismantle the phone to get it repair the SIM contacts.

    tthomashardie -

    Actually, the "button" side released fairly easily and I was able to loosen the top end with a plastic spudger. However, the remaining side was a @#!@! and the process of popping it off caused the protruding screw lug to break off the internal guide, which itself came off seconds later. Oof! While the side guide was easily glued back in, the lug ultimately became a casualty since it was too small and unweildy to SuperGlue™ back on. But, as Meat Loaf wisely sings, "two out of three ain't bad." The 'phone can live w/o one screw and possibly two if the center lug remains.

    turkeyneck -

    I didn't have a dental pick so i used a very small high quality allen key which worked perfectly. The back cover is interference fit to the front bezel and i found with the correct lever action it separated easily.

    Bigkarkus -

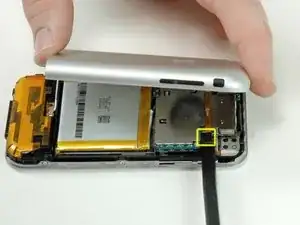
  13. stjuVIEWYc4RZlBx
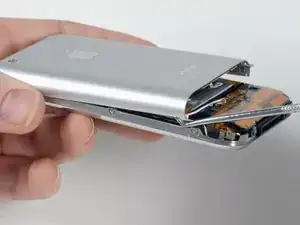
    • Heble die Rückabdeckung hoch, indem du den Zahnstocher mit eine schnellen Bewegung gegen den Uhrzeigersinn ziehst. Wende Kraft senkrecht zur Oberfläche der Displayeinheit an. Du hast vielleicht Angst, die Bewegung so schnell auszuführen, aber durch eine langsame Bewegung ist das Risiko höher, dass das Gehäuse verbogen wird.

    • Die Rückabdeckung ist mit dem restlichen iPhone immer noch durch das Kabel des Kopfhöreranschlusses verbunden, entferne die Rückabdeckung also noch nicht ganz vom iPhone.

    I've seen some guides that recommend a technique for prying up on the center of the case. if you do so, it is easy to accidentally damage the battery if you pry in the wrong direction.

    Bill Parquet -

  14. ntHQ2PA2WutVDlhq
    • Achte darauf, dass das iPhone ausgeschaltet ist, bevor du das Kabel des Kopfhöreranschlusses trennst.

    • Benutze einen Spudger, um das Kabel des Kopfhöreranschlusses vom Logic Board zu trennen.

    You need to stick the end in, and it detaches if you push it upwards.

    Gyuri Ordody -

    A picture of what the dental pick is poking at would be useful inside the back case. If you get on the wrong side of the frame rail you can break the ear where the screw goes pretty easily with that pick (yes it appears to be titanium). Guess that is why only the plastic pick was part of the toolset, but used a metal one as depicted and ran into this. As you say this is challenging, and more pictures are better.

    edl -

  15. pZofCqP6crokfwcp
    • Entferne mit der Spudgerspitze den milchig weißen Kleber, der die Akkukontakte bedeckt.

    • Um das Risiko eines Kurzschlusses zwischen dem roten Akkukabel und der Metallabschirmung zu vermeiden, kannst du zunächst den Kleber des schwarzen und des weißen Akkukabels entfernen. Nach dem Entlöten des weißen und des schwarzen Kabels, kannst du dann den Kleber entfernen und das rote Kabel entlöten.

    they seem to use lead-free solder in the original construction process. goody for the environment, but it made it really hard to get the original battery loose. i added a little bit of regular solder to what was already there and then was able to wick away the original.

    umopapisdn -

  16. ETJiGbsgvFPRNZhM
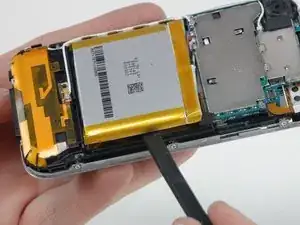
    • Fange an der Kante gegenüber von den Akkukontakten an und schiebe einen Spudger zwischen den Akku und den Plastikrahmen und heble nach oben. Der Akku ist mit Kleber am Gehäuse befestigt, aber er sollte sich langsam lösen lassen.

    • Falls sich der Akku nicht löst, träufle ein paar Tropfen hochkonzentrierten Isopropylalkohol (> 90%) unter die Kante des Akkus.

    • Warte etwa eine Minute, damit der Kleber sich aufweichen kann.

    • Nutze das flache Ende eines Spudgers, um den Akku sanft anzuheben.

    • Wende beim Ausbau des Akkus keine Gewalt an. Falls nötig, gib noch ein paar Tropfen Alkohol hinzu, um den Kleber weiter zu lösen. Achte darauf, dass du den Akku weder verformst, noch beschädigst.

    • Wenn du den Akku rausgenommen hast du noch Restalkohol im iPhone ist, wische ihn sorgfältig auf und lasse das Smartphone noch eine Weile an der Luft trocknen.

    Beware not to apply to much force on the battery !! In my case it broke and started to smoke ... surely not to healthy..

    Furthermore be aware that below the battery there is a flex cable which is easily destroyed.

    Dominik -

    What work for me very well was to leave the original wires at the pads on the system board, cut them at an appropriate length and soldered the new battery to them. Of course you have to insultate them with tape or glue. There is enough space and you avoid any risk of messing up the system board.

    danielfca -

    Dito. Cut the wires and spliced with the new battery wires. Had to peal away some of the white tape on the new battery to get enough wire to work with. Used some of the kapton tape from the old battery to insulate the splices (electrical tape too thick).

    Michael Lance -

  17. lDMPKwh1iEU4Ba5B
    • Wenn du noch nie zuvor gelötet hast, dann haben wir eine Anleitung, die es dir leicht macht, das zu lernen. Es ist empfehlenswert, sie sich zuerst anzuschauen.

    • Jetzt sind wir für das Löten gut vorbereitet. Du benötigst einen Lötkolben, Lötzinn und eine Entlötlitze. Falls du diese Gegenstände noch nicht hast, kannst du sie in einem Baumarkt oder einem Bastelgeschäft finden.

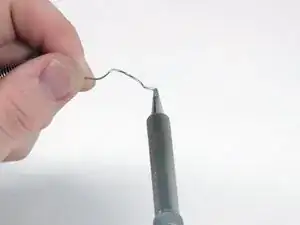
    • Reinige den Lötkolben, indem du eine kleine Menge Lötzinn direkt auf die Spitze des Lötkolben gibst und dann die Spitze des Lötkolbens mit einem feuchten Schwamm abwischst.

  18. 2iGVaaoGYAt5x4dj
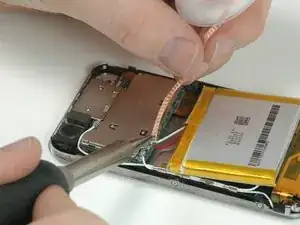
    • Lege die Entlötlitze auf die vorhandene Lötkugel.

    • Lege den Lötkolben auf die Litze über der vorhandenen Lötkugel.

    • Halte den Lötkolben solange darauf, bis das Lötmetall in die Litze schmilzt.

    • Wiederhole diesen Vorgang bei den restlichen beiden Anschlüssen.

    • Hebe den alten Akku aus dem iPhone. Achte darauf, dass das gesamte Lötmetall entfernt wurde, bevor die Kabel von der Platine abgezogen werden. Die Kabel sollten sich leicht und ohne Widerstand lösen lassen.

    It is probably much easier to remove the solder with the wick, so be sure to get some. I did it without and it took forever.

    Gyuri Ordody -

    when you preform this step de-solder the black wire first then the white and then the Red, do not de-solder the red first or it may short the device out

    Chris -

    Using the desoldering wick is a good idea. I thought I could heat up the existing solder and pull the wire out but it is very easy to rip off the solder pad if you get the connection too hot.

    Bill Parquet -

    much better to detach the 3 cables (white, red and black) from the battery rather than from the chassis.

    Andrea perinti -

    If you’re replacing the battery anyway, it’s far easier to cut the wires to the battery first. Then you don’t need to worry about which one to desolder first etc.

    Bigphilly71 -

  19. jRLY1CQSLn3O6uHH
    • Es ist empfehlenswert, die offenliegende Oberfläche der Platine mit einem weichen Tuch oder Schwamm und etwas Alkohol zu reinigen.

    • Schmelze einen kleinen Tropfen Lötzinn direkt auf den Metallstecker auf der Platine, indem du den Lötkolben auf den Metallstecker hältst und dann das Lötzinn gegen die Spitze und die Platine drückst.

    • Sobald eine kleine Menge Lötzinn auf die Platine geschmolzen ist, hebe zuerst das Lötzinn und dann den Lötkolben weg.

    It's very important to clean and prep the terminals before attaching the new leads. Get rid of as much glue as possible and any stray solder that might be left from the un-soldering process. Make sure all three terminals are electrically isolated from their neighbors! Like the instructions tell you, leave no more than a nice little pinhead-sized dome of shiny solder on each terminal and no 'cold' solder connections, which have the characteristic DULL GRAY lustre. If you must--do them over or risk having to pop the dang thing open all over again!

    turkeyneck -

    What do I do if the red connector to the mother board comes off? Is there any other point I could solder to?

    mortenskogly -

  20. bV2UvxlWiuVnPArE
    • Der Lötzinntropfen sollte aussehen wie eine kleine Kuppel oder Halbkugel. Wenn er flach ist oder gezackte Kanten hat, dann halte einfach noch einmal den Lötkolben dagegen, um das Lötzinn nochmals zu schmelzen und ziehe den Lötkolben dann wieder weg. Du brauchst eventuell noch ein bisschen mehr Lötzinn, falls es nicht klappt.

    If you accidentally ruin the negative (the black wire) soldering bead like I did. Then the big metal plate is an alternative for a negative connection. Just solder it directly onto this plate and it should work perfectly.

    XereX -

    Zitat von XereX:

    If you accidentally ruin the negative (the black wire) soldering bead like I did. Then the big metal plate is an alternative for a negative connection. Just solder it directly onto this plate and it should work perfectly.

    Um.. im not sure if exactly this happened to me... so the small squre piece came off with the black wire :( where should I solder it now? On that black little spot or somewhere else? Thanks for any help!

    ascent -

  21. bX2mvQWdMnLqgRCp
    • Verbinde zuerst das rote Kabel, dann das weiße und zum Schluss das schwarze Kabel.

    • Lege den Kabeldraht des neuen Akkus auf den neuen Lötzinntropfen.

    • Drücke die Spitze des Lötkolbens auf das Lötzinn bis es schmilzt.

    • Schiebe den Kabeldraht in das flüssige Lötzinn bis er genau in der Mitte des Tropfens liegt, und entferne dann den Lötkolben.

    • Verlöte in gleicher Weise die beiden anderen Verbindungen, und achte ganz besonders darauf, nicht zwei Stecker zusammenzulöten.

    Try to experiment with the temperature of the soldering iron if you can adjust it. If it's too hot for the solder you have, it'll melt it away in a small, spectacular boil and evaporation sequence.

    Gyuri Ordody -

    When you get the battery and get it ready for installation leave the red wire in the heat shrink plastic wrap until you solder it to the board, and here's a tip... when you go to solder the battery to the board solder the black wire first and then the White but leave the plastic wrap on the red wire on until last... when you start soldering do it in this order and it will limit the chance of shorting out the device (black, white, red)

    Chris -

    But I have a replacement battery with a yellow instead of the white

    raf -

    But mine has a yellow wire instead of a white

    raf -

    Hi Chris, do you know anything about the question I asked in Step 20? I tore off a little square piece where the black wire was soldered. Should I try soldering it on the same spot or I should put it somewhere else? Thanks!

    ascent -

    Zitat von ascent:

    Hi Chris, do you know anything about the question I asked in Step 20? I tore off a little square piece where the black wire was soldered. Should I try soldering it on the same spot or I should put it somewhere else? Thanks!

    I have the same problem, but a litle different, tore off the little square where the white wire was soldered. Same question, should I try to solder on the same spot, or somewhere else ?

    artur -

    Hmm.. I would really appreciate some comments from people who know a little bit more than me :( please help!

    ascent -

    Zitat von ascent:

    Hmm.. I would really appreciate some comments from people who know a little bit more than me :( please help!

    You should be able to solder to either the big metal shield there or GENTLY (VERY GENTLY) remove a bit of the PCB top where the pad was to reveal the copper below it. I stress GENTLY, like barely scraping a razor over it with no pressure. If you do it too aggressively you'll go through the layer.

    shawncl -

    First of all: thanks for the fantastic manual! I successfully fixed a broken solder bead, but due to a very raw, non-precise soldering iron, the solder bead of the black connection also touches the silvery metal plate (the one that can be seen in the top part of the step 20 image).

    Any problem with that? It is working fine for one day now.

    Flo -

    wow, I just saw, that "ascent" used the same procedure to fix the black connection.

    @ascent: is your phone still OK? not broken due to excessive heat or something like that?

    Thanks and good luck!

    Flo -

Abschluss

Um dein Gerät wieder zusammenzubauen, folge dieser Anleitung in umgekehrter Reihenfolge.

iRobot

Mitglied seit: 25/09/09

0 Reputation

2 Kommentare

Where can I source an iPhone 2g battery in 2018?

Adrian Ledesma -

Click on the button on the top of this page that says, “iPhone Gen 1 Replacement Battery available for sale on eBay”
Anthony Guerrero -