Einleitung
Benutze diese Anleitung , um die Haupt-Rückkamera des iPhones zu entfernen.
Anmerkung: Der Ausbau des Akkus erleichtert den Zugang zur Abdeckplatte des Verbinders der Rückkamera. Es ist jedoch nicht zwingend notwendig, den Akku auszubauen. Falls dein Akku besonders schwer zu entfernen ist, lass ihn drinnen und arbeite um ihn herum.
Werkzeuge
Ersatzteile
-
-
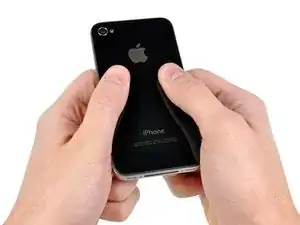
Schalte dein iPhone aus, bevor du es auseinander baust.
-
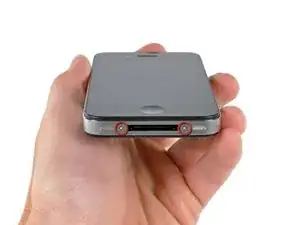
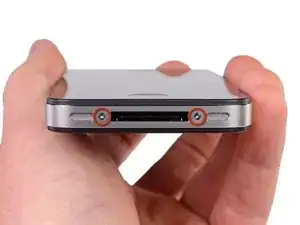
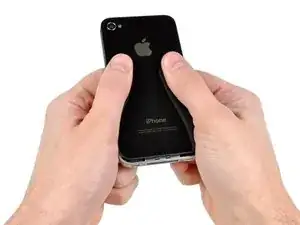
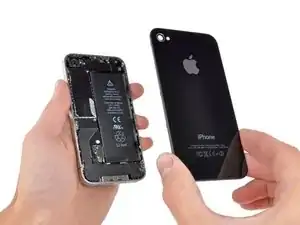
Deine iPhone 4 Rückabdeckung ist entweder mit zwei Kreuzschlitzschrauben #000 oder Pentalobeschrauben von Apple (zweites Bild) befestigt. Schaue nach, um welche Schrauben es sich handelt, um sicher zu gehen, dass du den richtigen Schraubendreher zum Lösen hast.
-
Entferne die beiden 3,6 mm Pentalobe oder Kreuzschlitzschrauben #000 neben dem Dock Anschluss.
-
-
-
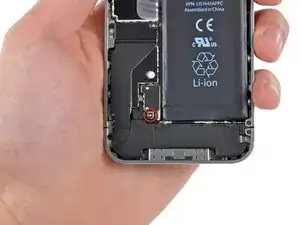
Entferne die einzelne 2,5 mm Kreuzschlitzschraube, mit der der Akkustecker am Logic Board befestigt ist.
-
-
-
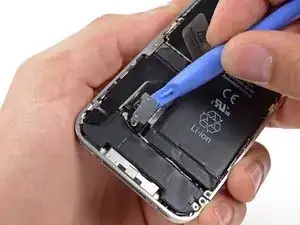
Heble mit einem Plastic Opening Tool den Akkustecker aus seiner Buchse auf dem Logic Board.
-
Entferne den Metall-Clip, die den Antennenstecker bedeckt.
-
-
-
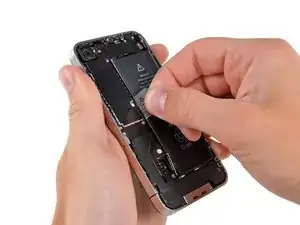
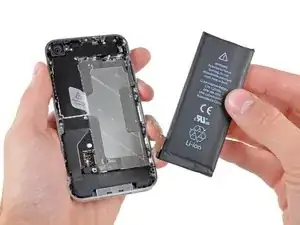
Verwende die durchsichtige Kunststofflasche, um vorsichtig den Akku aus dem iPhone zu heben.
-
Wenn sich noch Reste vom Alkohol im Smartphone befinden, dann wische sie sorgfältig weg oder lasse das Gehäuse gut austrocknen, bevor du den neuen Akku einbaust.
-
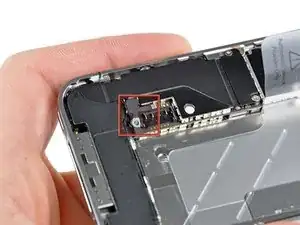
Bevor du den Akkustecker wieder anschließt, stelle sicher, dass der Kontaktclip (in rot) korrekt neben dem Akkustecker positioniert ist.
-
-
-
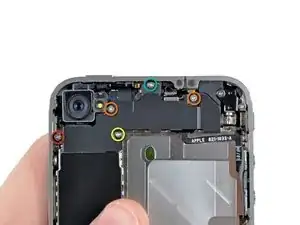
Entferne die fünf folgenden Schrauben, die die Abdeckung des Verbinders am iPhone befestigen:
-
Eine 2,3 mm Kreuzschlitzschraube
-
Zwei 1,6 mm Kreuzschlitzschrauben
-
Eine 1,4 mm Kreuzschlitzschraube
-
Eine 4,8 mm Kreuzschlitzschraube
-
Anmerkung: Um ihre richtige Position nicht zu vergessen, ist es hilfreich, fünf Kreise auf ein Blatt Papier zu zeichnen, und dann jede Schraube in den entsprechenden Kreis zu legen.
-
-
-
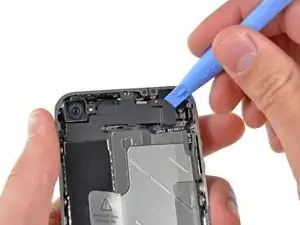
Benutze ein iPod Öffnungswerkzeug, um die Oberkante der Abdeckung des Verbinders leicht vom Logic Board wegzuheben.
-
Benutze die Spitze eines Spudgers, um die Halteklammern der Abdeckung des Verbinders vom inneren Rahmen abzulösen.
-
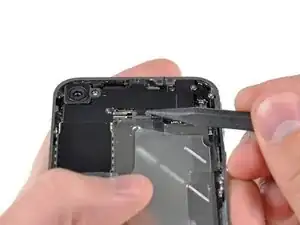
Entferne die Abdeckung des Verbinders vom iPhone.
-
Achte darauf, vor dem Zusammenbau alle Metall-auf-Metall-Kontakte auf der Abdeckung des Verbinders zu reinigen. Das Fett deiner Finger kann sonst unter Umständen Probleme mit kabellosen Interferenzen erzeugen.
-
-
-
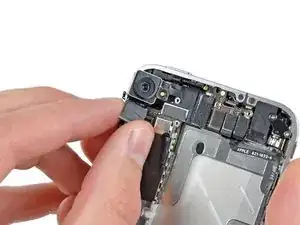
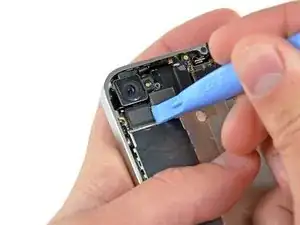
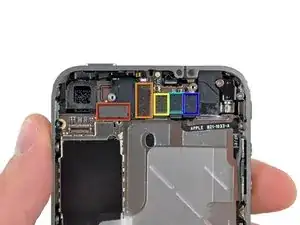
Benutze ein iPod Öffnungswerkzeug, um den Verbinder der Rückkamera vorsichtig aus seinem Anschluss auf dem Logic Board zu heben.
-
-
-
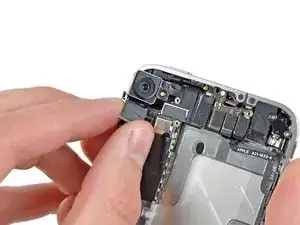
Entferne die Rückkamera vom iPhone, vermeide es dabei, einige der Verbinder auf der rechten Seite zu bewegen.
-
Nachdem du eine neue Kamera eingesetzt hast, kontrolliere diese Verbinder falls das iPhone nicht angeht.
-
Anmerkung: Der Akku (nicht auf den Fotos zu sehen) sollte abgetrennt sein, muss aber nicht ganz entfernt werden.
-
Um dein Gerät wieder zusammenzubauen, folge den Schritten in umgekehrter Reihenfolge.
11 Kommentare
This was super simple. My camera was not focusing after a previous company replaced it due to a faulty flash. I decided to take things into my own hands...no pun intended.
The instructions are super simple and easy to follow. Be aware of the loose clip under the connector - mine flew out - and I was worried I wouldn't figure out how to get it back in.
I also had to use a #0 screwdriver...#00 was too large.
I couldn't get the battery out...so, I was just super careful that the phone was off, and remained off during the repair.
Out with the defective camera...in with the functioning camera...replaced a couple of screws and the battery connector. Tested the camera prior to replacing everything.
Thank you ifixit!
You ROCK!!!
great comment!. You Rock!
Luca -
Hi guys. I just did it ! I would not describe it as super easy, but thanks to the screw template provided file, even the now famous pressure contact can not be lost ;-)
I just wanted to comment, not only to praise iFixit (and myself), but also to mention two side effects I had to overcome:
-First, when finished, the power button did not work (I had to plug the Dock Connector to start the phone). As I the power button is not so far from the rear camera, I figured out something went wrong in the reassembly. Since I had just done it once, I thought I could do it a second time, so I removed the newly assembled camera and reassembled it with extra caution. At the end, the power button worked as expected.
-Second: each time I restarted the phone after reassembly (twice, then), the SIM card would not unlock after the PIN code was entered. I had to remove and reinsert the SIM card for the PIN code to finally unlock it.
Otherwise, everything went smoothly, thanks again to the iFixit guys !
Fantastic!!! my problem was the rear camera, when i switch on the camera app the screen were completely black and the torch was not working at all! I buyed the tools and the rear camera everything arrived here in Italy in perfect time as scheduled and in one hour I did the job !!! now my iphone camera is perfectly up and running !!! thanks to IFIXIT.COM and their guides!
vflip -


using something like the 18-compartment tray will GREATLY help with this one; there are over a dozen groups of parts. For re-assembly having a digital calipers to measure the 2.4 vs the 2.6mm screws also helps greatly.
awr -
My method for hardware management during delicate phone surgery is to take and print out on 8.5"x11' paper, one or more pictures of the open phone in various stages of disassembly, and then tape the screws to the appropriate spots on the pictures. Also write numbers on the pictures next the screws to indicate the order in which you removed them.
lens42 -
I use a plastic egg tray, I drop all the screws and small parts (like the camera) for each step into the same egg indentation. You can see that the screws are different lengths, so I don't put one screw into it's own spot. I used 5 egg indentations to replace my screen.
robin -
I did a successful surgery on my iPhone, be warned this is not for the faint of heart!
I've done iPod screen replacements, battery replacements, this is by far much more difficult and intricate.
Great write up! Thanks a million.
Jaysen Strange -
I've changed some iPod screens as well and that has been the least pleasant experience so far. Glue and the main connector that has to be unwrapped and connected from the rear where you have no feel or control where it belongs.
iPhone repair is complex, but doable and has very few "traps".
mcbohdo -
Couldn't even get both screws out of the bottom of the case. One was easy and other refuses to budge. Screws so small I can't see if it is turning or screw driver is properly seated. Sad I too have done screen replacements on other phones. Don't know any secrets to get the screw out
ckracht -
I also have a problem with seeing what is happening with some of those tiny little screws and parts. For other projects that I do, I use an Opti-Visor. It slips over your head and provides 10x magnification. ( You can find them on Amazon).
Yeah, it adds cost to the project and you would have to wait for delivery, but it sure makes a world of difference in seeing what you are working with / on.
jhow -
On an early iPhone 4 I found that the #000 Phillips bit included in the 54 Bit Driver Kit didn't actually fit the screws. However the JIS #000 also in the kit did fit quite well. This is due to the JIS bits "thinner" design to prevent camming out of the slot. Otherwise everything went well. Looking forward to replacing the battery in my other phone that has the pentalobe screws. Glad I got the 54 Bit kit!
etler -
Use a vacuum duster and a sharp tool to pry out the dust, this can increase the volume insanely!
Dpairs -
What does the park that is gold and next to the 4.8mm screw for the antenna? Looks like I am missing that part and almost positive that is why I can't pick up or connect to any wifi signals. I have the screw and the antenna from another phone that is working and tried it on the broken phone and still doesn't work. Only thing different is that gold metal piece to the left of that 4.8 mm screw. Can I buy that part? how do I attach it?
Jay Pennington -
great instructions did it the first time
Mr J -
For organisation of the parts and for a much easier process of rebuilding i use a big magnetic flat surface with a grid drawn on it. Then I use a dry erase marker to make any notes I need and to number the parts in order as i disassemble . Believe me it saves a lot of time and hassle especially if you drop one of those tiny screws good luck finding it but when your working over the magnet and drop a screw its going to be right where it fell. At first I tried the piece of paper to keep organised but all it takes is one small slip and you move the paper too quick and your left with a jumbled bunch of screws and parts and a painstaking task of putting it all back correctly, aka a big waist of time and effort.
case-yg -
I found it very useful to use a magnet sheet when doing these repairs. I use electrical tape or a sharpie to make a grid, and place each micro screw in a separate box on the grid.
I work directly over the magnet sheet, so that if something drops I have a better chance at not losing it.
If you do lose a screw, go over the work area with a fridge magnet. It will pick it up if it hasn’t popped too far away.
Megan Telliano -