Einleitung
In dieser Anleitung wird gezeigt, wie du das defekte Display deines iPhone 5 reparieren kannst. Dieses Ersatzteil ist schon mit der Frontkamera, dem Ohrhörer-Lautsprecher und der LCD-Abschirmung ausgestattet, dadurch vereinfacht sich die Reparatur.
Du musst nur noch das alte Display ausbauen und den Home Button auf das Ersatzteil übertragen.
Schütze nach dem erfolgreichen Wechsel dein neues Display vor Kratzern, indem du einen Bildschirmschutz aufbringst.
Werkzeuge
Ersatzteile
-
-
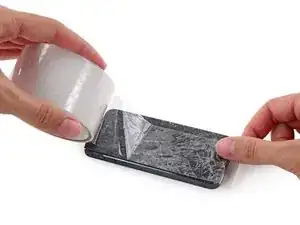
Falls dein Displayglas gesprungen ist, halte die Bruchstelle zusammen und vermeide Verletzungen, indem du das Glas mit Tape versiehst.
-
Lege sich überlagernde Streifen von durchsichtigem Paketband über das iPhone Display, bis die gesamte Frontseite bedeckt ist.
-
-
-
Schalte dein iPhone aus, bevor du mit der Demontage beginnst.
-
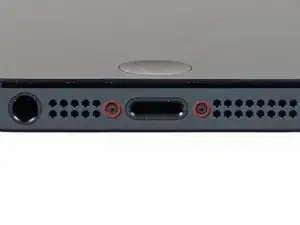
Entferne die zwei 3,6 mm Pentalobe Schrauben neben dem Lightning Connector.
-
-
-
Unabhängig vom verwendeten Werkzeug musst du darauf achten das ganze Display auf einmal abzuheben.
-
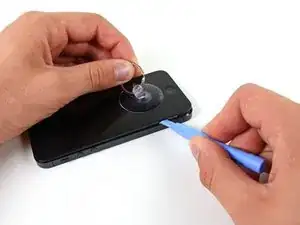
Wenn sich der Bildschirm vom Rahmen löst, wie es im ersten Bild zu erkennen ist, schiebe ein Plastik Opening Tool zwischen den Plastikrahmen und den unteren Teil des Gehäuses, um die Metallklammern zu lösen.
-
-
-
Drücke den blauen Griff zum Scharnier hin, um den Öffnungsmodus zu deaktivieren.
-
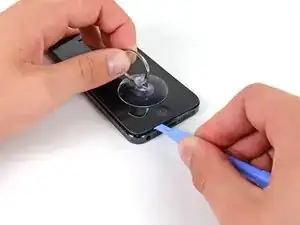
Bringe die Saugheber am unteren Rand des iPhones an, einen auf der Vorderseite, den anderen auf der Rückseite.
-
Drücke die Saugheber auf den Oberflächen fest.
-
-
-
Drücke den blauen Griff vom Scharnier weg in die Stellung für den Öffnungsmodus.
-
Drehe den Griff im Uhrzeigersinn, bis du merkst, dass sich die Saugheber dehnen.
-
Warte eine Minute, damit sich der Kleber allmählich ablösen kann und sich ein Spalt unten am Display bilden kann.
-
Überspringe die nächsten drei Schritte.
-
-
-
Während du das iPhone mit einer Hand unten hältst, ziehe an dem Saugnapf, um die Displayeinheit etwas von dem hinteren Gehäuse zu entfernen.
-
Heble mithilfe eines Plastik Opening Tools die Kanten des hinteren Gehäuses vorsichtig nach unten, weg vom Bildschirm, während du mit dem Saugnapf nach oben ziehst.
-
-
-
Heble weiter an den Seiten der Displayeinheit und löse die Clips entlang der linken und rechten Seite.
-
-
-
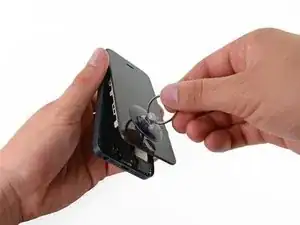
Sobald die Clips unten und an den Seiten der Displayeinheit gelöst sind, ziehe den unteren Teil der Einheit weg vom hinteren Gehäuse.
-
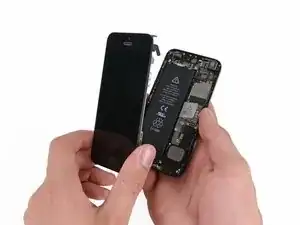
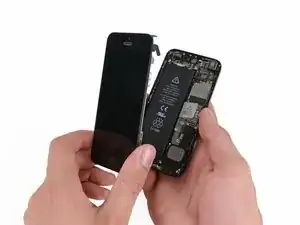
Hebe die Displayeinheit langsam bis zu 90° vom hinteren Gehäuse an, und lehne sie gegen eine Halterung, während du am Telefon arbeitest.
-
Fixiere das Display mit einem Gummiband, um es während dem Arbeiten sicher in Position zu halten und Spannung auf den Displaykabeln zu verhindern.
-
-
-
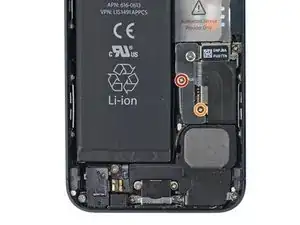
Entferne die beiden folgenden Schrauben, die die Metallabdeckung über dem Akkuanschluss auf dem Logic Board befestigen:
-
Eine 1,8 mm Kreuzschlitz Schraube
-
Eine 1,6 mm Kreuzschlitz Schraube
-
-
-
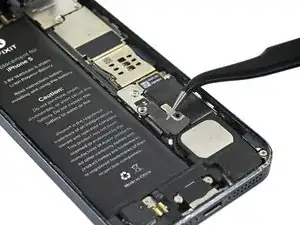
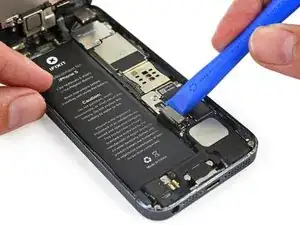
Heble den Akkustecker vorsichtig mit einem Plastik Opening Tool von seinem Anschluss auf dem Logic Board.
-
-
-
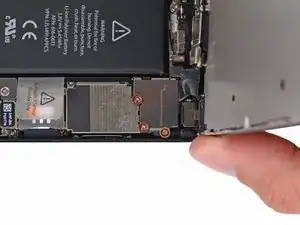
Entferne die folgenden Schrauben, die die Kabelabdeckung der Displayeinheit am Logic Board befestigen:
-
Zwei 1,2 mm Kreuzschlitz Schrauben
-
Eine 1,6 mm Kreuzschlitz Schraube
-
-
-
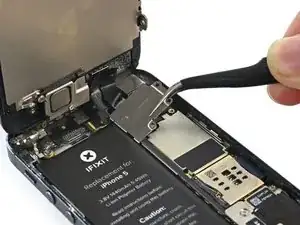
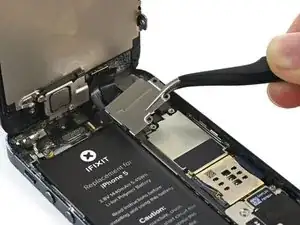
Hebe die Kabelabdeckung der Displayeinheit in Richtung Akku vom Logic Board und entferne sie.
-
-
-
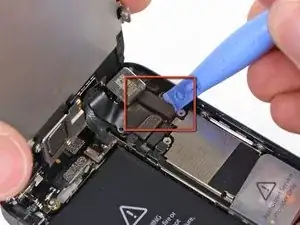
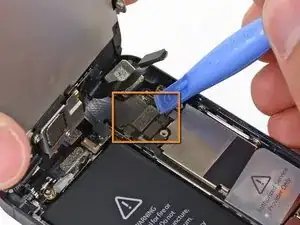
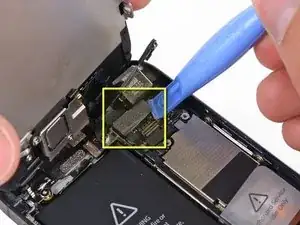
Benutze ein Plastik Opening Tool oder den Fingernagel, um die drei Kabel an der Displayeinheit zu lösen:
-
Frontkamera und Sensorkabel
-
LCD Kabel
-
Digitizer Kabel
-
Arbeite die Schritte in umgekehrter Reihenfolge ab, um dein Gerät wieder zusammenzubauen.
38 Kommentare
My brother in-law had water damage to his screen and the carrier was going to charge him and arm and a leg for a new phone so I ordered the complete display assembly from right here on iFixit that came with all the necessary tools. Took me a little over 5 minutes between repairing and chit chat to finish. It was a really easy repair and my brother in-law was never happier to have his phone back at a fraction of the cost the carrier was quoting.
Thanks for your guide for replace new touch screen
i had save one tiny screw from inside assembally :) :) :)
My display didn't shut down when i have a call and i put the phone near my ear! I plug my broken display and it work well but not the new one...please someone help! btw thanks for the guide and for the fast delivery
I know you posted this awhile ago, but if anyone else is wondering, how to fix the issue where the display won't turn off while on a phone call, You MUST transfer over the small plastic retaining brackets from the old display, and put them in the correct position! By correct position, I mean the two small transparent points need to line up with the receptors on your iPhone's front panel assembly (Camera, light sensor, mic).
This one is for Max:
Max, can you explain better what you mean by plastic retaining brackets? I'm about to swap my screen out and I wanna be able to do this
U need to scratch the paint in ur display where the proximity sensors are covered by it. After that use a black marker.






Having completed this repair using the rear camera part from Ifixit I have to comment that the camera is noticeably lower quality. Its not huge - You don't notice it looking at the photos scaled down to fit but viewing one for one there is significant detail lost. My staff member has an Iphone 5 bough at exactly the same time as mine so I was able to take a photo side by side on his and mine after my repair and when you view 1 for 1 pixel in product boxes on mine the text was just a colored blur where on his although you couldn't read the text it was more obviously text. Overall though its still better than having a camera that wouldn't focus at all and being that Apple seem to refuse to supply genuine spare parts (Which there has to be a low against??? - Imagine if a car manufacturer did that) its still good buying one from someone who gives good support. At the end of the day its a phone camera not an SLR and its still better than the older Iphone 4 camera.
matt -
The majority of product manufacturers are not required to provide parts, and apple will fix items under the various warranties it offers. Car manufacturers on the other hand are required to make parts available by law. It is part of the regulation of their industry. They get a lot of protection for their business model, but have some obligations too. It's why the EV1 was pulled, they didn't want to have to make the parts, and why there are so many Delorian parts.
William Leeper -
This is a great guide. However, I'm having a hard time popping the screen back into place. Everything works but I'm afraid of putting too much pressure least I crack it again. Any advice?
amciotola -
To avoid broken screens during reassembling:
Put the hooks of the screen in the right place in the housing, then close it loose, don't press it. Turn your phone upside down with the screen on a very flat surface (e.g. table). Now press the housing on the screen -> no more risk for braking the screen because of inhomogeneous force applied on the glass!
mondbewohner -
I hope folks read this comment before proceeding to attempt a Sleep/Wake button repair on the iPhone 5! Apple has an iPhone 5 Sleep/Wake button replacement program, free, for iPhone 5 devices manufactured through March 2013. See program details at https://www.apple.com/support/iphone5-sl.... Don't do this yourself if you don't need to. It's a difficult repair.
Mark Luscher -
I was willing to add the following important remark on top of this guide but, strangely, it has been refused! Here it is:
---
*Check if your Iphone 5 is eligible to the Apple special program for a free battery replacement (devices sold between September 2012 and January 2013, within a limited serial number range).
* If not, watch the video and use this guide [video|https://www.youtube.com/watch?v=6ogE8USs...]
---
And thus, as my Iphone 5 was eligible, I went to the Apple store of Le Louvre in Paris and the battery has been changed for free instead of 65 euros. Thanks to Mark!
revher -
Hi every one i drop my iphone5s 16gb
I replace 10!new screen but cant back to live i see on the "logic board" where u conect the screen i se damage HOW CANT FIX THAT WHITOUT LOST MA DATA ??? Thaks for anny hellp!!!!!
aliroberto01 -
Steps 12-15 seem to be not necessary for battery replacement. They are not required to remove and replace the battery and they at least DOUBLE the amount of work. Most of the time spent on this process involved working with those tiny screws and maneuvering them in place and screwing them down. Steps 12-15 are three of the five screws that you work with inside.
Also, there should be a note at the beginning of Step 2 that if you bought the iFixit kit that you should go directly to Step 6.
Bob Hatcher -
please wear safety helmet too, integral helmet and cover mouth with an N95 facemask underneath, just in case the battery punctures, explodes, you knock your head back to the wall and slam it back forward hitting the screw in your eye and and inhaling toxic fumes! can never be too careful ;-)
ibisiki -