Einleitung
Hier wird gezeigt, wie du die seitlichen Gummidämpfer an der Festplatte wieder einbauen kannst.
Werkzeuge
-
-
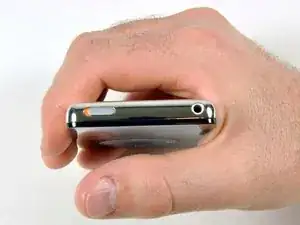
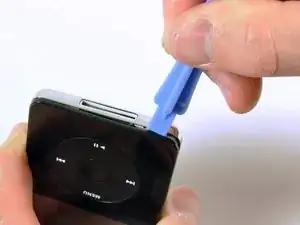
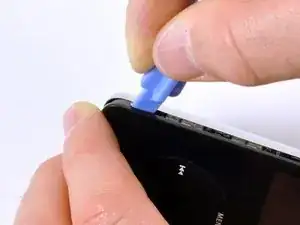
Öffne den ersten Halteclip auf der Unterseite des iPod mit dem iFixit Opening Tool. Die Erhebung des Werkzeugs sollte auf das Rückgehäuse aus Metall zeigen, um ein Verkratzen der Kunststofffront zu verhindern.
-
-
-
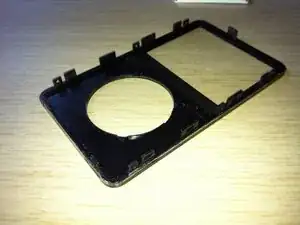
Benutze dieses Photo eines schon OFFENEN iPods als Vorlage. Es hilft dir, die Stellen zu finden, wo die Halterasten angebracht sind: vier an den Seiten, eine oben und zwei unten. So ersparst du für manche Frustration und vermeidest Kratzer in der Kunststoffabdeckung.
-
-
-
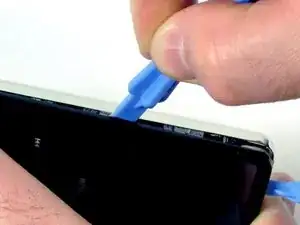
Setze das iPod-Öffnungswerkzeugvon an der linken Seite des iPod ein, die Kante des Werkzeuges zeigt dabei in Richtung der metallenen Rückseite.
-
Ein kleines Gitarrenplektrum kann beim Öffnen des iPods sehr nützlich sein. Setze ihn einfach ein und schiebe ihn um den iPod herum, das beschleunigt das Verfahren.
-
Vergrößere vorsichtig den entstandenen Spalt, indem du das iPod-Öffnungswerkzeug hin und her wackelst und nach links schiebst.
-
Fahre damit fort, bis die ganze linke Seite des iPods gelöst ist.
-
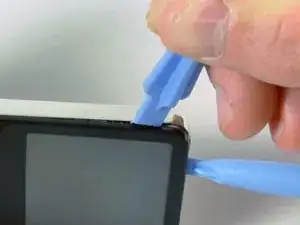
Du kannst das iPod-Öffnungswerkzeug rechts von der Hold-Taste einsetzen. Sei sehr vorsichtig beim Einsetzen des Werkzeuges, das Display ist sehr zerbrechlich.
-
-
-
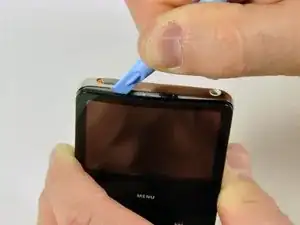
Lasse das iPod-Öffnungswerkzeug entlang der Oberkante des Displays gleiten, so dass dort die Rasten gelöst werden.
-
Jetzt sollte sich die andere Seite des iPods leicht lösen lassen. Wenn nicht, kannst du die rechte Seite des iPods mit dem iPod-Öffnungswerkzeug genau mit der gleichen Methode wie die linke Seite lösen.
-
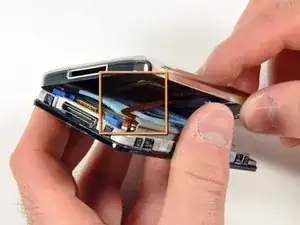
Trenne die Vorderseite des iPod etwa zwei Zentimeter weit von der Rückseite.
-
-
-
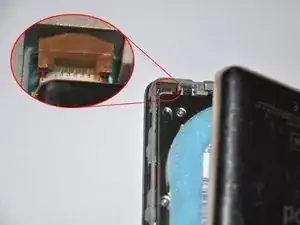
Schiebe den braunen Riegel am Verbinder mit einer gebogenen Pinzette oder einem iPod-Öffnungswerkzeug hoch. Er hält das orangene Flachbandkabel fest. Ziehe an beiden Seiten des Riegels. Der Riegel muss nur etwa 1 - 2 mm angehoben werden, damit das Kabel frei kommt. Ziehe ihn nicht weiter hoch, sonst kommt der weiße Verbinder mit heraus!
-
Entferne das Kabel vom Verbinder.
-
-
-
Es gibt jetzt noch ein orangenes Flachbandkabel, welches das Vorderteil mit dem Rückteil verbindet.
-
An dieser Stelle kannst du auch die blauen Gummidämpfer entfernen und austauschen, oder mit dem Trennen des Gehäuses fortfahren.
-
-
-
Hebe die Festplatte hoch, damit der Verbinder am Flachbandkabel zur Kopfhörerbuchse sichtbar wird (mit einem gelben Rechteck markiert).
-
-
-
Hebe die braune Lasche am Verbinder des Flachbandkabels zur Kopfhörerbuchse vorsichtig mit dem iPod-Öffnungswerkzeug hoch. Sie wird sich um 90° nach oben drehen und gibt so das Flachbandkabel frei.
-
Ziehe das Flachbandkabel zur Kopfhörerbuchse mit den Fingern heraus.
-
-
-
Klappe mit einem kleinen iPod-Öffnungswerkzeug das schwarze Scharnier hoch, welches das Flachbandkabel der Festplatte befestigt. Die Klappe dreht sich um 90° in Richtung des Logic Boards und gibt das Flachbandkabel frei.
-
Halte das Flachbandkabel mit dem Zeigefinger fest und löse die Festplatte vom Kabel.
-
-
-
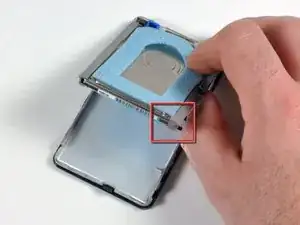
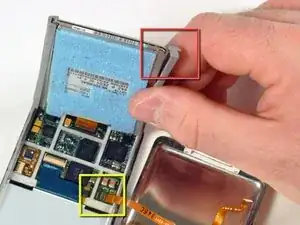
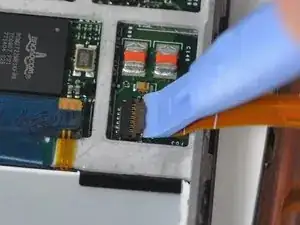
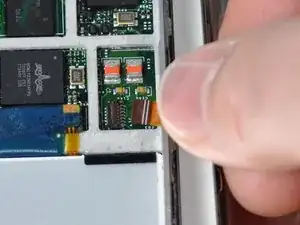
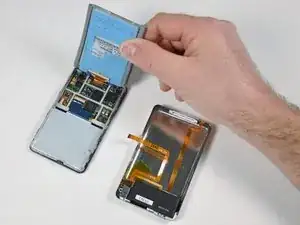
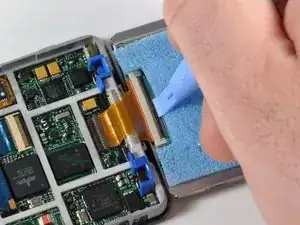
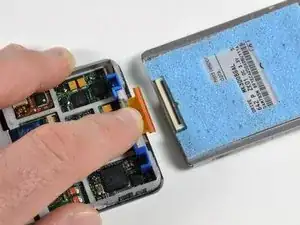
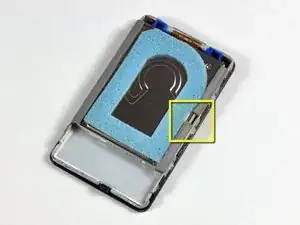
Die seitlichen Gummidämpfer an der Festplatte sollten wie gezeigt eingebaut werden:
-
Die Seite der Festplatte, welche von der Festplattenhalterung abgestürzt wird, sollte den Gummidämpfer mit der Seitenwand an der Ecke haben, so wie im roten Rechteck markiert.
-
Zwischen den beiden kleineren Gummidämpfern sollte ein kleiner Abstand sein, so wie im gelben Rechteck markiert.
-
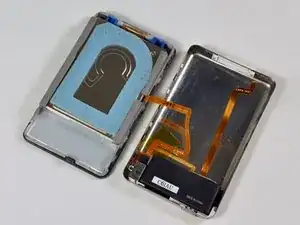
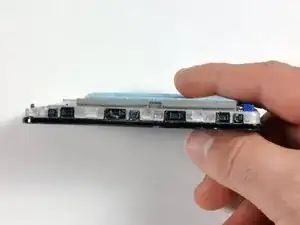
Beide Seiten der Festplatte sollten sehr eng sitzen, so wie im dritten Bild gezeigt.
-
Um dein Gerät wieder zusammenzusetzen, folge den Schritten in umgekehrter Reihenfolge.


Nice guide!
Miroslav Djuric -
One word of advice: My cousin opened his vid from the top and accidentally cracked his screen in half. I would suggest to start opening it from the bottom, near the dock connector.
Cyrus -
I too just cracked the screen in half by starting at the top. The screen is completely shot now. Got a guide for replacing screens? These things are hard to open. Be careful! Have someone hold it while you slowly pry it open.
wittweb -
I have a cracked screen, starting from the upper right corner. 1/3 ofthe screen is black. Can I fix it?
Phil
koby -
I just replaced a broken screen and battery tonight in my early ipod video 30g. I think you may have not got the audio cable back in correctly or you may need to replace the earphone connector. This site is great and just last week i used ifixit parts to fix my ibook dc in then tonight my ipod. Saved a ton of cash and the service is awesome.
spdmonkey -
ive just replaced my screen and its working fine, apart from when i switch it on it says i need to connect to itunes, when i do that it says that it needs resetting to factory settings, and when i do that it gets to the end then just says i need to reset it again???? any help please?
qwerty -
me too hav the same prob.. :D
nadhil muhammed -
very useful
jimixiaozi -
Replaced my screen that somehow cracked in my bag while it was under the seat in front of me on an airplane. 80GB 5.5g video.
The only thing I'll add is that when I first installed the new screen, I would get all kinds of weird artifacts after putting the case back together. It would be fine with the case open but as soon as pressure was applied it would turn white and go crazy. I looked at the old screen and saw a small white plastic sticker covering the electronics on the old screens ribbon cable, so I peeled it off and put it on the new screen's ribbon cable and everything went back together and worked perfectly. Placing pressure on these components must cause trouble and I guess the sticker disperses the pressure to prevent this. It's like new.
I was really bummed because I have Rockbox running on this thing and no ipods since the 5.5g will run it, and you can't buy those anymore without spending a fortune. Thank you ifixit.com.
gkmeyer -
i followed all the steps and fix it up by myself ~ haha THX~
swean -
hey, greg29 i have the same situation with my 5th gene iPOD, right now the display it's white and i want to know if you show where i need to put the white sticker or another kind of sticker because the old dispelay i throw it away...thanks,
hidi00z -
Just finished replacing my battery (30 gb video). Piece of cake! Great information. I would skip steps 7-9, and just replace battery. But I'm no expert....
Gino T -
I need a little help guys. I have an Ipod 30G video that I plugged into a car charger and now the screen is black with the apple logo. I thought it was the battery that was dead, but I replaced it using your guide(thanks!!) and it's still showing the same thing. Black screen with the apple logo. I tried charging it and it still doesn't do anything. Any ideas what it could be? Thanks.
jer -
Replaced battery and screen on 30GB video ipod in 90 minutes. In the first 5 minutes the fine tip broke off the removal tool. Later I discovered why....I was prying the front cover off instead of separarting the back cover from the rest of the unit. The front cover tabs are right next to the back cover tabs so be sure you are getting the right one. If done properly I would have saved 30 minutes. I also broke several front cover tabs during removal so good thing I was replacing front cover too! The new front cover did not match up well with the old tabs. I agree with skipping steps 7 - 9 to release the headphone ribbon. I yanked the unit around pretty good getting the front cover back on and no trouble with the headphones. The removal tools were no match for the tape on the back of battery, instead get a very small standard screwdriver to get the battery loose. Trickiest part is the little tab that holds the battery ribbon; when you are putting it back together just push straight down nice and easy with the tip of the small tool and she locks right back in place. The wife had given up on this iPod and get a new 8 GB nano for Christmas...I inherited this one and am quite pleased for $30! iTunes did not pop up when I hooked it to the USB to charge, so I that I will go now and see if there is problem there. Terrific site, thanks for the help.
Jeff -
I have exactly the same problem, though I was replacing the headphone jack instead. Nothing appears to be loose and I didn't open the front panel at all.
benthuronyi -
well the cables aren't too bad, and you don't want to accidentally tear one of the cables when sliding in the new display-- i'd recommend disconnecting the hard drive, battery and headphone jack before attempting to remove the screen.
iTronics Repair -
BRILLIANT instructions!
I got software problem after installing new Logic Board. iTunes keeps asking me to restore - I do, but it make no difference. Still can't synch. Anyone else have this problem?
jingofafa -
terry cynright -
Yes, when I replaced my screen, the click wheel no longer works except I can hold the select & menu buttons and rest my i-pod all day long. that is the only part of the click wheel that now works. Anyone can help all 3 of us out?
dragonlore -
I found out the problem: I used the wrong Logic Board! I have a 5th Gen. 80GB model and needed the 820-1975-A board (instead I installed the 820-1763-A board, which apparently only works for 30 and 60 GB models).
I wish I'd read this sooner: upgrading hard drive from 30 GB to 80 GB
jingofafa -
I've just replaced the my battery too (30 GB Video). Though it was quite challenging to opening the iPod, it all went smoothly after that; except from a small incident when the small tool broke when attempting to remove the battery from the iPod back. I used the big one instead and it went all fine. I also skipped steps 7-9)
CAUTION: when removing the battery from the iPod back panel, watch-out not to damage the "hold button cable" . The cable is right below the battery, and might be glued to it.
I've connected the iPod to iTunes and everything is reacting fine. My iPod is recharging right now on its cradle :-)
Total handling time: 45 min max.
Thanks to everyone for the tips. Great web site!
gioverking -
I'd check that the control cable is correctly seated in its ZIF socket. And that the hold switch is not on.
Yishai Sered -
It is a nice guide. I happened to have access to a #000 Phillips which I thought worked a little better than a #00. What do you think?
pricemccarty -
just tryed to replace battery in my i pod but didnt work had to put old battery back in the cable seems to be backwards to the oiginal one now what
saxconstruction -
Have you tried flipping the battery over?
eggs -
very informative
Mike Chang -
If a simple diagram of the retaining clips and their locations on the device might be helpful.
RJones -
The first step was the most difficult for me, as I nearly destroyed the wide opening tool sold by ifixit in the process... after wedging it slightly open, I then grabbed a screwdriver and pulled apart the rest of the iPod. On second thought if I remembered, the putty knife sold here would also help at the very beginning.
Thanks ifixit!
Raj Seshadri -
Excellent instructions! One suggestion was made to start at the bottom. The first step does show the tool used to start opening at the bottom; so, starting at the top contradicts the first step anyway. Am currently repairing a friends MBP, so have learned a lot about Apple's micro-technology. Patience is certainly a virtue here! : ) Thank you, iFixIt!! Jim W, Panama City, FL
Jim -
This was a workout! This took me 75+ min.
Very hard to open. Needed butter knife to work the crack begun by iPod opening tool (aka myFinger opening tool when it slips); would take forever with only the tool. Hard to sense when retaining clips release. Please use screws, Apple!
Step 6: Really tricky to slide up the tiny brown connector latch without popping off either it or the tiny white logic board connector. So delicate! I popped off both. Argh! By God's grace, nothing broke, and I got it all back together.
Steps 7-9: Skipped, and glad I did, given #6; just be careful not to over-twist ribbon cable joining case & face..
Step 10: Don't pry out battery looking from same angle as in photo; turn 180 degrees so you can see what's under battery, where to pry or not. I pried with small screwdriver; plastic tool is wrong shape. Apply leverage sensitively; peel headphone ribbon cable off adhesive as you go … slowly. I left some paper on adhesive so cable wouldn't adhere again.
But success. Thanks, iFixit.
rmccord23 -
I was doing great until I pulled the battery connector off the board. I guess that's game over. Darn! I'm really just trying to rescue someone's music. Does anyone know if there's a way to connect the hard drive to a Mac and access the contents without a functional iPod?
Mike Rosenberg -
Well, I found external USB cases on Amazon and eBay for the 1.8" ZIF hard drive, so I know it's possible to use the iPod's drive as an external drive. I just don't know whether it's formatted in a way I can access the music.
Mike Rosenberg -
Hello,
I think it’s easier if you open it by a side. It took me less than 20s, and from the bottom i can’t.
aurelien.engerer -