Einleitung

Diese Anleitung wurde von iFixit-Mitarbeiter:innen verfasst und ist keine offizielle Reparaturanleitung von Google. Hier erfährst du mehr über unsere Qualitätsstandards.

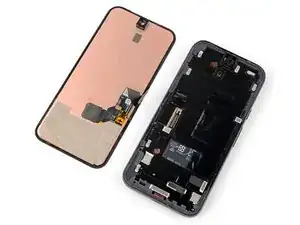
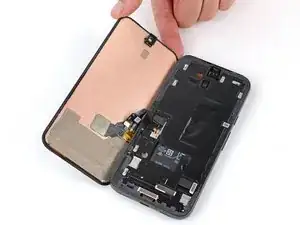
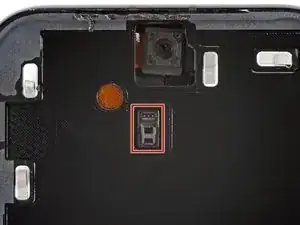
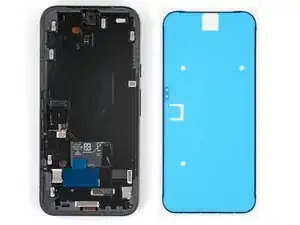
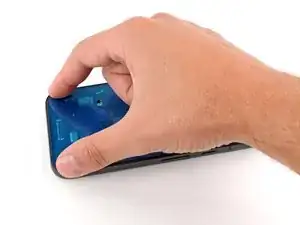
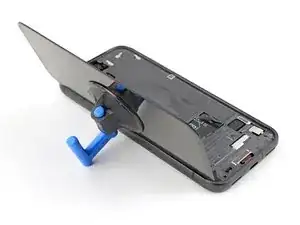
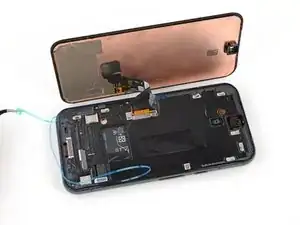
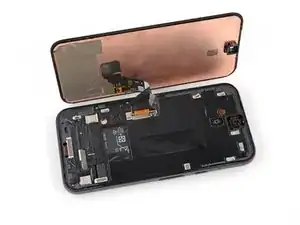
Diese Anleitung zeigt, wie du ein defektes Display am Google Pixel 8a austauschen kannst.

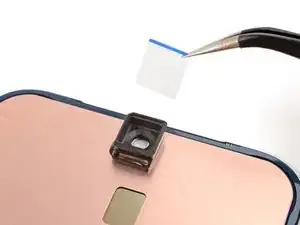
Folge dieser Anleitung, um den Fingerabdrucksensor zu kalibrieren. Original Google Ersatzdisplays sind mit bereits eingebautem Fingerabdrucksensor ausgestattet. Wenn dies bei deinem Ersatzdisplay nicht der Fall ist, musst du den alten Fingerabdrucksensor übertragen und neu kalibrieren, damit er richtig funktioniert.

"Du benötigst Display-Ersatzklebestreifen, um diese Reparatur abzuschließen"

Beachte: Bei jeder Reparatur kann dein Handy die Wasserdichtigkeit verlieren. Ob dein Handy nach einer Reparatur noch wasserdicht ist, hängt davon ab, wie gut der Klebstoff der Rückabdeckung angebracht ist.

  1. 3JEVETmFcPY3bGJu
    3JEVETmFcPY3bGJu
    GvrKPSHTYM5FRY5W
    eviZ1n3shxbBWsf1
    • Entleere deinen Akku auf unter 25%, bevor du startest. Ein voller Akku könnte sich bei Beschädigung entzünden.

    • Stecke alle angeschlossenen Kabel ab.

    • Schalte das Smartphone ganz aus.

    • Drücke die Einschalt- und die Lautstärke(+)-Taste gleichzeitig, um das Menü zum Herunterfahren aufzurufen.

    Mein Bildschirm ist schwarz - das Smartphone reagiert jedoch. Wie kann ich es ausschalten wenn ich kein Bild nicht sehe?

    Ulises -

    Press the power and volume up button, and imagine where the power off button will be on the screen. Touch area and wait a couple of minutes. Then call or text your phone to see it any notifications or ringing would indicate eithers it's on or off. You can also try to use find my device from the web to see if you can ping or find the phone if it's on you will find it, if off it will not ring.

    Dave Hom -

    My phone is cracked to the point where no image is shown, nor is touch registered. How can I safely power off the phone before replacing the screen?

    Jayden Hua -

    Let it run out of battery, then change your screen. Plug the phone back onto the charger at the point where you need to confirm your repair before sealing it with adhesive.

    Dave Hom -

    I kept turning on the phone as I slowly destroyed the screen removing it. Holding the power, volume up and volume down all at the same time for 30 secs turns the phone off without needing to do anything else.

    THOMAS P -

    This works! Thank you very much

    Drfox -

  2. 6H2eqZryrrINW2YW
    6H2eqZryrrINW2YW
    HXkIkGLRDnqqAqND
    • Glasscherben können die Demontage erschweren oder sogar zu Verletzungen führen. Wenn dein Display zerbrochen ist, folge diesen Schritten:

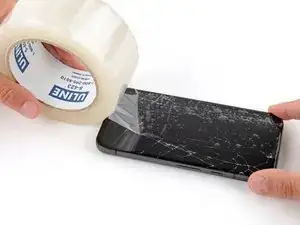
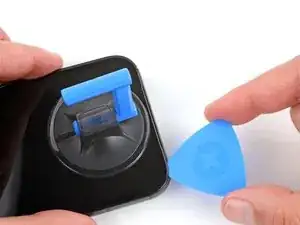
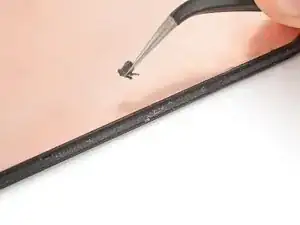
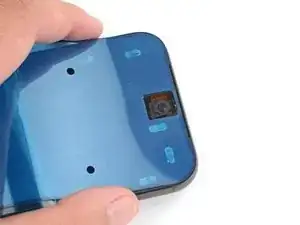
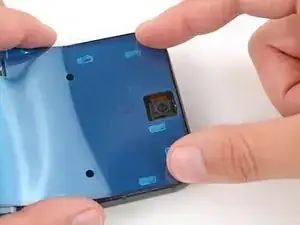
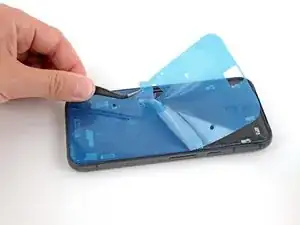
    • Klebe überlappende Streifen Paketband auf die zerbrochene Glasscheibe, bis sie komplett überdeckt ist. Dadurch kann der Saugheber besser an der Scheibe haften.

    • Überklebe nur das Glas, nicht den Rahmen.

    • Schütze deine Augen während der Reparatur mit einer Schutzbrille vor umherfliegenden Glassplittern.

    If the glass is broken, the suction cup will not adhere.

    Justin Santa Barbara -

    The tape is really important if your glass is thoroughly broken. Try to get the tape right up to the edge of the screen. You end up prying off bits of glass with your fingers and the tools provided. Safety glasses also definitely a good idea.

    Calvin M -

  3. UFDhRLepKraDAHhk
    • Das Display ist stark mit dem Rahmen verklebt. Es gibt keine Clips und es wiedersteht Verformungen. Um den Kleber darunter aufzuweichen, musst du es gut erwärmen.

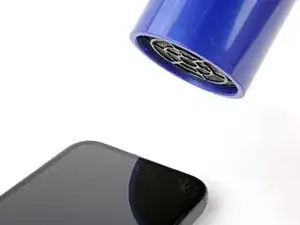
    • Erwärme die Oberkante des Displays mit einem Fön, einem Heißluftgebläse oder einer Heizplatte, bis sie so heiß ist, dass du sie kaum noch anfassen kannst.

    • Achte darauf, dass das Display nicht zu heiß wird, der Akku und die Kunststoffteile sind sehr hitzeempfindlich. Erwärme nicht weiter, wenn der Rahmen so heiß ist, dass du ihn nicht mehr anfassen kannst.

    You will need to heat all sides to do this without cracking the screen to bits... Ask me how I know? :(

    Timothy J Cooper -

  4. lgDdGqHpvAiJxDBx
    lgDdGqHpvAiJxDBx
    2AqdE3Apvick2MYH
    • Bringe einen Saugheber mittig am oberen Displayrand an.

  5. wfPbZYVnBaJCWloe
    wfPbZYVnBaJCWloe
    nP2kbv4HTufgmsdS
    wbidP6mtGt3MXXCn
    • Es ist ziemlich schwierig, ein geeignetes Werkzeug unter das Display einzusetzen. Sei geduldig und wenn du merkst, dass sich das Display nicht mehr bewegen lässt, dann erwärme es nochmals.

    • Setze das Werkzeug nicht tiefer als 2 mm ein, du könntest sonst die Frontkamera beschädigen.

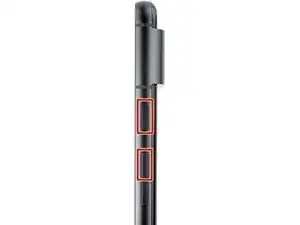
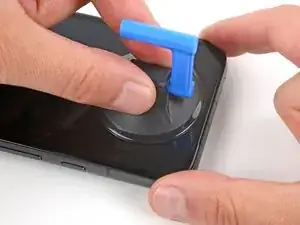
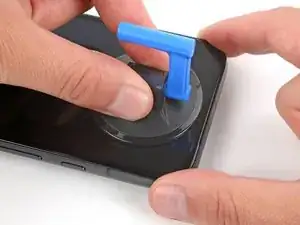
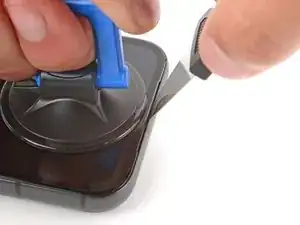
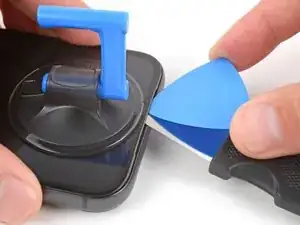
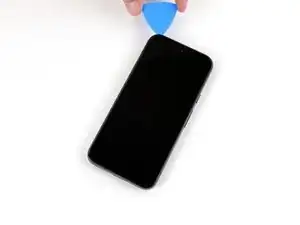
    • Setze die Spitze eines Jimmys in die linke Seite am Ausschnitt für den Ohrhörer-Lautsprecher ein.

    • Wenn du keinen Jimmy hast, kannst du auch ein anderes Metallwerkzeug benutzen. Es muss steif und dünn sein.

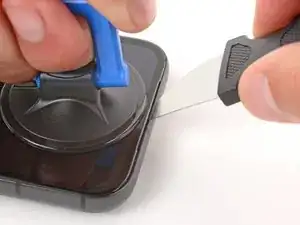
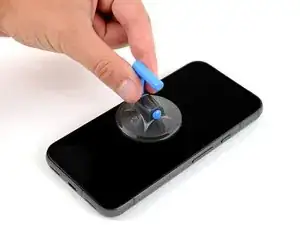
    • Ziehe den Saugheber fest und gleichmäßig nach oben.

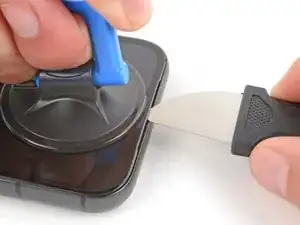
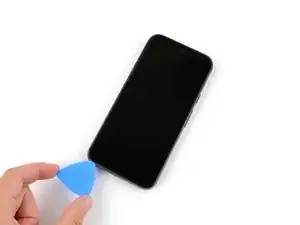
    • Drücke den Jimmy fest in den Ausschnitt und kippe ihn nach unten, bis er unter das Glas rutscht.

    Prying the screen with a metal tool can scratch or slightly dent the aluminum frame. Before placing a new screen, make sure to check the points of contact and fix any imperfections. A metal tool, like the Jimmy or a similar one, can easily be used to fix these dents.

    Sergii Iakymov -

  6. DJWsCfXUuKLQLiOS
    DJWsCfXUuKLQLiOS
    BKaGXuyLqvDdVsSn
    LBw3JLtNhhMVNVdL
    • Setze ein Plektrum mit der Spitze unter das Glas ein und entferne den Jimmy.

    My screen had a spider-web crack that reached all the way to the camera. When I inserted the Jimmy, it cracked even further and pieces broke off, stopping me from getting the opening pick in. I had to use tweezers to remove the loose shards of glass that had separated from the layer underneath. Taking the glass off in one piece was impossible; I took great care not to damage anything below, especially near the connector, but the only option was to remove it bit by bit. Apart from that, all the other steps were very straightforward to follow. All things considered, I think the guide falls short here, removing a display that’s still intact is certainly much easier.

    Fulvio Rivetti -

    Definitely really challenging when your screen is broken. Suction cup and pick are not going to work. I found that once I pull off the bigger pieces, running the really fine tweezers along the edge was the most efficient way of getting the last bits of glass.

    Calvin M -

  7. dR44AxL1sP5odSLT
    dR44AxL1sP5odSLT
    2TlSQOxNVvKaxkLy
    vHaA6BSFt4AJBkup
    • Setze das Plektrum nicht tiefer als 2 mm ein, du könntest sonst die Frontkamera beschädigen.

    • Schiebe das Plektrum an der Oberkante hin und her um den Kleber aufzutrennen.

  8. KXLcF5eItHoLgsdt
    KXLcF5eItHoLgsdt
    EqqL2nRPgmsRpTCd
    rqUbTRKyo1FZLGhi
    • Setze das Plektrum nicht tiefer als 3 mm ein, du könntest sonst Bauteile im Inneren beschädigen.

    • Als optische Hilfe kannst du 3 mm von der Spitze entfernt mit einem Permanentmarker eine Markierung am Plektrum anbringen.

    • Schiebe das Plektrum rund um das Smartphone herum, um den restlichen Kleber aufzutrennen.

    Könnt ihr am Plektrum abschnitte für die Millimeter direkt draufdrucken?

    Lukas Schmidt -

    Hier wurde einen Schritt vergessen. Es gibt noch Klebstoff unten mittig unter der Bildschirm. Diese muss auch vorsichtig abgemacht werden. Mein Bildschirm hat sich delaminiert beim Abbau.

    dsavio93 -

    Die hier beschriebene Variante funktioniert aber nur, wenn dass Display wenig gerissen ist. bei mir waren die Ränder kleinteilig zerbröselt, so dass ich rundherum mit einem kleinen Spachtel die Displayreste entfernen musste.

    Detlef Mücher -

  9. EM5IfZVe6XUpuG4a
    EM5IfZVe6XUpuG4a
    BhEKOpUvQX56E3nA
    hCuKU52FMKLYNfQ3
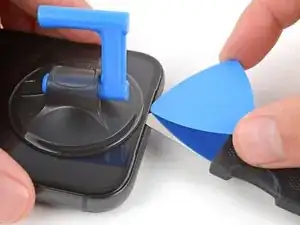
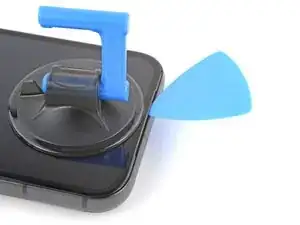
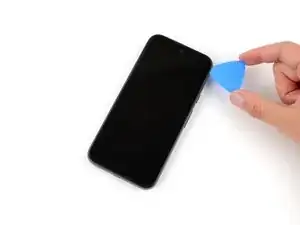
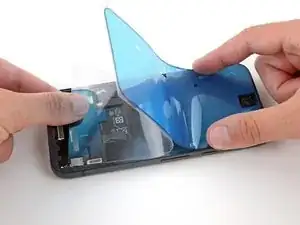
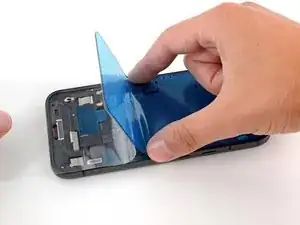
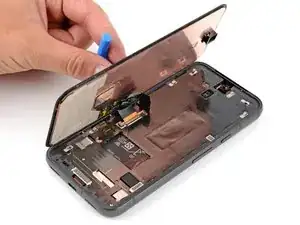
    • Klappe das Display von der rechten Kante her wie ein Buch auf und lege es über der linken Seitenkante ab.

    • Achte darauf, dass das Displaykabel nicht zu stark angespannt wird.

  10. bDTteNodmf1WrfLB
    bDTteNodmf1WrfLB
    TLbpKxeB4loJcPsE
    • Klappe die Lasche der Graphitfolie vom Displaystecker weg.

  11. sPtZcr3YHgb4ORhV
    sPtZcr3YHgb4ORhV
    uuN52HkFrkTfPKYs
    2Z1SgRLmbPRmYjUi
    • Halte eine Hand über die Halterung des Displaykabels, wenn du sie hochhebelst. Die Halterung kann leicht davonspringen.

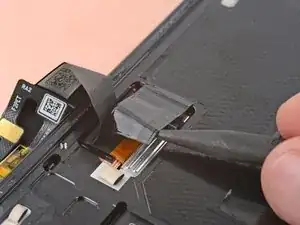
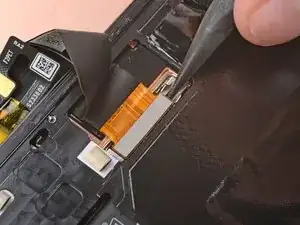
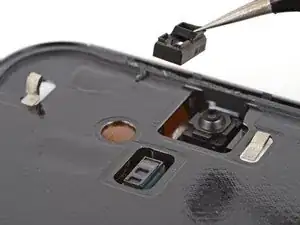
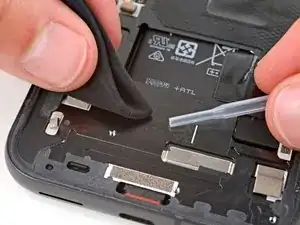
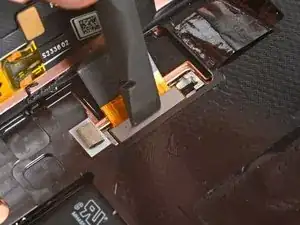
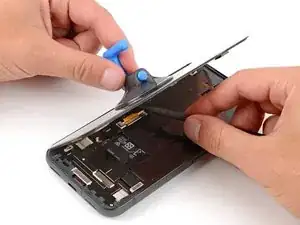
    • Heble die Oberkante der Halterung des Displaykabels mit einer der Spitzen einer gewinkelten Pinzette nach oben von der Mitte des Logic Boards weg.

    • Sei sehr vorsichtig, um die Platine unter dem Anschluss der Halterung nicht zu beschädigen. Setze die Pinzette nur soweit unter die Halterung ein, dass du sie als Hebel benutzen kannst.

    • Entferne die Halterung.

    Very hard to do this operation with the angled tweezers because they bend and do not really pry the bracket. Way easier to do so with a #1 flat screwdriver.

    Sergii Iakymov -

    Agreed with @sergiiiakymov

    Gregg R -

  12. 6hnAFMZnZgXcQyvw
    6hnAFMZnZgXcQyvw
    Ndn2ZCgfJW3l4wMD
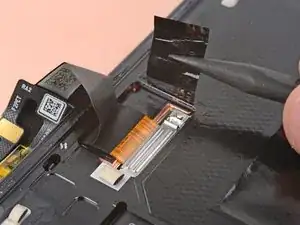
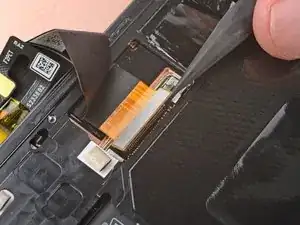
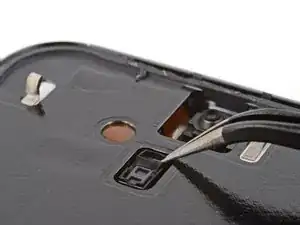
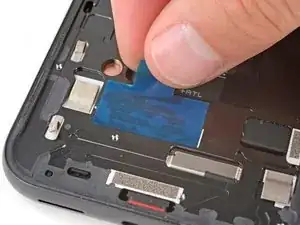
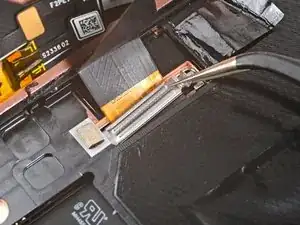
    • Setze einen Spudger mit der Spitze oder deinen Fingernagel unter die Oberkante am Druckstecker des Displaykabels, heble gerade nach oben und trenne ihn ab.

    • Um einen Druckstecker wieder zu verbinden, richte ihn über seinem Anschluss aus und drücke ihn auf einer Seite nach unten, bis er einrastet. Drücke ihn dann auf der anderen Seite herunter. Wahrscheinlich brauchst du einige Versuche, bis es klappt.

  13. GiNXJbCRW3IFMxFY
    GiNXJbCRW3IFMxFY
    55CB6e2D5n1TEKW4
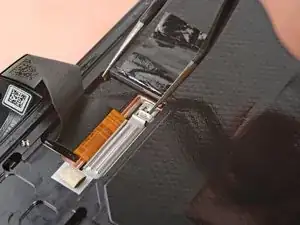
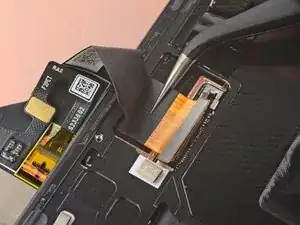
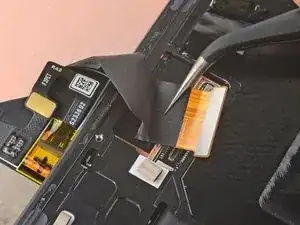
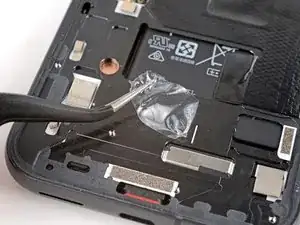
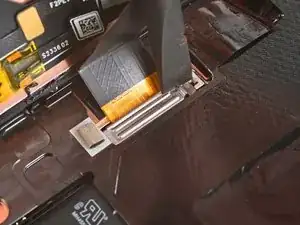
    • Ziehe das Displaykabel mit einer Pinzette oder deinen Fingern unter der Leiste an der Kante des Rahmens hervor.

  14. ATi5GQIvYO4VudPg
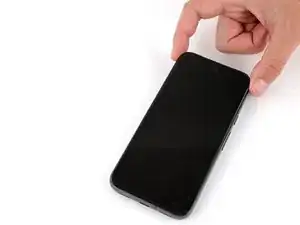
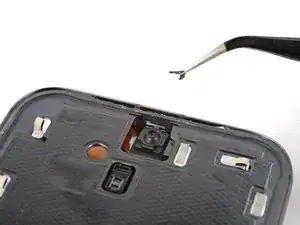
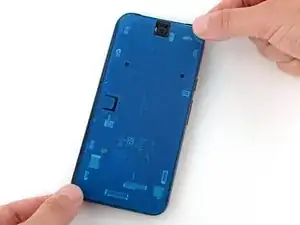
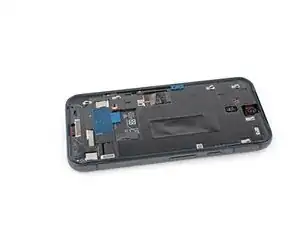
    • Entferne das Display.

    • Die Rückseite des Displays ist sehr empfindlich. Sie kann selbst durch kleinste Kratzer oder eine winzige Macke beschädigt werden.

    • Damit das Display nicht beschädigt wird:

    • Fasse das Display nur an den Kanten an.

    • Wenn du das Display auf die Arbeitsfläche ablegst, achte darauf, dass kein Fremdkörper die Rückseite berührt. Am besten legst du das Display auf ein sauberes, weiches und fusselfreies Tuch.

    How do you transfer the fingerprint sensor?

    Megabear4life -

  15. OqeSuNCAttTjlQkD
    OqeSuNCAttTjlQkD
    KHxx4ZdZo1ZNY3iZ
    mPcUbdAXpNxZ6GOJ
    • In den restlichen Schritten siehst du, wie das Ersatzdisplay eingebaut wird.

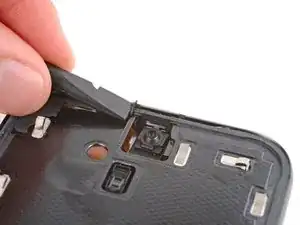
    • Achte darauf, dass die Frontsensor-Dichtung (direkt unter der Frontkamera) richtig sitzt und um den Sensor dicht abschließt.

    • Wenn dies nicht der Fall ist, setze sie nochmals neu über dem Frontsensor an. Der kleinere Ausschnitt muss nach oben zeigen.

  16. wNeGjhwquuocVaWA
    wNeGjhwquuocVaWA
    hCffmtYCUnnsL2xL
    • Die Unterseite des Akkus liegt durch einen kleinen Ausschnitt im Rahmen frei. Sei vorsichtig und beschädige ihn nicht mit deinem Werkzeug.

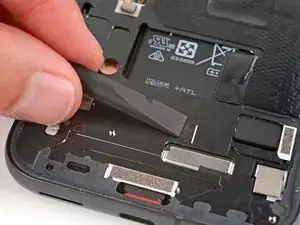
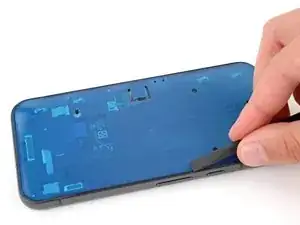
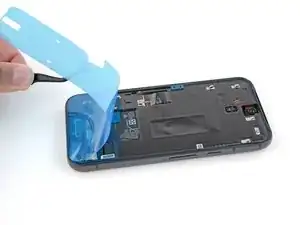
    • Schabe alle Kleberreste mit einer Pinzette und einem Spudger unterhalb des Ausschnitts für den Akku ab.

  17. xeu1Nrn6XjeyShqW
    xeu1Nrn6XjeyShqW
    6mQfdyFnNXWTtIQp
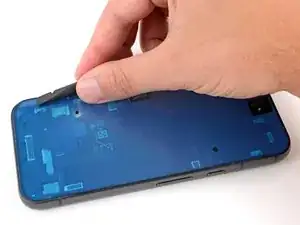
    • Wenn noch kleinere Reststücke vom Kleber am Rand des Rahmens verblieben sind, dann schabe sie mit einer Pinzette und einem Spudger ab.

  18. OSCnsiGrwYaVDKbA
    OSCnsiGrwYaVDKbA
    3PKPKrOoVaPGTs5X
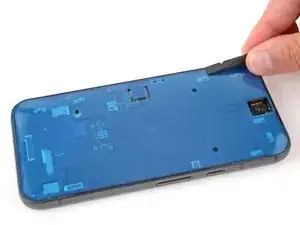
    • Wenn du das alte Display wieder einbauen willst, dann schabe auch hier alle Reste vom Kleber mit einer Pinzette und einem Spudger vom Rand ab.

  19. 4DuqkpXGOKXFMudI
    4DuqkpXGOKXFMudI
    e12mGr31DreoGxyU
    • Nimm eine Spritze oder eine Pipette und tröpfle etwas hochkonzentrierten Isopropylalkohol (mindestens 90%ig) auf den Rand des Rahmens und den Bereich unterhalb des Ausschnitts für den Akku.

    • Wische den Überschuss mit einem fusselfreien Tuch oder einem Mikrofasertuch weg.

    no 90% isopropyl included in kit?

    Venn -

  20. miEWpNYMdHn61IuO
    miEWpNYMdHn61IuO
    KrGIt3TNAthHLl6D
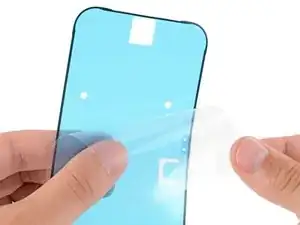
    • Löse das rechteckige Stück der Displayschutzfolie von der großen Schutzfolie ab.

    • Klebe den Klebestreifen am Rahmen an der gleichen Stelle fest, wo er vorher auch schon war, direkt unterhalb des Ausschnitts für den Akku.

    • Orientiere dich an der weißen Linie am Rahmen, um ihn exakt auszurichten.

    • Drücke die Klebefolie mit den Fingern nach unten am Rahmen fest. Entferne die obere Schutzfolie noch nicht.

    I bought a screen only as I had to replace a second time. This adhesive was not included in my delivery.

    Uwe Wolfram -

    Same as Uwe's comment. iFixit don't supply this when you buy a replacement screen. There must be some fineprint somewhere stating this, but it's not obvious, which is silly.

    David Loader -

    Same here... Quite frustrating.

    Gabriel Sikorowski -

    Same as everyone else here, ya think it'd have the adhesive already on the screen? For it being a genuine Google replacement part, it should have the adhesive on it already! I don't have time to order the adhesive and wait additional time. Need my phone!

    Jordan Petrone -

    Edit: The adhesive is already on the screen; just have to remove the protective sheet. I was looking for a large rectangular adhesive sheet as shown in the photos, but that's not here. However, there is adhesive on the screen, and the lack of the large rectangular adhesive sheet caused confusion.

    Jordan Petrone -

    Mine came with the rectangular adhesive AND the pre-adhered adhesive on the screen. Just had to remove the blue pieces of plastic and attach.

    I was removing my adhesive around the screen after I had already attached the screen cable so I had to cut the plastic border piece to fully remove it.

    Gregg R -

  21. Wgl3NPlpNYkKxjdY
    Wgl3NPlpNYkKxjdY
    gDkOS6YgpkCKXGOM
    • Wenn an deinem Ersatzdisplay bereits Klebestreifen angebracht sind, dann entferne die Schutzfolien und setze den Zusammenbau sechs Schritte weiter unten fort.

    • Bevor du irgendwelche Schutzfolien vom Displayklebefolie abziehst, halte sie passend über den Rahmen, damit du weißt, dass sie richtig ausgerichtet ist. Orientiere dich am Kameraausschnitt und an der Oberkante.

    • Die blaue Schutzfolie muss oben liegen, die durchsichtige große Schutzfolie ist auf der Unterseite.

    It's probably just me, but the large blue sheet looks very similar to other blue protective sheets covering the adhesive. I think it should be stated earlier that it is only the black edge which is the adhesive.

    Or remove these steps into a link and make the newer screens with adhesive the main instruction

    David Loader -

    I'd highly recommend NOT removing the adhesive protector until you're absolutely ready to put the screen on. Its a pain to get the suction cup on with the adhesive exposed.

    Gregg R -

  22. efbM1o5oJtVSjxyS
    • Ziehe die obere Hälfte der großen Schutzfolie (nahe beim Kameraausschnitt) nach unten, so dass die Klebeschicht frei liegt. Entferne die Schutzfolie aber noch nicht ganz.

  23. MyxNKVA4cIqXyBDc
    MyxNKVA4cIqXyBDc
    lLbuGSlTkaZCpkMh
    SQ3FIsZpMVkeXPmF
    • Lasse dir beim Ausrichten der Klebefolie am Rahmen viel Zeit, sie ist sehr klebrig und kann nicht mehr neu ausgerichtet werden, wenn sie einmal befestigt ist.

    • Halte die größere Schutzfolie bei diesem Vorgang zur Unterseite des Smartphones hin gefaltet.

    • Lege die freigelegte Oberkante der Klebeschicht auf den Rahmen, wobei du dich an der Kante orientierst.

    • Wenn die Oberkante richtig sitzt, drücke sie gut fest.

  24. RTt1krEeqynHliLm
    RTt1krEeqynHliLm
    inklAPixN6gAtAet
    1io1kDmVmbUPnGse
    • Lege die restliche Klebefolie langsam auf dem Rahmen ab und löse dabei die große Schutzfolie ab.

  25. 6NNdUPntcIe3pYBp
    6NNdUPntcIe3pYBp
    GvAGX4TFgZNLDXkL
    5ar1Mj1QtBAyHyKq
    • Drücke den Kleber um den Rand herum mit dem flachen Ende des Spudgers fest, so dass er gut am Rahmen haftet.

  26. VOST4m4FiD2wiIup
    VOST4m4FiD2wiIup
    Xesgqb2Z1mu2CWS2
    DLPMYWtnYOPorE4g
    • Fasse die Zuglasche in der Mitte am linken Rand, ziehe langsam die Schutzfolie ab und entferne sie.

    • Wenn sich die Klebeschicht zusammen mit der Schutzfolie ablöst, dann kontrolliere, ob du sie mit dem Spudger komplett an ihren Platz gedrückt hast. Wenn sie sich trotzdem ablöst, dann halte sie jeweils mit der Spudgerspitze fest nach unten.

  27. vVWF4Gl1WluL5vmh
    vVWF4Gl1WluL5vmh
    KU5sHMWY2ukdXVxO
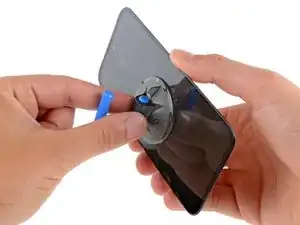
    • Bringe einen Saugheber an der linken Seite des Ersatzdisplays an, wobei der Griff nach links zeigt.

    • Stütze das Display an der linken Seite des Rahmens auf.

    • Wenn du keinen Saugheber hast, dann stütze das Display an einem stabilen Gegenstand ab, z.B. einem dicken Buch oder einer schweren Schachtel.

    I found that resting the edge of the new screen on the table surface made the cable closer to the right place so you don't have to pull on it quite so much.

    Calvin M -

  28. BfX1fuXCAkuXWwGy
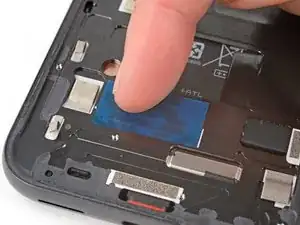
    • Richte den Stecker des Displaykabels über seinem Anschluss aus, drücke ihn auf einer Seite nach unten, bis er einrastet. Drücke ihn dann komplett herunter, so dass er wieder verbunden ist.

    My screen shows the google animation bootup in very tinted yellow and dim/dark. Then the time appears for less than a second and the screen goes completely black. Did I get a defective part?

    John -

    Hi, I hope somebody will be able to give some help. My screen wouldnt turn on after insterting my new screen connector, can anyone give me some advice on where i went wrong?

    Jimmy Lau -

    It really should be stressed here to be extremely careful!

    There is almost no feedback through your fingers or tools whether the cable is in the correct position before pressing down.

    100% this was the hardest/nerve-wracking part of the job

    David Loader -

    I can feel the click on what I believe is the alignment of the connector but unfortunately my screen won't cut on and show anything to me 😭

    Kayla C -

    I too have the same problem. My new screen won't light up at all. The previous screen at least used to show some flickering. It was not cracked. My phone has water damage. I wanted to switch the old screen back but now I cannot as there is no way to turn off the phone. The new screen is not working and since I had to recharge the battery a little bit to test it, I now again have to wait for the battery to drain and the phone to auto-shut.

    Abhijeet D -

    I was working on a phone for a friend. After a lot of frustration over the phone not powering on I remembered they had completely drained the battery. I plugged it in long enough to see that it worked then unplugged/powered it off again until screen install was complete. Something to consider.

    Anita Peters -

    My replacement screen came with a rectangle of masking tape on the connector. It's hard to get a proper view of the connector position with that in the way so took it off.

    Stephen H -

  29. yG2YeunlyCs6AFII
    yG2YeunlyCs6AFII
    bofc1KdQ2mQA1MQQ
    • Hake die Unterkante der Halterung in ihren Schlitz auf dem Logic Board ein und drücke sie oben fest herunter, so dass die Halterung an ihren Platz einrastet.

    • Wenn deine Display-Kabelhalterung verbogen ist oder nicht passt, ersetze sie durch eine neue.

    The position of the bracket in the last pic is interesting looking left and high on the bracket but maybe it's it's hovering not touching. In any case I avoided touching the latching end of the bracket and pushed high between the two ridges. It took more force than I liked to get a click. Because of the pic I then tried pushing high to the left of the ridges, and surprise, I got another click (bracket must have gone in crooked).

    Stephen H -

  30. QgonXJLoXrKNFDBf
    • Wenn sich Schutzfolien über der Fassung der Frontkamera an der Oberkante des Displays befinden, dann ziehe sie ab.

  31. yrDyAWl5wvPMxOUm
    yrDyAWl5wvPMxOUm
    FEWgPtUJsBkwhjAq
    ScKC4ICKoZEoseCq
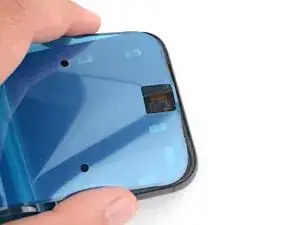
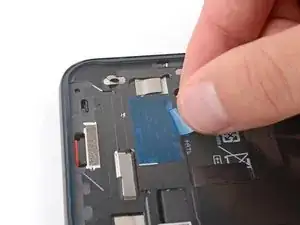
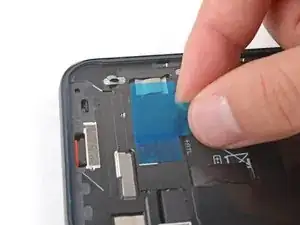
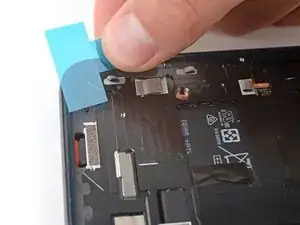
    • Löse die blaue Schutzfolie des quadratischen Aufklebers auf dem Rahmen direkt unter dem Ausschnitt für den Akku ab.

    I tried turning on the phone before removing any liners. Just positioned the display loosely on the frame and pushed the power button. After startup turned off by pressing power and volume up buttons and tapping power off on the display.

    Stephen H -

  32. 3ynwQTKDfNwMPKhv
    3ynwQTKDfNwMPKhv
    TlSYZAKg3lIyrwdH
    OYOqjgIDdpyZgOfg
    • Fasse die Zuglaschen der letzten Schutzfolie an der linken Kante und ziehe sie ab.

    This is the part that confused me the most. On a replacement screen the adhesive is pre installed and the very narrow blue perimeter adhesive liner is removed from the screen, not the frame.

    Stephen H -

  33. WQRO5EZMGHyoSxN1
    WQRO5EZMGHyoSxN1
    htLZ5EZDlBQU3XRl
    kZOeNQTWZKex2aZX
    • Halte das Display mit dem Saugheber direkt über den Rahmen.

    • Falte die Lasche an der Graphitfolie mit dem Spudger über das Displaykabel.

    • Drücke das Display an seinen Platz fest.

  34. eaOayGFpiRHAhmXP
    eaOayGFpiRHAhmXP
    uknqACTEUWnMeJHY
    PXQ3Oqv2f4jxpPQQ
    • Entferne den Saugheber.

    • Damit der Kleber besser haftet, erwärme das Display mit einem iOpener, einem Fön, einem Heißluftgebläse oder einer Heizplatte, bevor du den Rand festdrückst.

    • Drücke den Displayrand rundum gut fest, damit er gut am Rahmen haftet.

    Sehr gut zu nutzende Anleitung. Vielen Dank.

    Nur die anschließende Aktivierung des Fingerabdrucksensors war etwas hakelig.

    Detlef Mücher -

    Ich möchte mich auch noch einmal bedanken, für die nützliche Anleitung und auch den hilfreichen Kommentaren. Bei mir hat alles super funktioniert.

    Benno Schwarz -

Abschluss

Verwende Googles Pixel Update and Software Repair tool, um den Fingerabdrucksensor zu kalibrieren.

Um einen Diagnosetest mit dem vorinstallierten Pixel Diagnosetool zu starten, klicke hier.

Entsorge deinen Elektromüll sachgerecht.

Hat die Reparatur nicht ganz geklappt? Versuche es mit ein paar grundständigen Lösungen, ansonsten findest du in unserem Forum Hilfe bei der Fehlersuche.

Spencer Day

Mitglied seit: 14/09/22

170306 Reputation

29 Kommentare

so where is the replacement screens??

lsdfkgjlsdfjkl -

You can purchase a new screen from iFixit here.

Spencer Day -

Great step by step guide, it took a little time but was well worth it with my busted screen!

Kabel -

I think my screen was defective. It shows the boot up animation extremely yellowed out and dim/dark. Then it shows my lockscreen with the time for less than a second and goes complete black. I can still make my phone vibrate with the buttons, and do a reset to get the boot up animation again. It's just so frustrating because I really needed this to work and did so much of the hard work to get to the final steps, to find out... that the replacement screen is defective!!!!

John -

Hi John. I'm sorry to hear you're having issues with the replacement screen—that's very frustrating after taking the time to do the repair. My first thought is that the screen connector may not be fully seated (this connector in particular can be quite tricky to reconnect). If that's not the case, you can contact our customer support (support@ifixit.com) about a defective screen.

Spencer Day -

I've contacted support and they have yet to get back to me. I will be initiating a return. I don't think I would have attempted this repair again, taking the screen off was far far more difficult than it's worth. I'd take it to a repair shop.

John -

Excellent support and great company. I had a problem with the fingerprint sensor, which after starting it up indicated that it was faulty. I requested a replacement and everything went great. Thanks!

Carles Gomez -

You should add the part to recalibrate the fingerprint (pixelrepair.withgoogle.com/udfps) in your tutorial.

Bruno Spolidorio -

Thank you so much! As a first time screen repairer, it wasn't clear to me how deep I should insert the jimmy in the earpiece cutout. The screen assembly is much thinner than I imagined. Also, the screen was badly cracked so removal was overall messy. In the end I figured it out and after that it was all smooth sailing, but some additional clarifying notes in that section might be useful :)

Marco Baggio -

That's exactly what happened to me. I was super frustrated with their manual. to be honest, i'm not sure I'd choose this option again.

Tal Givati -

Did this as my first screen repair. Thanks heaps Spencer.

The only feedback I would suggest for this manual is how to handle massively cracked edges. Non cracked edges separated easily, but the blue pick looses its way when it gets to the cracked edges - I had a few - and for my first screen repair I was stuck.

I did end up applying some heat, and using the tweezers to carefully pry the screen away from the phone by grabbing the backing of the screen where it was stable. This worked. Most of the glass complied with the tweezers/heat method. The left over glass stuck to the frame was easy to remove with the spudger. Please let me know if there was a better way to do this.

The pixel 8a I have cost me $679 on special from JB-HifI. A local repairer quote me $700 - $800 to fix the screen - but I had to commit to a $99 diagnostic fee first.

Much much cheaper to fix it myself.

Thanks again!

Julius Csepregi -

Attempting this repair with the full ifixit kit has been a disaster. First off, the guide is not fit for purpose - if you have any cracks that run to the edge of the screen it is impossible to proceed past them with undoing the glue rim. Trying to just shatters the glass further. Also the suction cup is useless, does not adhere at all, even when using the tape as described. Now I have a completely broken phone screen that I cannot even use to recover the data (I should have backed up, but seemed like an easy enough repair for someone who has already had experience with these) and then I have an unused new screen i have no use for as I cannot repair this phone anymore. Urgh... 1/10 !!

Maciej Jabłoński -

A few days after the repair I wanted to put on a protective glass. I applied more then usual pressure on the screen and now my screen has a white stripe top to bottom and it does not react properly to my touch. Any idea as to what happened or how to fix it? Helpp!

Ulises -

Vielen Dank - Der Displaytausch hat perfekt funktioniert.

Die Werkzeuge im Set sind super und nichts fehlt. Selbst als Neuling hat in knapp zwei Stunden alles funktioniert.

ABER VORSICHT: Das Google update und repair tool hat einen schwerwiegenden Fehler. Die Software arbeitet nicht mit der aktuellsten Androidversion zusammen. Das wäre nicht so schlimm, wenn man im Fast-Modus nicht in einer Boot-Schleife landen würde!
Nach einer verzweifelten Stunde mit dutzenden Fehlversuchen habe ich aufgegeben. Das war mein Glück. Nach einer halben Stunde Inaktivität beendet sich der Fastmodus selber.....

Dirk Kwee -

Great tutorial. The worst part is removing the damaged old screen. Patience and persistent even heating is a must. Thanks for this guide.

AssyMcGee -

Very comprehensive & helpful guide 💘

Simon Felix Conrad -

Well done. How great the senTence serves well.

tyledge9211 -

I bought a genuine Google screen from iFixit and found that using this guide and a bit of common sense, I was able to successfully install the new screen. Unfortunately, when I tested the front facing camera, I found that the image was blurred. I removed the film cover from the front camera housing, so it's not that. The camera seems to be sitting perfectly in the camera housing so I'm not attributing it to that either. Any suggestions?

Julian -

What if you just need to replace the outer glass, not the entire "screen" as shown here? Do you have steps for separating & replacing just the outer glass?

Jeff Bihlman -

I purchased the kit and followed the guide. Everything went smoothly except the point for recalibrating the fingerprint sensor:

The tool by google claimed that the software on my device is newer than the version the service tool supports. So it suggests to use another service tool to install an old image. The tool did not succeed after several retries to install an older software image. So at the moment I'm stuck with a working phone without fingerprint sensor.

ifixit is not to blame for this, rather google in servicing it's support tools so badly. If you want to claim proper repairability you need also to keep the necessary software tools up to date

Matthias Schuh -

If your screen is severely cracked like mind was, you'll find removing the screen to be a bit difficult, as the screen will come off in pieces. Just go slow. I found liberal use of my wife's hair dryer to be very effective.

This guide does not mention that the screen/fingerprint sensor needs to be recalibrated when the new screen is installed. I would suggest adding another step (or even just a final note) with a link to recalibrating the screen.

Fingerabdrucksensor im Google Pixel kalibrieren

David M -

I ordered the kit from ifixit, and it came with their iOpener for heating up the device, but the directions don't mention using it for loosening the glue. I'm wondering if it'll get hot enough or if I'll need to try with a hair dryer.

Castor Fu -

Hi @castorfu! Just to confirm, are you using the Pixel 8a Screen Fix Kit? It shouldn't come with an iOpener. You should use a hairy dryer, as you're right in assuming the iOpener most likely won't be able to soften the adhesive enough.

Spencer Day -

I am about to do this for the first time on a Pixel 8a. Do I need this: Display Enclosure Adhesive on top, if I have the complete Display already? What about the cable bracket? Thanks for any advice in advance.

henri.bardouin -

I'm still looking for a solution. thanks to anybody helping me. :)

henri.bardouin -

If you buy the "fix kit" you will have everything you need. Bonne chance!

Drew -

Just finished this in about 2 hours. A few tips for those who follow me:

1. The iFixit screen replacement "fix kit" is completely worth it since it comes with everything you need.

2. If your screen is cracked to the edges (mine was) it will break when you try to remove it. That's ok even though it will make a mess. Removing the broken bits of screen was the longest part of the process for me. I peeled the broken screen off as best as I could (wear goggles) and heated the phone where the adhesive and broken pieces remained. You can remove them with the spudger and tweezers. I thought I had ruined the phone! Go slowly and trust the process.

3. The suction cup was not useful to me but the Jimmy and opening picks absolutely were.

4. Cover the rear camera with clear tape to protect it.

Drew -

One thing I think I'd recommend is to try turning on the phone before adhering it to the new screen. If something isn't set right ( IE the cable connection ) then you'll have to re-do the adhesive which sounds like a big pain to try and do without damaging the new screen.

Gregg R -

Good guide, thanks a lot.

Mind you, when holding the phone to tear off the display, make sure not to power it on by accident.

Seeing the now-really broken screen turn on, flickering and not being able to shut down the phone properly gives you a baaaaaad feeling for the rest of the repair 🥶

metaphil -