Einleitung

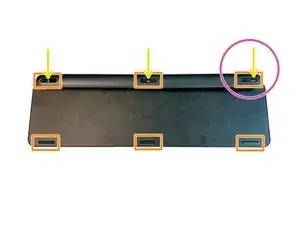
  1. Entferne die Gummi-Füße auf der Rückseite:
  2. Die drei Gummi-Füße auf der Oberseite sind in diesem Schritt notwendig, aber die unteren drei werden später sowieso entfernen, so dass es am besten ist, alle sechs zur gleichen Zeit zu machen.
  3. Löse die Schrauben hinter den Gummi-Füßen:
  4. In meinem Fall waren diese noch vom Kleber bedeckt
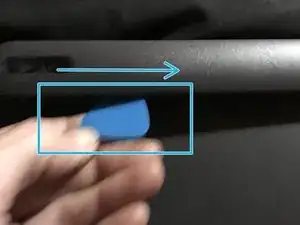
  5. Benutze iFixit-Tools um das Cover zu öffnen
  6. Entferne die Batterie:
  7. Ausstecken und entfernen, die Batterie ist leicht an der Rückseite festgeklebt
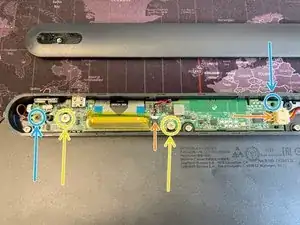
  8. Löse die kleine schwarze Schraube auf dem PCB, welche das Antennen-Kabel festhält
  9. Löse die Schrauben des PCBs:
  10. Drei Sorten von Schrauben mit großen silbernen Köpfen
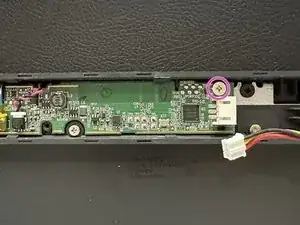
  11. Entferne das PCB
  12. Stecke das Daten-Kabel aus:
    Hebe das Klebeband an, dadurch lässt sich der weiße Teil/Verbinder anheben und das Kabel löst sich
  13. Entferne alle schwarzen und silbernen Schrauben
  14. Die Rückabdeckung:

    Starte in der oberen linken Ecke und ziehe langsam, bis die Abdeckung vollständig gelöst ist. Die Abdeckung ist ziemlich robust, aber der Kleber ist sehr stark, also gehe bei diesem Schritt langsam vor.
  15. Löse alle kleinen schwarzen Schrauben und entferne die metallene Bodenplatte.

Ich habe Bilder hochgeladen, also schau dir diese an, wenn du sie brauchst.

Ich hoffe das hilft, und danke an alle Leute, die geholfen haben!

  1. eBaLTROFV5TIXojF
    eBaLTROFV5TIXojF
    P4Sy1GFJO2VqaLpm
    • Entferne die Gummi-Füße von der Unterseite.

    • Die drei oberen sind für diesen Schritt wichtig, da die unteren drei später auch entfernt werden müssten, entferne am besten gleich alle.

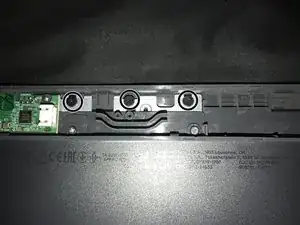
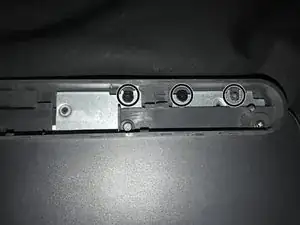
    • Entferne die drei Schrauben, welche sich hinter den oberen Gummi-Füßen befinden.

    • Beachte, dass die linke Schraube nach rechts versetzt liegt und nicht in der Mitte eingeschraubt ist/wird.

    • In meinem Fall hat der Kleber die Schrauben verdeckt – Drücke mit einem kleinen Kreuzschlitzschraubendreher (PH 0) leicht in den Kleber und du findest die Schrauben.

    • Benutze ein geeignetes Werkzeug aus Kunststoff, um die hintere Gehäuseabdeckung zu entfernen.

    Bottom three feet are not blocking any screws or clips, they can remain.

    There is a plastic film covering the screw holes, it can be peeled back and replaced.

    Cristina Vasco -

  2. 2gbYL4E5VSYoaAKB
    2gbYL4E5VSYoaAKB
    qaAi5Da3LcLXc4CF
    VPttdcPYX3goyGkW
    • Entferne den Akku. Er ist leicht auf der Unterseite festgeklebt.

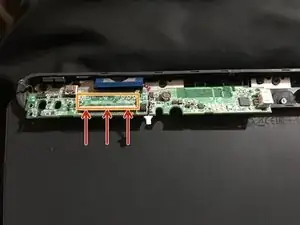
    • Entferne die zwei etwas größeren, silbernen Kreuzschlitzschrauben, welche die Platine im Gehäuse halten.

    • Entferne die kleine schwarze Schraube in der oberen rechten Ecke.

    • Ziehe das orangene Klebeband, welches das Flachbandkabel sichert, vorsichtig ab. Lege es zur Seite und hebe es für den Wiederzusammenbau auf

    • Hebe den Stecker des Flachbandanschlusses vorsichtig an, bis er sich nach oben öffnet, und hebe das Datenkabel an und entferne es.

    • Entferne die Platine.

    Can you please insert some basic info about the battery? Like how many mAh ie.

    Gunnar Arneby -

    Search for Logitech 533-000177

    VauWeh -

  3. nXhSMZgstDmThcWk
    • Entferne die letzte Schraube von der Platine.

  4. BukJRMcelI3SMP1d
    BukJRMcelI3SMP1d
    44AIC5HXBUOPEkVW
    cSBSYPDaNIpIeQfn
    • Entferne alle neun schwarzen Schrauben an der Oberseite.

    • Der obere Teil des Gehäuses wird mit Plastikhaken gehalten, welche mit einem Spudger gelöst werden können. Der obere Teil sollte sich nun vollständig vom Rest des Gehäuses trennen lassen.

    Remove 9 black screws in order to remove the circuit/battery housing.

    Filip van Hoeckel -

    Remove six silver screws, too.

    eMjay1805 -

  5. c4Hyupg43XkuGbbQ
    c4Hyupg43XkuGbbQ
    6sZyJI4vcb14hraR
    PIHadkycpBgElFsC
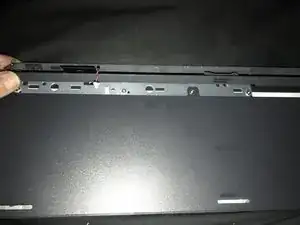
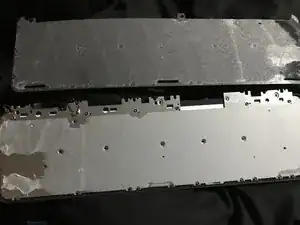
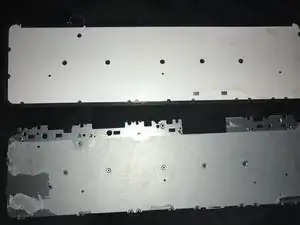
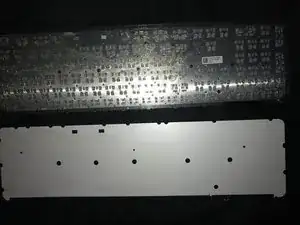
    • Die großflächig verklebte Rückseite kann nun vorsichtig und am Besten mithilfe von ein wenig Isopropyl-Alkohol vom Rest des Gehäuses entfernt werden, indem du langsam von der oberen linken Ecke aus anfängst, sie zu entfernen

    • Entferne alle schwarzen Phillips-Schrauben und entferne anschließend die Metallplatte.

    • Achte darauf, dass die Lichtleiter nicht beschädigt werden.

    The back is glued to the metal baseplate and needs to be removed using a spatula in order to expose the screws.

    Filip van Hoeckel -

Abschluss

Um das Gerät anschließend wieder zusammenzubauen, befolge die Anleitung in umgekehrter Reihenfolge.

Marts

Mitglied seit: 16/02/22

442 Reputation

19 Kommentare

Do you know how I can turn the keyboard backlight so it stays on, even if if t runs down the battery faster.
I really need that back light. I am willing to risk breaking my keyboard for the reward of having the light. If I am really lucky changing the circuit to add a manual switch for that dang back light :)

I have basic skills and I am still learning...

Thank to all the Content Makers and Fix-It guide makers...!

perhaps I could find the correct voltage for the light and prob with a test light to find the circuit for the back light with out damaging something important, like the old days_?

nazo -

Put a cover over the right top LED (green when turned on) - this is also the "window" for the ambient light sensor. By making it "dark", the backlight will be fully on when your hands are close to the keyboard.

Riaan Du Toit -

Hello,

Excellent tutorial!

Could you show me where the 2 red and black wires are connected (data cable I think)?

Mine got cut by accident.

Christophe -

hey, please look at Step 3 and you will see the red and black cables you are looking for

Marts -

Hello, the front and back plate are made from plastic or metal ? thank you

raduadyi -

the front and back and made from plastic

Marts -

Hello,

i spilled my keyboard, i clean everything, but backlight transparent layer broken, maybe do you know where i can buy this spare parts ?

Thank you.

Sorry for my bad english.

remjok -

i don't think you can buy parts from logitech. i would say the best place to try is ebay

Marts -

Thank you, i don't know about Logitech, but nothing - ebay, nothing google search result...
But thank you for this your tutorial.

remjok -

only one key is not working what to do ??

Sangram keshari beja -

What are you using to put back those rubber pads on the bottom? Special Glue?

Boerni -

No, just some double-sided tape is enough for this - The pressure added from the weight of the keyboard will keep it in place, and once it's fully adhered, it won't move because the force is lateral (being recessed) 😁

Mike Page -

Be careful NOT to use Isopropylalcohol in the Transparent/Plastic/Plexiglass thing for the Backlight diffusion plate INSIDE the Keyboard. It will absolutely destroy it.

EDIT: It is I believe PETG and not resistant to IPA.

Recep Gürbüz -

Thanks, that's a big help.

John Nolan -

Everything is glued. Clearly don't want you to repair your own keyboard. Never buying logitech again.

David Boucher -

I missed two keys I dont know why, "1" and "3" on numerical layout.

Will this have any kind of repair?

Cristiano Alves -

I had a tiny coffee spill on left part of my MX Keys Mini keyboard. I Thought I got everything dried off, but seems some made it into the key section. The spill was not over main-board but at end with battery. After this, the keys F1, F2, F3 F4, 1, 2, t, i and 'caps lock' did not function. I thought it was a strange combination and have attempted to open and clean inside keyboard in vain the hope that it is mostly mechanical damage. So far no luck... Can this be a burned electric component, due to shortage at one or more keys with coffee? Wonderful keyboard, but perhaps a little more fragile than its sturdy feeling suggests ...

TLA -

Where does the other end of the long red cable connected to the small black screw goes?

Jorge Sierra -

Hi! Does anyone know what type of glue is used to hold together the plastic back panel and metal plate? Looks like double sided foam tape with paper base but I'm not sure.

Sad_serpent -