
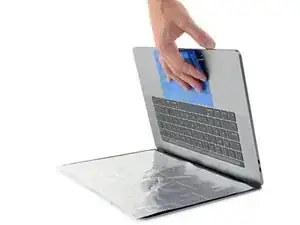
Introduction
Follow these instructions to safely remove the glued-in battery from your MacBook Pro using an iFixit kit with adhesive remover. The liquid solvent in the kit dissolves the adhesive securing the battery, allowing you to remove it more easily.
iFixit adhesive remover is flammable—use it in a well-ventilated area, and do not smoke or work near an open flame.
To minimize risk of damage, turn on your MacBook and allow the battery to fully discharge before starting this procedure. A charged lithium-ion battery can be very dangerous if accidentally punctured. If your battery looks puffy or swollen, take extra precautions.
Note: The solvent used to dissolve the battery adhesive can damage certain plastics. Follow all instructions and take care where you apply the adhesive remover.
Tools
-
-
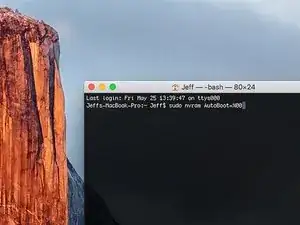
Power on your Mac and launch Terminal.
-
Copy and paste the following command (or type it exactly) into Terminal:
-
sudo nvram AutoBoot=%00
-
Press [return]. If prompted, enter your administrator password and press [return] again. Note: Your return key may also be labeled ⏎ or "enter."
-
sudo nvram AutoBoot=%03
-
-
-
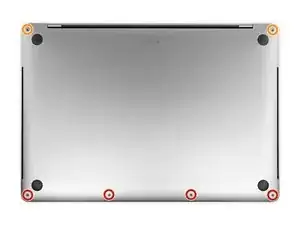
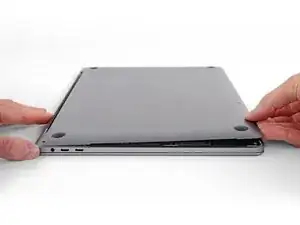
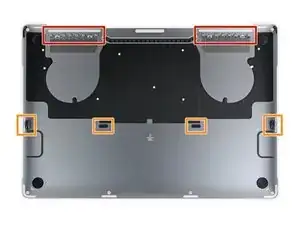
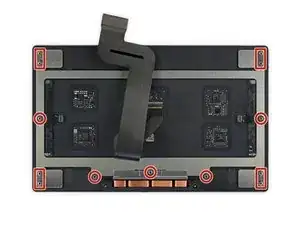
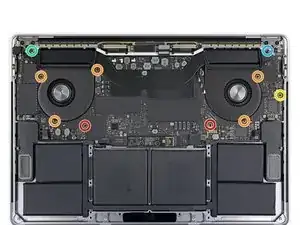
Use a P5 Pentalobe driver to remove six screws securing the lower case, of the following lengths:
-
Four 4.7 mm screws
-
Two 6.6 mm screws
-
-
-
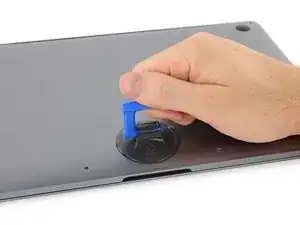
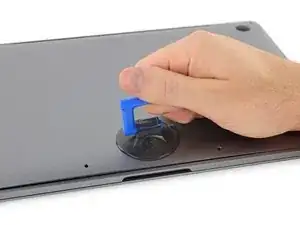
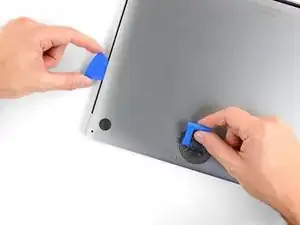
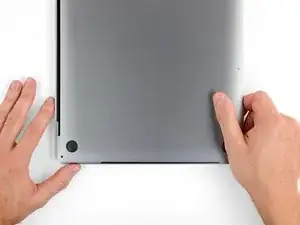
Press a suction handle into place near the front edge of the lower case, between the screw holes.
-
Pull up on the suction handle just enough to open a small gap under the lower case.
-
-
-
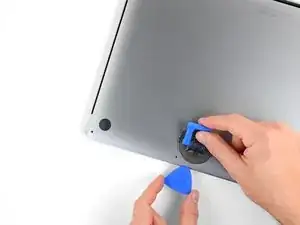
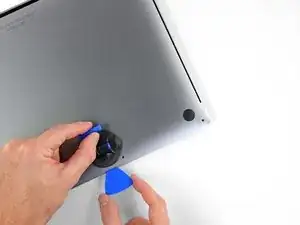
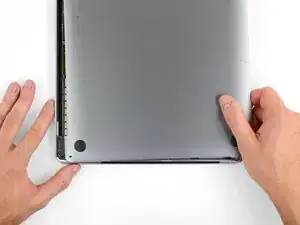
Slide the corner of an opening pick into the gap you just created underneath the lower case.
-
Slide the opening pick around the nearest corner and then halfway up the side of the MacBook Pro.
-
-
-
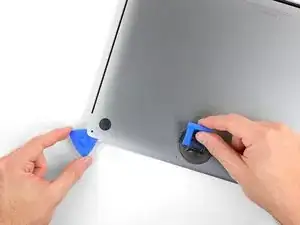
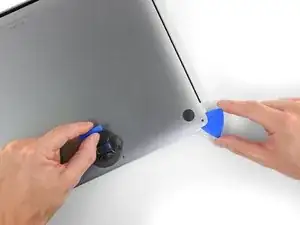
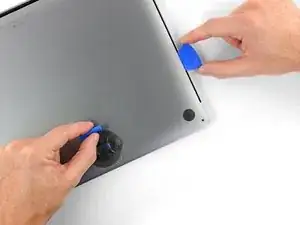
Repeat the previous step on the other side, using an opening pick to to release the second clip.
-
-
-
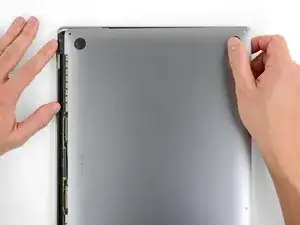
Lift the front edge of the lower case (the side opposite the display hinge) enough to slide your fingertips underneath and get a good grip on it.
-
-
-
Pull firmly to slide the lower case towards the front edge of the MacBook (away from the hinge area) to separate the last of the clips securing the lower case.
-
Pull first at one corner, then the other.
-
-
-
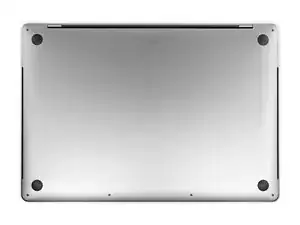
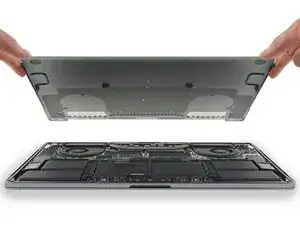
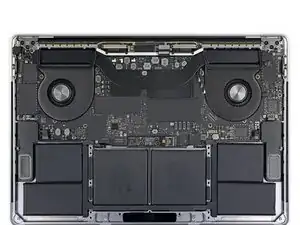
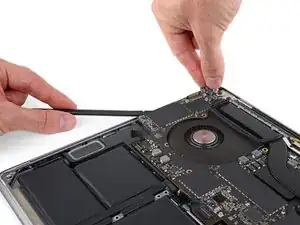
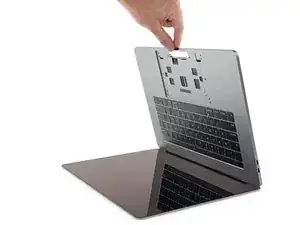
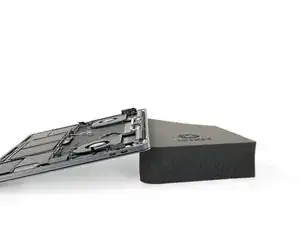
Remove the lower case.
-
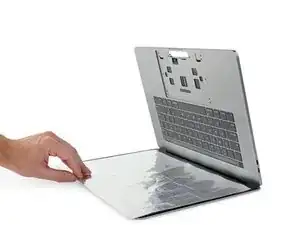
Set it in place and align the sliding clips near the display hinge. Press down and slide the cover toward the hinge. It should stop sliding as the clips engage.
-
When the sliding clips are fully engaged and the lower case looks correctly aligned, press down firmly on the lower case to engage the four hidden clips underneath. You should feel and hear them snap into place.
-
-
-
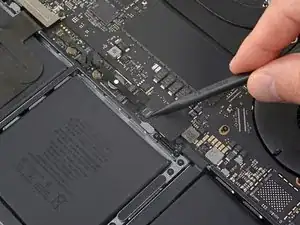
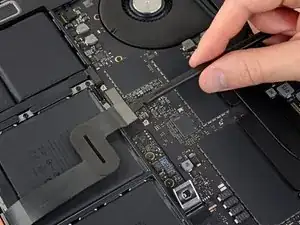
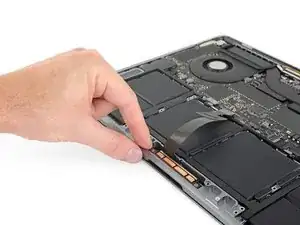
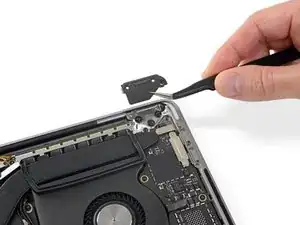
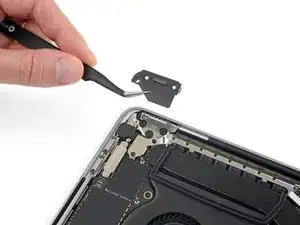
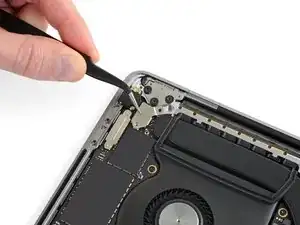
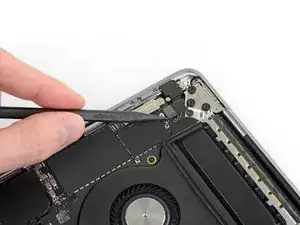
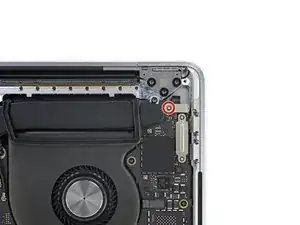
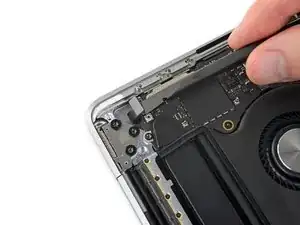
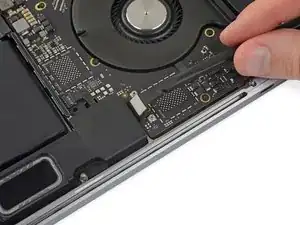
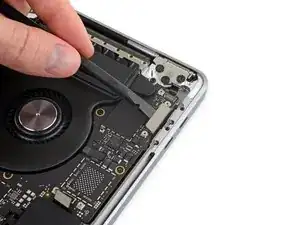
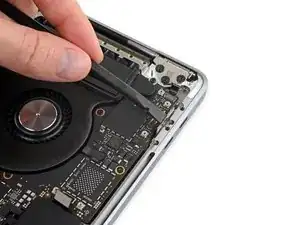
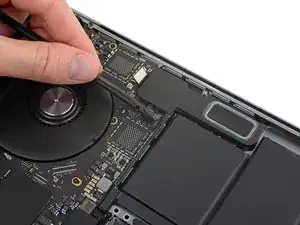
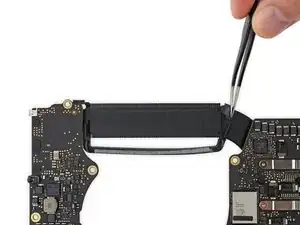
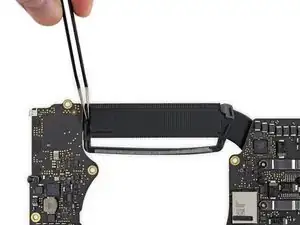
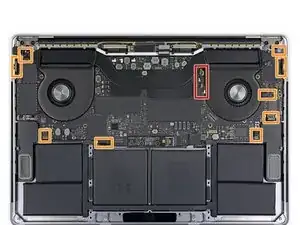
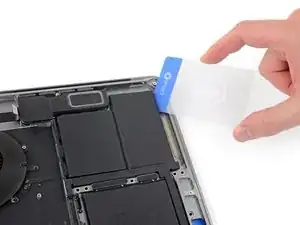
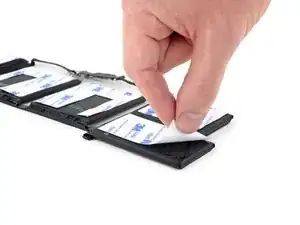
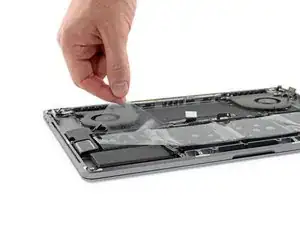
Peel up and remove the insulating sticker covering the battery board, on the edge of the logic board nearest the battery.
-
If the cover doesn't peel up easily, apply mild heat with an iOpener, hair dryer, or heat gun to soften the adhesive underneath, and try again.
-
-
-
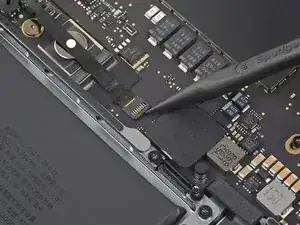
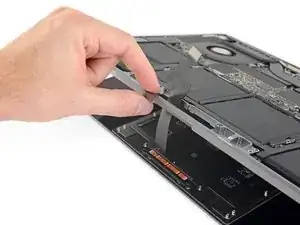
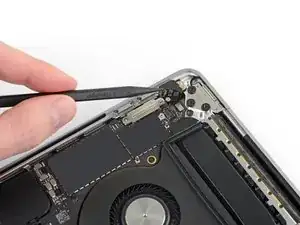
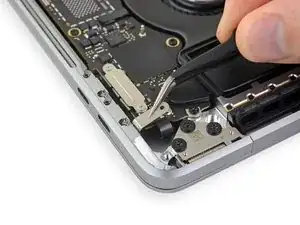
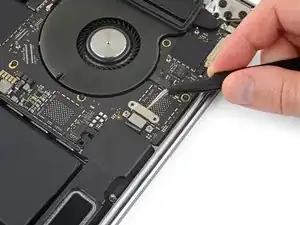
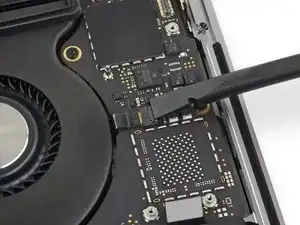
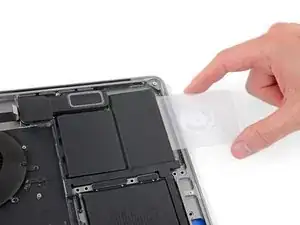
Peel back any tape covering the battery board data cable connector.
-
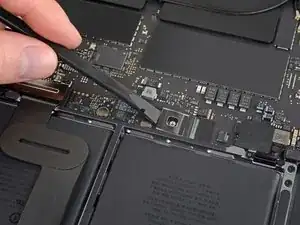
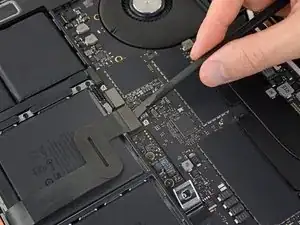
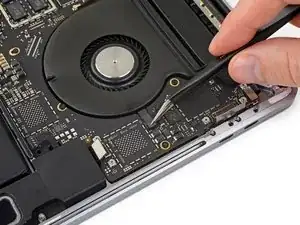
Use a spudger to gently pry up the locking flap on the ZIF connector for the battery board data cable.
-
-
-
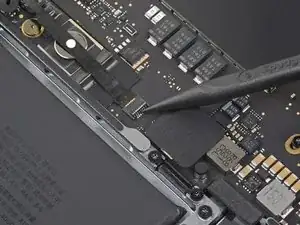
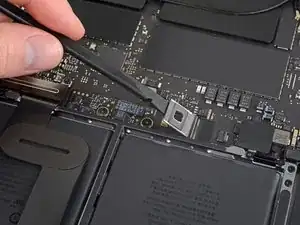
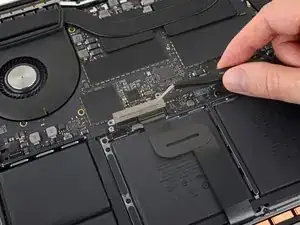
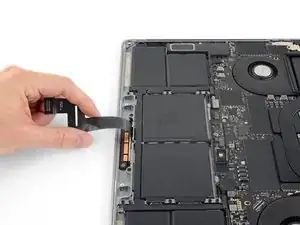
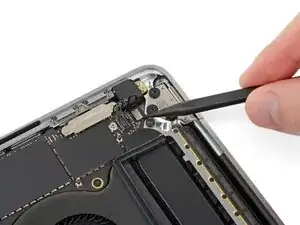
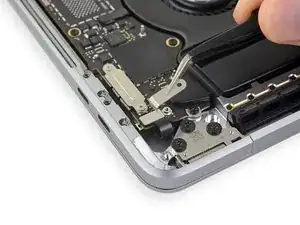
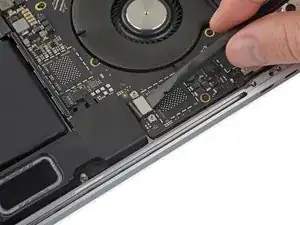
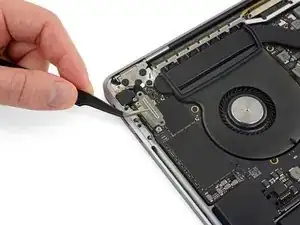
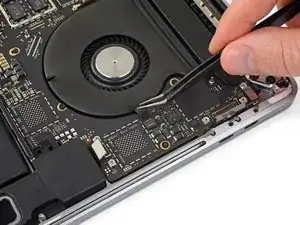
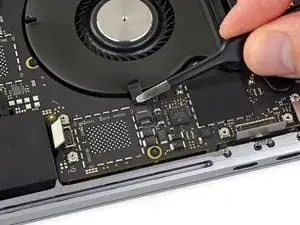
Disconnect the battery board data cable by sliding it out from its socket on the logic board.
-
Slide parallel to the logic board, in the direction of the cable.
-
-
-
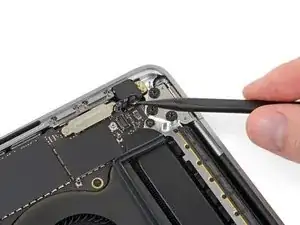
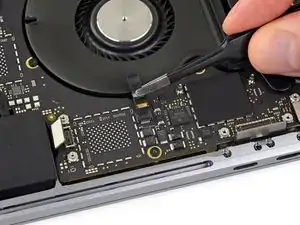
Pry up and disconnect the locking flap on the connector at the opposite end of the battery board data cable.
-
-
-
Slide the battery board data cable out of its socket on the battery board, and remove it completely.
-
-
-
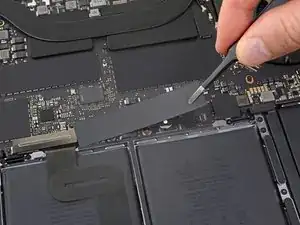
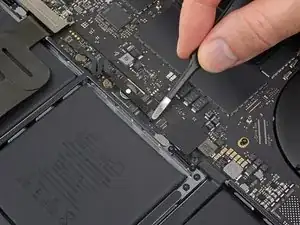
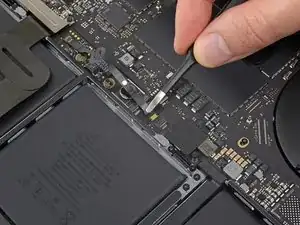
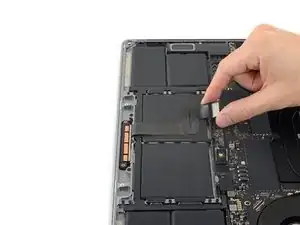
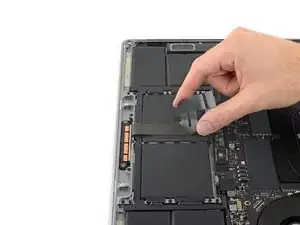
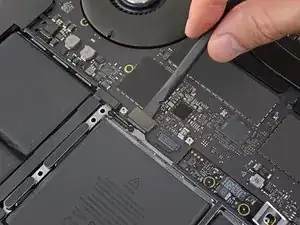
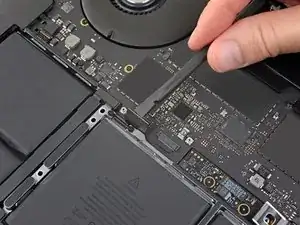
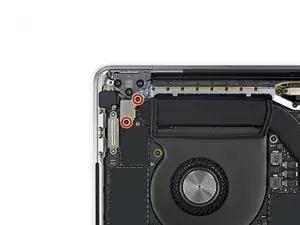
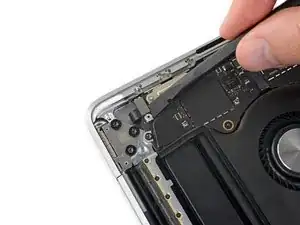
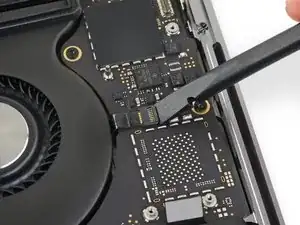
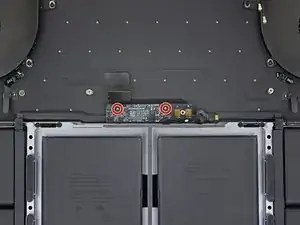
Use a T5 Torx driver to remove the 3.7 mm pancake screw securing the battery power connector.
-
-
-
Use a T3 Torx driver to remove the two 1.9 mm screws securing the cover bracket for the keyboard and trackpad cable connectors.
-
Remove the bracket.
-
-
-
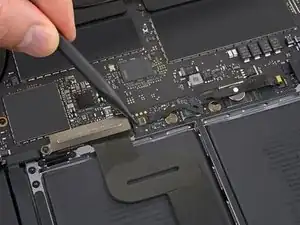
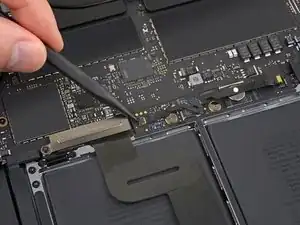
Use a spudger to disconnect the trackpad cable by prying its connector straight up from the logic board.
-
-
-
Apply mild heat to the trackpad ribbon cable to soften the adhesive securing it to the battery.
-
-
-
Use a T5 Torx driver to remove the 13 screws securing the trackpad assembly:
-
Nine 5.8 mm screws
-
Four 4.9 mm screws
-
-
-
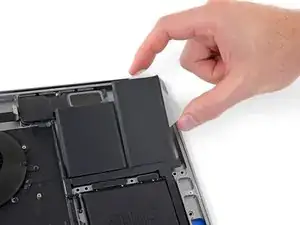
Swing the display open slightly, but keep the MacBook upside-down. The trackpad assembly should separate and lay flat on the display.
-
Carefully feed the trackpad's ribbon cable through its slot in the chassis.
-
-
-
As you remove the trackpad assembly, be very careful not to lose the nine small metal washers resting on the screw posts. (They will fly off and get lost with very little provocation.)
-
Remove the trackpad assembly.
-
-
-
Use your spudger to disconnect the keyboard by prying its connector straight up from the logic board.
-
-
-
Use a T3 Torx driver to remove the two 3.5 mm screws securing the cover on the display board flex cable.
-
Remove the display board flex cover.
-
-
-
Using a T3 Torx driver, remove the two 1.7 mm screws securing the bracket for the display board cable connector.
-
Remove the display board cable connector bracket.
-
-
-
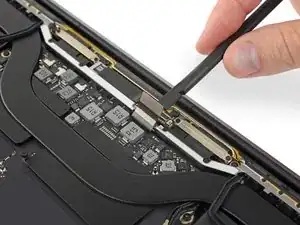
Pry the display board flex cable straight up from its socket to disconnect it from the display board.
-
-
-
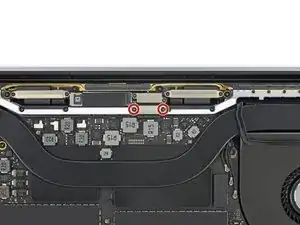
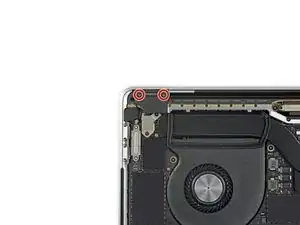
Use a T3 Torx driver to remove the four 2.0 mm screws from the hinge covers (two screws on each side).
-
-
-
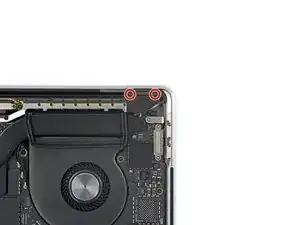
Use a T3 Torx driver to remove the two 2.4 mm screws securing the cover bracket for the Touch ID and headphone jack cable connectors.
-
Remove the bracket.
-
-
-
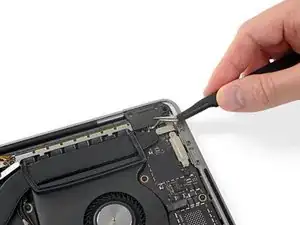
Disconnect the power button and Touch ID sensor by prying its connector straight up from the logic board.
-
-
-
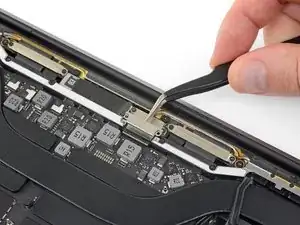
Using a T3 Torx driver, remove the 1.3 mm screw securing the cover bracket for the Touch Bar digitizer connector.
-
-
-
Using your tweezers, slide the bracket toward the side edge of the MacBook Pro until it clears the slotted retaining tab on the logic board.
-
Remove the bracket.
-
-
-
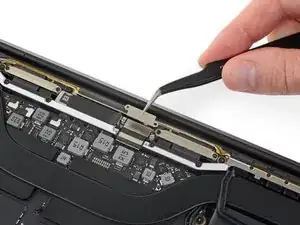
Use a T3 Torx driver to remove the two 1.9 mm screws securing the bracket for the Touch Bar display cable connector.
-
Remove the bracket.
-
-
-
Disconnect the Touch Bar display cable by prying its connector straight up from the logic board.
-
-
-
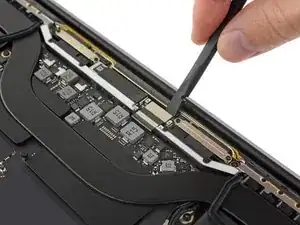
Using a T3 Torx Driver:
-
Remove the two 1.3 mm screws securing the Thunderbolt flex cable cover on the left.
-
Remove two more 1.3 mm screws from the Thunderbolt cable cover on the right.
-
-
-
Use a spudger to disconnect the left-side Thunderbolt flex cable by prying it straight up from the logic board.
-
Pry from the inside edge, nearest the fan.
-
Gently push the flex cable connector off to the side so it doesn't interfere with logic board removal.
-
-
-
Repeat to disconnect the Thunderbolt flex cable connector on the opposite side.
-
Carefully push the flex cable connector aside so there's clearance for the logic board to come out without snagging.
-
-
-
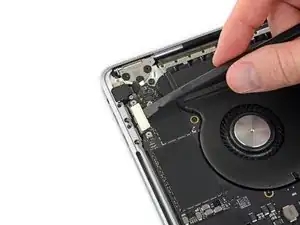
Disconnect the two speaker connectors by sliding the flat end of your spudger underneath each cable near its connector.
-
Gently twist or pry up to disconnect both speakers.
-
-
-
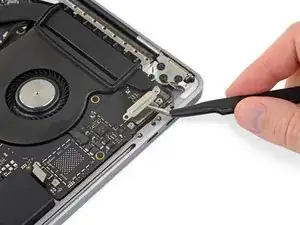
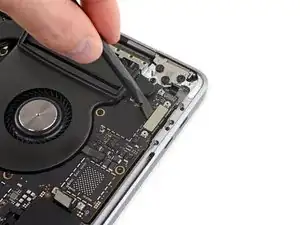
Open the locking flap on the microphone cable's ZIF connector by prying it straight up from the logic board.
-
-
-
Disconnect the microphone by pulling its cable toward the fan until it releases from its socket.
-
If possible, pull on the tape attached to the cable, rather than the cable itself, to reduce the risk of damage.
-
-
-
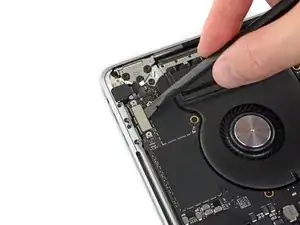
Disconnect all three antenna cables by prying each one straight up from its socket.
-
Slide your tweezers or the flat end of your spudger underneath each cable until it's near the socket, and then gently twist or pry up to disconnect it.
-
-
-
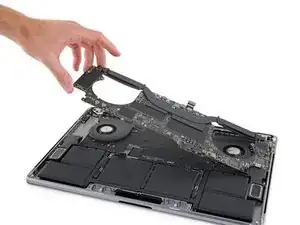
Remove all ten screws securing the logic board assembly:
-
Two 2.6 mm T3 Torx screws
-
Five 2.9 mm T5 Torx screws
-
One 3.7 mm T5 Torx screw
-
One 3.9 mm T8 Torx screw (large head)
-
One 4.0 mm T8 Torx screw
-
-
-
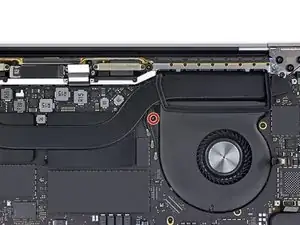
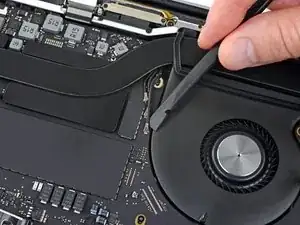
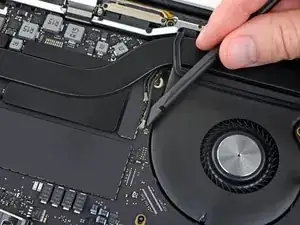
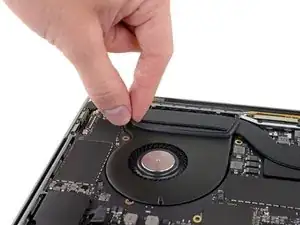
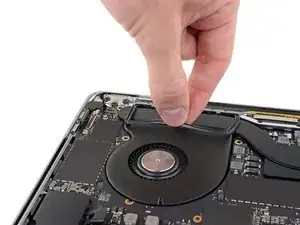
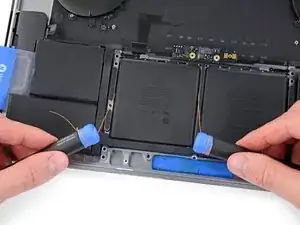
Peel up (but don't remove) the two rubber vibration damping strips from the adhesive holding them to the fans.
-
If needed, apply mild heat with an iOpener, hair dryer, or heat gun to soften the adhesive and make the dampers easier to separate.
-
-
-
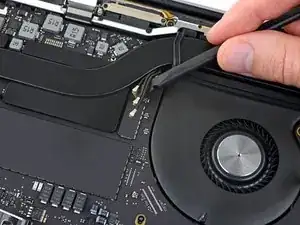
Check the alignment of the rubber vibration dampers, and adjust them as needed.
-
Feed the antenna cable bundle through the gap between the logic board and heat sink, and make sure it lines up correctly as you lower the board into place.
-
Verify that no cables get trapped under the board as you install it. Check each marked location carefully.
-
-
-
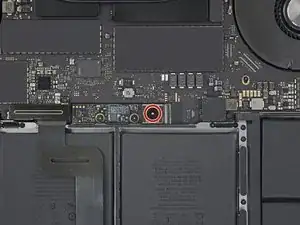
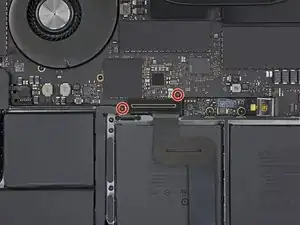
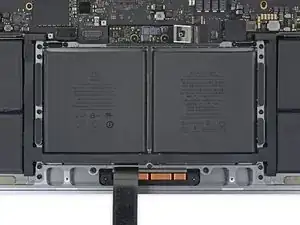
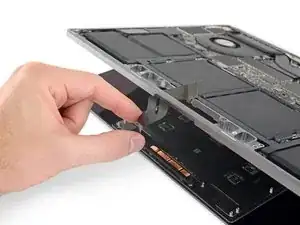
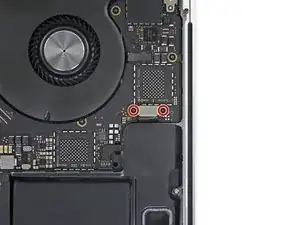
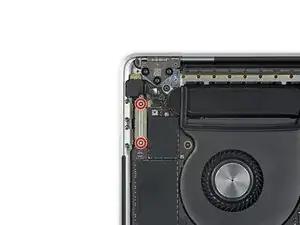
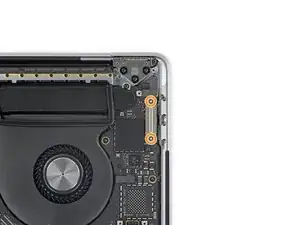
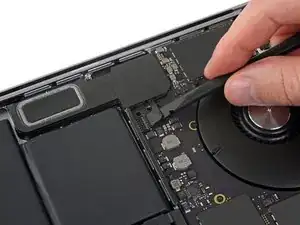
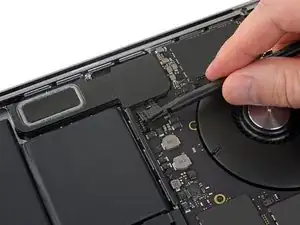
Remove the two screws securing the battery board:
-
2016-2017 models: Use a T5 Torx driver to remove both 3.5 mm screws.
-
2018-2019 models: Use a P2 Pentalobe driver to remove both 3.2 mm screws.
-
-
-
To protect your display, place a sheet of aluminum foil between the display and keyboard and leave it there while you work.
-
Additionally, use painter's tape to seal off the area under the trackpad as best you can. Optionally, you may also layer an absorbent towel directly underneath the trackpad area to soak up any excess adhesive remover.
-
-
-
To control the flow of adhesive remover, raise the back edge (hinge side) of your MacBook Pro a few inches using a book or foam block.
-
-
-
Now that your MacBook Pro is fully prepped, it's time to prep yourself.
-
Wear eye protection when handling and applying the adhesive remover. (Eye protection is included in your kit.)
-
Do not wear contact lenses without eye protection.
-
Protective gloves are also included in your kit. If you are concerned about possible skin irritation, put your gloves on now.
-
-
-
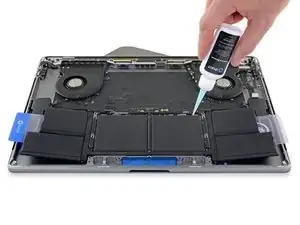
Pull off the black rubber stopper from your bottle of adhesive remover.
-
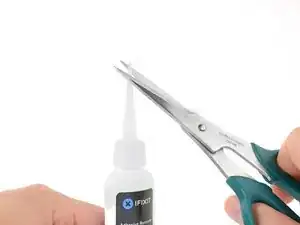
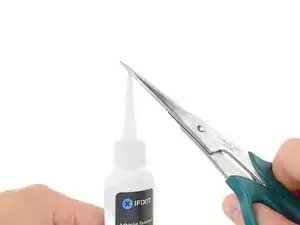
Use scissors to cut off the sealed tip of the applicator.
-
-
-
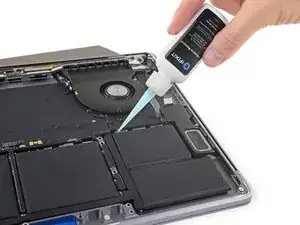
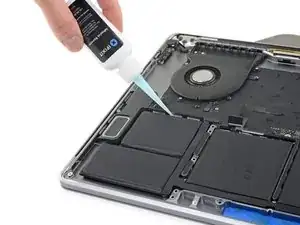
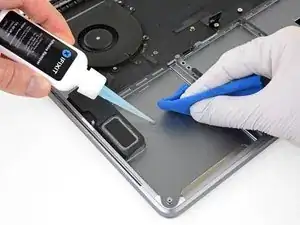
Apply a few drops of adhesive remover underneath the two battery cells on the right, starting along the edge nearest the fan.
-
-
-
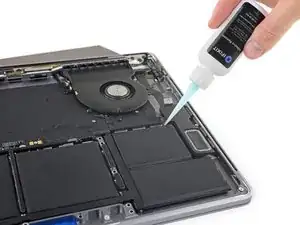
Add a few more drops of adhesive remover in between the two battery cells on the right, so that it flows down underneath the lower battery cell.
-
Wait about two minutes for the liquid adhesive remover to penetrate and weaken the battery adhesive before you proceed to the next step.
-
-
-
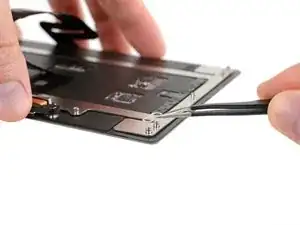
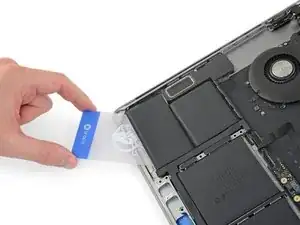
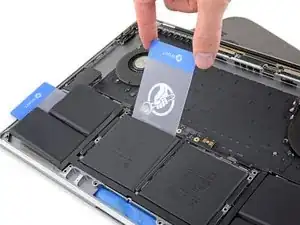
After a couple minutes, insert one corner of a plastic card underneath the battery, starting from the lower edge of the bottom, right-most cell.
-
Wiggle the card from side to side and slide it all the way underneath both battery cells.
-
Lift the cells to fully separate the adhesive, but don't try to remove them from your MacBook yet.
-
Leave the plastic card temporarily underneath the cells to prevent the adhesive from re-bonding as you proceed to the next step.
-
-
-
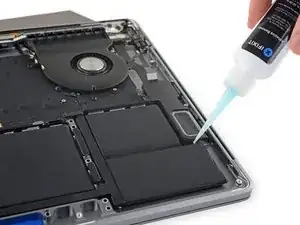
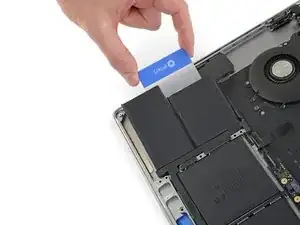
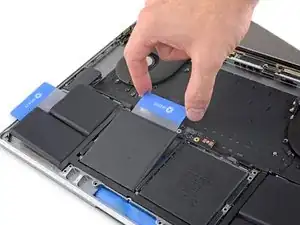
Switch to the left side of the MacBook Pro, and repeat the previous step to separate two more battery cells.
-
Leave the second plastic card in place temporarily.
-
-
-
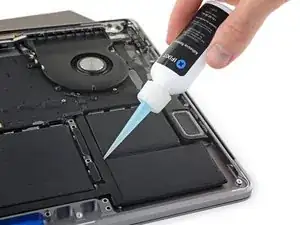
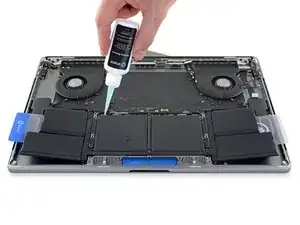
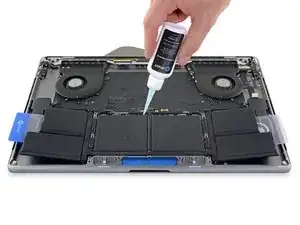
Apply a few drops of adhesive remover along the top edges of the two center battery cells.
-
Be mindful of leaks, and apply more adhesive remover along the side edges if needed.
-
-
-
After a couple minutes, retrieve your first plastic card and insert one corner under the top edge of one of the center battery cells.
-
Wiggle it from side to side and slide it underneath the battery cell until all the adhesive separates.
-
-
-
Retrieve your second plastic card and repeat the previous step to separate the remaining center battery cell.
-
-
-
If you had trouble getting the card underneath any of the battery cells, try working a piece of floss or wire underneath the battery cell and pull it side-to-side in a sawing motion to separate the adhesive.
-
-
-
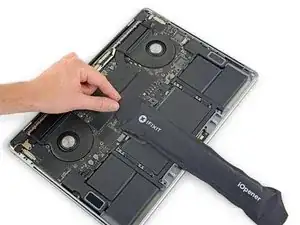
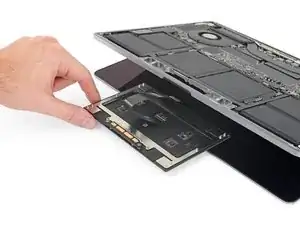
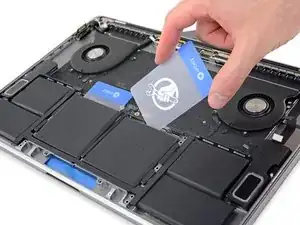
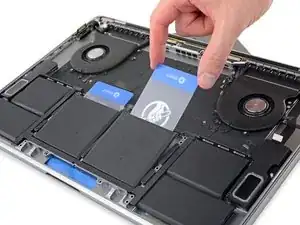
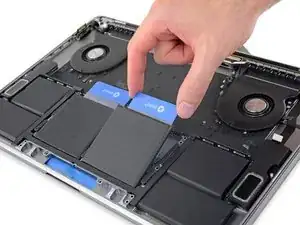
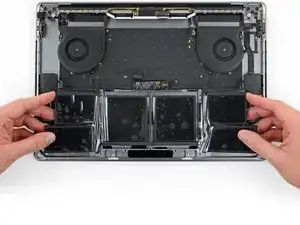
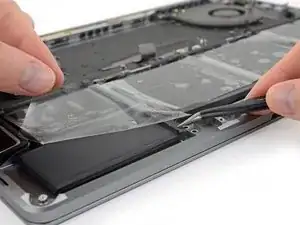
Lift and remove the battery.
-
Peel off any large strips of adhesive using tweezers or gloved fingers.
-
Scrape away any remaining chunks of adhesive with a plastic tool, and clean the underlying areas with adhesive remover or isopropyl alcohol. Wipe in one direction (not back and forth) until the chassis is clean and ready for your new battery.
-
-
-
If your battery came with adhesive pre-installed on the bottom, flip it over and carefully peel away the liner to expose the adhesive. If your battery did not come with adhesive, apply a thin double-sided adhesive tape such as Tesa 61395 to keep your battery in place.
-
Carefully position the battery and set it into place.
-
Press and hold each cell firmly for 5-10 seconds to secure it to the lower case.
-
-
-
After your battery is properly positioned and installed, peel off and discard the clear plastic liner from the top.
-
Calibrate your newly installed battery: charge it to 100%, and keep charging it for at least 2 more hours. Unplug and use it normally to drain the battery. When you see the low battery warning, save your work, and keep your laptop on until it goes to sleep due to low battery. Wait at least 5 hours, then charge your laptop uninterrupted to 100%.
-


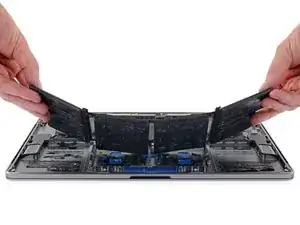
To reassemble your device, follow the above steps in reverse order.
Take your e-waste to an R2 or e-Stewards certified recycler.
Repair didn’t go as planned? Ask our Answers community for troubleshooting help.

7 comments
Hey, is it possible to replace battery without removing a logic board? It was possible on 2017 models.
avxkim -
@webcoder It’s similar to the 2017 design. I’m not sure how you’d replace the battery in either model without removing the board first, since the battery cables are routed underneath the board.
Yes, it is doable if you are very careful. I’ve done it numerous times on 2017 -2019 MBP’s. See my comment one step 24. I own a one-man Mac repair business in SF. Anything to save time. This method has been tried and successfully completed at least 10 times.
Where can I buy the battery? It is not available for iFixit?
Hello,
Is it the same procedure for a Macbook pro 13’’ Touch Bar 2019 ?
Thank you
PGCD -
Is this step necessary? I can’t perform this step as I am attempting to repair water damage and need to remove logic board & most likely replace the battery.
Macrepair SF -
@mac_medic You definitely don’t want the power coming on while the board is wet. In your case, I think powering on the machine to disable Auto Boot would do more damage than it prevents. I agree, skip this step and be prepared to disconnect the battery quickly if the laptop automatically powers on. Good luck!
Jeff Suovanen -
Thats right! You don't want power running while working on your logic board.
Dan -
This did not work when running High Sierra.
Kyle B -
Tried this on a 2018 MBP 13” Touchbar (there’s no iFixit guide for this model yet). Need to replace a broken screen.
Luckily I managed to connect to an external screen (Cmd-Down Brightness to switch displays) and enter above command. Seems to work, but there’s another problem with this model - it powers up as soon as any key is pressed……. ffs <gnashes teeth>
Cool_Breeze -
I unscrew the battery first and wrap electrical tape over the logic board battery connector before attempting any repairs to the board. Haven’t had any problems yet and I’ve worked on about 10 of these models already. Also when you open the bottom case use a suction cup at the bottom and pull up then run a plastic spudger along the edges to disconnect the clips. Also only use a plastic spudger on the board. Saw a youtube video from a repair shop and he did not disconnect the power and used all metal tools during the entire process of removing the board. His last step was to disconnect the battery terminal.
Brian -
Is this step necessary if my mac can turn on? Battery fully dead(
Nursat b -
BEFORE YOU START: The included torx head stripped off before I was done (and you might need an additional T4) so stop now and go buy a good one. Also they fail to warn you above to get some blue threadlocker ahead of time.
Jason Sherron -
This command did not work for me and I read that sometime in later 2020 Apple stopped this command from working…any ideas on a work around?
Patrick Machacek -
Not able to do that with damaged screen
richardjgreen -
If you have a damaged screen you can still use a converter from thunderbolt (USB 3) to HDMI and plug your Macbook Pro to your TV as monitor display. Just make sure to chose the right Source (HDMI IN) in your TV. I did it and to make it work I unplug and plug again in my Macbook and so I could disable the Auto boot
Roberto Sanchez Bustos -
Hi. This does not work on 2018 13” MacBook Pro with Touch Bar. I did exactly this to disable auto boot. But when I check by using nvram -p it says: auto-boot true. Am I doing something incorrectly? I did everything step by step. Copied and pasted the sudo command, pressed enter and then entered my password. I have Big Sur 11.1 installed. Is there any other way since I need to replace the screen. Thank you. Adrian
Adrian Vizik -
Hi everyone. This is also a little pointless if you can’t see anything on the screen, and you don’t have a display adapter to USB C to display it. I agree with Brian about removing the back and disconnecting the battery cable before you even think about opening the lid of the MacBook. Applying the insulation tape is also a handy little tip that just makes sure there is no way to discharge from either the board or battery.
Roberto Enrieu -
running `nvram -p | grep 'AutoBoot'` in terminal verifies that it was accepted
result: `AutoBoot %00`
Marek Polák -
Running Big Sur 11.6.7 on a 2019 16" MBP, it's "auto-boot". So it's:
nvram -p | grep 'auto-boot'to display the current state, the default istrue- and then to change it,sudo nvram auto-boot=falsewhich turns it off.Ed Mechem -
This step is completely unnecessary if you follow the guide to disconnect the battery properly. Just put some tape between the battery and logic board connection to prevent it from accidentally touching and therefore powering on the laptop.
Grant Ormsby -
It took me a few tries to make this command work, as I was able to copy and paste the command into Terminal, but could not type in my laptop’s password. I finally typed my password into a text document, copied it (command C), and then pasted it into Terminal and it worked.
tommy404 -
I didn’t do this. Mine never auto-booted before I replaced the battery. Now it does.
hatuxka -
BEFORE YOU DO ANYTHING - CHECK THE BATTERY!
I-fixit sent me a bad battery, which I didn’t realize until it was already install. They sent me a new one, but I wasted hours uninstalling and reinstalled.
Get a volt meter and measure the voltage on the output of the battery pack. If it reads 0 V, SEND IT BACK. It should read over 2 V.
bcardanha -
When I did this from Terminal.app within Recovery Mode, the “sudo” was not recognized but I could invoke it without the sudo part. It seems to have been accepted when looking at “nvram -p”
johann beda -
When in Recovery Mode, you already have superuser powers. So you don't need to prefix commands with the sudo command to invoke them with root privileges; you already have them. Do a
pwd(print working directory) after opening Terminal in Recovery Mode, and you'll see that you're in the root user's directory.Ed Mechem -
I received the battery kit for my 2018 MacBook Pro and as per the above comment from bcardanha - Oct 12, 2021, I checked the voltage on the pads marked + and - . It was zero volts so I panicked a bit.
I sent a message on the iFixiT Facebook page and I got no reply. I finally found the customer service email for Ifixit Europe and sent them an email voicing my concern as I was not keen to work for couple of hours just to discover that the battery is faulty. I had an almost instant reply on the email (kudos to them) and they adviced me to go ahead and install the new battery as the voltage measured when battery is not connected is not relevant.
I took a leap of faith and after two hours… the new battery showed 50% charge and everything seems to be working just fine. I am happy it worked.
Mircea Comanici -
After removing the old battery and installing the new battery I powered up the MBP before screwing the bottom on. I discovered the my keyboard would not function. It took a few hours of investigation and frustration that I discovered the track pad power ribbon had become partially dislodged from the trackpad. I was able to see that this through the little machined slot where the battery sat. I had to remove the trackpad to reinsert the power ribbon back into the connector in the trackpad. after reassembling and reinstalling the battery etc the keyboard worked. Just food for thought if your run into the keyboard issue.
Ed Mease -
This should be the default. IMO I tell you to power on - not the lid.
G Sena -
Est ce que cela fonctionne sur un macbook pro 2017 sans touchbar ?
maël muzelet -
Bonjour Maël, oui, ce tutoriel concerne "les MacBook Pro 2016 (et plus récents) et les MacBook Retina 12" 2017 (et plus récents)"
Claire Miesch -
Excellent instructions. I was able to follow and install the new screen. I recommend that you get a good set of tools before you begin. I started with an inexpensive repair kit bought online. The Penta and torx bits failed. I bought an IFIXIT kit with quality bits and I was able to do everything I needed.
Tom Markham -
If you're not running an admin account the sudo command won't work (which honestly, you should not be running admin). Rather than logging in to your admin amount via the OS, in the terminal type "login [admin username]," then the password and you'll be able to do the sudo command as described above. Once you're complete, type "logout [admin username]" and you'll be good to go. Obviously replace [admin username] with whatever the account name for your admin user is.
arichard2401 -