Einleitung

Verwende diese Anleitung, um den Akku in deiner Apple Watch Series 2 auszutauschen.

Achtung: Wenn dein Akku aufgebläht ist, musst du geeignete Vorsichtsmaßnahmen treffen.

  1. 3jETuMAJGuYOyrM1
    3jETuMAJGuYOyrM1
    lENxZXOSlnxhjUKM

    Verify your model. The back of the Cellular model just says GPS, so be sure to check the groves where the watch band goes to determine you model. I made the mistake of just reading the back of the device and since I’d been gifted the device didn’t know it was cellular. Cellular has a different type of touch force gasket, different screen, and different battery connections.

    Ryan Holt -

    From what I just read on Apple, the only differences in watch series 3 is 38mm and 42mm.

    mcr4u2 -

    As a consumer all you need to know are 38mm and 42mm

    Michael Adoga -

    The back will say GPS LTE if it’s the cellular version. If it doesn’t say LTE it is only the GPS version. The displays are different whether or not it is LTE(cellular).

    themepark -

    This alternative method only reboots the watch.

    Gregg Stanley -

  2. dAlO5MlADoI4aHmQ
    • Verwende einen iOpener (oder einen Haartrockner oder ein Heißluftgebläse), um das Display so zu erwärmen, bis es sich fast nicht mehr anfassen lässt.

    • Lasse den iOpener mindestens eine Minute auf dem Display liegen, so dass dieses überall heiß wird und der Kleber darunter aufweicht.

    • Wahrscheinlich musst du den iOpener mehrfach erwärmen oder auf dem Display bewegen, bis es überall heiß genug ist, um es abzuhebeln.

    I have heated up the iOpener to 165 degrees and left it on for more than a minute. No way I can lift the screen off with the exact knife. Tried different angles in various places, but no go. I also used a hair dryer un til the watch screen was too hot to touch and even tried a very hard cutting tool blade and also no go. Could n ever get the blade under the face I applied enough force where I could see that the blade left small marks, not very big, but could never get anything to move or lift. What am I doing wrong? I spent 47 years at a global computer company and I am used to taking apart small things and applying force when required. I don’t know what I am doing wrong. Please help me.

    Rafael Blanco -

    Getting the initial gap is not easy. Maybe a playing card could work its way in the tiny gap and cut some adhesive. After that there might be some success with an exacto knife. Or you want to try a piece of aluminum foil (folded for more rigidity) for cutting the adhesive. Be aware of the force touch gasket and that it might get damaged during that procedure.

    Tobias Isakeit -

    I finally used a hot air gun set to 150 deg. C heating up the edges by slowly spinning the watch around before the technique worked. Difficult is the level noted and it’s correct. Finally worked and watch perfectly functioning.

    Chris Giavotto -

    I had to heat the iOpener 2 times and leave it on top of the watch for 10 minutes.

    Axel Trujillo -

  3. TiPIaVjFQZ6OJlTT
    TiPIaVjFQZ6OJlTT
    6hNke1uI3WvUQ3Im
    yys2M1eO4GHOURDx
    • Weil der Spalt zwischen dem Display und dem Uhrgehäuse sehr schmal ist, benötigst du zum Trennen der beiden eine sehr scharfe Klinge. Lies folgende Warnhinweise sehr aufmerksam durch, bevor du weiterarbeitest.

    • Schütze deine Finger und halte sie fern von der Schneide. Schütze im Zweifelsfall deine freie Hand mit einem schweren Handschuh, wie z.B. einem Arbeitshandschuh aus Leder oder einem Gartenhandschuh.

    • Sei vorsichtig und wende nicht zuviel Druck mit dem Messer auf, es könnte sonst abrutschen und dich verletzen oder die Uhr beschädigen.

    • Trage eine Schutzbrille. Das Glas oder das Messer könnten brechen, so dass Splitter herumfliegen.

    • Du kannst das Armband dranlassen oder abnehmen, je nachdem, wie du die Uhr beim Reparieren besser halten kannst.

    Don’t cut your finger off!

    Mike -

    The Watch 3 stainless Steel has an additional Frame. Where do i have To Open it?

    asteffen@me.com -

    I wore thick gardening gloves just to be safe 😅 and it took a while but the screen did come off.

    Axel Trujillo -

  4. ZkWMSNMJYG6IZhkL
    ZkWMSNMJYG6IZhkL
    NQIDl3ZOwVEC44ZA
    oZFcsBuOlJ6JyOK3
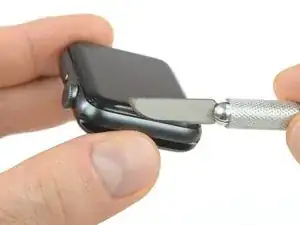
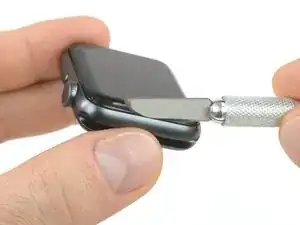
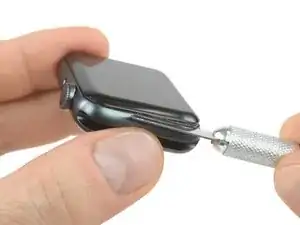
    • Setze eine gebogene Klinge in den schmalen Spalt zwischen Display und äußerem Gehäuse. Beginne an der kurzen Seite des Displays, nahe der Krone.

    • Drücke die Klinge mit viel Kraft gerade runter in den Spalt.

    • Wenn die Klinge drin ist, dann neige die Klinge seitwärts, um das Display etwas zu öffnen.

    • Setze die Klinge nicht tiefer als 2 mm ein.

    It’s difficult to grip case in a way that keeps fingers safe from the blade but doesn’t hit the side buttons and turn the device on!

    If it’s a struggle to get the display to release, warm case for a few more minutes.

    Kyle Powderly -

    I have tried so may times to get the display to release but nothing works. Should have bought a new watch LOL. Kept the iOpener on 2 times for 10 minutes and it still won't open. There must be a better way.

    Susan E. White -

    Hi Susan,

    if you're struggling to get the adhesive loose enough a hair dryer, heat gun, or hot plate may also be used, but be careful not to overheat the device. The edge should feel slightly too hot to the touch.

    Dominik Schnabelrauch -

  5. AjRJCyCiMOCZ3rad
    AjRJCyCiMOCZ3rad
    ARGTNpwjNblelqda
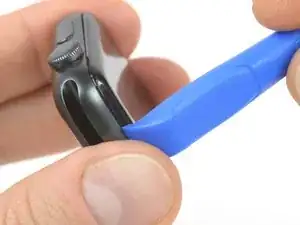
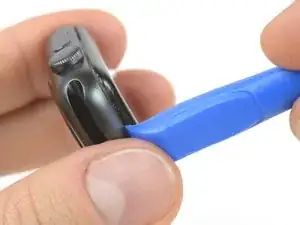
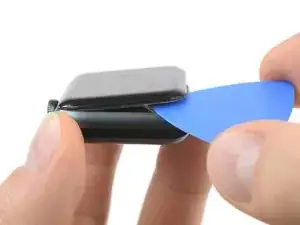
    • Wenn du mit der gebogenen Klinge einen schmalen Spalt geöffnet hast, dann entferne die Klinge und setze die dünne Kante eines Plastiköffnungswerkzeugs in den Spalt.

    • Drücke das Plastiköffnungswerkzeug in den Spalt hinein und vergrößere ihn, wobei du es mit deinem Daumen abstützen kannst.

    • Achte darauf, das Display noch nicht ganz zu öffnen oder abzulösen.

  6. R4FIOpCBksWgGmXY
    R4FIOpCBksWgGmXY
    XUMQGYuCDf4DO6MI
    GWW1SH1I4KqcmfKr
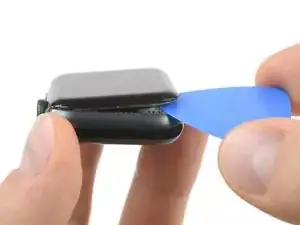
    • Setze ein Plektrum unter das Display und trenne die Force Touch Dichtung behutsam vom Display.

    • Bei den Akku- und Display Repair Kits von iFixit ist eine neue Force Touch Dichtung dabei, mach dir also keine Sorgen, wenn deine alte Dichtung kaputt geht.

    • Andernfalls kannst du deine Dichtung schonen und sehr sorgfältig unter der Dichtung hebeln. Wenn die Dichtung beim Hebeln und Hochheben des Displays reißt, musst du die Dichtung natürlich auch erneuern.

    • Schiebe das Plektrum um das Display herum und trenne den Kleber zwischen Force Touch Dichtung und Display auf.

    • Setze das Plektrum nicht tiefer als 2 mm ein

  7. rPZ1tKy2Hq2hQToM
    rPZ1tKy2Hq2hQToM
    vdTqXtcOWsXKFMeh
    x5qVggWBkbWBMNls
    • Öffne das Display noch nicht ganz, sonst ziehst du an den Kabeln.

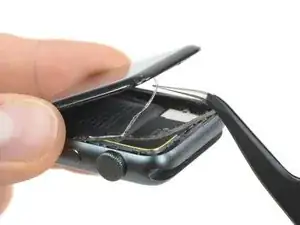
    • Ziehe den Klebstoff mit einer Pinzette vom Display und dem Force Touch Sensor Kabel, während du das Display im 45° Winkel öffnest.

    • Fädle den Klebstoff hinter die Displaykabel und über das Display um ihn zu entfernen.

  8. y1fV1Nd2PZhidSJy
    y1fV1Nd2PZhidSJy
    iJkqEdVVY2YdLKMo
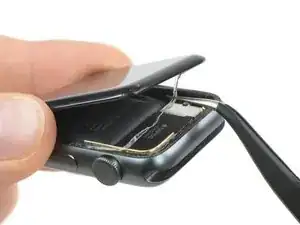
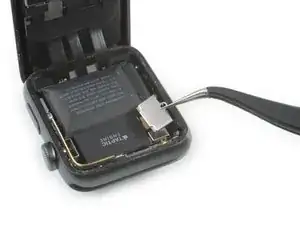
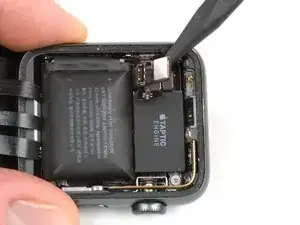
    • Entferne die Tri-Point Y000 Schraube, mit der die metallene Abdeckung des Akkusteckers befestigt ist.

    • Entferne die Abdeckung.

  9. rCcSY1GiFOR2oeRP
    rCcSY1GiFOR2oeRP
    USkmJGVUcoYa1Oal
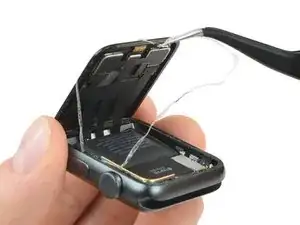
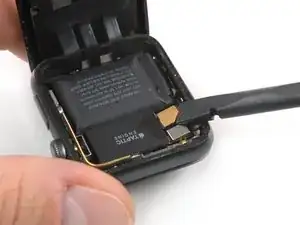
    • Trenne den Akku ab, indem du seinen Stecker mit der Kante eines Plastiköffnungswerkzeugs nach oben hebelst.

    • Biege den Stecker leicht nach oben, damit er sich nicht versehentlich wieder verbindet.

  10. nDRjCiwFAgKuunO6
    nDRjCiwFAgKuunO6
    ToMknTpJ6LcNTTvW
    yYkkSYHkB6cRuDSc
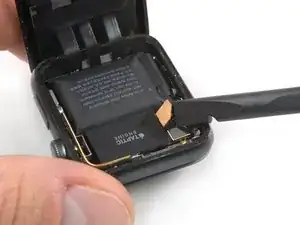
    • Biege den Stecker des Akkus aus dem Weg.

    • Setze die Spitze eines Plastiköffnungswerkzeugs unter die Steckerplatte des Akkus, sie ist fest daran verbaut.

    • Hebe die Steckerplatte des Akkus aus ihrer Vertiefung.

  11. dINYwkOWkB21mMcw
    dINYwkOWkB21mMcw
    gGuULW3EVHDZQSHH
    TSHBOGfQMwwD6WRk
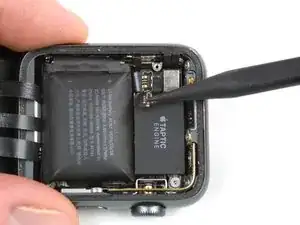
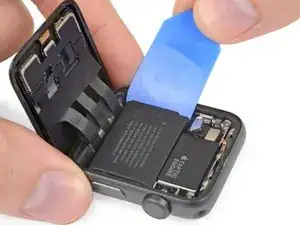
    • Schneide mit einer Schere ein Plektrum so zurecht, dass es etwa so breit wie der Akku ist. Achte darauf, dass keine scharfen Kanten entstehen.

    • Setze das zugeschnittene Plektrum zwischen den Rand des Akkus und das Gehäuse auf der Seite ein, die der Krone gegenüber liegt.

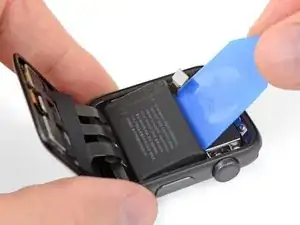
    • Hebe den Akku langsam und vorsichtig aus dem Gehäuse, um ihn allmählich von dem Kleber zu lösen, mit dem er befestigt ist.
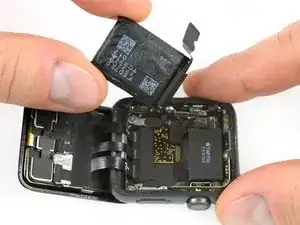
    • Wenn es nötig ist, kannst du auch gut an der Oberkante des Akkus gegen die Taptic Engine hebeln.

    • Achte auf die Displaykabel, um zu vermeiden, dass sie verdrückt oder verknittert werden, während du den Akku heraushebelst.

    • Achte darauf, den Akku nicht versehentlich zu perforieren, zu verbiegen oder anderweitig zu beschädigen, da dieser sonst explodieren oder Feuer fangen kann.

    Der Akku Wechsel ist absolut unproblematisch danke für die super Anleitung.

    Maximilian Theilig -

  12. 2TvuPVbcdDCB12hg
    • Entferne den Akku.

    • Vergiss vor dem Einbau des neuen Akkus nicht, die Schutzfolie vom Akku abzuziehen, so dass die Klebeflächen freigelegt werden.

    • Du kannst - wenn nötig - auch den vorhandenen Kleber zum Befestigen des Akkus benutzen. Als Alternative kannst du es auch mit einem kleinen Stück doppelseitigem Klebebands probieren, wie z.B. Tesa 61395, oder einen flüssigen Kleber auftropfen, wie z.B. E6000.

    • Wenn du ein Reparaturkit von iFixit benutzt, dann musst du mit der Anleitung fortfahren, die in der Zusammenfassung verlinkt ist. Sie zeigt, wie der neue Force-Touch-Sensor eingebaut und die Uhr verklebt wird.

    • Wenn du nur den Kleber und nicht den Sensor erneuern willst, kannst du alternativ auch mit der Anleitung zum Verkleben diese Reparatur beenden.

    If the protective plastic over the adhesive removes the adhesive from the battery, reattach the plastic to the battery. Carefully fold the tab of the plastic back on itself, and look for an edge to the adhesive. Using the blade, CAREFULLY scrape the plastic until you see the edge of the adhesive pull away from the plastic. Tap the edge onto the battery surface, and slowly remove the plastic, ensuring it doesn’t continue to pull at the adhesive.

    Kyle Powderly -

Abschluss

Wenn der neue Akku eingesetzt ist, dann fahre ab Schritt 10 dieser Force Touch Gasket Anleitung fort, um die Uhr zu verkleben und die Reparatur zu beenden.

Tobias Isakeit

Mitglied seit: 31/03/14

108055 Reputation

10 Kommentare

Ordered the kit and replaced the battery, no dice! I believe the components in my watch failed victim to thermal breakdown since the battery got so hot. After the battery replacement my watch acted the same. It got real hot again, so I am not sure what is actually wrong with the watch. I think it is time for a new one.

These directions were easy to follow. The screwdriver in the kit didn’t work at all. luckily I have a good kit with the right tip. If you are confident and able, this procedure should take about 2 hours. Thank you IFIXIT for providing this product an the easy to follow instructions.

Thomas Bole [Abston ES] -

Success! Following this guide and the gasket replacement guide saved having to buy a new watch. Like Thomas mentions in his review, the screwdriver was difficult to use. I eventually got it to turn the tiny screw by holding the watch from the bottom rather than just pressing down with the driver from the top.

A question: should I reset my watch after replacing the battery? Or will whatever throttling WatchOS put in place reverse itself?

dalexgray -

Yay it worked! Was supposed to wait for my boyfriend to do it but got impatient and gave it a go.. easy peasy even with my baby having a hissy fit inbetween ?

Beth Almond -

Thanks ! It worked perfectly in 30 minutes !

Benoit Maillard -

This guide made the repair quite simple. Opening the watch proved to be quite straightforward once it got started. The biggest challenge was actually getting the Force Touch gasket connector aligned and reinserted, but even that wasn’t tough. I’m not sure why this repair is classified as very difficult, unless it’s to discourage people who find everything to be difficult.

I did find that I had to force restart the watch twice after replacing the battery to take care of some strange problems with sluggishness, but after that was taken care of it fixed so many problems and the watch now runs all day without seemingly random shutdowns. Previously if the battery said less than 50% I knew it would probably shut down with a workout. Now it runs like new.

Arle Lommel -

The hardest part was separating the screen, I had to heat the iOpener tool 2 times and leave it on top of the watch for 10 minutes, wait until the watch was almost too hot to touch and ONLY then did the screen came off.

Axel Trujillo -

I agree with Axel, the toughest part was getting the display off. I left the watch on my 3D printer heat bed, set at 80℃, for about 15 minutes. After that the watch was so hot that I had to use a glove on my left hand to hold the watch down. Also, the curved blade is extremely important.

coffee -

How hot is too hot? At what temperature will the display be damaged?

mikefunkpa_c -

As long as you can touch it, your display should be fine. You might avoid anything beyond the ~95°C (~200°F) threshold for an extended time (~5min). But that’s just a rough ballpark. As in life, if anything smells funny, you might not want to continue ;)

Tobias Isakeit -

Success! The kit came with everything I needed and than some. Getting the screen off took some doing as my watch is pretty beaten up and dented in on the sides. Take your time, its not worth breaking it or cutting yourself. I ended up getting it open without slicing the force touch gasket, which was nice. Everything after that was a cakewalk, except for reconnecting the battery to the mainboard. The cables are stiff and very very small, so getting everything lined up was tricky. Don't force them! Overall though it could have been much worse. The watch booted back up without an issue and seems to be holding a charge.

Daniel Schabilion -