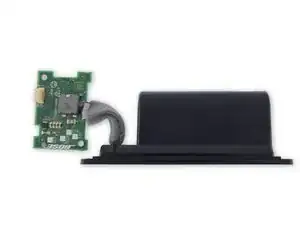
Einleitung

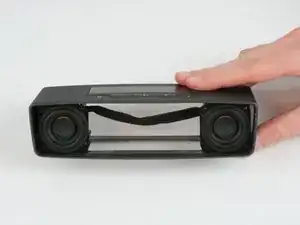
Diese Anleitung zeigt, wie das Gerät zerlegt und die Lautsprecher getauscht werden können. Achte während der Reparatur darauf, dass alle Teile und die Schrauben zusammen bleiben.

Hinweis: während der Reparatur muss der Akku aus- und wieder eingebaut werden. Dazu sind Lötkenntnisse erforderlich, sowie eine Menge Arbeit.

  1. Q6lCMJsX26BSfPKP
    Q6lCMJsX26BSfPKP
    hhSQLdLlaxcuVLGl
    • Drehe den Lautsprecher auf seine Rückseite.

  2. EaeGvC3kcpGtVnxD
    EaeGvC3kcpGtVnxD
    aINoZo2TZeBDRYkO
    • Entferne den Gummifuß vorsichtig vom Lautsprecher, indem du an den Kanten ziehst.

  3. DWfFRBU2v3NL3J6U
    DWfFRBU2v3NL3J6U
    g1Eb4DHfsWLbQOkC
    • Entferne die vier 6 mm T9 Torx Schrauben von den Ecken des Akkus.

    Not sure what’s going on here but T9 is the wrong size—too big—for the screws on my SoundLink Mini II. Maybe T8? Perhaps my model is more recent and they’ve changed sizes? I bought the screwdriver from IFIXIT following these instructions, so I’m a *bit* annoyed…

    David Whitley -

    That’s really frustrating. I’ve seen this before, where manufacturers swap screws and other components without changing the model number. I have a 64 bit driver set from iFixit, but I don’t recall which bit I used for this. The screws in my one are different lengths to the ones in the original instructions.

    Kate Morris -

  4. PJBPtBI4PgVyLPXQ
    PJBPtBI4PgVyLPXQ
    VMbKBRUfmxKZaUPW
    FTdsnvhJrhWGJlAX
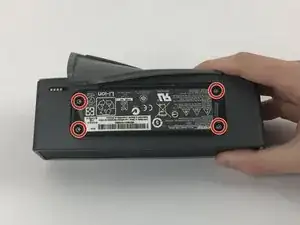
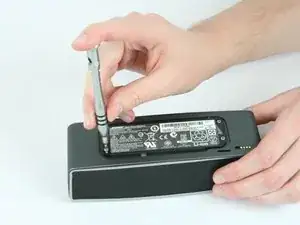
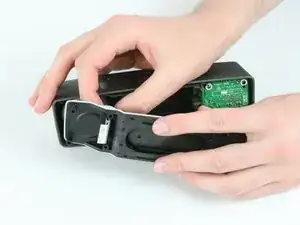
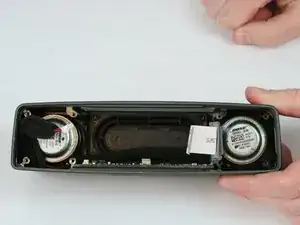
    • Hebe den Akku vorsichtig an der Seite nahe an den vier goldenen Kontakten an, entferne ihn aber noch nicht ganz.

    • Der Akku ist noch mit vier Kabeln an der Versorgungsplatine angeschlossen.

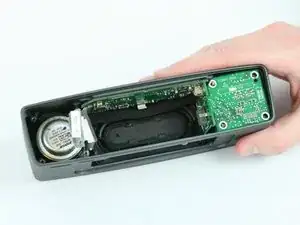
    • Löte die vier Kabel behutsam von der Versorgungsplatine ab und trenne den Akku komplett ab. Es ist wenig Platz für den Lötkolben, so dass die Gefahr besteht, das Gehäuse oder die Platine zu beschädigen; du kannst auch die Platine vorher ausbauen.

    • Unsere Lötanleitung zeigt dir, wie das geht.

    • Du kannst auch - ohne zu löten - den Akku und die Versorgungsplatine zusammen ausbauen. Dies erfordert aber weitere Ausbauarbeiten, während denen der Akku - in aller Vorsicht - immer noch über die Kabel angeschlossen bleibt.

    cuanto tiempo dura la bateria original ?

    Marcelo Lastra -

    the mini 2 battery is soldered to a smaller board, either u desolder it or buy it with the small board, but with that it is even harder to replace

    user user -

    Yeah this guide is just like the original Bose Mini which looked like that model had a way to replace the batter easily. I purchased a battery off Amazon thinking it was the same. This is not the same. The Bose Mini II has a battery hard-wired directly to the board. Might be too late but read this guide’s comments first to get the low down. The guide is very misleading. The BOSE SOUNDLINK MINI II **DOES NOT HAVE A REPLACEABLE BATTERY**

    Ian Lucero -

    yess, got the same problem. Purchased an substitute which had as Replacement No. the original Bose-No. on its description. Bose’s accu has 4 strings, the replacement has 5 strings (where to put the fifth then?!).

    Original we had to CUT OFF, because it is firmly soldered and glued with foam! No chance to replace it!! Nearly 60.- Swiss Francs as we say “for the foxes”.

    Maranathatalitha -

    DO NOT buy a replacement battery until you understand that the battery is HARD WIRED to the circuit board and is NOT designed to be replaceable. If you are not an electronics specialist, the only option is to send to Bose for battery replacement.

    Even if you are an electronics specialist, finding a replacement battery may not be possible.

    ldthom65 -

    I am very glad I took the time to review everything and all the comments before I started this procedure on my Soundlink Mini 2.

    I have to say, the author of this procedure is a pathetic jerk for posting this and not distinguishing the between the 1 and 2 versions. It is also highly suspect that there is no clear picture of the top of the unit, which would indicate which version is being used due to the fact that the 2 has no mute button.

    trmsd -

    Hey du hole Frucht, die Bose Soundlink 1 hat keine Kabel an der Batterie, nur die Soundlink Mini 2 hat Kabel die auf die Platine gelötet werden muss!

    Ihr Affen habt doch keine Ahnung!

    Und den Bose Schriftzug muss der Autor nicht zeigen, wegen der Rechtlichen Lage in Deutschland!

    r.janda -

    It’s disappointing, for sure. But to call the author, who’s been kind enough to post this without getting anything in return, a pathetic jerk is waaay over the top! Come on. If anyone deserves abuse, then it’s Bose for producing a speaker with a battery that’s totally and easily replaceable except they decided to solder it onto the circuit board for some unfathomable reason. Argh!

    B. J. -

    I suspect that the soldering the battery directly to the power board is a way to enhance revenue because most people will either send it in to be replaced or throw it away and buy another speaker. Of course Bose hopes that the replacement will be another Bose, but that is not likely for anyone who is frustrated by the idea that Bose would not make the battery easily replaceable.

    wannabagolfer -

    Absolutely. Great I checked up first. I will not buy any other rechageable battery operated Bose product. It is clear customer abuse. The same should go to companies like Samsung which produces cellular phones with practically embedded impossible to replace without risking breaking the cristal. Customer protection in this country unfortunately has gone away with lobby. (Legalization Of Bureaucratic BriberY) Same with Apple and then Microsoft when they do updates and then no longer support an OS that could be still useful for the needs of certain people or businesses

    Dario Grisales -

    ………..just bought a replacement battery based upon ifixit’s original post. This is neither a 5 minute two wire push fit job NOR one for an amateur to attempt. I now have a box of BOSE bits and spare unsuable battery.

    Thanks pal.

    Beware of internet advice

    Richard Brickwood -

    ……..just bought (£30) a replacement battery based up ifixit’s orginal post that it was a)simple and b)took 5 minutes only to discover that a) there are four wires involved hard solderied to a pcb. Spent an hour undoing torc screws to dismantel the whole thing. It is not possible.

    I now have abox of BOSE bits and a brand new unuseable battery. And no speaker.

    Shame on both BOSE and ifixit - the latter for being so misleading .

    Richard Brickwood -

    I’m pretty disappointed with ifixit on this one! I feel bad giving you guys a bad review but this one is just bad! It’s Missing steps, it’s labelled as easy when it certainly shouldn’t be. iPhone battery’s are easy. This requires awkward desoldering/soldering. In a tight spot. There’s not even a mention of that in this guide? Maybe someone could rewrite this so others don’t go and purchase a battery thinking it’s easy!

    Wiebie -

    The instructions are not complete, and I needed extra information to replace the battery on my soundlink mini 2. I successfully completed the battery replacement using instructions I found by searching for SLminiII_SM.pdf. That document describes the steps Bose technicians take. With that, it took about 30 minutes to replace the battery. I removed the board the battery is soldered to, which made it an easy soldering job (four through-hole wires, no SMT). I carefully saved and replaced the foam tape because the last thing you want in a speaker is buzzing sounds due to the wiring rubbing against the speaker. If you’ve already bought the parts, and have access to a soldering iron. I’d recommend searching for the instructions I used.

    Kate Morris -

    I was not able to find that document. Do you have any tips for finding it and I was wondering if you bought your replacement battery from ifixit or if you have any recommendations for where you bought yours.

    Michael Calaiaro -

    The instructions are at https://riverparkinc.com/wp-content/uplo... . I bought this battery from Amazon: https://www.amazon.com/gp/product/B08FHX... (not an affiliate link). The speaker is working fine and charging, a few months later.

    Kate Morris -

    Thank you very much

    daniel -

    I tried to follow these instructions. I cannot find where to download the 'Polycomm' software necessary to reset the hardwire between chip and battery. I've trawled all over the internet and Bose's own websites. Could some one please advise?

    Christie Dunne Murphy -

    I would like to measure the voltage of the battery before replacing it, does anyone know which one of the 4 wires is power or ground?

    Akash Arora -

    Playing with a soldering iron and live li-on battery leads ?

    A good way to burn the place to the ground !

    cricri -

    I have a box of SoundLink parts.

    That Polycomm software has got to be out there somewhere! Anybody?

    Does anyone have a copy of this software tool.

    Aaron V. -

    You don't need the Polycomm software, you just need to reinstall the Firmware even if it's up-to-date. Got to https://btu.bose.com/ and plug the speaker in and update. It may say it's up to date, but if you type A, D, V, Up Arrow & Down Arrow it lets you into advance mode and you can force the firmware to be reinstalled

    James Pither -

  5. glUEQaFP6atETI1s
  6. rwWecc5vTkAUn2LP
    rwWecc5vTkAUn2LP
    M3GVI6sWpJO5s2YL
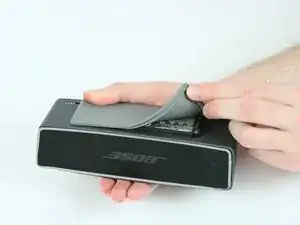
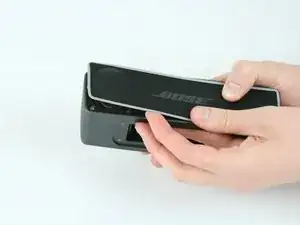
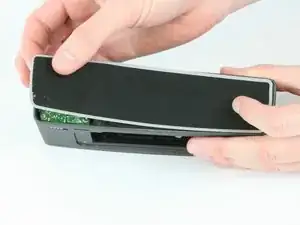
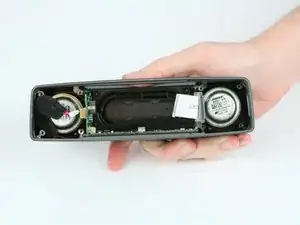
    • Entferne zuerst die vordere Lautsprecherabdeckung. Beginne in einer Ecke und heble sie ringsherum mit einem Metallspatel ab.

    • Die Abdeckung kann sich leicht verformen.

    The speaker grilles have foam tape. The shop manual suggest dissolving the glue with alcohol to avoid destroying the foam tape.

    Kate Morris -

  7. EVnTPxJumAHC2WNB
    EVnTPxJumAHC2WNB
    jJT5suIlUiCKpFhh
    gVOeaIXRaKNXrB1y
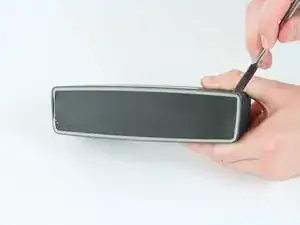
    • Entferne dann die rückseitige Lautsprecherabdeckung. Beginne in einer Ecke und heble sie ringsherum mit einem Metallspatel ab.

    • Die Abdeckung kann leicht verformt werden.

    Ich habe einen Ersatzakku gekauft, dieser hat aber jetzt einen Steckerteil mit 5 Anschlüssen, der alte Akku aber nur 4.

    Ich habe wieder 4 Kabel an die Platine gelötet. Wie muss der 5. Anschlusspunkt am Akku verbunden werden? Eine Antwort würde mich freuen!

    Danke, Karle

    Karlhans Schwarz -

    I recommend starting in the middle of one of the long sides and working outward, then doing the same with the other side. There are two strips of foam tape, about 2” long, at the centers of the long sides. The foam tape either needs to be cut or detached to remove the grille. The short sides are held on by tabs which must be released by bowing the center of the grille outward. Before reattaching, it’s helpful to put a slight inward bow into the grille, but to then seat the outer tabs before seating the center.

    Christopher Dickey -

  8. xxeTMNILKsXstbwe
    xxeTMNILKsXstbwe
    TpmOI3YB4TUdZN6e
    • Entferne die acht 9 mm Torx T9 Schrauben.

    For the model I have, the four screws on the left hand side were 15mm not 9mm.

    Kate Morris -

  9. pwVwqpF6bEWn1dPC
    pwVwqpF6bEWn1dPC
    uK33XhxhUQitrdSj
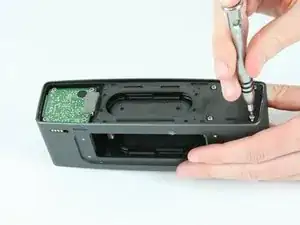
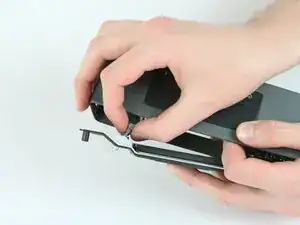
    • Löse den Flachbandkabelhalter mit dem Spudger ab.

    • Schiebe das Flachbandkabel aus dem Anschluss auf der Leiterplatte heraus.

    This is the step I am unsure of. Could you add a better picture or more information? Does the ribbon cable connector clip in, or simply slide in? The foam that covers the cable hides some detail here.

    Kate Morris -

    Updating my comment: I searched for SLminiII_SM.pdf and found more detailed instructions, which helped me complete the repair.

    Kate Morris -

    The black strip on the connector lifts from the back side of the connector and then the ribbon cable just slips out.

    Tracey Jackson -

  10. 1DGTlmxFisQbiPsP
    1DGTlmxFisQbiPsP
    3GdyrtBOSMjyYOQr
    GwjhGGgcnTFcTErK
    • Führe das Flachbandkabel durch die Trennwand zum rückseitigen Gehäuse durch.

    This step is not necessary if all you are doing is replacing the battery (if you want to do a complete tear-down, go ahead!).

    Kate Morris -

    It is easier to slide the cable out through the slot if the barbs on the cable grommet (the gray rubber piece at the base of the cable) are first pushed through the slot with a spudger.

    Christopher Dickey -

    During this step I ended up ripping the ribbon cable connector from the control board below the back plate. Do not try to remove the back panel from the connector side. The connector side MUST not be lifted while removing the back panel. Not sure where to go from here. The cable connector is destroyed. I will have to solder a new connector or buy a new control board.

    Tracey Jackson -

  11. AkjUHhUensPhlQLL
    AkjUHhUensPhlQLL
    IQybXHBRYxBqqVIV
    4qd14EPhvSQbS6Tm
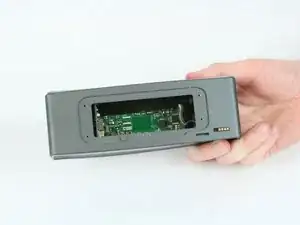
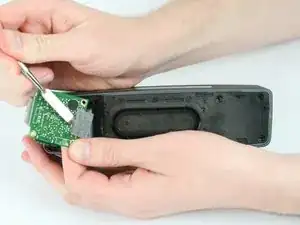
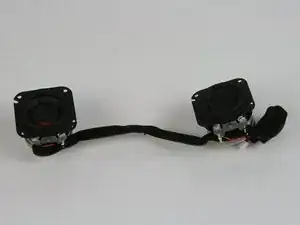
    • Hebe die obere Leiterplatte hoch und entferne sie.

    • Trenne das Kabelpaar beim Entfernen von der Platine ab.

    • Es gibt einen nicht verriegelten Stecker, der die obere Platine mit der Seitenplatine verbindet. Achte darauf, diesen Stecker beim Entfernen nicht zu beschädigen.

  12. DtsdtIBpwPaL5vWK
    DtsdtIBpwPaL5vWK
    3tYYlFN4btUPp4qI
    • Schiebe die Versorgungsplatine heraus und entferne sie vom Gerät.

    • Diese Platine war vorher mit dem Akku verlötet.

    • Es gibt einen nicht verriegelten Stecker, der die Tastaturplatine mit der Seitenplatine verbindet. Achte darauf, diesen Stecker beim Entfernen nicht zu beschädigen.

    If all you are doing is replacing the battery, you don’t need the following steps. Desolder the old battery from the board, solder the new one in, and reverse the steps to reassemble. Save and re-use the foam tape to prevent buzzing.

    Kate Morris -

  13. iPLQTiXk1b6Z6PHd
    iPLQTiXk1b6Z6PHd
    ZVSmyIOQyUNWGo5q
    • Entferne die acht 9 mm Torx T9 Schrauben von der Gehäusevorderseite.

  14. myOhPNfTpy2aTkfY
    myOhPNfTpy2aTkfY
    vUOi3KiwgqYjxTHO
    SfJIbSphC3jgBjVS
    • Entferne das Frontpanel mit einem Metallspatel vom Gehäuse.

  15. DdK3H6M1HI3dcWZD
    DdK3H6M1HI3dcWZD
    OojY1jWPcQNrquFd
    • Entferne die Lautsprecher vom Gehäuse.

Abschluss

Um dein Gerät wieder zusammenbauen, folge den Schritten in umgekehrter Reihenfolge.

Tyler Roessler

Mitglied seit: 15/02/17

1444 Reputation

10 Kommentare

Anyone know where to find the speaker for replacement?

Matthew -

Die Anleitung ist Fehlerhaft! Der Akku ist im SLM2 Festgelötet, in der Anleitung kein Wort davon und auch die Bilder sind damit Falsch.

Robert -

(englisch version below)

Scheinbar eine Verwirrung, es gibt verschiedene Ausführungen des selben Models. Es scheint als sie im amerikanischen die Soundlink mini 2 mit steckbaren Akku verkauft worden und die gelötete in Europa.

It seems there is some confusion ongoing, there are different versions of the same model. It seems likely in Amerika the Soundlink mini 2s battery is unplugable, as the european version is soldered.

Raphael Krug -

Nachtrag! Das ist die Anleitung vom Mini 1 und somit Falsch Deklariert.

Robert -

The German guy (Robert) seems incorrect. He claims this teardown is for the original Bose MiniSoundlink I. I just confirmed it is indeed a teardown for Bose Mini Soundlink II by checking the model number of my own Soundlink II with the teardown photos showing the model number (in steps 3 & 4). Both show model number 088796., confirming this is Soundlink II.

Jason -

Hi all.

One of the speakers of my soundlink mini II is malfunctioning (rattling/buzzing) due to (let us say) vandalism. Is there any place where I could purchase the replacement for the speaker?. I am in Spain and I can not find it. Thanks !

porrinchas -

How do you repair the press button on and off it has warned out. No longer cutting on or off due to the rubber switch wear and tear

Bernadette Everette -

Anyone know where can I get a shell and grill replacement part for my soundlink mini 2? I want to replace the shell and the grill of my soundlink mini 2.

Hadrian Wong -

Hi all,

instead of removing the parts in order to replace the cable I would recommend to unsolder the speakers from the cables and solder the new ones.

What do you think?

2ch -

Hi all,

while changing the speakers I learned that the cables are not soldered but wrapped around the contacts. However, they can easily be soldered which seems to me recommended. Works perfectly and spares time.

2ch -