Einleitung
Wenn dein Mac an ein Laufwerk ohne Betriebssystem angeschlossen ist, oder das Startlaufwerk defekt ist, dann zeigt der Computer beim Hochfahren kurz ein Laufwerksicon mit Fragezeichen und fährt wieder runter.
Diese Anleitung zeigt dir, wie du deinen Mac im Internet Recovery Mode starten kannst, so dass du Werkzeuge, wie z.B. das Festplattendienstprogramm, die Time Machine und den macOS Installer aufrufen kannst.
Internet Recovery ist nur auf Apple Computern ab Baujahr 2009 verfügbar. Wenn dein Computer in 2010 oder 2011 hergestellt wurde, dann musst du eventuell auf die letzte Version von macOS updaten und/oder auch ein EFI und SMC Firmware Upgrade durchführen, um Internet Recovery aufrufen zu können
-
-
Wenn der Computer ganz heruntergefahren ist, dann drücke die Einschalttaste und drücke und halte sofort danach die Tastenkombination cmd+Option+R
-
-
-
Wenn eine sich drehende Weltkugel erscheint, kannst du die Tasten loslassen.
-
Während des Starts von Internet Recovery dreht sich die Weltkugel weiter. Wenn du kein Netzwerkkabel benutzt, wird die Frage choose Network (wähle Netzwerk) erscheinen. In diesem Menü kannst du dein Wi-Fi Netzwerk einstellen.
-
-
-
Wenn die Netzwerkverbindung hergestellt ist, wird unter der sich drehenden Weltkugel ein Fortschrittsbalken gezeigt.
-
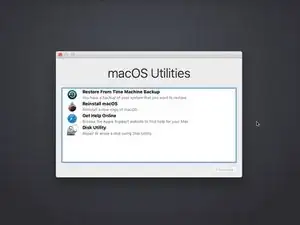
Über die Menüs zur Wiederherstellung lassen sich die Daten einer Time Machine Sicherung zurückholen, macOS neu installieren, Online Hilfe einholen und das Festplattendienstprogramm aufrufen, mit dem du angeschlossene Laufwerke formatieren oder Probleme diagnostizieren kannst.
35 Kommentare
Apparently PowerBook G4 12” does not work for restoral based upon this exercise?
Oh, I’m so sorry! I forgot to specify: internet recovery mode is only available on newer Apple computers. I’ve updated the intro now, sorry for the confusion!
So a mid 2009 computer won’t have internet recovery mode?
I bought a Asgard (seems operates from HongKong) 2TB NVME PCIe M.2 SSD that I installed into mackbook pro 15in mid 2015 with sintech adapter for conversion to MacBook AHCI controller. The disk utility does not show this SSD. Later I installed in same way another Sabrent SSD 2TB it worked fine.
What might have gone wrong in the fist SSD. Could that SSD itself faulty or incompatible? any fixes available?
GBish -
Two main reasons:
- You aren’t pushing deep enough your new ssd drive into the slot. Please reopen your mac, unplug the battery connector and push the new ssd to a fashion position.
- Your are missing the Alt/Option key. Please make the full shorcut: Alt+Shift+R.


I thought this guide is for a completely new SSD, but in this example MacOS appears to already be running. Is the target SSD connected internally via SATA or is this guide for a USB based second SSD that will also run the OS?
In the latter case, is the intent to run internet recovery on the new SSD and then open the machine up and connect it directly, replacing the old disk?
orun bhuiyan -
Sorry for the confusion, Orun! The new SSD guide shares a few steps with the general “boot to internet recovery mode” guide. If you’re installing MacOS to a new drive, you can skip this step. :)
Taylor Dixon -
Just to clarify, I have a late 2009 MacBook 6,1 running El Capitan and will be upgrading to a new SSD. Will Internet recovery work with this computer? The article states “after 2009”. Also I want to upgrade to High Sierra at the same time is there an option to select which OS or how does it decide?
nathan davis -
My current hard drive won’t read. I don’t care about saving anything on the computer at all and had planned on starting fresh. Can i just install the drive then do internet recovery mode or do i still have to have a backup usb with the os preinstaled?
J H -