Einleitung

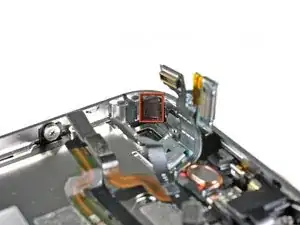
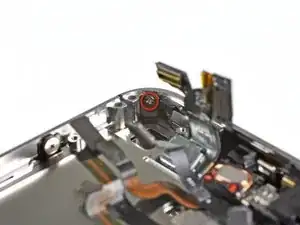
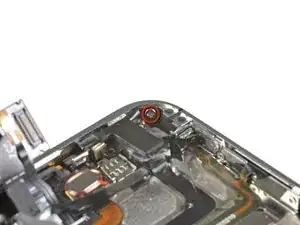
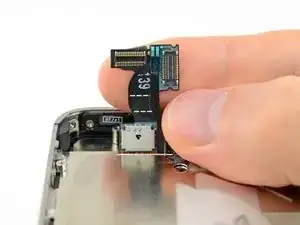
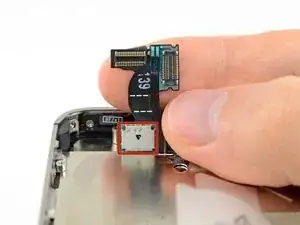
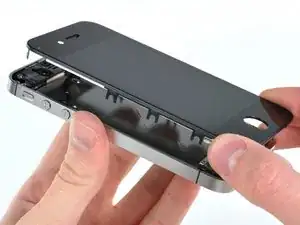
Benutze diese Anleitung, um ein gebrochenes Frontpanel oder ein gebrochenes LCD zu ersetzen.

Nach dem erfolgreichen Austausch der Displayeinheit kannst du dein neues Display mit einem Screen Protector vor Kratzern schützen.

  1. AdErsIJhNJPEIwaH
    • Bevor du anfängst, musst du den Akku deines iPhones auf unter 25% entladen. Ein geladener Lithium-Ionen Akku kann sich entzünden oder explodieren, fall er versehentlich beschädigt wird.

    • Schalte dein iPhone aus, bevor du es auseinanderbaust.

    • Deine iPhone Rückabdeckung ist entweder mit zwei Kreuzschlitzschrauben #000 oder Pentalobeschrauben von Apple befestigt. Schaue nach, um welche Schrauben es sich handelt, um sicher zu gehen, dass du den richtigen Schraubendreher zum Lösen hast.

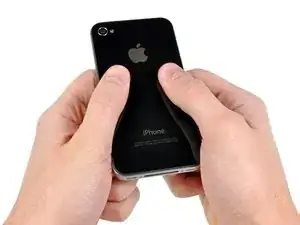
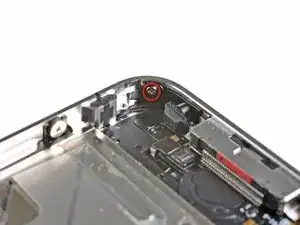
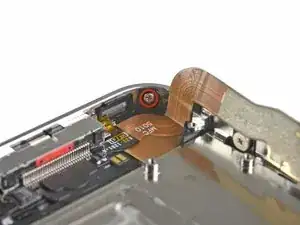
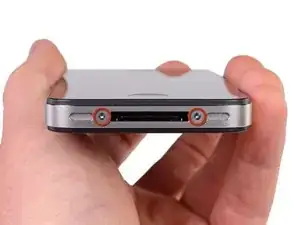
    • Entferne die beiden 3,6 mm Pentalobe oder Kreuzschlitzschrauben #000 neben dem Dock Anschluss.

    Pra descarregar a bateria, antes de fazer o serviço, isso serve pra qualquer celular?

    Gilmar Dutra -

  2. rVhDuRx2uaJSuxf2
    rVhDuRx2uaJSuxf2
    2vvnHJnD3YDvbmnv
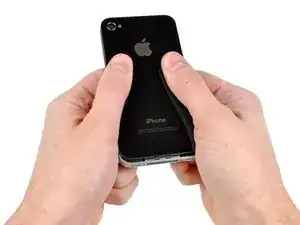
    • Schiebe die Rückabdeckung in Richtung Oberkante des iPhones.

    • Das Abdeckung wird sich um etwa 2mm verschieben.

  3. WJeyQyaeDLrtJgqQ
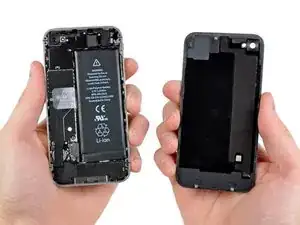
    • Entferne das hintere Panel von Hand vom iPhone. Verwende alternativ einen Saugheber.

    • Achte darauf, die Kunststoffklammern, die an der Rückabdeckung befestigt sind, nicht zu beschädigen.

  4. oLyEUqmIVWe4BRU2
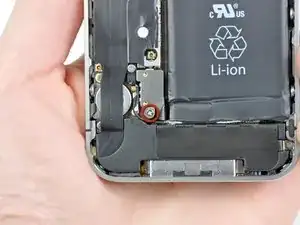
    • Entferne die einzelne 1,5 mm Kreuzschlitzschraube, die den Akkustecker am Logic Board befestigt (falls vorhanden).

    you do not need to take the battery out as chuck said so you dont run the risk of braking the battery connector socket from the logic board

    22therealala -

    Won't you need the battery removed to access the large-headed screws on the side which hold the front display?

    Casey Baierl -

    In my situation, the #00 screwdriver had a hard time trying to get the screws off. Using a glasses screwdriver kit may be a better alternative if the screws are resistant to the #00 screwdriver.

    tjaeger -

    Unfortunately the battery screw was already stripped probably from original assembly. We used a pair of nail clippers as pliers to grab a hold of the screw by the edges to turn it. If it hadn't have been for the stripped screw it would have taken us about 10 minutes, as it was it took us 30-40 minutes if you count searching for solutions for removing the stripped screw.

    Margaret Burruss -

  5. KR5yGXHNNDTdPfDS
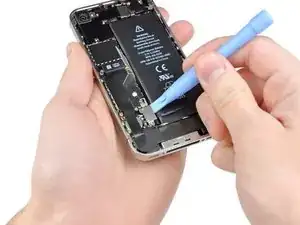
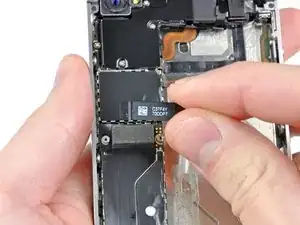
    • Benutze die Kante eines Plastiköffnungswerkzeugs um den Akkustecker vorsichtig aus seinem Anschluss auf dem Logic Board nach oben zu hebeln.

    • Achte sehr darauf, nur am Akkustecker und nicht am Anschluss auf dem Logic Board zu hebeln. Wenn du am Anschluss auf dem Logic Board hebelst, kannst du ihn ganz abbrechen.

    • Entferne die Metallklammer, die den Antennenstecker bedeckt.

    I don't see the metal clip covering the antenna connector, in the photo or in my phone. Hope this isn't a deal breaker.

    Gary Tash -

    I don't see it either. I think the metal clip is on the model A1332. The GSM model.

    mcr4u2 -

  6. y2wXHiHrNdk4arNj
    y2wXHiHrNdk4arNj
    rVNi5HbNfyNYnJWK
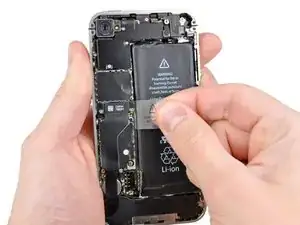
    • Ziehe die freiliegende durchsichtige Plastiklasche nach oben, um den Akku von dem Klebeband zu lösen, mit dem er am iPhone befestigt ist.

    • Falls die Lasche abreißt bevor der Akku gelöst ist, dann schiebe vorsichtig einen Spudger unter den Akku, um den Kleber zu lösen. An anderen Stellen zu hebeln könnte Schäden verursachen.

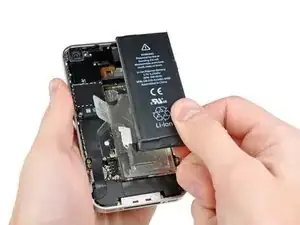
    • Entferne den Akku.

    • Falls dein Ersatzakku in einer Plastikhülle geliefert wurde, dann entferne sie vor dem Einbau, indem du sie vom Flachbandkabel abziehst.

    • Reinige vor dem Wiederzusammenbau alle metallenen Kontaktpunkte mit einem fettlösenden Reiniger wie Windex. Die Öle an deinen Fingern können drahtlose Interferenzen verursachen.

    • Führe nach dem Wiederzusammenbau einen Hard Reset durch. Dies verhindert diverse Probleme und vereinfacht eine eventuell trotzdem notwendige Fehlersuche.

    Note that the pull tab is not actually attached to the battery. It is attached to the iPhone chassis, and is only used to separate the battery from the adhesive. (Don't expect it to come out with the battery!)

    Also, the adhesive is VERY strong. I had to use my plastic opening tool to assist in prying the battery loose. This is probably the most nerve-wracking part of the job.

    Matt Strange -

    It is much easier to slightly WARM the battery with a HAIRDRYER not a HEAT GUN to soften the adhesive. DO NOT GET BATTERY HOT AND DO NOT USE HEAT GUN

    Joe -

    I just did this today. Everything was as scripted. Mine had lots of adhesive and had to use plastic spudger to go around battery to loosen up. Do not use plastic tab until you can see under battery a little bit. Great instructions. Took less than 10 minutes.

    kamullins4135 -

    The adhesive is very strong and I was initially worried about damaging the phone by prying so much. There are a couple of places below the volume switch where you can pry between the metal of the case and the battery. If you lift the battery just a little, wiggle the pry bar further in and then start moving down the case. Don't worry about bending the battery, its dead anyway.

    Do not pry on the left side (circuit board side) and do not use the pull tab until the adhesive is broken loose.

    martin474 -

    I tried this at first with a plastic pry tool, and the adhesive was so strong that I broke the tool. I then used a large screwdriver and applied pressure very slowly along various places on the outer side of the battery. That eventually did the trick.

    alsmith1928 -

  7. jPUAxeb2mf23g3xh
    jPUAxeb2mf23g3xh
    qCYXtFxfDw41WUvT
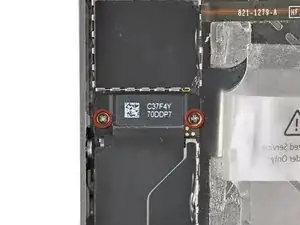
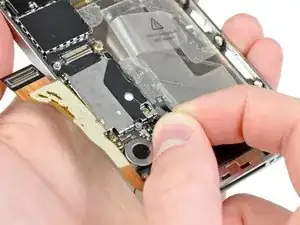
    • Entferne die beiden 1,8 mm Kreuzschlitzschrauben, die das Dockanschluss-Kabel am Logic Board befestigen.

    • Entferne die dünne Metall-Kabelabdeckung des Dockanschlusses.

  8. MBSwlPHH1tlijFAx
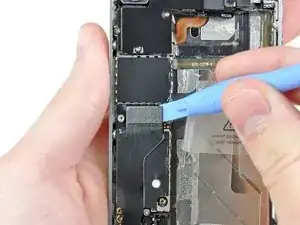
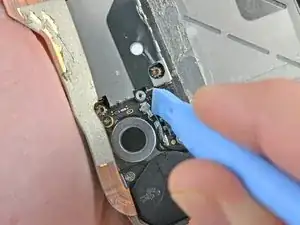
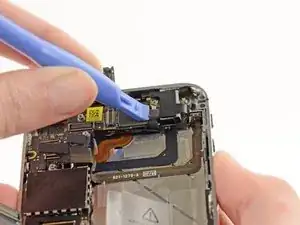
    • Benutze die Kante eines Plastiköffnungswerkzeugs, um das Dock-Kabel aus seinem Sockel auf dem Logic Board hochzuhebeln.

  9. EmsOBgGNAbgmHLWR
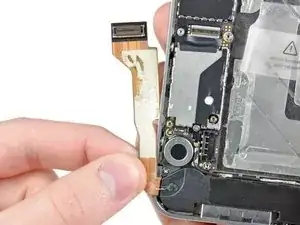
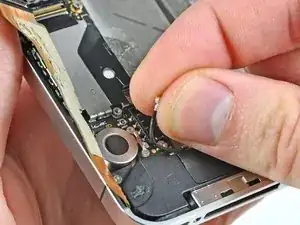
    • Löse das Dockanschluss-Kabel vom Kleber ab, mit dem es am Logic Board und an der Seite des Lautsprechergehäuses befestigt ist.

  10. mE5jRDmiVOYtCWct
    mE5jRDmiVOYtCWct
    3gIYQlcPE1fFYThA
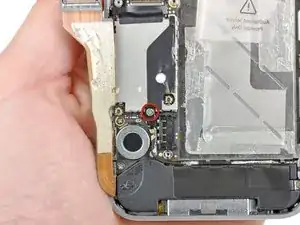
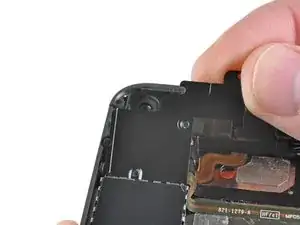
    • Entferne die 1,6 mm Kreuzschlitzschraube, mit der der Druckkontakt am Logic Board neben dem Vibrationsmotor befestigt ist.

    • Entferne des Druckkontakt.

  11. 5G3cLCN1qQQuKDFU
    5G3cLCN1qQQuKDFU
    j1TAQgtTXTl4ZtAb
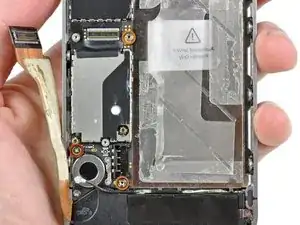
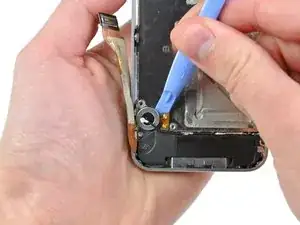
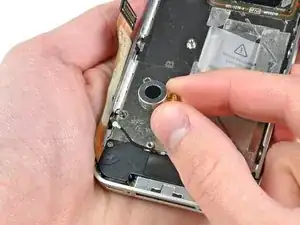
    • Benutze die Kante eines Plastiköffnungswerkzeugs, um das Kabel der Mobilfunkantenne aus seinem Anschluss auf dem Logic Board zu hebeln.

    • Löse das Kabel der Mobilfunkantenne unter den Metallstiften, die am Logic Board befestigt sind, heraus.

    • Beim Wiederverbunden des Antennenkabel mußt du SEHR sicher sein, dass der runde Stecker am Ende des Kabels genau auf seine passende Hälfte auf dem Motherboard passt bevor du darauf drückst. Wenn du das nicht tust, werden beide Hälften des Steckers sehr wahrscheinlich zerstört.

  12. OEGdKuWBO6I5QNEd
    • Entferne folgende fünf Schrauben:

    • Drei 1,3 mm Kreuzschlitzschrauben

    • Eine 1,5 mm Kreuzschlitzschraube

    • Eine 2,4 mm Kreuzschlitzschraube

    Careful here...On my phone, the little mounting screw boss (the part the screw threads into) of the top red-circled screw came unglued/welded from the underlying board, meaning the screw will no longer be able to be screwed back in.

    usnmustanger -

    The three 1.3 mm screws are very difficult to distinguish from the 1.5 mm screw. I spent a long time with a magnifying glass trying to tell them apart. For the other steps of the repair, I kept the screws in a tray compartment along with the piece that they connected, but for this step I recommend keeping each of the different types of screws separate.

    alsmith1928 -

    One of the 1.3 screws stripped on the head. Any idea how to remove it? I got the other screws out.

    kayers -

  13. GQyU1ZsgIw2KAQH3
    GQyU1ZsgIw2KAQH3
    DFbmxVvPNnTVCUaC
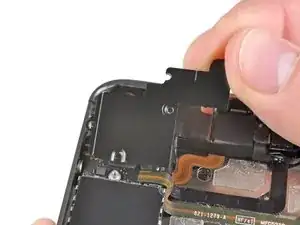
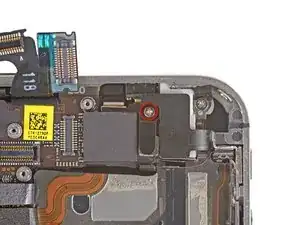
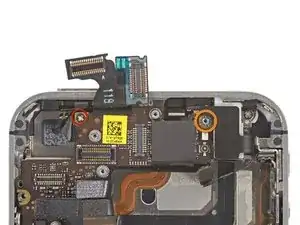
    • Hebe die Kabelabdeckung an der Kante oben am iPhones an.

    • Ziehe die Rasten der Kabelabdeckung aus ihren Schlitzen in der EMI Abdeckung auf dem Logic Board und entferne sie vom iPhone.

  14. yNrw2UpQCM5dQHrH
    yNrw2UpQCM5dQHrH
    JN5bLLXuhKBMSOHl
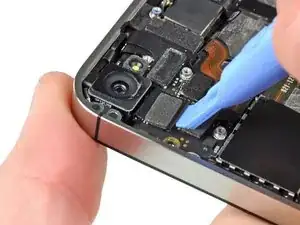
    • Benutze die Kante eines Plastiköffnungswerkzeugs, um den Stecker der Rückkamera aus seinem Anschluss auf dem Logic Board zu hebeln.

    • Achte darauf beim Hebeln keine umliegenden Komponenten auf dem Logic Board abzubrechen.

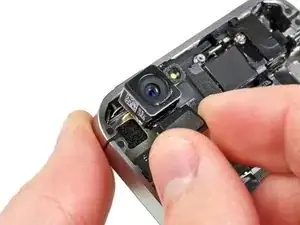
    • Entferne die Rückkamera vom iPhone.

    • Achte darauf, die Rückseite der Displayeinheit nach dem Ausbau der Rückkamera nicht zu verkratzen.

    Better to delay removing the camera and its cable until the Display and Digitizer cables are removed as there is an arm on the right side of the camera that slips under the other cables.

    ed50buffalo -

    I agree with ed -- move the camera removal step until after Step 16, after the digitizer and display cables have been removed, as there is a tab/arm on the camera's cable that should go under these two cables during reassembly.

    Chris Kovach -

    I found it quite easy to remove the camera at this step. Just simply move the camera up and slip it to the left in order for the arm/tab to come out.

    Kent -

    When putting the camera back in, make sure the tab on the right goes under the display and digitizer cables.

    Calion -

  15. GRmvQwhwL4KfARlL
    • Trenne die fünf Kabel nahe der Oberkante des Logic Boards in der folgenden Reihenfolge:

    • Kabel der Kopfhörerbuchse/des Lautstärkereglers

    • Kabel der Ein-/Ausschalttaste

    • Frontkamera-Kabel

    • Touchscreen-Kabel

    • Displaydatenkabel

    • Benutze die Kante eines Plastiköffnungswerkzeugs, um die Kabel zu trennen. Heble damit vorsichtig ihre Stecker hoch und aus ihren Anschlüssen auf dem Logic Board heraus.

    • Achte darauf, keine der kleinen und empfindlichen Komponenten auf der Oberfläche abzubrechen, während du die Kabel trennst.

    The Digitizer Cable on the new display seems to be too short. Trying to make it reach. It doesn't reach its place on the logic board. Going to disassemble and start over. (Step 15)

    Any pointers?

    chris -

    What happened was there is a tab on the cable, and that didn't go all the way through the casing. I made this mistake about 3 times. It's not too short, just move the screen a little away from the casing, and pull the cable all the way through without ripping it.

    savage24x -

    ⚠️ On reassembly, before plugging in the screen/digitizer cables, put the rear facing camera back in. There's a prong on the camera that lays underneath them.

    I Can't Even -

  16. 4PDhh2ye4iRgJJ6g
    • Entferne die 1,5 mm Kreuzschlitzschraube #000 bei der Kopfhörerbuchse.

    The two verizon phones I've repaired so far both have a phillips screw that screws into the flathead screw that is shown here. The grounding clip is between the phillips and the flathead. So remove the phillips, and then the grounding clip, that will reveal the flathead screw.

    boo -

    take out screw on top of stand of first, then take of grounding plat, and then stand off.

    Corey Berghorst -

    This is correct.

    savage24x -

    Echoing the notes from 'boo' and Corey -- that's exactly what I saw too. Perhaps the guide should be updated?

    Matt Strange -

    This has been changed several times on the iphone 4 logic board manual, and the changes are always being reverted. There _IS_ a screw in step 16, but someone seems intent on not having it mentioned in the manual. Dunno why...

    Mobile Rapid Response Unit -

    Because it's mentioned in Step 20.

    usnmustanger -

    It may have been mentioned in step 20 at some point, but it isn't anymore. The phillips head screw that's mentioned in step 20 is the one holding the grounding finger to the rear-facing camera corner of the motherboard.

    That said, my concerns about step 16 have since been rectified, so I suppose step 20 could've been fixed at the same time.

    Mobile Rapid Response Unit -

    The manual does need to be updated for the screw being inside the standoff screw.

    Billy -

    Some Phones such as mine (march2012) had a philips head screw here..

    Anson -

    There's a little rubber piece that you can see in the Step 17 & Step 21 pictures just above the yellow sticker. It fits over the edge of the board where the two ribbon cables from the display/digitizer come up through the board (Step 36). It's there to make sure the ribbon cables don't rub against the sharp edge of the board. This piece loves to fall out when pulling the logic board off. Make sure to put it back in when routing the cables in Step 36, thin edge on the bottom, thicker edge on the top.

    Jere -

  17. tHSThYh2FqGbKO3J
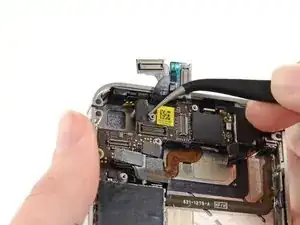
    • Hebe die kleine Erdungsklammer vom Logic Board ab und entferne sie vom iPhone.

    one of the small prongs on the standoff near the headphone jack broke off, is this a big deal or should i not worry about it

    Sam -

    Don't worry about it, the stand-off just holds the wifi antenna in place

    Jake -

    Can you show how this piece attaches?

    Mitch Frederick -

    This piece broke when i had to drill out stripped screw. Is it important enough to replace it?

    Buhz -

    hey okay so i did all the step and my i phone screen wont work and know the power button

    wont work ether help

    Apolonia -

  18. NxcOGwwSLAG41Xsg
    • Benutze die Kante eines Plastiköffnungswerkzeugs, um den Stecker des Wi-Fi Antennenkabels vom Logic Board zu lösen.

    • Wenn du den Stecker des Wi-Fi Antennenkabels wieder mit dem Motherboard verbindest, achter GENAU darauf, dass der runde Stecker am Ende des Kabels genau auf seine passende Hälfte auf dem Logic Board passt bevor du ihn festdrückst. Andernfalls gehen beide Hälften der Verbindung sehr wahrscheinlich kaputt.

    For me, aligning the connector when putting things back together was the most difficult part of this repair. Unlike reattachment of the radio antenna in step 11, it is very difficult to see whether the male/female are aligned properly before applying pressure. Unfortunately, I have no secret as to how to accomplish this, other than to say that my WiFi is working after the repair.

    alsmith1928 -

  19. WXhngtHrSBWP2uuu
    WXhngtHrSBWP2uuu
    uEaJ3UIQeohfukTr
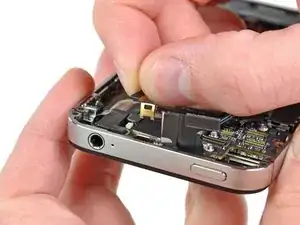
    • Falls vorhanden, entferne das Stück Klebeband, dass eine Kreuzschlitzschraube bei der Ein-/Ausschalttaste bedeckt.

  20. gpShvH22OoTAkett
    • Entferne die 2,5 mm Kreuzschlitzschraube #000, die das Logic Board bei der Ein-/Ausschalttaste befestigt.

    • Entferne die 4,8 mm Abstandsschraube bei der Kopfhörerbuchse.

    • Abstandsschrauben lassen sich am besten mit einem iPhone Standoff Bit (Abstandsschrauben-Bit) und einem Bithalter entfernen.

    • Zur Not geht es auch mit einem kleinen Schlitzschraubendreher, sei aber besonders vorsichtig, damit du nicht abrutschst und umliegende Komponenten beschädigst.

    can someone tell me what that flap thing is thats right behind the other? also whats its use & how important it is. ( the one thats hidden behind the other)

    Camarri -

    Now is a good time to remove the gold grounding finger. I used the condiments cups from Wendy's (fast food restaurant) to hold my screws for each step. Hope this helps.

    Kent -

    I’d use a Phillips 00 instead of a flathead

    Zach Heaton -

  21. dR5KCnwp21jWj2ZN
    • Entferne die 3,4 mm Kreuzschlitzschraube beim Vibrationsmotor.

    • Entferne die beiden 3,6 mm Abstandsschrauben entlang der Seite des Logic Boards bei der Vertiefung für den Akkus.

    When replacing the standoff screw closest to the dock connector, make sure it is tightened all the way down. The battery terminal screw fits in the standoff later, and if the standoff isn't tight (NOT TOO TIGHT!) then the battery will not be completely connected and your phone will power off unless tethered. This mimics a bad logic board symptom! Inspect this before replacing your logic board!

    goodski -

    The standoff screws are very difficult to get out unless you have a very tiny (jeweler's) flathead screwdriver, which I lacked. A pocketknife did work, however.

    Calion -

  22. XiODlAOsicZprM33
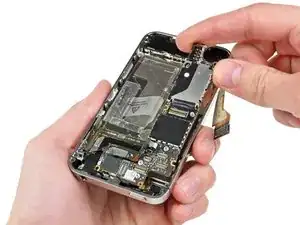
    • Hebe das Logic Board vorsichtig an der Kante beim Lautsprechergehäuse an und schiebe es von der Oberkante des iPhones weg.

    • Entferne das Logic Board.

    • Achte vor dem Wiederzusammenbau darauf, alle Metall-Kontaktpunkte auf dem Logic Board (ausser den passenden Hälften des Steckers) mit einem entfettenden Reinigungsmittel oder Isopropylalkohol zu reinigen. Das Fett deiner Finger kann sonst unter Umständen Probleme mit der Erdung hervorrufen.

    • Oben am Logic Board befindet sich ein kleines Gummipad, das ein Reiben der Displaykabel an der Kante des Logic Boards verhindert. Falls es sich während der Reparatur löst, dann achte beim Einbau des Logic Boards darauf, dass es korrekt positioniert ist.

    When I was attempting to reinstall the logic board (step 21 in reverse), a small rubber bumper came loose from 'somewhere' on the board (I think). It isn't visible in any of the photos, so I really have no idea where it came from!

    Matt Strange -

    I don't see it in the pictures either, but I'm pretty sure there is a black bumper that rides on the 'top' of the logic board. I believe it reduces friction between the display/digitizer cables and the top of the logic board.

    Ken McCann -

    You can see this "bumper" in steps 16 and 20 (right above the yellow sticker in the pics), and it provides relief for the digitizer and display cables as they both come up and around the edge of the logic board. I put my bumper with its thicker side down towards the inside of the phone and it worked fine.

    Chris Kovach -

    This is correct, and if you look closely the rubber piece has a "thick" and "thin" side. The "thin" side should be facing "up" on logic board (towards back cover) while the "thick" is pointed "down" (towards screen)

    Joe -

    The rubber bumper has a groove in it, which rides a notch along the top edge of the logic board. Its purpose is to ease pressure between the top of the phone and the board. If you look at the top of the frame, there is a little horizontal ridge about 0.8cm (3/8") long which is just the right width of the rubber bumper.

    For reference:

    http://i.imgur.com/GITTv.jpg

    http://i.imgur.com/IoeZV.jpg

    http://i.imgur.com/Po9h8.jpg

    TheIronGiant -

    Your images show incorrect placement of the rubber spacer. Step 20 shows correct placement. It is just above the scan code sticker on the motherboard. That is where the ribbon cables roll over, so it makes sense.

    I assume the thick side would be facing the rear of the phone, but can not be sure.?

    http://d3nevzfk7ii3be.cloudfront.net/igi...

    Keil Miller -

    I wouldn't use Windex. It's mostly water. Why would anyone put water on a connection? Use isopropyl alcohol and be certain that it's at least 95% alcohol.

    Better yet use contact cleaner or the original Brakleen (in the RED can). You can find the Brakleen at any automotive store.

    Tom Brandolini -

    I am having major issues with the motherboard! I have removed all the screws and done all the necessary steps, but the motherboard won't budge! It will not move at all! Help!

    kcmonstr -

    Never mind! I got it! It was like screw inception O.O

    kcmonstr -

    I experienced that when the rubber spacer had the thick side up towards the rear of the phone, the display data cable would plug in but had enough pressure from the rubber bumper pushing up that it would eventually become partially unplugged. This may not be immediately apparent while putting the phone back together because of still being partially plugged in. This was not an issue when the thin side was installed facing up towards the back of the phone.

    uncletom -

  23. 5Wh1WLWjUYPG5bS6
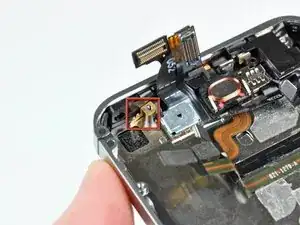
    • Achte darauf, den kleinen Erdungsstift für die Rückkamera bei der Ein-/Ausschalttaste nicht zu verlieren.

    Hope someone can ease my uncertainty: does the grounding finger for the

    rear-facing camera go on TOP of the motherboard OR between the motherboard and

    the standoff???

    Tom Brandolini -

    Under. There is nothing to ground if it went over the pcb. Look on the backside.

    Keil Miller -

    It shouldn't matter. If on top, it will still be grounded through the screw. I've done both without any problems.

    Anthony -

    What happens if you accidentally lose this piece or when putting it back together it shoots somewhere

    Jen -

    i didn’t see that thing when i removed the camera

    meow -

  24. gWsBKB3ZEsX2oA3O
    gWsBKB3ZEsX2oA3O
    mLCU4JFlZJvoiIKT
    • Benutze die Kante eines Plastiköffnungswerkzeugs, um den Vibrationsmotor von dem Kleber zu lösen, mit dem er am Rahmen des iPhones befestigt ist.

    • Entferne den Vibrationsmotor.

    For the record.... This thing was really REALLY stuck with adhesive when I removed it. Surprised I am the first to comment on this.

    kevindelong -

    Make sure to align the hole on the vibrator to the hole on the frame for the screw that will attach the logic board.

    uncletom -

  25. sFHXMOVcJCsAcTiB
    • Entferne die beiden 2,4 mm Kreuzschlitzschrauben von den Seiten der Lautsprecher-Gehäuseeinheit.

  26. V2fIQlP24llEWiUC
    • Entferne die kleine Kunststoffklammer, die unter der Schraube gleich neben dem Dock Anschlusskabel eingesetzt war.

    My plastic corner bracket actually came out with the screw, so be aware this can happen

    kevindelong -

  27. lQUqocmJeqZJJTJm
    lQUqocmJeqZJJTJm
    s3q4RJoUFpdigwfj
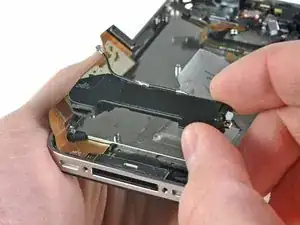
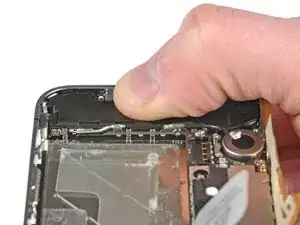
    • Entferne die Lautsprecher-Gehäuseeinheit vom iPhone.

    • Bevor du die Schrauben der Lautsprecher-Gehäuseeinheit wieder einsetzt, achte darauf, dass sich die Wi-Fi Erdungsstifte unter dem Vorsprung im Metallgehäuse des iPhones befinden wie im zweiten Bild zu sehen ist.

    • Reinige vor dem Zusammenbau alle Metall-auf-Metall Kontaktpunkte zwischen den Erdungsstiften der Wi-Fi Antenne und dem Gehäuse des iPhones mit einem entfettenden Reiniger oder Isopropylalkohol. Das Fett deiner Finger kann sonst unter Umständen Probleme mit kabellosen Interferenzen hervorrufen.

    Be careful not to lose the black plastic triangle spacer (roughly the same shape as the one you removed in step 25, just thicker). This spacer can be seen in the first picture (step 26) in the lower left hand corner near the palm. It goes under the metal.

    Steven K -

    I can't find where the wifi grounding fingers go when reassembling. The picture isn't very helpful. Any ideas?

    otonomurray -

    These Wi-Fi grounding fingers should be distinguished in the image that accompanies the instructions to show their location to ensure their identification to be cleaned and to be in the proper position upon reassembly. If I guess correctly, there is one by the screw on the left, two below the thumbnail in the image and a fourth that is blocked from view in the image by the logic board.

    uncletom -

  28. 3JNGkwfSPcrXJdKA
    • Löse die kleine schwarzen Klebebandstückchen ab, die die Montagestifte des Displays bedecken.

  29. xibUfmYsvG6djkj1
    • Entferne die 1,6 mm Kreuzschlitzschraube, die die Displayeinheit in der Nähe der Ein-/Ausschalttaste befestigt.

    This isn't particularly easy. Maybe it's the screwdriver I have, but I can't seem to reach these corner screws.

    Andrew Ruiz -

    No the problem is that you should probably remove the audio Jack. There is NO way you can unscrew that screw without stripping it without taking the audio jack out.

    futballlover44 -

  30. PZAnY21KiIXOtEpG
    • Entferne die 1,6 mm Kreuzschlitzschraube in der Nähe der Kopfhörerbuchse.

    Nearly impossible to reinstall this screw when reassembling.

    joeboo7902896 -

    I was able to perform this step on my first repair attempt. Here's a tip: the rounded part of the headphone cable is very stiff and "spring" like. Just take a very thin Philips (#000) screwdriver and lay it down on the cable diagonally, pointing almost directly towards the screw. Push gently down on the cable and it will cave in somewhat. This is fine. Then you can go straight in at the screw and turn it out.

    Photograph: http://i.imgur.com/wKigI.jpg

    TheIronGiant -

    Thank you Bradley. I've had tons of grief with this screw in the past. I've just had to turn the driver at an angle and curse and yell and retry it 5 times before it worked. This is a MUCH better approach! I had no idea that cable safely had that much give. You have my gratitude.

    Kyle Sankowicz -

    Took me an hour to get this screw back in. Tried different tools. I didn't have a long shank thin phillips head magnetic screwdriver. That would have helped out tremendously.

    GSchlag77 -

    AH, perhaps I jinxed myself, but I could not get this screw out. I think I stripped the phillips head too. Is there anything left to do to salvage it?

    Linda Vanasupa -

    This screw was very hard to replace - lost the part after many minutes of trying.

    tponeill3 -

    I was just able to replace this screw by first placing it in the hole with tweezers, then using the Phillips head screwdriver at an angle. The screw itself is slightly magnetized, and held onto the edge of my tweezer point, and then held itself inside the hole.

    jzeth -

    It's kind of frustrating that this guide doesn't include an optional headphone jack removal step or something, as I can't even do what Bradley suggested. I have the ifixit pro kit and the thin section of the shank on the bit isn't long enough to reach without removing it.

    I Can't Even -

    If needed, you can find instructions for removing the headphone jack here.

    Jeff Suovanen -

    i succeeded putting the screw back in by putting the screw into a piece of cellophane plastic and holding it in place with it until it started and then pulling out the cellophane once it was.

    ayon3rd -

  31. onlJEGI6IrATZ5PD
    • Entferne die 1,6 mm Kreuzschlitzschraube in der Nähe des unteren Mikrofons.

  32. fS4L3pGEouqAkjcH
    • Entferne die 1,6 mm Kreuzschlitzschraube in der Nähe des Dockanschluss-Kabels.

    I stripped this screw. Any suggestions on how to get it out?

    Aaron Shapiro -

  33. 1LRBifAueqODpaaw
    1LRBifAueqODpaaw
    cM1q5JrXrjqBpgt2
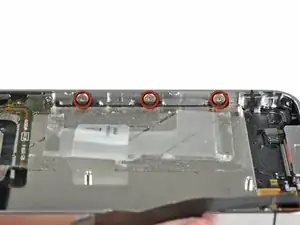
    • Löse die drei Kreuzschlitzschrauben mit großem Kopf entlang der Seite mit dem Lautstärkeregler des iPhones um etwa eine halbe Drehung.

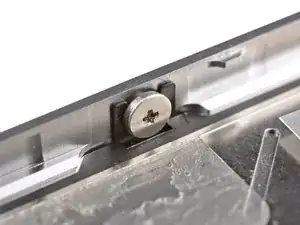
    • Es ist nicht nötig, diese Schrauben vollständig zu entfernen. Achte beim Wiedereinbau des Displays darauf, dass sich die Unterlegscheiben nahe am Schraubkopf befinden (wie auf dem zweiten Bild).

    These screws are impossible to remove. Please help, what's the trick. I only could get one of them to loosen

    Dana Palermo -

    Someone please help, I'm going to throw this thing across the room. cannot get these screws to loosen

    Dana Palermo -

    You need a smaller screwdriver. One in my kit was too big spinning out the heads. Can also touch each screw with soldering iron if locktite is holding it but probably driver as they all came with the right driver.

    curvecrazy -

  34. bmGvXDgw6Q2ly2yZ
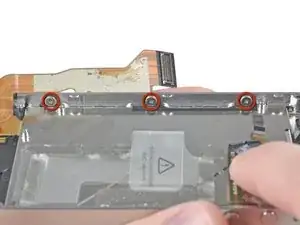
    • Löse die drei Kreuzschlitzschrauben mit großem Kopf entlang der anderen Seite des iPhones um etwa eine halbe Drehung.

    I found removing the three screws on one side during reassembly made it easier to keep the washers on the opposite side in the correct position when installing the display. When the display is in place, reinstall the three screws and then snug down all six. Then back all off about a quarter to a half turn to assist in aligning the holes for the four corner screws. Only after all ten screws are in place should the screws be tightened. Be sure to gently squeeze the display down to the outer frame at each screw while tightening to eliminate any gaps between the two.

    uncletom -

    That one corner screw is at the wrong angle what a pain stripping out the head of my driver/screw!

    curvecrazy -

  35. cVdCrbHEmJTMQFCT
    cVdCrbHEmJTMQFCT
    ohfsgYjW4NQiGULw
    W4c3JAtfiDOLAxUB
    • Benutze die Kante eines Plastiköffnungswerkzeugs, um die Displayeinheit ringsherum hochzuhebeln.

    • Fädle die Kabel von Touchscreen und LCD durch den Stahl-Innenrahmen.

    • Glätte die Kabel von Touchscreen und LCD beim Wiedereinbau des Displays sorgfältig und führe sie durch den Schlitz im Stahlrahmen. Dieses Foto zeigt eine falsch eingesetzte Displayeinheit, da sich im Touchscreenkabel eine Falte befindet.

    • Wenn das Frontpanel korrekt eingesetzt wurde, sollten die Kabel von Touchscreen und LCD dicht beieinander liegen und die gleiche Länge haben, so wie es auf dem zweiten Foto zu sehen ist.

    • Wenn das Touchscreen-Kabel falsch eingesetzt wurde, ist es zu kurz, um seinen Anschluss auf dem Logic Board zu erreichen. Versuche nicht, es gewaltsam durchzuziehen, es wird sonst reißen. Entferne die Displayeinheit, glätte das Kabel und führe es, wie gezeigt, ganz durch den Schlitz.

    • Berühre beim Wiederzusammenbau nicht den metallenen Bereich unten am LCD Datenkabel, da dies zu Problemen mit dem LCD führen kann. Falls du ihn versehentlich berührt hast, reinige ihn vorsichtig mit einem Alkoholwischtuch, bevor du weitermachst.

    Remember to take the earpiece screen off the old lcd and put it on the new screen. Most replacements do not include this mesh screen.

    boo -

    DEFINITELY REMEMBER THE ABOVE ADVICE TO TRANSFER THE METAL MESH SCREEN FROM THE OLD SCREEN TO THE NEW ONE.

    I've done this twice now, and it really, really stinks because you don't usually see it until the phone is all back together. That would mean doing the whole process again. Slapped myself in the forehead the second time.

    Thank you so much for this easy to follow guide, but it's so good I don't usually look at the comments. Maybe this last little thing could be added.

    Either way, Thanks Again.

    isaacstuff -

    took me about 2 hours to succesfully complete the entirety of this replacement. Although the hardest part is putting the screws back into their respective holes. And it does help to read the comments after reviewing the guide as well. It wasn't until I had the customer's phone completely back together that I realized that earpiece grill wasn't there on the new screen.. nevertheless.. Thank You to my favorite repair website for the easy to follow guides.

    Chris -

    There is also a small plastic ring around the front-facing camera that may come away with the broken screen. Make sure to recover it and re-attached to the camera before reassembly.

    Mark -

    Well I got about 1/2 way back through the re-assembly and found that the digitizer cable was too short. I disassembled back to here and this time started snapping the new display surface back into place beginning at the end where the digitizer cable feeds through. Then I did a "dry-run" with the logic board to ensure the cable reaches and it looks good.

    tponeill3 -

    Instruction here refers to routing the digitizer/LCD cables through the

    "outer case". Just for the sake of clarity,

    isn't the part through which the ribbons are

    being routed the FRAME? If it really IS the outer case, where is the "inner case"?

    Tom Brandolini -

    To Mark and the small plastic ring, I remembered to salvage it an save it, but then forgot to reinstall it... Oops... Humm.. Wonder if the phone really needs it? .......

    Chenoa14 -

    ive gotten everything apart and all of the screws out.. but cannot seem to pry the screen off. suggestions?

    Rachael -

    The digitizer/LCD cable warning is VERY important! I thought I had it right, but had to go back and disassemble again when I realized the digitizer connection wouldn't meet - it had folded under the frame (which I might have noticed if I'd compared it to the photo in Step 23 - that clearly shows that the 2 cables should be about the same length).

    It's a great manual, and a satisfying repair - this iPhone had been run over, the front glass totally shattered, and now it's operational!

    Jen Morris -

    Got my phone back together and cut it on and the screen is white with a couple pixels in upper left hand corner that are black. I could very faintly make out the screen after it booted up and was able to power it down. Any recommendations on how to proceed. I plan to disassemble and check all the connections.

    Doug -

    Same problem as Rachael. I've removed all the screws but the front glass isn't budging despite my spudging. Any tricks for resolving this? I don't want to break it at this point.

    Dave -

    Use the guitar pick or a fingernail file to pry up one of the corners (the plastic goes with the glass away from the metal frame). Then carefully pull up the whole screen. There are plastic "feet" that are holding the screen on, you'll have to pry up an edge to get them to let go.

    rafesmom -

    I had a lot of broken glass stuck to the adhesive after removing the screen. Be sure you use tweezers and a scraper (be careful) to remove all the old debris prior to installing the new part. I got my part from ifixit so it had the mesh and the ring for the camera on the new part.

    kevindelong -

    During the whole replacement of everything process, I ripped off the cable for the digitizer from the main cable, is there any way to repair this or should I just order a new screen?

    Dylan Carter -

    Reassembly Warning: Be careful routing the cables through the frame. The digitizer cable tears easily. The LCD cable has the square shield. So, the digitizer cable is the cable without the shield. On the digitizer cable there is a section where the cable is wide then it gets more narrow. Where it tapers down (gets narrow) the cable can tear at this point. If the digitizer cable is torn the touch screen feature will not work.

    scottrape -

    There's adhesive top and bottom which gave me a large struggle spooning off the screen. My LCD cable was short due to it folding take it apart again uggg

    curvecrazy -

    The warning regarding tearing of the cable cannot be overemphasized. I tore a brand new cable on installation and had to hang my head in shame after having to reinstall a broken screen until I got another new part.

    Graeme Hatley -

    It’s best to put the plastic ring around the lens before assembly. The assembly I got from ifixit had the ring oriented wrong and interfered with the glass laying flush. I removed it with a drop of alcohol and rotated it around the lens until it slid in flush.

    Take out the 6 side screws/washers. Put the four corner screws in loose and then thread in the 6 screws/washers. Once all are threaded in then tighten. It’ll save you a lot of grief.

    Sue Lucas -

  36. MAfNLscsCKMAWhTR
    MAfNLscsCKMAWhTR
    JddxSM1KEBvvB1VE
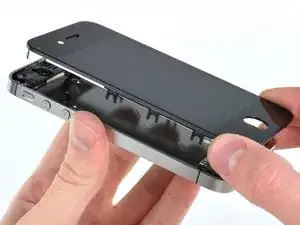
    • Entferne die Displayeinheit vom iPhone.

    • Achte darauf, den Home Button vom Frontpanel abzulösen. Wenn der Home Button am Frontpanel hängen bleibt, kann das Home Button Kabel reißen.

    • Achte beim Wiedereinbau der Displayeinheit auf Folgendes:

    • Unter Umständen mußt du das Gitter des Ohrhörers und den durchsichtigen Plastikring der Frontkamera der alten/beschädigten Displayeinheit wiederverwenden. Das hängt davon ab, wo du dein Ersatzteil kaufst.

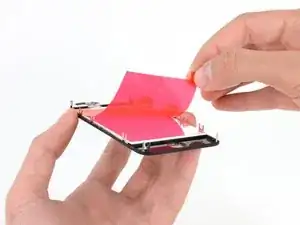
    • Auf deinem Ersatzdisplay kann sich eine farbige Plastikfolie auf der Rückseite des LCD befinden. Falls dies der Fall ist, benutze die Zuglasche in der Nähe des Home Buttons, um den Plastikfilm vom LCD abzuziehen, bevor du das neue Display einsetzt.

    • Achte nach dem Zusammenbau auf Folgendes:

    • Reinige die Oberfläche des Touchscreen mit einem Alkoholwischtuch bevor du das iPhone einschaltest. Der Alkohol hilft, noch vorhandene elektrostatische Aufladung, die zu Problemen mit dem Display führen kann, zu verflüchtigen.

    • Verbinde das iPhone nach dem Wiederzusammenbau mit einer Steckdose, bevor du es das erste Mal einschaltest. Wenn dein iPhone erfolgreich hochgefahren ist, kannst du es wieder von der Steckdose trennen.

    Nope. Broke the Home button cable at this point, because the button stuck to the display during separation.

    Chris -

    When I put it all bck together the phone itself comes on but the screen won't come on... did I do something wrong?

    blake88rob -

Abschluss

Um dein Gerät wieder zusammenzubauen, folge dieser Anleitung in umgekehrter Reihenfolge.

Andrew Bookholt

578335 Reputation

44 Kommentare

Thanks guys' u are always awesome!!!

Cheik sana -

I could not remove the logic board because it will not release at the top left. Have I missed something.

elaineleiker -

Their are only 3 things that are holding down anything in the cell phone world screws adhesive or clips their are 5 screws connecting the board make sure all 5 are removed theirs also kinda a clip it fits under be careful not to brake that when taking it out

brandon hobbs -

Had it done in1.5hrs exact. Very helpful as always, thanks IFIX IT.

Its a good note to posted's and label where the screw is from, since they are so small and a pain to remember where its going.
mirandaroque -

The Digitizer Cable seems to be too short. Trying to make it reach. It doesn't reach its place on the logic board. Going to disassemble and start over. (Step 15)

Any pointers?

chris -

I know it's late, hopefully someone else reading this finds this helpful - the digitizer cable on my screen was slightly tucked under the display, on the inside-facing side of the replacement front screen. When I put everything together, it didn't reach, so I gently tugged on it. Welp, it tore. Took it apart to find out what I did wrong, and I was able to carefully unfold the digitizer cable from the LCD. Had I been patient and disassembled the phone and worked the digitizer cable until it came out, I would have had it fixed. Go slow, be careful, don't shy away from backing up a few steps if you need to make sure it's right!

Jonathan Samonas -

The screw that holds the wifi connector on is wrong in half these pics. There are two screws. The base screw which goes on before putting the grounding clip in and then another top screw. Step six has it wrong and a few steps on the next page do to.

anthonyg -

When we removed the face plate on the final step, one of the corner brackets broke & remained in the corner. What do we do now? I have tried to gently force the broken piece out but it will not budge. I am afraid I will mess something up when I reassemble the new face plate. The one side with the broken corner will not align to reattach. Help please????

Leslie -

Try the best you can to get that bracket out. Just don't break anything else in the process.

Worst case scenario, if there's just no way at all to get that bracket out (say the screw head is stripped and you're not comfortable or don't have the tools to safely drill it out), you can CAREFULLY break the tab off the new plate.

It's a... "not quite completely professional" solution, but if it's your phone, and you're not regularly prying at that corner for some reason, the other brackets should hold the face plate on more than sufficiently.

Kyle Sankowicz -

Exciting and challenging repair. Successful repair. Happy camper here. Thanks!!

Michael -

We lost the small grounding finger for the rear facing camera near the power button. (Step 22) the one is says be careful not to lose...

What happens now? is it the reason the phone wont turn back on?

Someone else dis-assembled it before me and lost it... not sure if its the reason why it wont turn back on, also the last screw in the top right corner (near headphone jack was stripped in first attempt... what do I do?

James -

I just did this today, turned my iPhone on and to my relief everything is working great... except one problem. The backlight is flashing, very subtly... anyone know why this might be and what I could do to fix it?

Katie -

I know it is late, but someone else may find this helpful, try unseating and reseating the connections for the screen if it flickers

Ethan Chow -

Super great guide! Was able to to replace front and back with just the complications of itty bitty screws being an issue haha but had shattered both sides! It's also blue now:-) thank you so very much for sharing this! Only advice I could offer is it's very teetious so try to avoid doing it with your young kids around haha.

Keisha Nukaya -

So I have a question before I put in the logic board. What do I do with the digitizer if it does not reach its socket? I don't want to pull it and damage it.

Jose Estrada -

The cable is folded up under the new display, take it off and look carefully as you put the cables through the hole. Guide them through. You may have to push digitizer cable to the right a little and watch it from the side until the new display is completely touching the front of the phone. If you pull the cable it will rip it in half then you have to buy another display! There are other posts about this issue. This happened to me with my first phone repair, an iPhone 4s. Also posts in guide for the ATT 4s display guide!

Amanda -

Thanks for the great guide! One issue I had, the #00 Philips screw driver was too big for most of the screws on the phone. I ordered the #000 from ifixit, and had no real issues after that. Thanks for the support!

Chenoa14 -

My Verizon phone is an A1349, but they say it is 8GB. Is this compatible with the 16 and 32GB instructions here, or is it an unrepairable knock off ? Thanks.

Rick -

Be careful some screws are hidden with black tape

Mtech -

I just repaired a fellow coworker's phone. I have repaired several iPhone 4s models. So this phone had a colored piece on top of the home button that my coworker attached to match her phone cover. When I was replacing the display I could not get this colored piece off. I have put the phone back together and everything works correctly except for the home button! Any suggestions? I did not rip the cable that is attached to the home button! I need help! lol.

Amanda -

Thanks so much- fun to do and saved the $

rafesmom -

I put everything back together. It powers up and I can use functions and apps. However, I tried to sync or charge it and it doesn't recognize the cable being plugged into the port. Any suggestions?

Timothy -

To stay organized I wrote the step numbers on white paper and stuck loops of Scotch tape beside the numbers to hold the tiny screws and parts. This kept everything in order and kept screws still.

You can magnetize any tool easily by taking a magnet and swiping it down the shaft of the screwdriver. Put magnet at the midpoint of the shaft and swipe it downward. One direction only.

rafesmom -

Followed all directions, screen lights up. But will not respond to my touch. What did I do wrong?

Connie Kromarek -

I am having the same problem. Followed all steps and it lights up but will not respond to touch. Please help!

grifbeck72 -

My daughter Samantha Lionheart is the living prof that a woman can repair a screen on an i-phone.

It was pretty amazing to watch her do it.

She was very patient, well organized(paper on hand to write her own reminder of which or where those tiny screws go back after 36 steps of instructions (tuff one).

You have to be a smart cookie !

Congratulation !! my phone looks brand new now.

I am very proud of you.

Much love.

Maman

annick lionheart -

Completed all the steps, but when I attempted to turn phone on after, it didn't work. Any suggestions for trouble shooting the issue? I think it might be the screen connector, but not sure.

Brian -

I had an iPhone 4 CDMA (Verizon), the bottom of the screen (where you swipe to unlock) would no longer respond to touch. Ordered new screen (screen and digitizer are attached to each other), and followed the guide. I would suggest looking at the sub-pictures for each step (especially 36), they include helpful and important info.

I left the following comment on Step 17 about an "extra" rubber piece that fell out during reassembly:

"There's a little rubber piece that you can see in the Step 17 & Step 21 pictures just above the yellow sticker. It fits over the edge of the board where the two ribbon cables from the display/digitizer come up through the board (Step 36). It's there to make sure the ribbon cables don't rub against the sharp edge of the board. This piece loves to fall out when pulling the logic board off. Make sure to put it back in when routing the cables in Step 36, thin edge on the bottom, thicker edge on the top."

Jere -

Thanks, first display was a LEMON (from China) white display with a few pixel top and bottom. Ordered from IFIXIT (inspected and tested) before shipping to customer.

Could have save myself a couple weeks of none usage of my iPHONE. Read comments first before you start, they are very helpful.

dwleersgt -

Thank you so much for this "Do It Yourself" instruction. It was difficult, but not impossible (a few rubber spacers here and there). Tools that were needed came with the front screen from "Zeetron". Great pictures to go back to for a visual help.

Shirly Gabriel -

If this guide was on paper it would be worn out by me. I have gotten accustom to the repair but this guide is a great check list. Mr. Andrew Bookholt, I want to thank you for your time, effort, and for sharing with the world this repair guide. My hat is off to you!!!

Darren -

Everything works great EXCEPT the bottom row of apps that don't move ( phone book Safari etc). Any suggestions.

davidleisure -

Suggestion - Remove SIM card around Steps 21-23. Well done!

Mary McGillycuddy -

Suggestion - Remove SIM card around Steps 21-23. Well done!

Mary McGillycuddy -

My ic under camera cable got damaged

Nazrin -

Under the front camera connector there is black square type ic covered with a black strip it seems broken how can I fix it

Nazrin -

Could I use this display on an iPhone 4s?

freshalvontai -

Only took two hours to do... :/ It was fun, though. Now my friend can rest easy because his phone's screen isn't shattered and now works properly! :D

Bailey Freebairn -

Help! I put everything back together but I still have a little clip! Maybe a cable cover or connector? I have the two ground clips mentioned back in place. But where did this little piece come from? It's black and gold with a little right angle in it.

c.w. -

https://ibb.co/f3bttG

Which step did this piece come from??

Please help!

c.w. -

You can see it in Step 17, it’s a grounding clip from the logic board.

Sam Goldheart -

THIS MISSES A VITAL STEP IN NEWER VERSIONS OF THE VERIZON 4!! The flip release on the home button cable NEEDS to be opened and released BEFORE removing the screen. Because I didn't see what the flip release was connected to, I ended up ripping the flex cable in half when I pried off the front display. I'm not a happy lady, I'll say that.

Kendall K -

Sorry to hear that. As far as I know, there’s no newer version of this iPhone—the home button simply stays behind when the display comes off, although you may need to give it a nudge if yours is stuck or frozen for some reason. There should be no need to disconnect the cable. There’s a clear warning about this in the last step, but I added an additional warning earlier in the guide so it’s harder to miss. If it’s any consolation, the home button + cable is pretty easy to replace at this stage of disassembly. Better luck on your next repair!

Jeff Suovanen -

I disassembled and then attached the new display. Had to check that the washers were in correct location. The corner screw, near headphone, would not go in. The front panel would not depress so that the hole would show for the screw. Loosened all screws and then made another attempt…. The glass cracked!! Took off the front panel and a very small triangular piece fell out. Now all the screws could align. Frustrating but I learned something.
Andrew Faltonson -