Einleitung

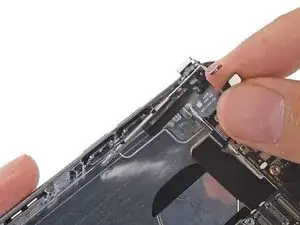
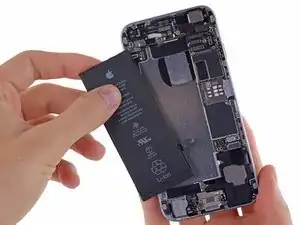
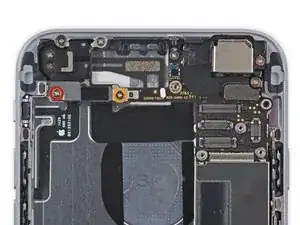
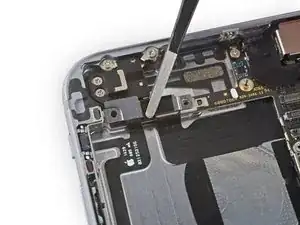
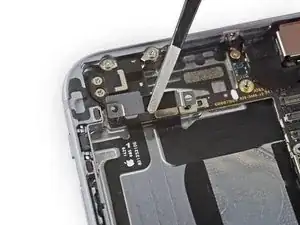
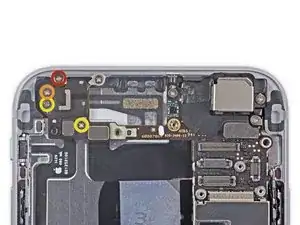
Folge dieser Anleitung, um das defekte Kabel des Lautstärkereglers zu ersetzen.

  1. 4O2ARkdCHfToqXR4
    • Vor der Demontage des iPhones entlade die Batterie auf unter 25%. Eine geladene Lithium-Ionen Batterie kann Feuer fangen und/oder explodieren, wenn sie beschädigt wird.

    • Schalte dein iPhone ab, bevor du mit der Demontage beginnst.

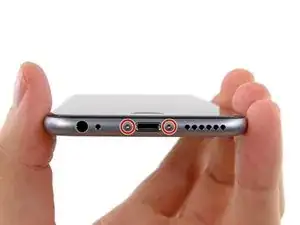
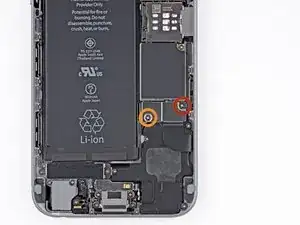
    • Entferne die beiden 3,6 mm langen Pentalobe P2 Schrauben neben dem Lightning Connector.

    When reconnecting be VERY careful not to over tighten. The connectors on the screen that these 3.6mm Pentalobe screws lock with are notorious for breaking off

    Blair Tryba -

    what do i do if ive managed to tighten them too hard and now they wont come off?

    kristian686 -

    Before opening the phone, I gently warmed it using a buckwheat heating pad. This made removal of the adhesive strips (steps 20 to 24) easy.

    Howard Bales -

    Exactly what I did as well, the gently warming made the adhesive removal work like a charm. The heat as well help to lift the screen easily, no need for the prying tools for me to open te phone.

    For the adhesive removal just pull it slowly to the bottom of the phone and keep in under tension.

    On reassembly, turn on the phone after getting all connectors back in place to verify all is working fine before putting all screws back in their spot.

    Maarten Vergauwen -

    Thanks for the suggestion! I heated up a hot/cold pack, and it worked great.

    Linda Chandler -

    I put mine back together but mine looks very different than this one. Why is it that when I make a call I cannot hear through the ear piece and have to put it on speaker. Also my screen doesn't go black when my face touches it

    Bailey Wilson -

    Hey Bailey, which repair were you attempting? Is it possible you have a 6s, or maybe a 6 Plus? You may have better luck with faster troubleshooting if you post in our Answer Forum!

    Sam Goldheart -

    See its a long time ago you had this issue. You can try to remove the cable from front camera/sensor/earpiece from the motherboard port and gently push it back on. All the problems you relate to is thru the same cable. If this dont solve your problem, check if the earpiece is correctly placed onto the polarity poles, and that the proximity sensor is lying right down into the corresponding socket. If something is blocking the sensor, yeah then the screen wont turn on/off when you put it onto your ear.

    Kenneth Hilstan -

    I see in the preamble that when you replace your logic board, you would lose touch id functionality, so my question is what if you have the homebutton and thus the fingerprint reader for the logic board replacement, would touch id work?

    socratesmens -

    The guide for the iPhone6 battery replacement needs to be revised. There are a couple of issues.

    1) While the battery cover has two screws, they are different lengths. Since they are very small, it can be hard to see the difference (until one tries to screw the smaller one into the longer hole). The video needs to mention this.

    2) The application of the adhesive strip if very different from what is mentioned. Also, there is a “one piece plastic” applique, and it is very unforgiving. The video should show this process in more detail.

    I believe the attention to this detail would help folks correctly install their iPhone 6 batteries, and with the recent Apple disclosed battery problem, would continue to show that iFixit is very committed to the end-user.

    Gary Long -

    I felt a bit silly getting stuck at the end of a long repair, unable to screw one of these last screws back in. What worked was gently pinching the phone above and below the screw, to make sure the screen and back were perfectly aligned.

    Matt D -

    Apple edits posts on their Communities website that link to this fix page justifying as follows:

    “We’ve edited your post because following the procedures at the site you provided may lead to damage to the user’s device.”

    What is certain is that following Apple Support’s advice of resetting our phones again and again never works whereas this fix works. Apparently Apple does not want people to know that their hardware fails and can be fixed, because then they would need to explain why they don’t offer neither the fixing service nor the fixing advice by directing us to this website.

    Brice -

    Before you get started, I suggest you confirm you are replacing the correct camera. If you are thinking of a camera, the front is the side of the device with the main lens. On an iPhone this is actually known as the rear facing camera. Once the phone is disassembled your orientation can be distorted and it is not that hard to fail to realize your are replacing the wrong camera. Doh!

    William Miller -

    I found it very useful to use a magnet sheet when doing these repairs. I use electrical tape or a sharpie to make a grid, and place each micro screw in a separate box on the grid.

    I work directly over the magnet sheet, so that if something drops I have a better chance at not losing it.

    If you do lose a screw, go over the work area with a fridge magnet. It will pick it up if it hasn’t popped too far away.

    Megan Telliano -

    I agree. The Magnetic Project Mat makes your project incredibly easier and keeps your screws/parts organized. Here is the link for anyone interested:

    Magnetic Project Mat

    Cooper -

    or some masking tape with sticky side up and the ends folded underneath on a piece of paper, then you can write notes like

    “1.4mm for FOO bracket →”

    “7x2.3mm for EMI cover, different one by camera →”

    The arrows point as appropriate.

    If you drop something, put a flashlight on the floor & shine it across the floor — Turn off ceiling & other lights off to maximize the shadow from the flashlight.

    Bass Clef -

    These screws are tiny, and the first two are the biggest of the lot. Get a magnifying glass or good reader glasses.

    Jennifer Porter -

    Which torx is this T?

    klemenecanze -

    The screws are no torx screws they are Apple Pentalobe screws. You need to buy a Pentalobe screwdriver seen above.

    Claes -

    I have to use the P2 right?

    Aman Singh -

    The best advice I can give is not to perform this operation over carpet.

    Bruce codding -

    I'm an amateur, but I was able to replace the parts almost perfectly while looking at this explanation, thank you very much.

    irichin.3.26 -

    was fairly easy more nerves than anything, one thing one should have on hand is alcohol just in case its needed. also if one doesn’t get the entire tape strips out, use the alcohol like suggested and lift the battery up. Then can grab the remaining tape strips with tweezers and pull it out. Easy to put back together just make sure the connectors are in. The screws are tiny so take your time. I plugged it in and it started charging and it worked. Great to have my 6 back for a trip as I wanted to use it for the camera, also my game phone so nice to have a battery that lasts. Yes having a flat place to put the parts and put them in separate area so they don’t get mixed up. It took about a hour with hunting for a spare bottle of alcohol.

    Greg Wischmeyer -

    The first step should always to be to backup your phone as there is always a slim chance that even a simple battery replacement may render the phone inoperable and data on it lost.

    Jim -

    Please do not forget to remove the SIM-Card tray!!

    Steffen Albrecht -

    I didn’t need to remove my sim card tray when I did my iPhone 6 battery replacement. Why do you suggest to remove it?

    Jim -

    You dont need to remove sim card while battery replacement

    bertan -

    Did mine today, with iFixit battery and iFixit tool kit. Did not need suction cup, to open case, as it had partially sprung open on left, as a result of a badly swollen battery. Supported base and screen with a bookend and rubber bands. This kept these parts at a 90 degree angle, so that screen did not need to be removed. IFixit screwdriver tips were perfect fit. Somewhat difficult to remove battery adhesive strips, but slow and steady got it done, after mild heating with hair dryer. Took about 3 minutes to reposition battery connector…just a wee bit tricky, to position correctly. Was careful to place top of screen in place first, and remainder snapped into place with light pressure, and replaced the 2 pentalobe screws.

    Will highly recommend iFixit for such a repair. Repair kit and battery, are first rate. I give this an 11, out of 10.?

    Len Drasin -

  2. MlFVR1LQTgwKXrHp
    MlFVR1LQTgwKXrHp
    EDYJGwtOOAXWscrY
    mRRvrbZ1XX6UbFIh
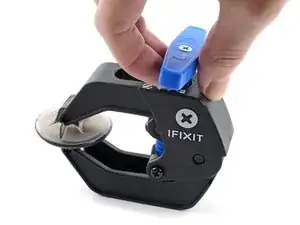
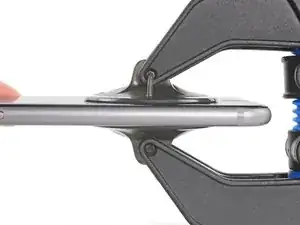
    • Wir haben die Anti-Clamp entwickelt, um Geräte sicher zu öffnen. Die nächsten beiden Schritte zeigen die Benutzung der Anti-Clamp. Wenn du sie nicht verwenden willst, überspringe die nächsten zwei Schritte und folge einer anderen Methode.

    • Genaue Anweisungen, wie die Anti-Clamp benutzt wird, findest du hier.

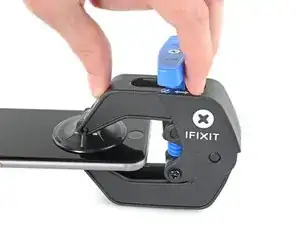
    • Drücke den blauen Griff zum Scharnier hin, um den Öffnungsmodus einzustellen.

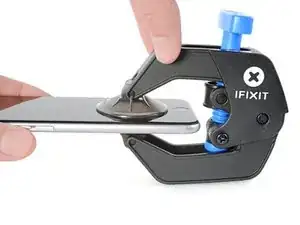
    • Bringe die Saugheber direkt über dem Home Button am Display an, einen auf der Vorderseite, den anderen auf der Rückseite.

    • Drücke die Saugheber auf den Oberflächen fest.

    • Wenn die Saugheber nicht gut auf den Flächen haften, dann klebe Paketband darüber.

    There was only one suction cup in my kit. Why show the need for two if ifixit provides only one?

    Lisa Klitses -

    Do Not Worry. The Islack comes seprate. This guide shows you how to remove the front screen with a normal suction cup.

    Owen -

    I found that the single suction cup from the kit worked very well. It didn’t take that much force to separate the front panel from the phone. I think any suction cup that you are able to get a firm grip on will probably work as well. There isn’t any adhesive holding the front panel in. It just snaps in and out. If you have a cracked screen and no screen protector, it may be hard to get a good suction seal. If that’s the case, someone else here suggested applying clear tape to the front glass to get a good surface for applying the suction cup. In my case, I already had a screen protector that was still intact so the suction cup sealed easily.

    fiftysomething -

    WORKED PERFECTLY… easy, no harm at all…. thanks a lot

    carlos restrepo -

    Opening my iPhone 6 was so easy using the iSchlack. Well worth it.

    Raymond Rinaldi -

  3. gGTMkiIl5fOeSuDX
    gGTMkiIl5fOeSuDX
    pVhYdjkOr4KLpDiG
    aCDwmxYXlXmDB2OM
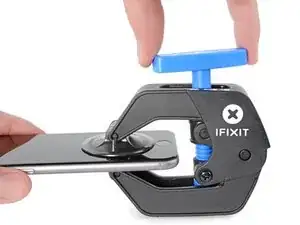
    • Drücke den blauen Griff vom Scharnier weg in die Stellung für den Öffnungsmodus.

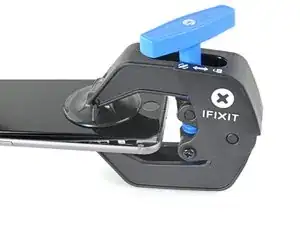
    • Drehe den Griff im Uhrzeigersinn, bis du merkst, dass sich die Saugheber dehnen.

    • Achte darauf, dass sich die Saugheber weiterhin gegenüber stehen. Wenn sie sich nicht mehr gegenüber stehen, dann löse die Saugheber ein wenig ab und schiebe sie in die richtige Position.

    • Warte eine Minute, damit sich der Kleber allmählich ablösen kann und sich das Display unten löst.

    • Wenn es nicht gelingt, mit der Anti-Clamp einen ausreichenden Spalt zu erzeugen, dann erwärme die Stelle nochmals und drehe den Griff eine halbe Umdrehung im Uhrzeigersinn weiter.

    • Drehe den Griff jeweils nicht mehr als eine halbe Umdrehung weiter und warte jedes Mal eine Minute lang. Gib der Anti-Clamp Zeit, ihre Arbeit zu erledigen.

    • Überspringe die nächsten drei Schritte .

    The iPhone 6 DOES NOT have back glass.

    Nigel -

  4. H1HthQNPZmEFTcSq
    • Entferne die folgenden Kreuzschlitz #00 Schrauben von der Abdeckung des Akkuanschlusses:

    • Eine 2,2 mm Schraube

    • Eine 3,2 mm Schraube

  5. 5JskONmSKsXFnkVY
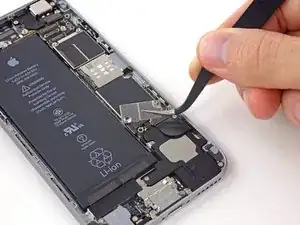
    • Entferne die metallene Abdeckung des Akkuanschlusses vom iPhone.

  6. piLRpAtGasEMTkk2
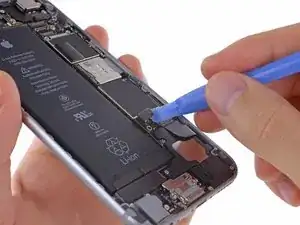
    • Benutze ein Öffnungswerkzeug aus weichem Plastik (Plastic Opening Tool), um vorsichtig den Akkuanschluss vom Logic Board zu lösen.

    • Achte darauf, nur das Kabel zu lösen und nicht den Anschluss selbst. Wenn du den Sockel löst zerstörst du vielleicht den gesamten Anschluss.

  7. RrIGcubMTn5AMldM
    RrIGcubMTn5AMldM
    n5TdBCdeCdIW22Uu
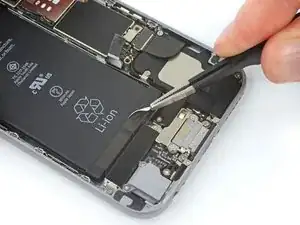
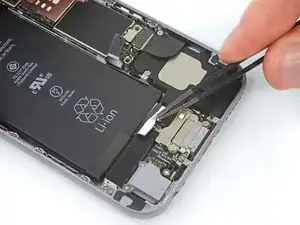
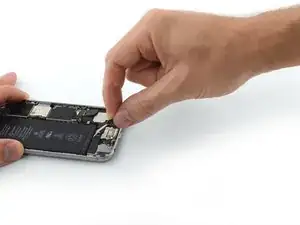
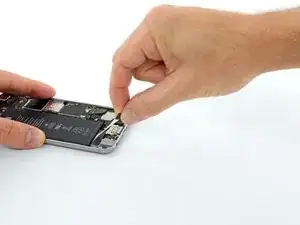
    • Ziehe den ersten Akku-Klebestreifen, ausgehend von der unteren rechten Ecke des Akkus, nach unten weg.

    • Benutze deine Finger oder eine stumpfe Pinzette und sei extra vorsichtig wenn du in der Nähe des Akkus arbeitest – einen Li-Ionen Akku aufzustechen kann gefährliche Chemikalien freisetzen und einen Brand verursachen.

    • Bevor du weiter arbeitest kannst du aber auch die zwei Kreuzschlitzschrauben entfernen, welche den Vibrationsmotor sichern. Dadurch erhältst du mehr Freiraum, um die Akku-Klebestreifen erfolgreich abzuziehen.

    Before you start on the battery, jump ahead to step 27. Click the "this guide" and read and watch the video. Then come back and start on the battery. The adhesive strips are difficult the first time. They work like 3M Command Strips products, if you've ever used those. Stretching them lengthwise makes them release.

    Joel Horie -

    The “This Guide” link is in the STEP 25 text and in the Conclusion text. There is no Step 27 in the current (03 Nov 2017) online guide.

    hobywonkenobee -

    Several comments below attest to the benefit of heating the back of the phone (thus heating the adhesive) before attempting to remove the adhesive strips. See below.

    kevin evans -

    Definitely easier to remove the adhesive after using the iOpener to warm up the phone!

    Richard Van Cleave -

    My phone did not have the tabs or peel off adhesive. I had the pry, yes pry, the battery out of the phone while heating it. The battery was glued in place and came out shaped like a banana. I’m just glad it did not puncture during the process. On the plus side, I didn’t need to install the new adhesive pad, as it looked like that is what was in there, and they were still sticky. As I think back, this phone was replaced by Verizon under warranty, and they gave me a refurbished phone. I bet it already had a repair battery in it…

    Darren Rowley -

    CAUTION! As I already had the tools I bought only the battery, not the kit. It was not evident that new adhesive strips are needed. Having only replaced a 4s battery before, even reading this Guide did not alert me that new strips were needed.

    response1234 -

    I too was able to skip steps 13-19, by securing the display at a 90 degree angle. I used a soup can with a microfiber cloth between the screen and the can. I secured it with a rubber band and worked very carefully. I do recommend heating the back of the phone as it made the adhesive come up with relative ease. You just have to be slow and apply constant pulling pressure, but lightly. I was able to remove the strips without removing the vibrator. I was going to remove the vibrator but the screws were unwilling to come out, so I just proceeded to removing the strips and had no issues. I expected this to be much more of a project than it was but had no problems or issues and it was a breeze. Now just waiting to see if the battery is good, but so far everything is fine. Phone came back on and everything is as it was before. No glitches or issues there either.

    If you have patience and can be gentle and follow the instructions, you should be able to skip several steps.

    Katt -

    Thanks for the info. Although it’s unclear if the iPhone 6 has adhesive or strips present in it or not. As people keep saying both iPhone 6 and 6s. If they kept the guides separate even for near identical guides and setups it would be prudent.

    Shawn -

    @shawn_c There are completely separate sets of guides here for the 6 and 6s. Both models use stretch-release adhesive strips to secure the battery—if the strips are missing, that’s likely a sign of a previous repair that wasn’t completed properly.

    Jeff Suovanen -

    Dear God, I really made a mess of this part, probably the most difficult with the possible exception of putting the data interface plugs back in. But I kept going on a hope and a prayer, having finally to resort to the hairdryer trick in the end and somehow managed to get the blighter out. Not very pro. But everything is now back in place and the iPhone kicked in first time and away she goes. Yeah look at the video a couple of times before starting this…

    p-corbett -

    Unless the video comes with a “magic” Time Travel Component that allows the bogus adhesive strips to be better designed so they had any chance a all of releasing in a reasonable manner, I’ll pass. After the stripes snapped off, again (this is my second 6 battery replacement), leaving the battery 90% adhered to the iPhone, the only thing that got me out of the pickle was plenty of heat (my Thermalon Dry Eye Moist Heat Compress, microwaved 10 times) on the underside of the iPhone. That, and insanely CAREFUL prying with two of the FLAT versions of the four long-handles tools sold as a kit by iFixit, so as to not puncture the battery and create the loathsome flaming mess.

    Michael Russo -

    If you replace the iphone 6 battery with out using heat gun, will it spoil the battery?

    Mos'ab Ahmad Qamar -

  8. nCto4JUreUollpev
    nCto4JUreUollpev
    ZKddMDqZeDdkyWA6
    vmxHox6rSFjPgbOA
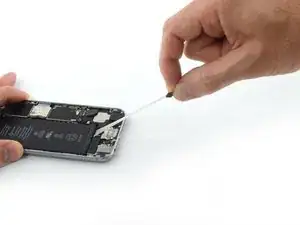
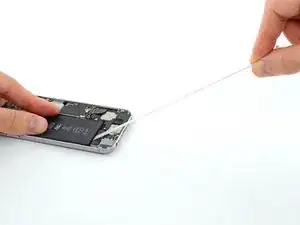
    • Halte den Klebestreifen bei diesem Vorgang glatt und knitterfrei. Verknickte Streifen kleben zusammen und reißen statt ordentlich heraus zu kommen.

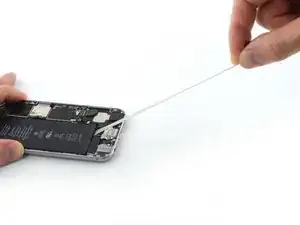
    • Ziehe den Akku-Klebestreifen langsam vom Akku weg in Richtung des unteren Rands des iPhones.

    • Um zu vermeiden, dass der Klebestreifen reißt, achte darauf, dass der er sich nicht mit dem Vibrationsmotor oder anderen nahegelegenen Komponenten verhakt.

    • Ziehe gleichmäßig und halte den Streifen unter konstanter Spannung bis er zwischen Akku und Gehäuserückseite herausrutscht. Am Besten ziehst du in einem Winkel von 60 ° oder weniger.

    • Der Streifen dehnt sich dabei auf ein Vielfaches. Fahre mit dem Ziehen fort und fasse in der Nähe des Akkus nach, falls nötig.

    • Sollte der Klebestreifen trotz allem beim Entfernen reißen, nutze die Pinzette, (keinesfalls den Akku dabei beschädigen!) um den Rest zu greifen und weiter zu ziehen. Falls er unter der Batterie unerreichbar reißt, fahre mit den nachfolgenden Schritten fort.

    I suggest removing the vibrator before attempting to remove the adhesive strips. It makes the process much easier. I broke both tabs following this step and recovered both the strips by removing the vibrateor and using a tweezers and fingers to pull the remaining strip. I grabbed a corner of the strip underneath the battery and pulled very gently until I was able to recover the entire width of the strip. This required holding the corner of the strip with my fingers and using the tweezers to grab the stip closer to the battery, allowing me to grab more width.

    kkm113 -

    I had to do this, so I will vouch for this step. It made things a lot easier and is a pretty simple removal/installation.

    Dan -

    This should be a required Step in this guide. I've replaced two batteries now, one without removing the vibrator, and it took me about a half hour of using a blow dryer because I ripped the adhesive strips. Removing the vibrator allows for the "down-right" / "down-left" pulling of the strips MUCH MORE EASILY - just removed both without any problems...no blow dryer needed now!

    ethanmaretich -

    My iphone 6 will not power on. I started it with 30% battery can you suggest solutions?

    xavierwells03 -

    It was that dang data cable. Awesome, thanks!

    xavierwells03 -

    I did this but it doesn't charge. I'm concerned that I may not have attached the new battery cable properly. It didn't snap into place very well. It looked as if the new cable had some plastic that may have been blocking the connectors I'm not sure how snug it's supposed to go on. It definitely did not click into position the way the screen cables clicked in. Anyway, I connected as best I could and put the metal cover on and it doesn't work. Was I supposed to do something to the new battery's cable connector so that it would connect better?

    My phone had some water damage and I was hoping that replacing the battery would solve the problem.

    epetner -

    When 'reversing the steps' to put it back together, where do the adhesive strips come in? And where do you get them? How do you put them on?

    TJE -

    Hi TJE, you won't be able to follow every step exactly in revers ;) You can buy the strips here, iPhone 6 / 6s / 7 Akku Klebestreifen, or just use a piece of double-sided tape. For the adhesive strips, just peel off one layer of the backing, align the strips as they were in step 20, press them onto the battery and remove the outer backing, and put it in the phone, making sure the connector can attach to its socket, then head up to step 19 attach the connector etc.

    Sam Goldheart -

    The strips need more instruction/picture. As soon as I tried to peel the top layer the strips stuck to each other and created a mess. I salvaged part of the strip, but not pretty. Used double sided tape. Much easier.

    eschrank -

    AGREED! I bought the iFixit kit and this instructional is great, for sure... buuuuut it really would have been nice to see how you guys apply the new battery adhesive. I had no idea and just about botched mine. Thankfully I figured it out before it was a total loss.

    leon -

    Yup, I agree! The only bit of information that is missing.

    I hope I do not have to remove the battery again as i put the strips on the wrong way round.

    The kept folding themselves under the battery, so next time not tabs. I did not pust hard on the battery though so that may save some ball ache.

    I did not need to remove the screen, so all in all a simple process. I think once you have done one or 2 batteries, then it becomes easier as you are learning by doing.

    PJ Donnelly -

    That information isn't missing exactly, it's just a separate guide. It's linked in the last step of this guide. It pays to read all the way to the end ;)

    Jeff Suovanen -

    There is another guide that explains it, here is the link to it. iPhone Akku Klebestreifen anbringen

    IFIXIT should point in the right step to avoid issues on adhesive missteps.

    Anand Parthasarathy -

    Heat helps. Got lucky pulling both out full length from the bottom. A few minutes with a hair dryer prepped the aluminum case to surrender the stretchy sticky tabs. Be sure to click the tape install link so that you apply the new double sticks correctly. I also 'dry fitted' the battery first to see where the connector lined up. With the battery all the way at the top of the opening, the connector took a bit of effort to align. With strips attached, I allowed some space and the connector fell into place.

    griffn -

    why do you need to secure the battery with the strips in the first place? Will the battery slide around?

    jsimons -

    We recommend readhering the battery to the rear case with some form of adhesive. You don't have to use the adhesive strips we sell, but if your battery is just bouncing around inside the case you risk damage to the cell itself or the ribbon cable. There's also circuitry at the lower edge of the battery that is not meant to take a lot of abuse. It's not likely that your battery will explode, but it could become damaged and leak, or stop working prematurely.

    Evan Noronha -

    I didn't secure the battery with anything and after completing the installation, my battery bounces around inside the phone. Personally, I don't see any problems with this and if anything, it gives my iphone 6 a haptic touch type feel :) I'll let you know if it explodes.

    Brett Benson -

    Be careful when placing the new battery. The compartment is a little bigger than the battery, but the cable to the connector is pretty stiff. I had to do some serious adjusting of the cable to get the connector to align. I suggest connecting the connector before laying down the battery.

    Howard Bales -

    I was able to pull the right strip completely out just from the bottom of the battery. Pull straight out with a low angle (just slightly above the black chip so it doesn't get caught or break) and the adhesive will pull right out. There's no need to go around the sides of the battery unless the adhesive is dry and not flexible. If the adhesive is very flexible, you'll be able to pull it out very easily as long as you take your time and are careful. It also helped that I started with 100% battery and drained down to under 25%, so the iphone was very warm from doing this and that helped make it very easy to pull the adhesive out. I did not need a warming kit, I just used the heat from using the iphone to drain the battery before shutting it down for the repair!

    Ryan -

    I managed to pull the strips out without using any heat. I pulled maybe 25 degrees from the vertical, carefully avoiding the metallic parts around. However, after starting to pull with an even pressure, and seeing that the strip was stretching without coming out, I found that it helped if I gave small, repeated tugs, rather delicate but abrupt. This way I could actually hear the strip pulling out from under the battery, with a rubbery vibrating sound. It must have taken maybe 100 small tugs for each strips but they came out easily. Also, as the extracted part got too long, I held it with the other hand and grabbed it again further down the exposed portion, to always have a shorter section to pull on.

    matteorisoldi -

    Pulling straight down towards the bottom of the phone at a small angle worked well for me. I highly recommend taking your time to prevent breakage. I think I spent over 8 minutes on each strip just slowly stretching it out so it would not break. Just keep it straight and dont twist. I was able to remove both strips intact and thus did not need to pry the battery. Because I was able to do this method, I left the screen attached and saved a few steps (I was not trying to save time, just did not want to create additional problems by removing and reconnecting various ribbons). I think slow and steady will be your best friend. I did not heat up the adhesive or case.

    Michael Kirkpatrick -

    This is a straight up BS instruction - both of my strips broke IMMEDIATELY. I ended up with a blow dryer, dental floss, credit card and about a half hour of swearing. This step needs to be re-written\improved.

    Chet Seidel -

    Sorry you had such a tough time. I’ve had them break on me instantly as well. Unfortunately that can’t be fixed with better instructions—sometimes the strips get brittle and practically disintegrate when pulled. I’m not sure if it’s an issue with the strips degrading over time, heat/moisture, manufacturing tolerances, or something else—it seems a bit random and it’s definitely frustrating when it happens. That’s why we have the additional instructions for the card, floss, etc. Better luck next time I hope ¯\_(ツ)_/¯

    Jeff Suovanen -

    Same thing just happened to me. Had to use a guitar string and slid it underneath along with heating and prying with a card. My phone is about 4 years old though so it was expected as the adhesive dries out and becomes incredibly hard to remove. Even after the battery was out I had to scratch constantly at the adhesive to get it off the body.

    Kieran Kristoffersen -

    One of the trickier parts, mine tore as soon as I tried on both.

    Richard W -

    I would definitely recommend heating the back of the phone with a heating pad for 15 minutes prior to this step. The first time I tried pulling the first strip, it broke off almost instantly. I then heated the back of the phone with a heating pad for 15 minutes and was able to remove the 2nd strip as described in the instructions above. I was then able to retrieve the 1st strip using a pair of tweezers and remove it as described above.

    kylecompfix -

    The first white strip ripped right off before any of it pulled loose. I was extra careful with the second one and got 2/3 of it off before it broke. Heating the back side of the phone probably would have helped. I didn’t think there was any hope of getting the battery out until I read the comments here. Here is what I did, I took an iron and used it to heat up a 5 lb metal weight so it would stay warm for a while. I put the phone on the heated weight to keep it warm. I took dental floss and worked it under the battery to try and work the white strip loose. At the same time I used a plastic credit card/door key to work the battery up from the side. I eventually worked the plastic card under the back edge and worked my way deeper in until I was able to get it loose. When I got it loose it looked like the white strip was wadded up underneath the battery. I don’t think I had a chance of getting the strips up by just pulling.

    mike garner -

    Both my strips broke at about 5-10 cm of pulling. Heart sank. I repeated the following: heat from hair dyer for about 1 min until the case was hot to touch, IKEA card edge to pry the battery along its length, reheating when the case cooled. Moved onto a stiffer/ thicker credit card type item once I could get it under the battery. Took me about 20-25 mins but with new confidence it could easily be done in 10 minute; I erred on caution since first time. I just used two 3 mm wide strip of double sided tape to secure the battery. Once i removed the film I heated up the case once again the soften the new adhesive before placing the battery. Working fine.

    Richard -

    Just broke the two strips of double sided tape. Look at the pictures well here. Pull the strips out a long way (i.e. the length of the battery or more) before you try to move them around the sides of the battery. One they are pulled out that far, becareful as you try to manurer them around the batter as they are now fragile and can break / tear easily. I was able to use a very thin flexible but strong ID card to wedge under the battery and with some effort (careful effort) I was able to pry the tape from under the battery. Half of the tape was still too strong and the battery came out with half of the battery casing left on the bottom case of the phone. Very strong tape the original tape

    Ron -

    2 - iPhone 6 devices to replace batteries on. First was a total MESS! Strips broke - immediately! After much gentle prying, plastic cards, blue picks and dental floss, I got the bloody thing out! Second iPhone, I came at it differently. Used my iOpener (heater) to warm the whole phone for about 40 minutes. Peeled up the black “top edge” of the first strip, and it was then I noticed the top side white adhesive is NOT connected to the bottom side. Only the black film makes the connection on the factory battery. I was very gentle with that tab - until I saw the white strip start to appear from under the battery. I then became MUCH more deliberate with my pulling. No going back in (sticky stuff gets stuck on the battery edge) just smooth, steady pulling of the (warm) strip. As about an inch was exposed, I replaced my pulling fingers back near the edge of the battery without allowing any slack. More and more adhesive came out, and each time I repositioned my grasp. Finally - snap, and the strip was gone!

    Bill Groth -

    The iFixit youtube video (www.youtube.com/watch?v=KtK7b_pqnCU) shows a method of pulling the adhesive around the bottom, side, and top of the battery. I did this for the first adhesive. The one caution with that approach is that, as you’re pulling the adhesive, it could get caught on surrounding components and that could cause a break if you’re not careful. For the second adhesive I pulled it only in the direction away from the bottom of the phone (as shown in Step 21) and that was MUCH simpler. As you’re pulling the adhesive, even if a slight tear occurs in the process, keep at it with a slow and steady motion to remove as much as you can. Thankfully the adhesive strips came off completely in my repair.

    Jimmy Doi -

    That was fun!! I removed the volume side adhesive strip first. It broke immediately, but I was able to get it started again with the tweezers. It came right out. The inside strip was another story. It also broke immediately and I couldn’t get it started again with tweezers or anything. Since the volume side strip was out I used the black spudger tool to slowly start wedging the battery up and then I used a gift card to work the battery the rest of the way out. The gift card was not as thick as a credit card but was stiff enough to work the adhesive without bending the battery too much.

    brian -

    Just completed the battery replacement on 2 phones. Lessons learned from this step on the first phone allowed me to complete the 2nd in about 10 mins:

    - WARM THE PHONE FIRST. I used a regular heat pack.

    - Don’t bother removing the screen. Leave it attached and prop it up with a small box or something to stop the cables being stretched/damaged.

    - DO remove the vibrator component (small black rectangle at bottom of battery). Simply unscrew the 2 phillips screws and pop it out.

    - Carefully peel back the tab on the battery using tweezers then get a good grip on the tab with your thumb and finger.

    - VERY SLOWLY start pulling the tab back at a 45 degree angle. Use a constant, slight pressure, allowing the strip to detach itself. You will feel and hear the strip slowly coming unstuck, just let it do it’s thing. BE GENTLE AND PATIENT.

    - I did not need to bring the strips around the battery. Just keep pulling gently back at 45 degrees out the base of the battery, adjusting your grip on the strip when it gets too long.

    Ben Payne -

    I decided after reading many comments etc., that I agreed with your conclusions. I was going to remove the vibrator component, however the screws were not cooperating, so I proceeded with removing the adhesive. It went well and I had no issues.

    Katt -

    I think I had the extra-sticky and seriously old tape on my phone. The tape disintegrated at this part for me. Very frustrating. Use a double strand of dental floss and if need be, that black plastic scraper. Be patient and keep working on it. Set it down for a few if you’re ready to chuck the phone across the room and come back when you’ve settled down. Crying is optional.

    Jennifer Porter -

    Actually the stripes come off very easily. All u need is a little Patience. Keep´em low around the edges when you pull. What helped a lot was grapping them very thight and close to the battery.

    The most important part is to stay Patient. Changing the battery and the Display took me about 2 hours including cleaning up in the inside. Thanks a lot for the manual  guys !

    Patrick Küffner -

    Removing the vibrator and heating the phone before removing the old adhesive strips was the ticket! The extra room was good and the strips pulled right out after heating. I just used my wife’s hair dryer.

    Ronald Glosemeyer -

    I didn’t see the part about removing the vibrator till after snapping the ends off the adhesive strips. I don’t think I snagged the strips on it, but extra room to work is a good idea. The strips didn’t stretch hardly at all before the ends snapped off. The tweezers that come with your repair kit are pointy, while in the video, they are blunt with rounded corners. I think the points punctured the strips and caused them to rip. I had to heat it over a light bulb and use the long black spudger to pry it loose. I ended up bending and puncturing the battery, but no harm was done. I recommend, lots of heat to soften adhesive, remove the vibrator and use blunt/rounded tweezers.

    William Vojtech -

    I been doing electronics for forty years now the battery strip adhesive if possible must be applied correctly as it aiding heat transfer from the battery through back casing being like a heatsink it’s white in colour similar to heat transfer compounds in normal use the phone will have moments when it gets a little warm this adhesive strip for battery must be the correct strip for the battery using double sided sticky tape does not do the same thing as the correct battery strip

    dvbow930 -

    At the end of the day this repair will ALWAYS be about pulling the white stretchy adhesive tape out from under the battery to release it without damage to the strips or the battery. I have not always been successful in this exercise. But this time, as recommended, I removed the “vibration” block and used a number of short pieces of painter’s tape to created a series of better pulling “devices.” After getting a slow-but-reasonable start, once several inches emerged I used the 3/4” wide x 2+” long pieces of tape, carefully applied to both sides of the two strips, to “combine” them and form a unified “grab point.” Removing the “vibration” block allowed me to reduce my pull angle to an wonderfully shallow degree. I was then able to slowly-but-surely pull out both adhesive strips. Moving those strips in tandem allowed me to successfully release of the battery from the iPhone.

    Michael Russo -

    Removing the sticky strips: Take the head off a matchstick. Lift up the end of one sticky strip as per instructions. Hold the matchstick so that it’s parallel with the bottom edge of the battery and wrap the end of the sticky strip around the matchstick. Pull the matchstick+tape up/back a bit. Roll the matchstick to wrap more tape around it and pull up/back on the strip using your middle fingertip. Wrap, pull, wrap, pull, repeat until the end of the tape comes through.

    Use a new matchstick for the second sticky strip.

    It’s like how bakers roll a Swiss roll, in reverse.

    JL Walsh -

  9. MXupsfVYT1fpVRYq
    MXupsfVYT1fpVRYq
    lBHh6upGEOcfxPMP
    5VrshMDAcMIYVXmN
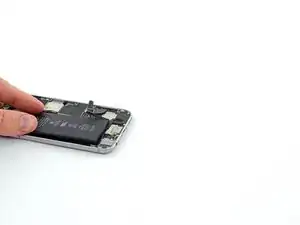
    • Wiederhole für den zweiten Streifen.

    • Drücke den Akku nach unten, während du den zweiten Streifen entfernst, er könnte sonst den Akku heraus schleudern, wenn er sich vom Gehäuse löst.

    • Wenn der Klebestreifen abgerissen ist und nicht herausgeholt werden kann, dann tröpfle ein wenig hochkonzentrierten Isopropylalkohol (mehr als 90%ig) an die Stelle mit dem gerissenen Klebeband unter die Kante des Akkus.

    • Lasse den Alkohol etwa eine Minute lang einwirken, bis der Kleber weich ist. Hebe dann den Akku vorsichtig mit dem flachen Ende des Spudgers hoch.

    • Versuche nicht, den Akku mit Gewalt herauszuhebeln. Tröpfle mehr Alkohol hinein, falls das nötig ist, um den Kleber zu schwächen. Verforme niemals den Akku und stich ihn nicht an.

    • Heble nicht gegen das Logic Board, das iPhone könnte beschädigt werden.

    • Schiebe die Karte nicht im Bereich zwischen der oberen Kante des Akkus und dem Lautstärkeregler (-) ein, sonst riskierst du, das Lautstärkekontrollkabel zu beschädigen, das direkt unter dem Akku in das Rückgehäuse geklebt ist.

    • Wenn einer der beiden Klebestreifen gerissen ist, kannst du auch eine der Alternativmethoden aus nachfolgendem Schritt benutzen.

    First adhesive (component side) broke during removal, but enough of it was hanging out to finish the job. 2nd strip (vol side) broke and snapped so far back I couldn't retrieve any part for pulling. HOWEVER, I proceeded with wedging a health care card, which is more flexible and thinner than credit card, and continued to push the adhesive from component side to edge of case. Once I have gotten enough adhesive bunched up and battery is showing signs of being lifted slightly, with health care card still in place, carefully swap a credit card and continue to leverage battery out slowly. (I did all of this without taking sceeen off, so be careful and do it at your own risk)

    youmingc -

    The correct way of taking off the adhesive is not how it's shown in the picture (that is exacly how I broke both strips): it should be pulled out by tearing it away and right (to the speaker direction) and as flat as possible, and as the strip grows thinner move up but still pulling "down-right" until all comes out, same movement: " down-left" for the left strip

    Ed Oliver -

    Definetly aided in the removal. Thanks!

    Nicholas Sattele -

    This comment refers to an out-of-date version of this guide. The current photos are correct. ;)

    Jeff Suovanen -

    just wanted to comment i followed this method and found it to be the easiest. as i got more and more adhesive out, i wrapped the excess around my finger like you would do with excess dental floss to keep the firm grip. worked perfectly. the total job was roughly 5-7 minutes from the first screw to the last.

    Robert Vela -

    Highly recommend using your iphone to do high power consumption tasks before shutting it down. This will warm the inside of the iphone and warm the adhesive strips. Doing this allows you to very easily pull the right adhesive strip completely out from the bottom of the battery. I just pulled straight out at a low angle and kept pulling until the strip was completely removed. You do need to take your time and be careful, pull slowly and it will eventually come out completely. If it is dry and not flexible, you'll will most likely fail, so make sure the inside of the iphone was warmed prior to starting your repair.

    Ryan -

    The white "Command" type adhesive band broke, but was able to reach it with tweezers in the First Aid kit. Winding the adhesive around the tweezers with gentle tension allowed me to pull it all out and then the battery was "free".

    malowitzp -

    The 2nd one did break loose on me, but I was able to pick it up with the sweet tweezers provided with the Repair Tools kit. It took a few tries, but I was able to snag an edge and pull the strip back successfully.

    smahar -

    Heat the back of the phone before trying to pull the adhesive, makes it much easier.

    Jonathan MacIntyre -

    To heat the back of my phone I opened a console on my laptop and had it run a ridiculous computation, then put my phone underneath.

    kevin evans -

    Before you put in the new battery (with the new adhesive strips on it), be sure to bend the pre-bend the battery connector cable!!!! (In the same pattern as the old battery!!!!) Will save you a big headache when trying to reconnect the battery connector cable.

    Bernadette Smith -

    Pull slowly, do not rush it and it will be fine.

    info -

    I agree with Jonathan MacIntyre . Heat the back of the phone with a heating pad for 15 minutes prior to do this and the strips come off much easier! I didn’t heat it at first and I almost broke off the first strip. (I was able to recover it later on with the tweezers after heating it with a heating pad.) The strips came out much easier after heating!

    kylecompfix -

  10. kkNONOap5ThC5vDO
    kkNONOap5ThC5vDO
    d1EkcSdNcamFYjFd
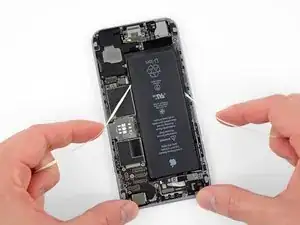
    • Du kannst als Alternative auch das iPhone wieder umdrehen und ein Stück Zahnseide oder Nylonschnur hinter den Akku einfädeln. Ziehe den Faden nun in einer sägenden Bewegung langsam vor und zurück, um den Klebstoff aufzuschneiden.

    • Eine stärkere Alternative zur Zahnseide ist eine abgewickelte Gittarensaite, zum Beispiel eine 0.009E Saite eines 12-Saiten Sets.

    • Wenn der Akku immer noch festklebt, dann kannst du auch einen heißen iOpener oder einen Haartrockner benutzen, um damit die Gehäuserückseite direkt hinter dem Akku zu erwärmen. Sie sollte so heiß sein, dass du sie kaum anfassen kannst.

    • Wenn das iPhone zu heiß, wird kann der Akku in Brand geraten.

    The bad news was that the adhesive strip ripped on the logic-board side. The good news is that recovery was not as difficult as I thought. By using a hair dryer, and some very patient wedging with a credit card, I was able to separate the battery from the adhesive, and then remove it. Some simple cleanup with tweezers got the adhesive sticking to the case. Just make sure you get it right on the edge side, or this technique will be a lot harder to pull off.

    Billy Bob Baler -

    I screwed up the peeling part but I managed to get it through with a credit card.

    Important, do not force the card down. Just take your time pushing and moving the card left and right. When the battery was up I just kept going with my hand, reeeeeally slowly and with constant force (so that it peels off the remaining straps).

    Emanuele -

    The left side adhesive strip broke where I couldnt reach it. I tried dental floss but it wasnt strong enough in my case to cut through the adhesive, but I had 20lb fishing line that I had used to remove an emblem from a car and that worked well. I think the key is to pull the adhesive strips nearly straight down and not to the side.

    Roger Stroud -

    Both adhesive tabs broke for me. I ended up starting with the hairdryer then trying floss and then a plastic card which was too flimsy. In the end I used the plastic wedging tool to pry the battery up and hold it there. With the battery raised, on the side closest to the phone edge I was able to scrape the adhesive strip together enough with the tweezers and then my fingers to pull at it laterally stretching it so that it came away in one piece. The battery was slightly dented and bent, but not punctured at this point. The second strip near the logic board was much higher and necessitated bending the battery much more and just holding it there. I couldn't get the battery up enough for fear of a puncture so I just held it there as the adhesive slowly detached itself and in the end the battery just popped free. Not sure if the warming from the hair dryer made any difference.

    Jimmy Howlum -

    I used an ID card (without magnetic strip) just like the picture above to wedge the battery up to reach the broken adhesive strip.

    malowitzp -

    This part is where I almost gave up. The strips broke, I tried to pry it out, then I heated the back with a hair dryer. I used an ID card and got under it and shimmied left and right until the battery was able to break look from the strips. Afterwards the battery was bent which concerned me it could just break. At this point I realized, yes, Apple does not want you to get in their phones. After it came out all went well and was glad to have finished this.

    Garret Gray -

    For me the strips broke and I had to use credit card to detach the battery. This is quite tricky thing.

    Kristaps Grinbergs -

    Cool trick, used hair dryer and gentle persuasions.

    Richard W -

    Be careful if you have failed to pull out the adhesive near logic board. Since the cable responsible for power button and mic near the back cam lays above apple’s logo plate, when you pull out the battery with logo plate sticked with it, you may damage the cable. Mine cable was damaged in this way.

    Berry Wang -

    Used the floss technique and damaged the volume control cable. Fortunately complete cable and button assembly is a $9 part on Amazon.

    stvn chng -

    If u read the instructions in advance this is where u consider not doing this. Getting the battery away from the adhesive strips is a bear. The floss idea is a joke.

    james licata -

    Battery removal with adhesive stuck under the battery using floss personal record was around 10 minutes.

    Tri Vuong -

    using fishing line worked well for me. the wire was cutting into the battery pack and dental floss would not work.

    Jeremy Thiriot -

    I too found that fishing line, specifically 10 lb test Fireline braid fishing line, is an excellent alternative to floss or wire due to its strength and small diameter. I tied washers on each end using a Palomar note to provide a secure grip.

    Patrick Langvardt -

    Both adhesive strips broke despite heating. Then the floss broke. Likewise, here is where I almost gave up. Used an old credit card gently, and bent the battery a little bit with constant fear that I would be starting a fire. Some patience, and with a few minutes, it was out.

    Hannah Hyun -

    If you need to use dental floss, use the thin type and double strand it. Have extra on hand in case that breaks.

    Jennifer Porter -

    If the adhesive strips break, take your time removing the battery. Yes the battery will turn into a big fire ball if it is bent too much or punctured with a screwdriver while trying to pry it out. Not sure which one was the culprit. It gives a new meaning to the term “Burn Phone”. Luckily, only the volume control ribbon cable needed to be replaced. Even after the battery caught fire and was removed, the adhesive strips remained on the case and I had to scrape them off.  I also had to remove some of the melted plastic so the new battery would fit in properly.

    So, as you are trying to blow out your flaming battery like a giant birthday candle, remember to blow the flames away from the logic board and other sensitive components.

    Paul -

    This is why the instructions say to discharge the battery before you start. Battery fires are really dangerous! Stay safe out there. If you do somehow end up with a battery fire, do NOT blow on it or get your face anywhere near it. Have a bucket of sand ready to pour on top of it if you’re doing something risky. But seriously, just drain the battery first and you’ll have very little chance of a problem.

    Jeff Suovanen -

    Hardest part. The adhesive is extremely… adhesive. Dentalt floss didn’t work, credit card bent out of shape. By this time the battery was already bent to the point where I could use the tweezers to pull the white tape sideways from under the battery. Being strong tape, I was able to pull it out along the side of the battery all the way. That was actually easy. Strangely there seemed to be only one strip.

    Johan Fredrik Varen -

    YOU have to remove the VIBRATOR so it does not CUT the strips. Keep grabbing up close after pulling some out. these are over 2 feet long so be gentle..pull low and away, not up ever. Good Luck!

    Jack Dennis -

    That was hard to remove but I did it. Be careful about the lower frame edges, it’s so sharp, it cut my finger.

    Babak Sepahyar -

    Ich habe gleich den Weg gewählt, den Akku zu erwärmen (mit dem Föhn von unten) und dann denn Akku vorsichtig mit einem Kunststoffspachtel rausgehebelt! (Das riskante entfernen der Stecker für Display und Touch habe ich nicht gemacht...ging auch so gut!)

    Fridtjof Schüssler -

  11. QdOnktTToNMblMo3
    • Nimm den Akku aus dem iPhone.

    • Sollte dein Ersatzakku in einer Plastikhülle geliefert werden, entferne zuerst die Plastikhülle vom Akku, indem du die Hülle vom Flachbandkabel abziehst, und setze erst dann den Akku ein.

    • Wenn noch Reste vom Alkohol im Smartphone sind, dann wische sie sorgfältig weg oder lasse sie abtrocknen, bevor du den neuen Akku einbaust.

    • Stecke vor dem Festkleben des neuen Akkus den Akkustecker vorläufig in den Anschluss auf dem Logic Board ein. Dadurch nimmt der Akku die richtige Position in seiner Vertiefung ein.

    • Klebe den Akku fest, löse den Stecker wieder ab und fahre mit dem Zusammenbau fort.

    • Wenn an deinem neuen Akku noch keine Klebestreifen dran sind, dann folge dieser Anleitung, um die Klebestreifen korrekt anzubringen.

    • Führe nach dem Austausch einen Hard Reset durch. Dies verhindert einige Probleme und vereinfacht die möglicherweise dennoch anfallende Fehlersuche.

    This was very helpful

    PRABHUDEV KULKARNI -

    I got the battery out but what if it the battery bends a bit????

    babyuk76 -

    A bit of bending is probably fine as long as you are planning to replace the battery. Don't try to reuse a bent battery. In any case, try not to bend it any more than necessary, as bending increases the risk of fire.

    Jeff Suovanen -

    I need a little help... I've been through your tutorial and success... all gone smoothly.

    But.... I've had it on charge for 25 minutes... no charging symbol, no life at all... how long does a new battery take to charge before you notice any life?????

    joehopkin2016 -

    It can take a little while. If it doesn't power on after a little more time has gone by, open your phone back up and double-check your cable connectors. If that doesn't work, try plugging in your old battery to see if it behaves the same way. If you continue to have problems, drop a post in our Answers forum for more detailed troubleshooting. Good luck!

    Jeff Suovanen -

    Well, the screen removal step is completely unnecessary and cost me the functionality of my front facing camera. I would remove it from the guide altogether.

    migue31096 -

    There's no way I could have replaced the battery without removing the screen. It took a fair amount of wrangling to remove the battery.

    Steve Allen -

    It depends on your experience level. If you don't successfully remove both pull tabs, it's much easier to pry the battery out if the screen isn't connected. Most professionals probably leave the screen connected to save some time but we recommend beginners remove the screen to minimize the risk of damaging the display's ribbon cables.

    Evan Noronha -

    Got it working turned it off now it doesn't want to turn on!!

    Juan Ramirez -

    You should add a comment about the best way (environmentally) to dispose of this battery.

    malowitzp -

    You should add the final step of connecting the battery cable and finishing the install. I followed these steps and my phone is dead and no longer works, so not sure if I connected the battery cable incorrectly. It doesn't secure as tight as the original was, but there is no guidance in this guide on how to reinstall it. The youtube videos skip past the final steps too.

    Jay -

    @jaybytez Sorry you're having trouble! Installation for the most part is just the reverse of removal. There's a link in the final step and the conclusion for how to install new adhesive strips and stick the battery down. To reconnect the battery to the logic board, just position the connector over its socket and press gently until it clicks into place. Same goes for all the other connectors. I'd suggest going through the guide a second time and checking your work carefully. If you're not sure whether the battery is connecting correctly, try the old battery again for comparison. If you continue to have trouble, reach out to our customer support team or try posting your issue in the Answers forum. Good luck!

    Jeff Suovanen -

    ("Never" part 1 of 4)

    If you are only directly interested in the current instructional steps for iPhone 6 battery replacement, please know that this 4-part comment simply upvotes/supports Jay's post above.     (4-parts needed as ran up against the character limit for this box.)

    This is a commentary on this specific guide, yes, but it really applies to all guides I've read so far on iFixit, so I am not critiquing the author per se. This turned into a global recommendation for possible improvement in the fundamental approach that iFixit takes in writing ALL of the guides.

    I agree with Jay 100% and I think the iFixit community would benefit tremendously if this suggestion were taken more seriously, namely that reassembly should be addressed as a separate instruction. Here is my further claim:

    Reassembly is NEVER simply following disassembly instructions in reverse order.

    It is never “just the reverse of removal.”

    (Cont'd)

    Paul -

    ("Never" part 2 of 4)

    If you tend to disagree with my statement, simply try dragging the included YouTube video in reverse. Then try to follow that along while reassembling your phone. As just one example, see if you have great success reconnecting the battery connector to the logic board using the opening tool in the same manner as you used it during disassembly. Heck, try using the opening tool in a different manner if you like, but go ahead and reattach the connector using the opening tool. It is even called an “opening” tool - the very name of the tool shows you that it would NOT be included in a reversal of the instructions. That would require a “closing” tool. In this case, the “closing” tool is actually wisely recommended to be our fingers, applying gentle pressure, and in one case (I believe it was for the display connector) even pressing on the connector in a very particular manner (not much in the middle).

    (Cont'd)

    Paul -

    ("Never" part 3 of 4)

    If you still question my claim that reassembly is never simply following disassembly instructions in reverse, it might be a very interesting exercise to record yourself actually reassembling the item (you already have the cameras present and rolling anyway, why not for a little while longer?). If you did that, and watched the assembly video side by side with the disassembly, you will quickly see all the many differences there are. I imagine that would be all it would take to convince "the powers that be" at iFixit that it would be a very good recommendation to authors that they complete the full round trip. Alternately, as I said, you could simply watch any of the current videos in reverse while actually performing reassembly, and could then at least add notes to existing content regarding the differences (as was done with the display connector NOTE found in this article above - I thought that was a really nice touch, BTW).

    (Cont'd)

    Paul -

    ("Never" part 4 of 4)

    In closing, I really, really like iFixit, so I hope this recommendation is helpful and I hope it is received as such, as constructive criticism. Just trying to make iFixit even better, on its way to becoming an indispensable resource to all.  :-)

    (End of "Never" comment)

    Paul -

    @spacemanspiff2 As you seem to have noticed, there are reassembly bullets sprinkled throughout each guide specifically to mark the areas where additional instructions are provided for reassembly. Hence the qualifier, “Installation for the most part is just the reverse of removal.” When it’s not, reassembly tips are added to the appropriate step. In those cases where more is needed, you’ll find reassembly steps or even a full-blown reassembly guide.

    Jeff Suovanen -

    Pre-bend the new battery connector cable! If doing this again I would make sure I had pre-bent the connector cable the same way as the original battery is bent. I did not and then once the new battery was glued down I could not get at it well to bend it properly. I had to wedge the extra cable in a bit and then the very small extra thickness left a small color distortion on the screen due to the additional pressure on the back of the display.

    SC -

    Es posible que al instalar una batería no original falle a continuación él detector de huella en un iPhone 6 ?

    Jose Luis Arias -

    Well, I disassembled my work phone after buying just the battery. Now I find out the battery doesn’t come with these adhesive strips. Too late, I need this phone. Nice.

    Wesley French -

    Hi Wesley!

    I’m sorry to hear about the trouble. If you ordered just the battery and not the Fix Kit option, then the adhesive strips are not included and are sold separately. This is mentioned on the product page. If you’re still in need, you can find them right here: iPhone 6 / 6s / 7 Akku Klebestreifen

    However, the battery should still technically perform just fine for you without the adhesive strips, as these are primarily used to keep the battery structurally adhered to the inside of the phone. If you are mindful of how well you handle your device (ie: Don’t throw it across the room, or go running with it in your hand), you shouldn’t have too much to worry about. Otherwise, it would be best to replicate the way the batteries come in all iPhones and get yourself a set of adhesive strips.

    Kadan Sharpe -

    Yeah, the glue tab part is where this is not realistic to do yourself… mine tore off and now the battery is stuck in there, with no way to get it out and now voided. Your special tools are a joke.

    David Roberts -

    Assuming I get through this procedure, are we supposed to cycle the battery a certain way?

    Mark Lynch -

    Assemble in reverse needs update because I fix it now includes a screen gasket with no instruction. I’ve got a feeling I need to disconnect screen again in order to install it???

    fm Haynie -

    @docwild There is no screen gasket on the iPhone 6. If you’re working on an iPhone 6s, the instructions are here, and there’s a link in Step 21 with instructions for replacing the gasket.

    Jeff Suovanen -

    I agree with the comment about pre-bending the cable first. I didn’t look close enough at the original battery and it looked like the replacement battery had a completely different cable. Then I realized that the cable turned up 180 degrees and then bent over 90 degrees.

    brian -

    I’m amazed my phone works after all this. I must have done just about everything wrong. Good luck to everyone attempting this. My next phone will be an Android, just not yet now that I’ve successfully replaced the battery.

    Jennifer Porter -

    ifixit needs to change their product configuration to include the adhesive strips with the battery only option and not just with the kit. Stupid to make people buy all the tools again just to get the adhesive strips…

    Matt Sutton -

    @mts04a60 You can buy the strips separately. They’re linked in the parts list at the top of the guide.

    Jeff Suovanen -

    Warming the back of the phone was the only way I could remove the adhesive strips. If cold, the adhesive strips do not release and break easily. Once warmed up, the improvement in ease of removal was amazing. I think this should be the starting point unless you live in a really hot place

    Chris Wright -

    The battery replacement went off without a hitch, but now I have no speaker sound. I still have earpiece and headphones sound, but no speaker. I’m trouble shooting now, but does anyone have any ideas? I’ve cleaned my headphones jack, checked my ringer is on etc. etc. Doing the most recent software update now ( hadn’t done it yet), but could just replacing the battery cause my speaker to be damaged? I didn’t even touch anything near where the speaker is housed. ???

    Katt -

    Replacing iphone6 battery with out using heat gun, will it spoil the battery? Thank’s

    Mos'ab Ahmad Qamar -

    Great kit! Simple to follow instructions made an intimidating task a breeze to accomplish. I highly recommend this kit to any owner of an iPhone to replace their own battery. An added bonus is the tools you have after the job for future use. They’re handy for glasses and other items with miniature screws besides phones. Overall an easy task with everything needed to complete the job in a professional manner. AAA+++

    kmoomoo2 -

    A few weeks I brought my 6S to Best Buy and let them replace it for $49. They are a certified Apple repair agent. Not worth my time or risk of breaking the phone. Just my preference and opinion.

    Stephen Fox -

    my phone doesnt turn on and without a charging cable is the only time i can see the apple logo and then it retries and reshows the logo every 10 seconds. not sure what i did wrong

    Vincent Guida Jr -

    Have you already replaced your battery?

    Daniele Carminati -

    I found it beyond helpful to have the old battery and its connector to compare it to the way the replacement arrived. This told me approximately what the exact shape the replacement cable ought be configured/pre-bent into to successfully reconnect it to where it must go in the iPhone.

    Michael Russo -

    Just be warned that the Battery I received was absolutely dead flat- no residual charge at all.

    Just to check that I hadn’t messed up any connections I dismantled it again.

    In desperation I put it on charge and it worked!!!!

    David Mugglestone -

    The iPhone 6 that I replaced the battery in did not have the dual adhesive strips at the end of the battery but rather a single narrow adhesive strip under the center of the battery. I had to heat up the back case and then pry the battery out by wedging a spudger tool under to work it lose.

    Gary Eldridge -

  12. LJpAopLnuaaDTuvd
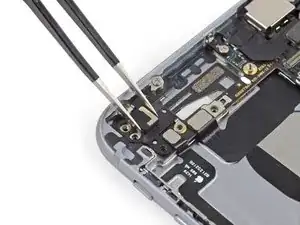
    • Entferne folgende Kreuzschlitz #00 Schrauben, die die obere Kabelhalterung befestigen:

    • Eine 2,9 mm Schraube

    • Eine 2,2 mm Schraube

  13. Bx5ycgHSBhCMoWku
    Bx5ycgHSBhCMoWku
    KvBPlgDRUkG3y3LG
    • Entferne die obere Kabelhalterung aus dem iPhone.

  14. 1BvwnA5LRdrDIOgS
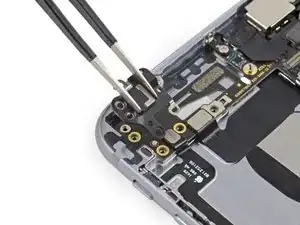
    • Entferne folgende vier Kreuzschlitz #00 Schrauben, die die Kontaktklammer befestigen:

    • Eine 1,5 mm Schraube

    • Eine 1,4 mm Schraube

    • Zwei 2,1 mm Schrauben

  15. Hpau5eQpSBbnCfOY
    Hpau5eQpSBbnCfOY
    BZiEGbLLYBgZqBEl
    • Entferne die Kontaktklammer aus dem iPhone.

  16. Ps5aSFSuSv4MGfdy
    Ps5aSFSuSv4MGfdy
    cWptgTFlGsHMK2RI
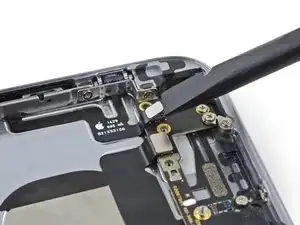
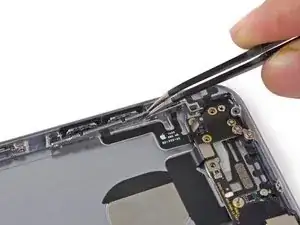
    • Löse mit dem flachen Ende eines Spudgers das Kabel der Lautstärkeregler vom Anschluss.

    • Achte darauf, dass du nur das Kabel löst und nicht den Anschluss auf dem Logic Board, du könntest es sonst beschädigen.

    I wished I removed the Orange Screw from the next step, BEFORE, I removed this connector, as I used a screwdriver without being careful enough and accidentally crushed the socket below this connector. At least I would have had half a chance. Managed to get the new connector on and amazingly the mute works but no more vol up or down :-(

    Tahir Khan -

  17. 43Pi25HnnWHRiZVR
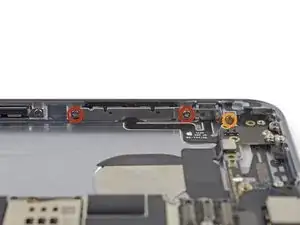
    • Entferne folgende drei Kreuzschlitz #00 Schrauben, die die Klammer des Lautstärkekabels befestigen:

    • Zwei 2,3 mm Schrauben

    • Eine 1,8 mm Schraube

    The two 2.3 mm screws are not the same: on one of them, the thread stops before the top of the screw. Is that normal, or problematic?

    Jean Orloff -

  18. ORgQC1fYJNRC52tS
    ORgQC1fYJNRC52tS
    BypLWmSAtAcFXAkl
    ydFxaxdjVtsXMPnY
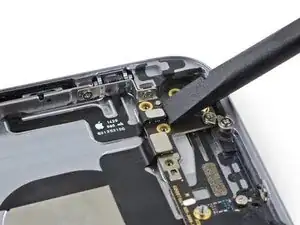
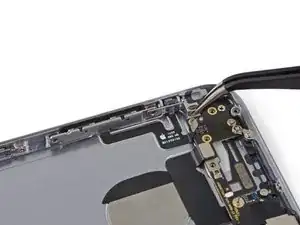
    • Ziehe die Sperrtaste und die Klammer der Lautstärkeregler vom Gehäuse weg, um an die Abdeckungen der Regler zu gelangen.

  19. PhHuKrbAkKGufaLY
    PhHuKrbAkKGufaLY
    6nBtWNTDYIgDjHyM
    JOaOb21rHavAKDtI
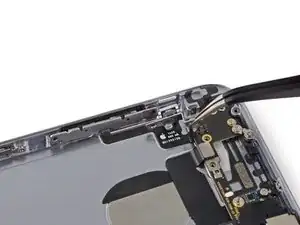
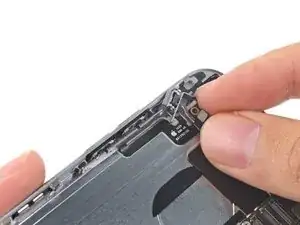
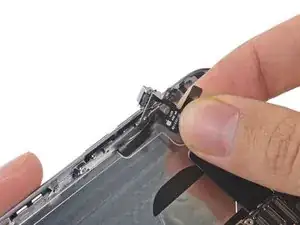
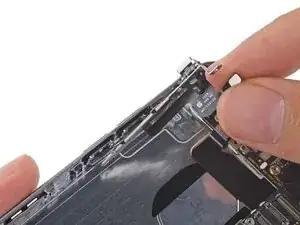
    • Ziehe vom Ende des Steckers ausgehend das Kabel der Lautstärkeregler aus dem Gehäuse.

    • Sei vorsichtig, wenn du an den dünnen Teilen ziehst.

    • Entferne das Kabel der Lautstärkeregler aus dem Gehäuse.

    After unscrewing the metal bar that holds the cable, I had a lot of trouble with separating those two parts. After ripping it out the metal bar, I've found out that the cable was soldered to the bar. I tried to fit the cable again and screwed the metal bar back in but the mute switch is loose now and its impossible to change/switch it. Did any of you encounter this? Any ideas for that? This part is quite important but skipped by the guide.

    ivul -

    Did you figure this out? I'm having the same problem with the mute switch being loose. It seems like it needs pressure on the top edge of the switch (ie. not the back of the switch where the metal bracket that screws into the phone casing, and not the front where the outer switch is). I can't figure out how to keep pressure on that top edge so the switch isn't loose.

    Ed Varga -

    I just did this repair. You have to use a soldering iron to melt the three plastic posts on the mute button. The posts need to be melted while you hold the mute button flush against the bracket with a pair of tweezers. Make sure the posts are melted all the way down to the bracket so it stays secure. Also, be sure not to allow the soldering iron tip touch the mute/volume flex cable. Cheers!

    Eddie -

    These instructions are not complete. The mute switch has to come apart which is not covered here and there are three plastic posts that have to go into the bracket. Disassembly of the flex needs to be covered in the final disassembly instructions. Also disassembly of the power buttons from the bracket should be covered in the instructions.

    Bobby Gorden -

    As stated above, the instructions seem lacking with regard to the mute switch and the volume control buttons. The comments above were very helpful and luckily for me I have a soldering iron. On the mute button, there were two very small metal brackets I lifted up to release the mute button. I used an exacto knife to cut the rear of the three plastic posts. This released the old cable from the mute button bracket. I then installed the new cable to the mute button bracket and melted the three posts with a soldering iron. For the volume control bracket, I pried the metal bar off the bracket. I agonized as to how to replace the new cable with the micro switches to the metal bracket. Soldering seemed risky as I did not want to damage the micro switches. Since I was also replacing the battery, I had new adhesive strips for the battery. I cut a small strip of double sided adhesive adhere the micro switches to the bracket, being careful to align the plastic posts. All is well so far.

    Scott Wilson -

    Please fix this post! The info about mute is very important.

    nandogbr -

    The comments were very helpful in understanding how to remove the bracket from the mute button and then re-fix it using the soldering iron to melt the three plastic posts. However it was not clear for me from the comments how to remove the small metal plate that is that glued to the volume switches. And also what is the right procedure to refix this plate to the new cable. Since my problem is only that the up volume button is not working I decided to reassemble the phone waiting this guy to be a little bit more clear about this two topics.

    gsanse -

    Does anyone know how to correctly attach the metal part with the colour to a new switch?

    Tristan Bettesworth -

    The complete cable, buttons and bracket assembly is available on Amazon for $9 as of January 13, 2018.

    stvn chng -

Abschluss

Arbeite die Schritte in umgekehrter Reihenfolge ab, um dein Gerät wieder zusammenzubauen.

Sam Goldheart

Mitglied seit: 19/10/12

457712 Reputation

2 Kommentare

These instructions are so AWESOME to be able to reference! That last 1.8mm screw was a pain to get out of my phone. Step-by-Step, worked EXCELLENT. Thanks for posting these!

Brian S Graham -

TRICKY BITS: replacing the mute switch lever onto the cable assembly is a bit…interesting. It was only when I used the Head Magnifier that I was able to see the mechanics of the switch and fit it on. There needs to be a seriously microscopic shot of that mechanical fit!

But, get the magnifier, it’s great for digging out splinters from your fingers.

SUGGESTION: Once you get the switch and the bracket situated, but before you stick the control cable to the case, make sure the switch functions. I had to loosen the three screws and place pressure on the assembly, holding the switch firmly in place, before it made a solid fit-then I tightened the three screws. Voila, the switch works!

Only then should did I bond the cable to the case

And now my phone rings again! Yay, no more missed calls!

maxB -