Introduction

If your iPhone 12 screen is cracked, not responding to touch, or not showing a picture when your phone is powered on, use this guide to restore your iPhone to working order with a new screen, a.k.a. display assembly.

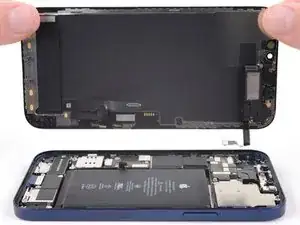
The combined earpiece speaker + sensor assembly affixed to the back of the display is paired to your individual iPhone from the factory, so you must transfer it from your old display to your new one during any display replacement. It contains the flood illuminator, which is part of the biometric Face ID security feature. If it is damaged or replaced, Face ID will cease to function, so take extra care not to damage any of these components during this procedure. If damaged, only Apple or an Apple-authorized technician can restore Face ID function.

Note: True Tone functionality is disabled after a screen replacement, even when using an original Apple screen.

  1. oBBxtkV2gJcIPKkK
    • Caution: Before you begin, discharge your iPhone battery below 25%. A charged lithium-ion battery can catch fire and/or explode if accidentally punctured.

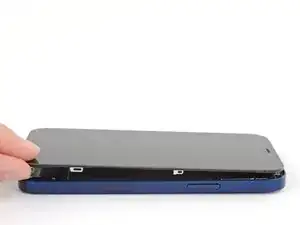
    • Power off your iPhone before beginning disassembly.

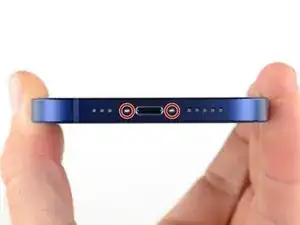
    • Remove the two 6.75 mm long pentalobe P2 screws at the bottom edge of the iPhone.

    • Opening the iPhone's display will compromise its waterproof seals. Have replacement seals ready before you proceed past this step, or take care to avoid liquid exposure if you reassemble your iPhone without replacing the seals.

  2. voNWTD25eWiGUdu3
    voNWTD25eWiGUdu3
    XTM1CepRnVkDnbfI
    NgVMfmOgJwEalMFF
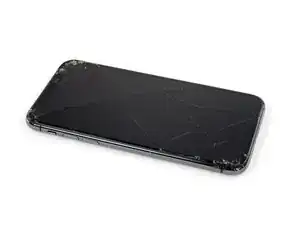
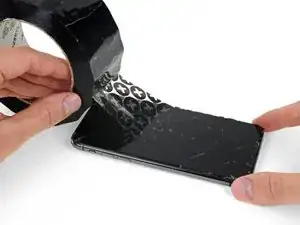
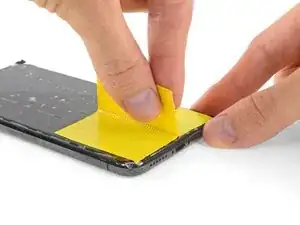
    • If your iPhone has a cracked screen, keep further breakage contained and prevent bodily harm during your repair by taping over the glass.

    • Lay overlapping strips of packing tape over the iPhone's display until the whole face is covered.

    • This will keep glass shards contained and provide structural integrity when prying and lifting the display.

    • Wear safety glasses to protect your eyes from any glass shaken free during the repair.

    • If the broken glass makes it difficult to get a suction cup to stick in the next few steps, try folding a strong piece of tape (such as duct tape) into a handle and lifting the display with that instead.

    How to detect my Iphone what screen it is, OLED or LCD?

    sabrihakulii -

    It’s OLED. You can find the specs here, https://support.apple.com/en-us/HT201296

    When you find your phone, at the bottom of the description click on, See the tech specs…

    mcr4u2 -

    The included suction cups were stiff and worthless. They would not lift the screen. Also, I tried every type of tape on the screen to help the suction cups stick without success. Heavy duty suction cups were for my bathroom also failed. However, I had an old GoPro mount with some preapplied double sided 3M VSB tape and stuck that on the screen near the bottom. Magic! This method had the added bonus of being able to use a GoPro attachment as a handle to lift the screen, and propped up the screen like a kickstand in step 12.

    Tawan Khamapirad -

    Very cool! Thanks

    Antonio -

    My screen was pretty stuck… would not budge. Heated, super glued the suction cup, tried gorilla tape. Ended up doing the GoPro mount with 3M VSB tape method mentioned. Worked great. That 3M tape is the bomb.

    Rich Wachtel -

    The included suction cup took a few tries but ended up working for me.

    charlotte -

    If you have flat feeler gauges (for adjusting engine valve tappet clearance, ignition points … old school) the .003 thick goes right in. Work your way up until you can get the pick or supplied pry tool in.

    William Olstad -

    where can I buy 3M VSB plis!!

    gerardo artigas cuellar -

    3M VHB tape is at auto stores and other big box stores, or online.

    nicO Gurney -

    I used the tweezers that came with the replacement screen and jammed one of them into the glass and that eventually worked. Heating with a blow dryer is also important. The suction cup was helpful in loosening the adhesive for sure, but just not enough to get the display to come out.

    J Olin -

  3. KcwpCcd5eHc36IsG
    • Heating the lower edge of the iPhone helps soften the adhesive securing the display, making it easier to open.

    • Use a hairdryer or heat gun or prepare an iOpener and apply it to the lower edge of the iPhone for about a minute in order to soften up the adhesive underneath.

  4. B3jjMp2cvD5Rjabx
    B3jjMp2cvD5Rjabx
    wufMUDq5ACWHc1cq
    UJOVsyajxtH5oKXa
    • The next two steps demonstrate the Anti-Clamp, a tool we designed to make the opening procedure easier. If you aren't using the Anti-Clamp, skip down two steps for an alternate method.

    • For complete instructions on how to use the Anti-Clamp, check out this guide.

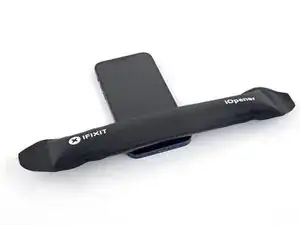
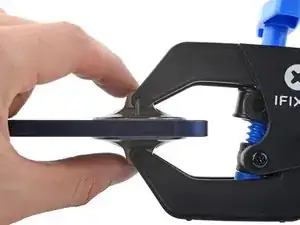
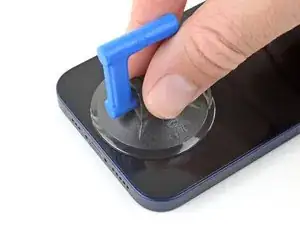
    • Pull the blue handle towards the hinge to disengage opening mode.

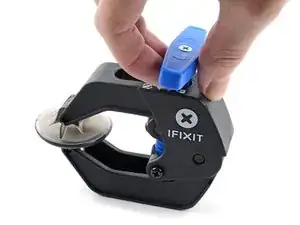
    • Position the suction cups near the bottom edge of the iPhone—one on the front, and one on the back.

    • Push down on the cups to apply suction to the desired area.

    • If you find that the surface of your device is too slippery for the Anti-Clamp to hold onto, you can use packing tape to create a grippier surface.

  5. yLfpwmHpnwNOcPLB
    yLfpwmHpnwNOcPLB
    byGIIm5JpAn4ebnI
    sW4dOcZKqS3koq3Y
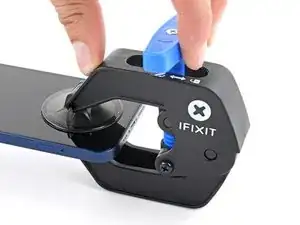
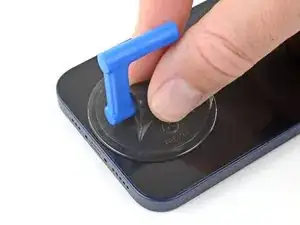
    • Push the blue handle away from the hinge to engage opening mode.

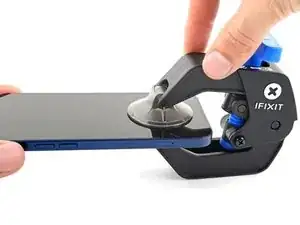
    • Turn the handle clockwise until you see the cups start to stretch.

    • Make sure the suction cups remain aligned to each other. If they begin to slip out of alignment, loosen the suction cups slightly and realign the arms.

    • Wait one minute to give the adhesive a chance to release and present an opening gap.

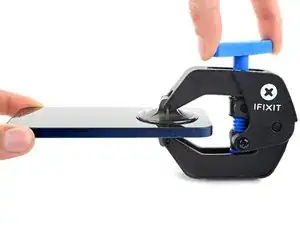
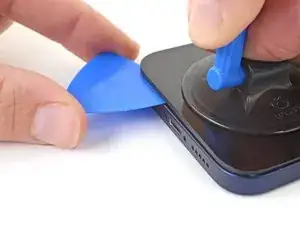
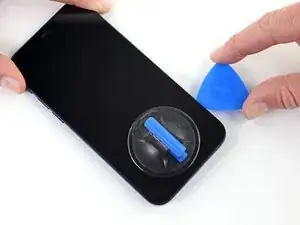
    • Insert an opening pick under the screen when the Anti-Clamp creates a large enough gap.

    • If the Anti-Clamp doesn't create a sufficient gap, apply more heat to the area and rotate the handle clockwise half a turn.

    • Don't crank more than a half a turn at a time, and wait one minute between turns. Let the Anti-Clamp and time do the work for you.

    • Skip the next two steps.

  6. ASLAa2AJO4E5GYT1
    ASLAa2AJO4E5GYT1
    EMmHxm3YOfOoLkEG
    • If you're using a single suction handle, apply it to the bottom edge of the phone, while avoiding the very edge of the glass.

    • If your display is badly cracked, covering it with a layer of clear packing tape may allow the suction cup to adhere. Alternatively, very strong tape may be used instead of the suction cup. If all else fails, you can superglue the suction cup to the broken screen.

  7. QdfiItrQQ6MhHWbj
    QdfiItrQQ6MhHWbj
    4nKuwPf1B6TyCssL
    eU1UEGuDjKnyIdUg
    • Pull up on the suction cup with firm, constant pressure to create a slight gap between the front panel and rear case.

    • Insert an opening pick into the gap.

    • The watertight adhesive holding the display in place is very strong; creating this initial gap takes a significant amount of force. If you're having a hard time opening a gap, apply more heat, and gently rock the screen up and down to weaken the adhesive until you create enough of a gap to insert your tool.

    This seems impossible. I've been trying for an hour with heat and rocking, and the screen doesn't budge. :(

    Aubi Abramowitz -

    this is impossible, will take years

    Evan Z -

    Don’t give up! Use more heat and a tad more force. I know you may fear breaking it more, but as long as you don’t stick the prying tool too far or tug too hard, you can do it! I have faith that you can do it!

    Rachel Kelley -

  8. HXxOYoIJr6dN5GBP
    HXxOYoIJr6dN5GBP
    3NcL1QNq6UtAhuFE
    bdcgRte11dLF2meV
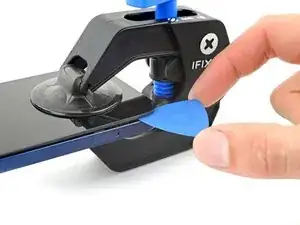
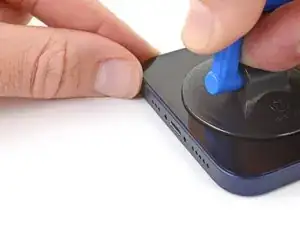
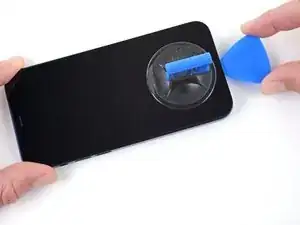
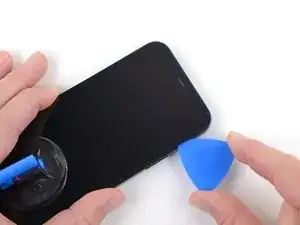
    • Slide the opening pick around the lower left corner and up the left edge of the iPhone, slicing through the adhesive holding the display in place.

    • Don't insert the pick very far, or you may damage the display cables along this side of the iPhone. Insert it only a few millimeters, or about the width of the display bezel.

  9. hATeurdIJEidUriB
    hATeurdIJEidUriB
    ptww2ctyJRwHecaZ
    yscGiecacBYtCBLl
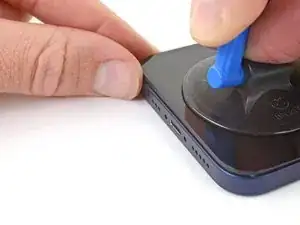
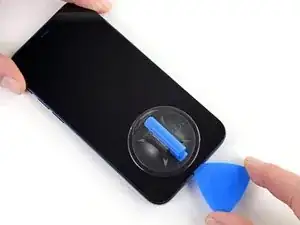
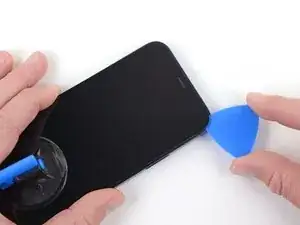
    • Re-insert your pick at the bottom edge of the iPhone, and slide it up the right side to continue separating the adhesive.

    • Don't insert the opening pick too far into the iPhone, or you may cause damage to internal components.

  10. UIAwqBMqupTTceT5
    UIAwqBMqupTTceT5
    SJCGqNaJKr2xakYZ
    CWbV2lsc6XgsJlNB
    • The top edge of the display is secured with both glue and clips.

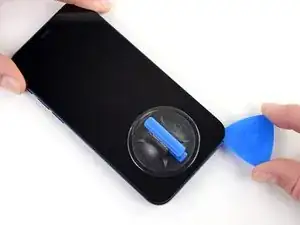
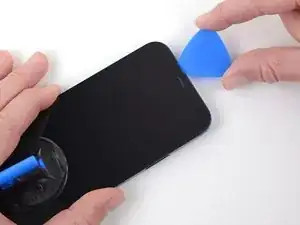
    • Insert your pick into the right edge of the phone. Slide it around the top-right corner and across the top edge.

    • Again, don't insert the pick more than a few millimeters—about the width of the display bezel—or you may damage the front panel sensor array.

  11. IWXGOEkVZMt431sG
    IWXGOEkVZMt431sG
    Qxj6lbMWEEfMw45M
    NoVbSlrJHyCMaaFN
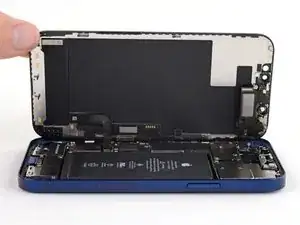
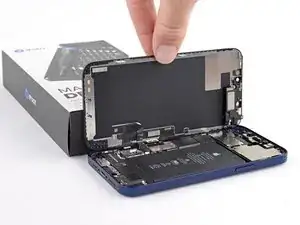
    • Open the iPhone by swinging the display up from the right side, like the front cover of a book.

    • Don't try to fully separate the display yet, as several fragile ribbon cables still connect it to the iPhone's logic board.

    • Lean the display against something to keep it propped up while you're working on the phone.

    • During reassembly, lay the display in position, align the clips along the top edge, and carefully press the top edge into place before snapping the rest of the display down. If it doesn't click easily into place, check the condition of the clips around the perimeter of the display and make sure they aren't bent.

  12. fVLd1ujMC23kPMBM
    • Remove two 1.1 mm long Y000 screws securing the battery and display connector cover.

    • Throughout this repair, keep track of each screw and make sure it goes back exactly where it came from to avoid damaging your iPhone.

    • During reassembly, this is a good point to power on your iPhone and test all functions before you seal the display in place. Be sure to power your iPhone back down completely before you continue working.

    Ouch, I see a broken flat here…

    Alessandro Sordelli -

  13. nCqmqLuRyNhUsecI
    • Remove the cover.

  14. q1GE6ij6DBGAtVUa
    q1GE6ij6DBGAtVUa
    UFeAbkthIglN1PdG
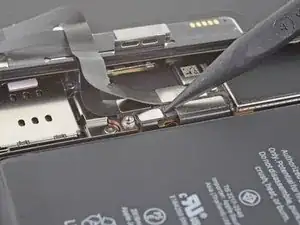
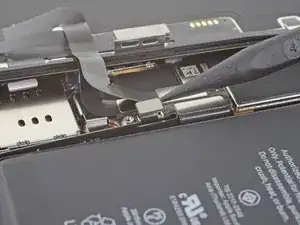
    • Use a spudger or a clean fingernail to pry the battery connector up from its socket on the logic board.

    • Try not to damage the black silicone seal surrounding this and other board connections. These seals provide extra protection against water and dust intrusion.

    • Bend the connector slightly away from the logic board to prevent it from accidentally making contact with the socket and providing power to the phone during your repair.

  15. JWGf11bubrJIQJqt
    JWGf11bubrJIQJqt
    JnsnSmZNtLSbSfID
    • Use a spudger or a fingernail to disconnect the display cable connector.

    • To re-attach press connectors like this one, carefully align and press down on one side until it clicks into place, then repeat on the other side. Do not press down on the middle. If the connector is misaligned, the pins can bend, causing permanent damage.

  16. FtXJDFkUoD1lyBai
    FtXJDFkUoD1lyBai
    lnDDQGdsvpfnyRjt
    • Use a spudger or a fingernail to disconnect the digitizer cable connector.

    • If any part of your screen doesn't respond to touch after your repair, disconnect the battery and then re-seat this connector, making sure it clicks fully into place and that there's no dust or other obstruction in the socket.

  17. vanQfZqXPQGekhh1
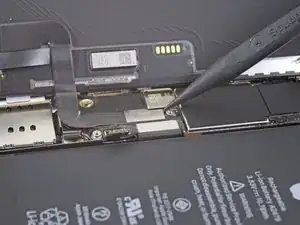
    • Use a Y000 driver to remove four screws securing the front sensor connector cover.

    • Three 1.1 mm long screws

    • One 1.4 mm long screw

  18. KJnJAuPTwlxnICBD
    KJnJAuPTwlxnICBD
    MHdESpgJCsSSZaMy
    1qodeTMyy56DyGRv
    • Swing the cover up from the left until the small clip on the right unhooks.

    • Remove the cover.

    • During reassembly, insert the clip on the right edge into its slot first, then hinge the rest of the cover into place.

  19. LC4oSHWw4nEIZ3H5
    LC4oSHWw4nEIZ3H5
    5PkRCF6AJnj1hYTc
    • Use a spudger or a fingernail to disconnect the front sensor assembly cable connector.

  20. XrIRhPcqOHJyMV1q
  21. FNoMExEdtM2bCQRG
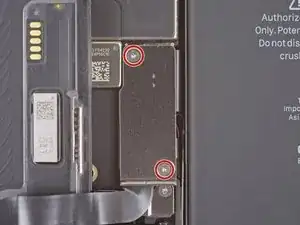
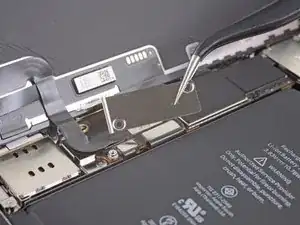
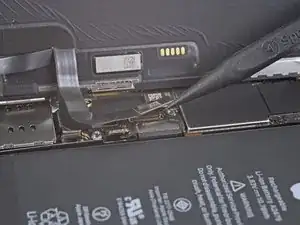
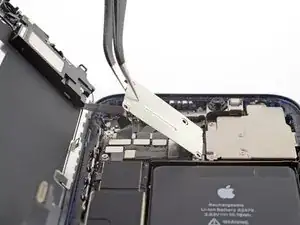
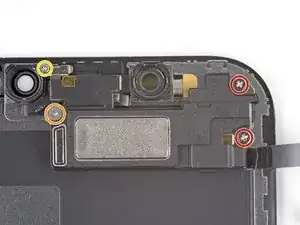
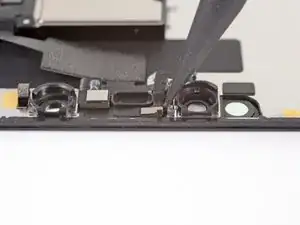
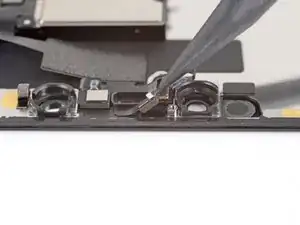
    • Remove the four screws securing the speaker/sensor assembly to the back of the display.

    • Two 1.4 mm long Phillips screws

    • One 1.7 mm long shouldered Y000 screw

    • One 1.2 mm long Y000 screw

  22. DfRmLtFThgt3RCJF
    DfRmLtFThgt3RCJF
    JFRDHIoLXoAcQd3j
    • The earpiece speaker is lightly adhered in place.

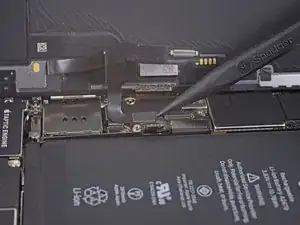
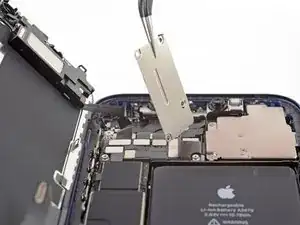
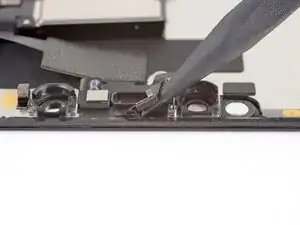
    • Use the point of a spudger to gently pry up the top edge of the speaker.

    • Flip the speaker assembly over—down and away from the top edge of the display.

    • The speaker remains attached via a very thin ribbon cable. Be careful not to strain or damage the cable.

  23. RdXToegN2BGGYdyN
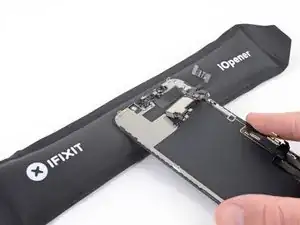
    • Use a hair dryer or heat gun or prepare an iOpener and apply it to the top front of the display for 1-2 minutes, in order to soften the adhesive securing the sensors.

  24. BVjAbVWW2crHEFdI
    BVjAbVWW2crHEFdI
    YXlZGYoSRLPmpVEO
    2sEdYZwZK5YtBN5o
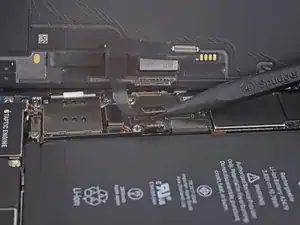
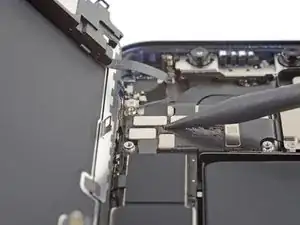
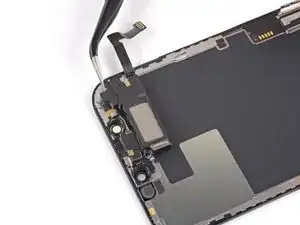
    • Use the point of a spudger to lift and separate the ambient light sensor from its notch in the front panel.

    • Take care not to damage the light sensor ribbon cables while prying.

    • Continue sliding the spudger underneath the ambient light sensor and its cable to separate the adhesive securing the cable.

  25. gJMTCKnBTFbYMGir
    gJMTCKnBTFbYMGir
    FW3JR4BeQlirVqEl
    HBEGxfStEHZDjFgw
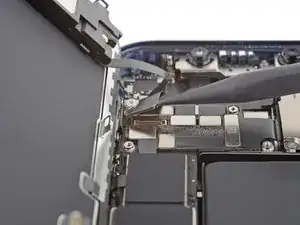
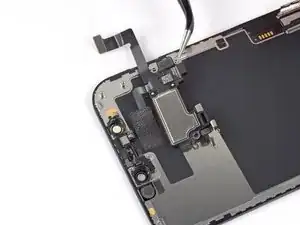
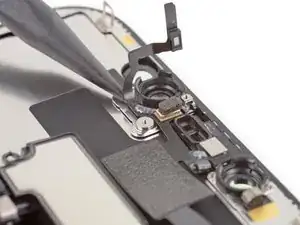
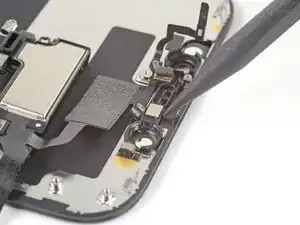
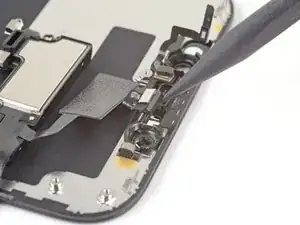
    • Use the point of a spudger to lift and separate the microphone from its notch in the front panel.

  26. skZ4Y3qHkQJvCHId
    skZ4Y3qHkQJvCHId
    ZqJ3P6fCmcwlKyCw
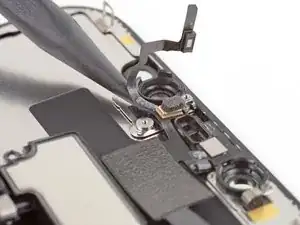
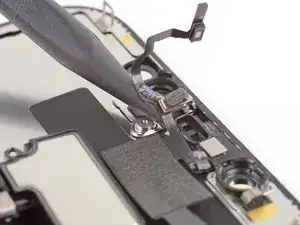
    • Use the point of a spudger to lift the proximity sensor and flood illuminator module out of its notch in the front panel.

  27. MgCiuB1KVM4cVrui
    MgCiuB1KVM4cVrui
    lP1ybDY4QKcSBQsp
    cJ3liVwEWJmas4Zq
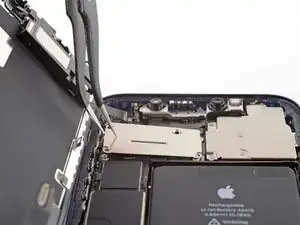
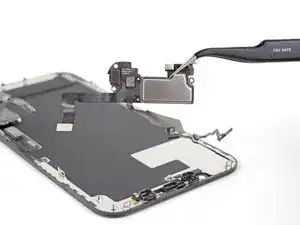
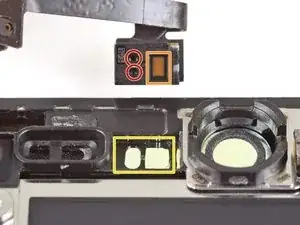
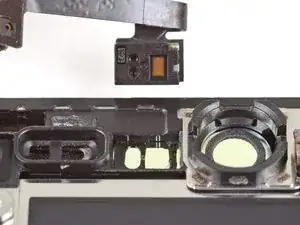
    • Remove the earpiece speaker and front sensor assembly.

    • During reassembly, check the position of the black plastic module containing these components:

    • Proximity sensor

    • Flood illuminator

    • The module must be positioned so that these components are not obstructed by any adhesive.

Conclusion

Compare your new replacement part to the original part—you may need to transfer remaining components or remove adhesive backings from the new part before installing.

To reassemble your device, follow the above steps in reverse order.

Take your e-waste to an R2 or e-Stewards certified recycler.

Repair didn’t go as planned? Repair didn’t go as planned? Try some basic troubleshooting, or ask our iPhone 12 Answers community for troubleshooting help.

Adam O'Camb

Member since: 11/04/15

178619 Reputation

6 comments

i am trying to source a replacement screen for my iPhone 12 that needs a new digitizer and battery. My main concern is since I cannot purchase an original part from apple and have to resort to eBay they have several option;

Lcd / Oled soft / Oled hard / Incell lcd??

I asssumed the 12 came with the oled screen and I’m worried that if I put a non original type screen it could damage phone after awhile?

what digitizer should I get?

Adam Anderson -

Hi, I would recommend looking at places like Fixez.com rather than Ebay. Their prices are lower and they have a LCD buyback program which is very helpful. They have a wide ranging variety of LCD's. On a scale of best to worst LCD's its ranges: OLED Soft,OLED Hard, Incell LCD, LCD. I hope this helps

Tecc World -

Hi there,

I have read that by installing an aftermarket screen, I would get a non-genuine display message. Has Apple addressed this issue?

Than

Alex Hsu -

Genuine components have chips that allow the phone to identify them - third party ones frequently do not. The phone is doing what it is designed to do so there isn’t really anything for Apple to address. Much as anything it’s to stop companies refurbishing iPhone’s ‘in-house’ and selling them as having genuine parts. The non genuine part message is t inherently a bad thing, it’s an advisory rather than an error.

Core Confusion -

Hi, I lent my grandson my iphone 12 and I got it back with a broken screen and a broken back glass. I have another iphone 12 for parts. I was going to swap out the screen and the back glass. My question is do I have to remove all these parts as described above or c an I just plug the new screen in ? Second question my iphone has a Qlink wireless SIM card in it and it works perfect. The same SIM card will not work in my other iphone that being said would it be easier to somehow take my other iphone and use the parts from my broken one so the SIM card would work in it? I don't know what it would entail to do such a thing but if you would possibly know what I would have to do to make this happen please let me know... Otherwise I will take the screen and back glass and continue to install them on my own phone. also which procedure would be easier to do?? Kudos to you on this article I followed it to the letter and everything worked perfect I removed the screen without any problems. GREAT ARTICLE! Thanks Jeffrey

Jeffrey Miller -

Great guide.... I was able to successfully replace the screen. However, the step to apply the glue sheet is missing. I had to undo what I spent 40 mins doing correctly just to get the adhesive sheet applied and redo it.

CV Sayani (cvs) -