
Introduction
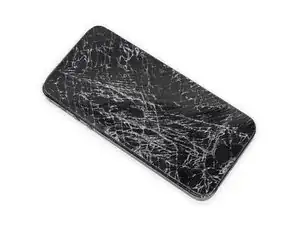
Use this guide to replace a scratched or damaged rear case on your iPhone 5s.
This guide requires removing the battery. The adhesive strips securing the battery are not re-usable, so you'll want to have a supply of replacement adhesive strips on hand before you begin. Alternatively, you can secure the battery in the case using a piece of double-sided tape.
Tools
-
-
Power off your iPhone before beginning disassembly.
-
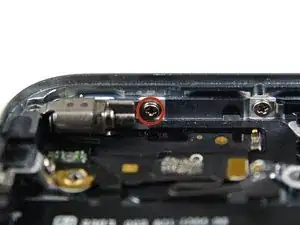
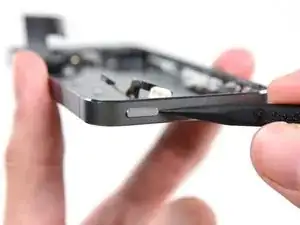
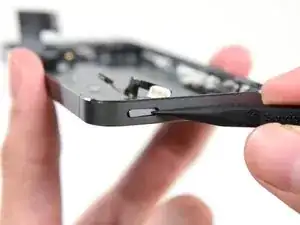
Remove the two 3.9 mm Pentalobe screws from either side of Lightning connector.
-
-
-
If your display glass is cracked, keep further breakage contained and prevent bodily harm during your repair by taping the glass.
-
Lay overlapping strips of clear packing tape over the iPhone's display until the whole face is covered.
-
-
-
Regardless of the tool you use, you need to be sure you pull up the entire display.
-
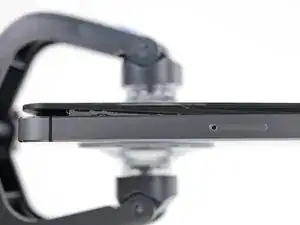
If the glass begins to separate from the plastic, as shown in the first image, slide a plastic opening tool between the plastic frame and the metal phone body to pry the metal clips out of the case.
-
-
-
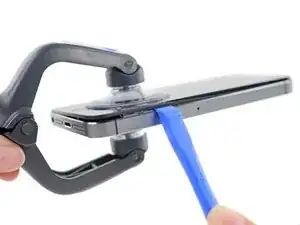
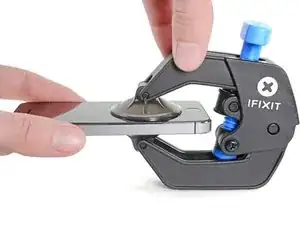
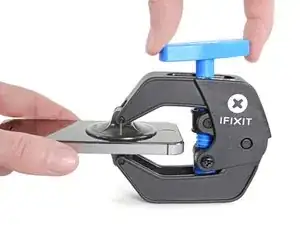
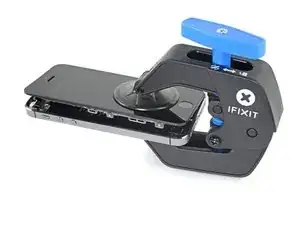
Pull the blue handle towards the hinge to disengage opening mode.
-
Position the suction cups near the bottom edge of the iPhone just above the home button—one on the front, and one on the back.
-
Push down on the cups to apply suction to the desired area.
-
-
-
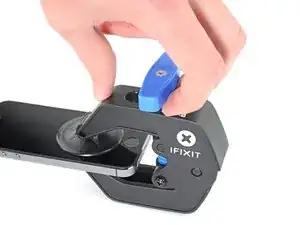
Push the blue handle away from the hinge to engage opening mode.
-
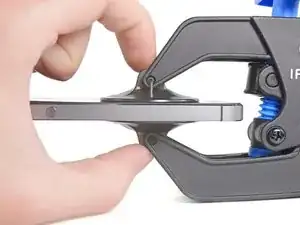
Turn the handle clockwise until you see the cups start to stretch.
-
Wait one minute to give the adhesive a chance to release and for the bottom of the screen to open.
-
Skip the next three steps.
-
-
-
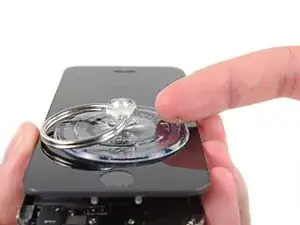
If you don't have an iSclack, use a single suction cup to lift the front panel:
-
Press a suction cup onto the screen, just above the home button.
-
-
-
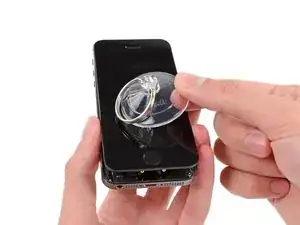
While holding the iPhone down with one hand, pull up on the suction cup to slightly separate the home button end of the front panel from the rear case.
-
With a plastic opening tool, gently pry the edges of the rear case down, away from the front panel assembly, while you pull up with the suction cup.
-
-
-
Pull the plastic nub to release the vacuum seal on the suction cup.
-
Remove the suction cup from the screen.
-
-
-
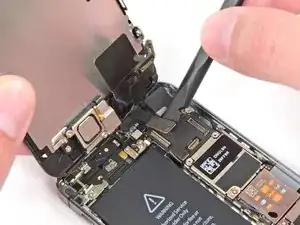
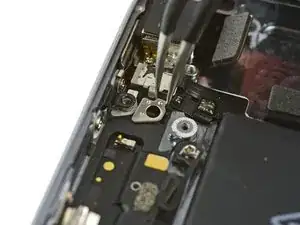
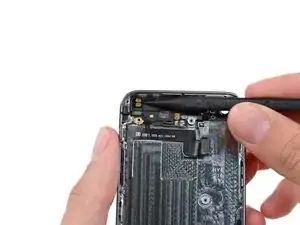
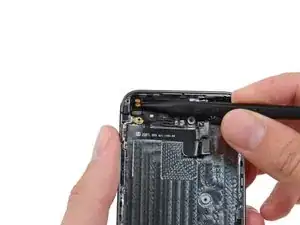
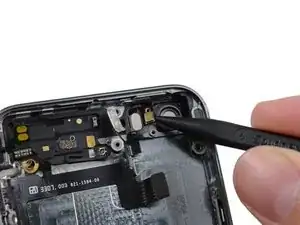
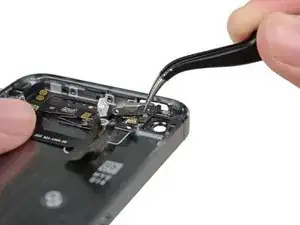
Open the phone just enough to reveal the metal bracket covering the home button cable.
-
Only the phone's original home button assembly will be capable of using the Touch ID functionality. If you rip the cable, installing a new home button will only restore ordinary home button functions, not the Touch ID features.
-
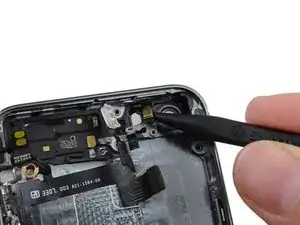
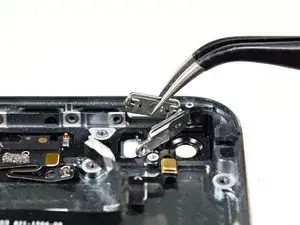
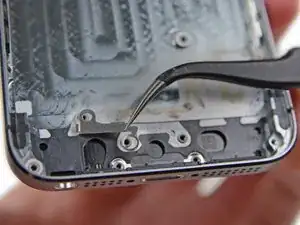
Use the tip of a spudger to push the bracket free and remove it with tweezers.
-
-
-
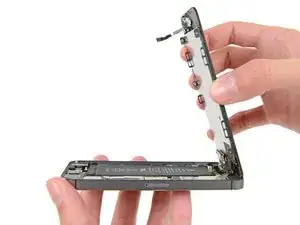
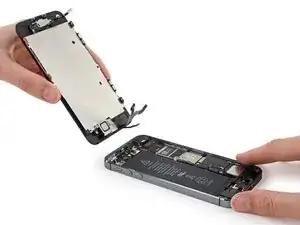
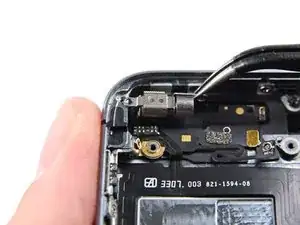
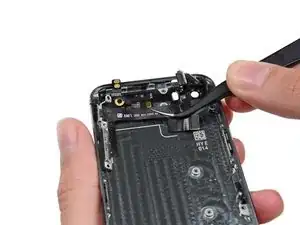
Once the connector has been released, pull the home button end of the assembly away from the rear case, using the top of the phone as a hinge.
-
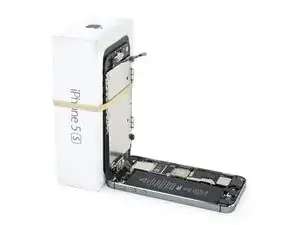
Open the display to about a 90º angle, and lean it against something to keep it propped up while you're working on the phone.
-
Add a rubber band to keep the display securely in place while you work. This prevents undue strain on the display cables.
-
-
-
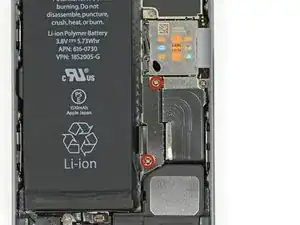
Remove the two 1.6 mm Phillips #000 screws securing the metal battery connector bracket to the logic board.
-
-
-
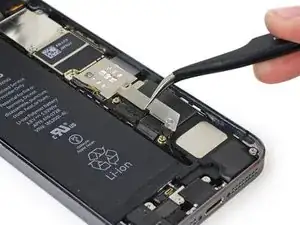
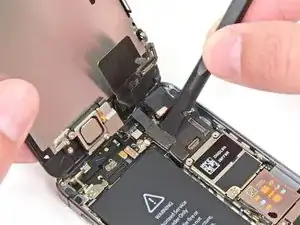
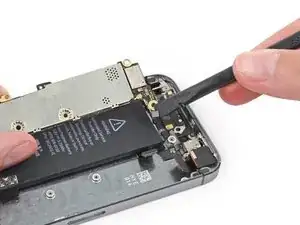
Use the flat end of a spudger to gently pry the battery connector up from its socket on the logic board.
-
-
-
Remove the following screws securing the front panel assembly cable bracket to the logic board:
-
One 1.7 mm Phillips #000 screw
-
One 1.2 mm Phillips #000 screw
-
One 1.3 mm Phillips #000 screw
-
One more 1.7 mm Phillips #000 screw
-
-
-
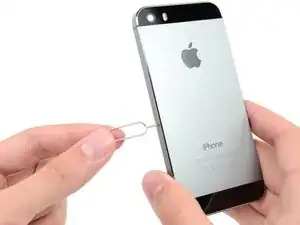
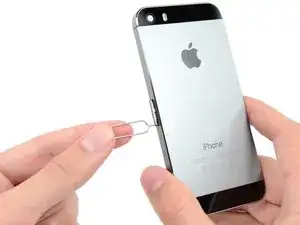
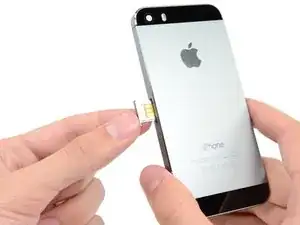
Insert a SIM card eject tool or a paperclip into the small hole in the SIM card tray.
-
Press to eject the tray. This may require a significant amount of force.
-
-
-
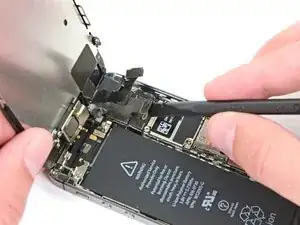
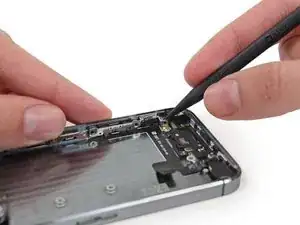
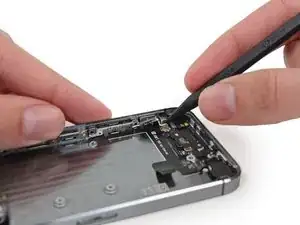
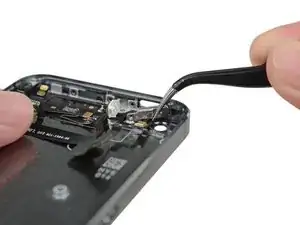
Use a spudger to gently pry the button assembly cable up from its socket on the logic board.
-
-
-
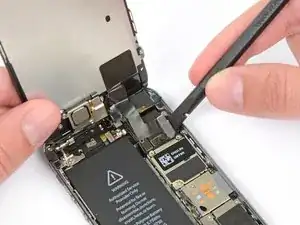
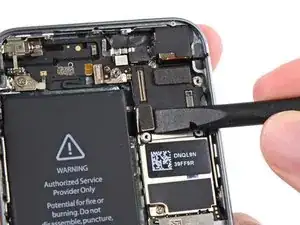
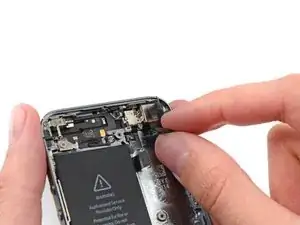
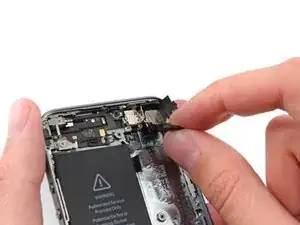
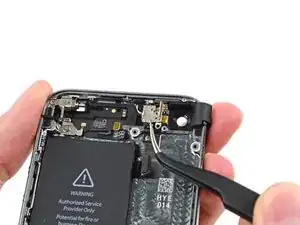
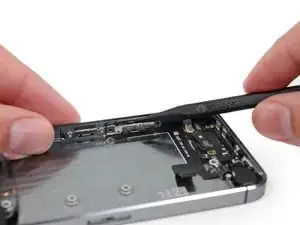
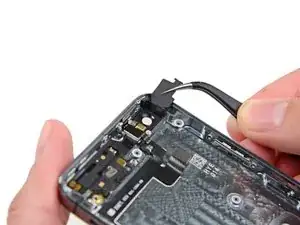
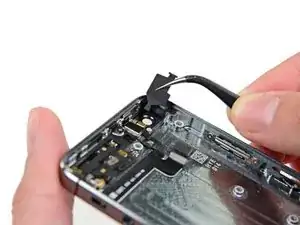
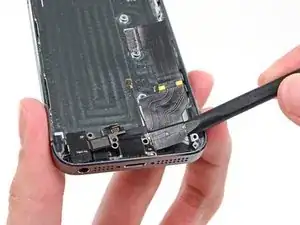
Use a spudger to pry the Lightning connector cable up from its socket on the logic board.
-
Fold the Lightning connector cable out of the way of the logic board.
-
-
-
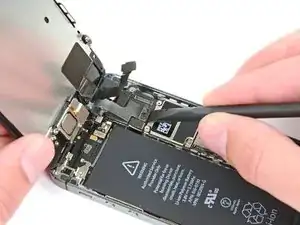
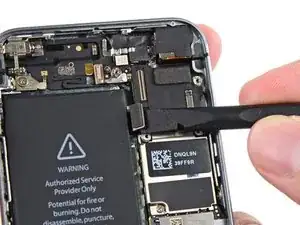
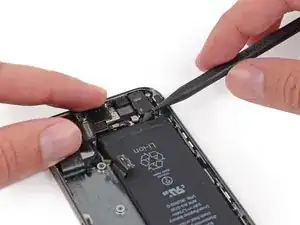
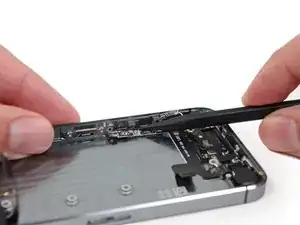
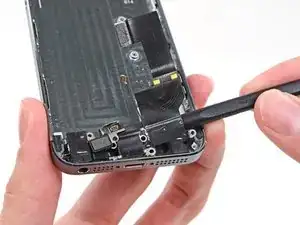
Use the flat end of a spudger to disconnect the rear-facing camera cable from its socket on the logic board.
-
-
-
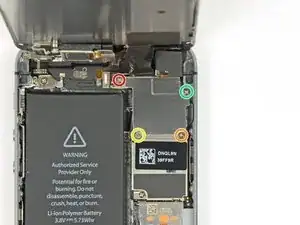
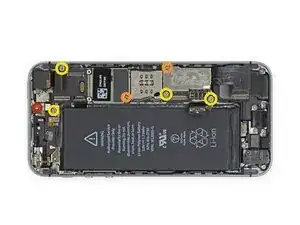
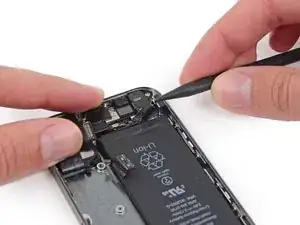
Remove the following screws from the logic board:
-
One 2.4 mm Phillips #000 screw
-
Two 2.3 mm Phillips #000 screws
-
Four 2.8 mm standoff screws
-
-
-
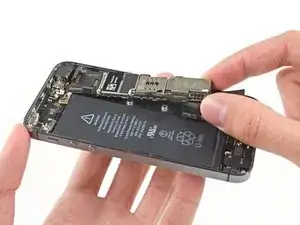
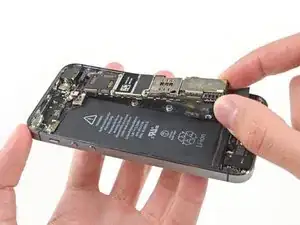
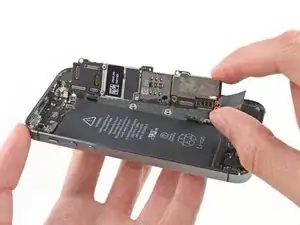
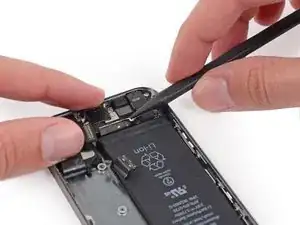
Pull the logic board slightly away from the rear facing camera.
-
Flip the logic board toward the battery, as if you are turning the page in a book.
-
-
-
Use the flat end of a spudger to disconnect the antenna cable on the back of the logic board.
-
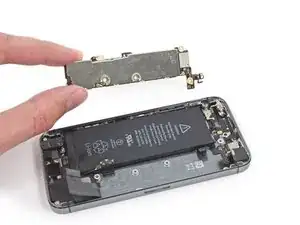
Remove the logic board from the iPhone.
-
-
-
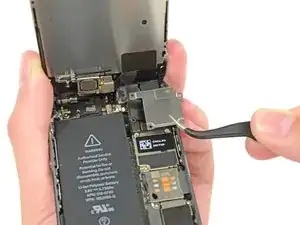
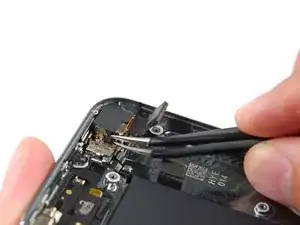
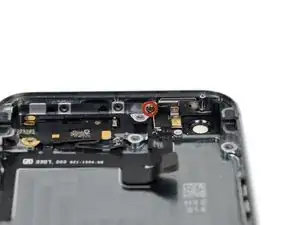
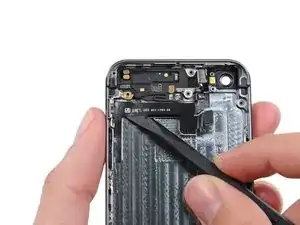
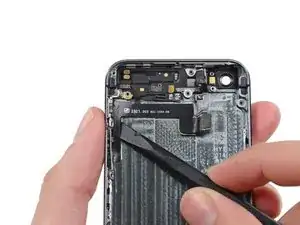
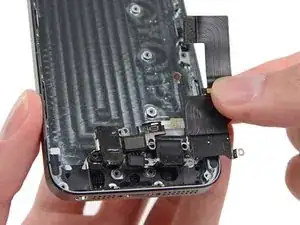
At this point, a small metal plate near the rear facing camera is loose and may come free from its recess.
-
Use tweezers to remove the plate from beneath the bracket to the left of the rear-facing camera.
-
-
-
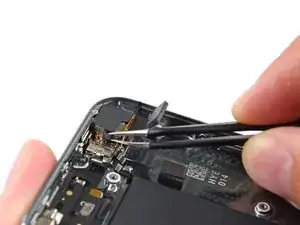
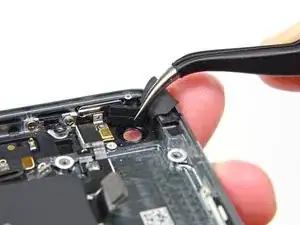
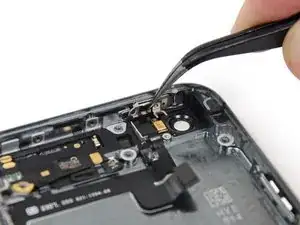
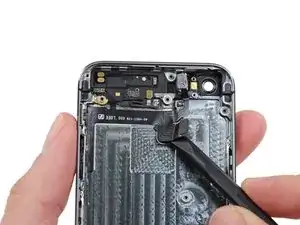
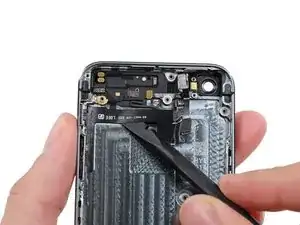
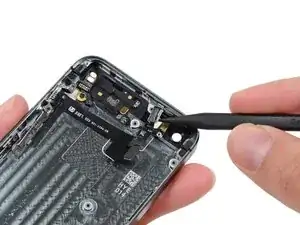
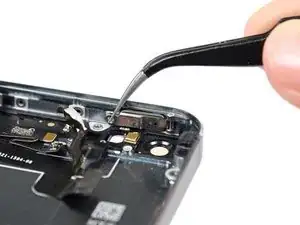
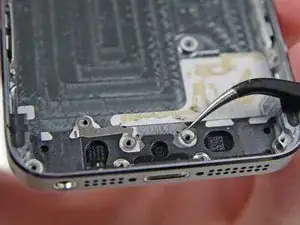
Using a pair of tweezers, flip the rubber camera cover out of its clip and toward the outside of the rear case.
-
-
-
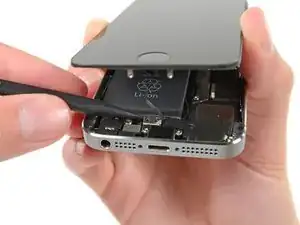
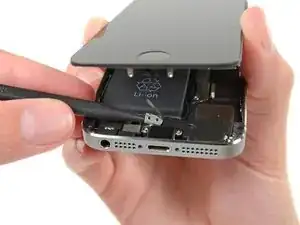
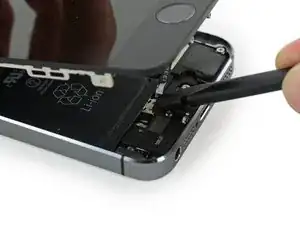
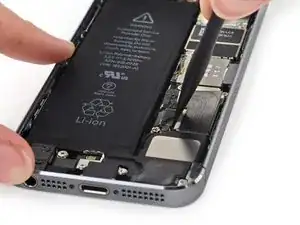
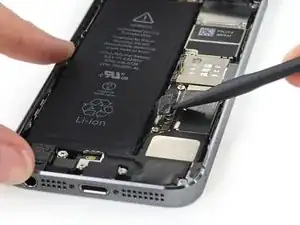
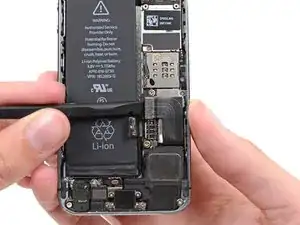
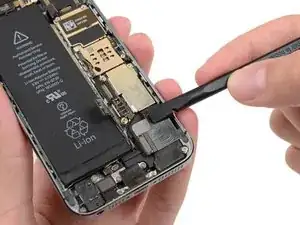
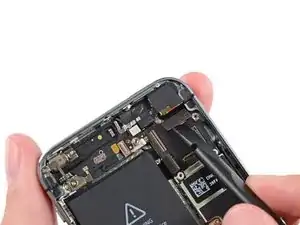
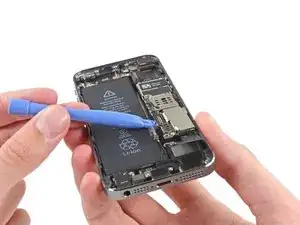
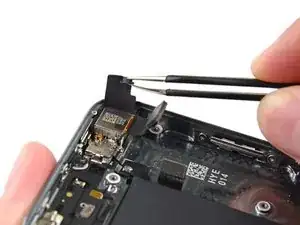
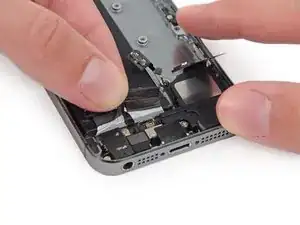
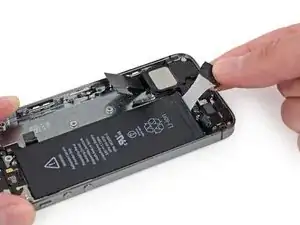
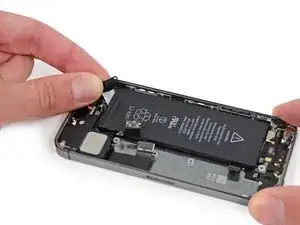
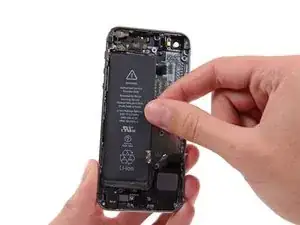
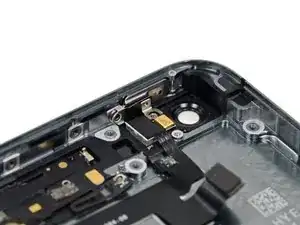
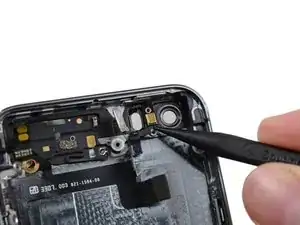
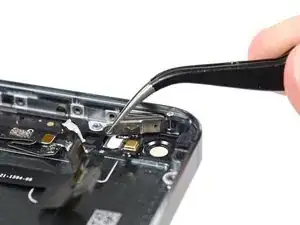
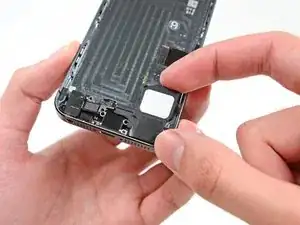
Insert the tip of a spudger into the hole in the battery adhesive tab near the headphone jack.
-
Lift the tab up slightly and use the spudger to unfold the tab from its recess.
-
-
-
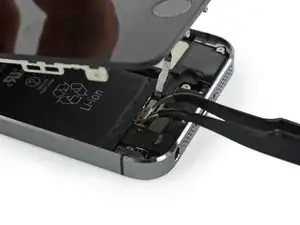
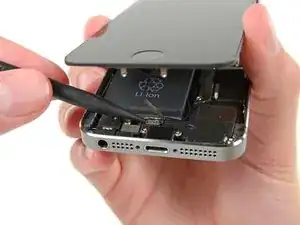
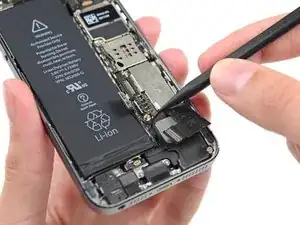
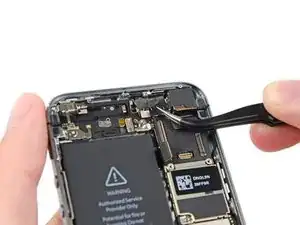
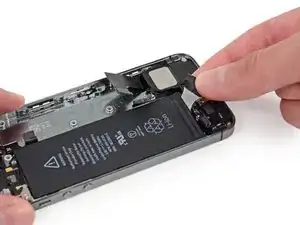
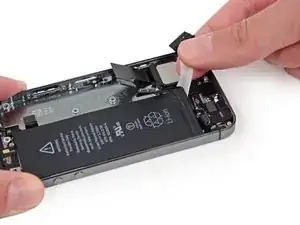
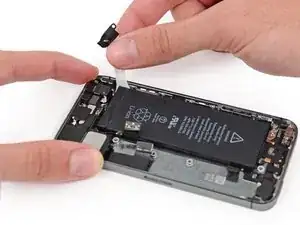
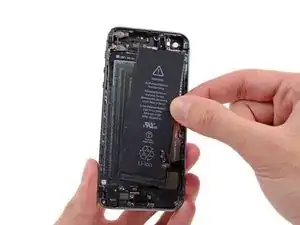
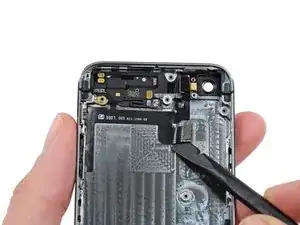
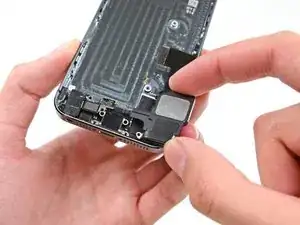
Pull the battery adhesive tab straight up from the phone.
-
Cut the black battery adhesive tab between the two white adhesive strips, separating them.
-
-
-
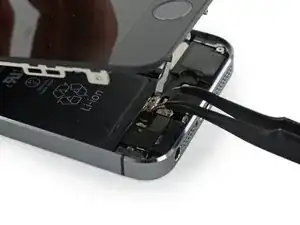
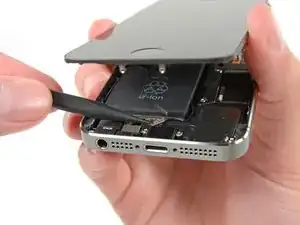
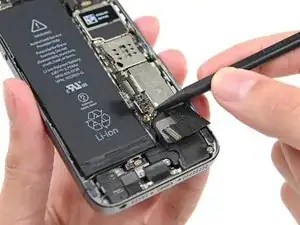
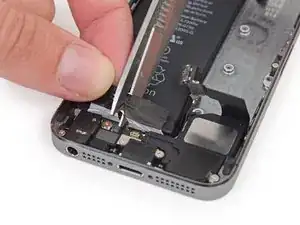
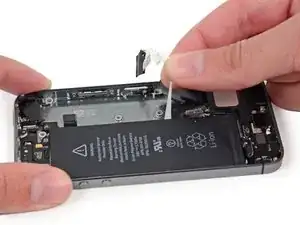
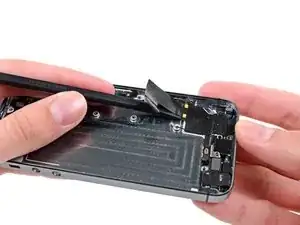
Slowly pull one of the battery adhesive strips away from the battery, toward the bottom of the iPhone.
-
Pull steadily, maintaining constant tension on the strip as it slips out from between the battery and the rear case. For best results, pull the strip at a 60º angle or less.
-
-
-
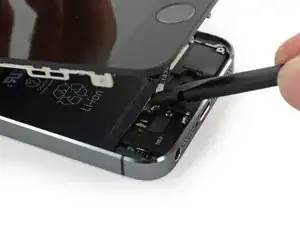
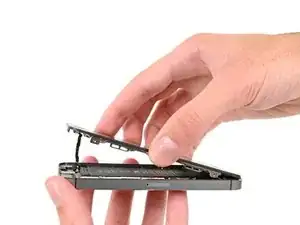
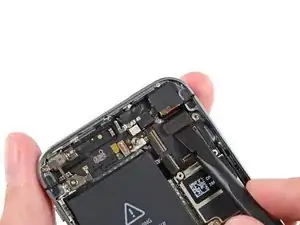
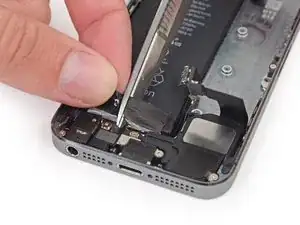
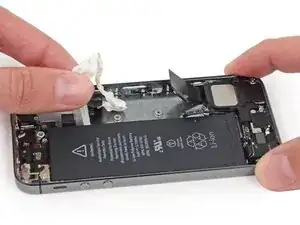
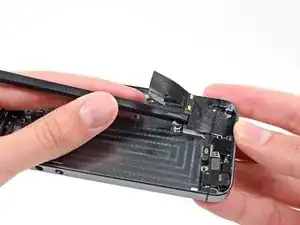
Repeat to remove the second adhesive strip.
-
If you removed both strips successfully, skip the next two steps.
-
-
-
If any of the adhesive strips broke off and the battery remains stuck to the rear case, prepare an iOpener or use a hair dryer to heat the rear case directly behind the battery.
-
-
-
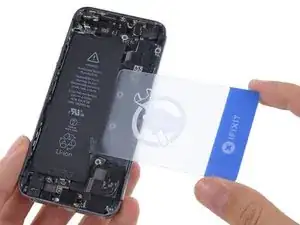
Flip the iPhone back over and insert a plastic card between the case side of the battery and the rear case.
-
Press the card in farther to break up the adhesive behind the battery.
-
-
-
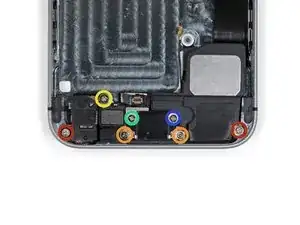
Remove the following Phillips #000 screws from the vibrator bracket:
-
One 1.7 mm screw
-
One 2.5 mm screw
-
-
-
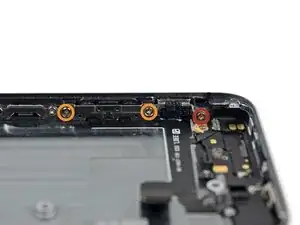
Remove the following screws securing the volume button and ringer switch brackets to the side of the rear case:
-
One 1.9 mm Phillips screw
-
Two 1.6 mm Phillips screws
-
-
-
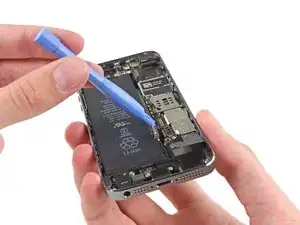
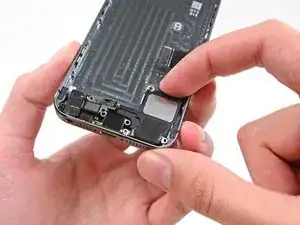
Use the tip of a spudger to pry the ringer switch bracket from the side of the rear case.
-
Remove the ringer switch.
-
-
-
Use a spudger to pry the volume button bracket from the side of the rear case.
-
Remove the volume buttons.
-
-
-
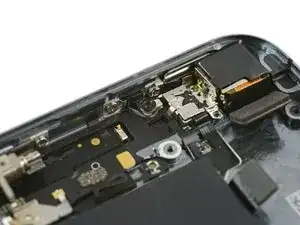
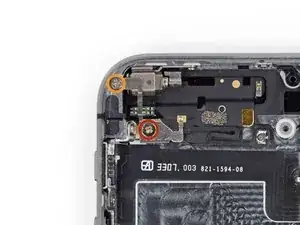
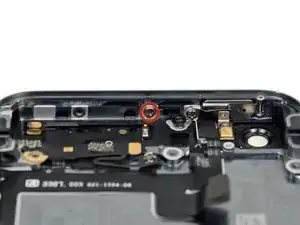
Remove the 1.3 mm Phillips #000 screw securing the logic board antenna bracket to the rear case.
-
-
-
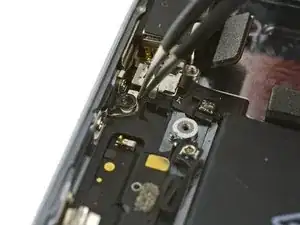
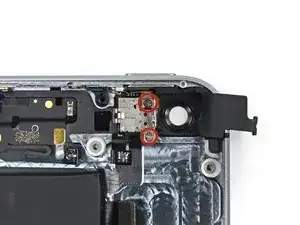
Remove the 2.1 mm Phillips #000 screw securing the contact clip and power/sleep button bracket.
-
-
-
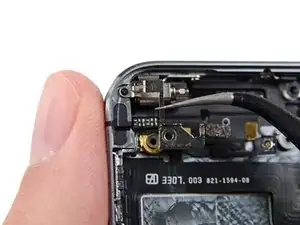
Slide the flat end of a spudger under the upper component assembly cable to free it from the rear case.
-
-
-
Run the flat end of the spudger under the portion of the cable near the volume control buttons.
-
-
-
Use the tip of a spudger to free the adhesive securing the vibrator contact portion of the upper assembly cable from the rear case.
-
If the flash assembly has not already popped out of its hole in the rear case, use the tip of a spudger to push it free.
-
-
-
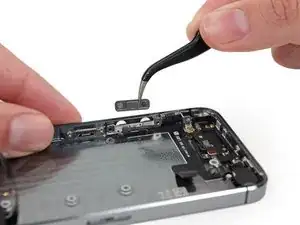
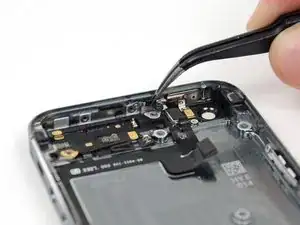
Use the tip of a spudger to push the power/sleep button into the phone slightly.
-
Use a set of tweezers to remove the button.
-
-
-
Remove the following Phillips #000 screws:
-
Two 2.9 mm
-
Two 1.5 mm
-
One 3.1 mm
-
One 3.6 mm
-
One 3.4 mm
-
-
-
Slide the flat end of a spudger under the right-hand side of the lightning connector cable assembly to free it from the rear case.
-
-
-
Continue to detach the lightning cable assembly by sliding the spudger under the port components.
-


To reassemble your device, follow these instructions in reverse order.

24 comments
There appears to be steps missing from this guide. I am finished but the antenna is still attached to the inside of the case. I see it in the image of step 60, but not after. I also have 2 clips remaining on one side of the case.
scott56 -
I quote scott56 except the last pic I see the piece is #61 and I have two clips per side plus the spring of the SIM card.
The guide is excellent, but few things are missing. You will need double stick adhesive to reattach the battery otherwise it will rattle inside the case. Also the lightening cable need double stick tape to stick to case. Its highly recommended that you have a roll of 3M thin double stick tape before you start. The guide also left out that you need to remove and reinstall SIM card lever and three mounting clips. Plus you need to pull off various rubber components all around the old case including those that secure lightening, speaker, audio jack etc to the case and reinstall them in the new case.
I used a white terrycloth hand towel as my work surface and to position and retain all the screws and part in their relative positions, so I didn't mix things up. I also magnetized the screwdriver tips and that made it very easy to deal with these tiny, tiny screws.
Magnus Dalen -
For a secure working, put a small pot with lid on your workplace. When the battery starts burning, throw it in the pot, close it with the lid and get the pot safely out of the building, e.g. on the balcony or throw it out of the window. Do not try to extinct the battery with water, just let it burn out outside. This might take some hours.
Raymond Willems -
This is a really helpful one! My battery caught fire but luckily it was only one cell and not the entire battery. So it was done after a few seconds and I could go on with the replacement.
Matthias Blab -
Directions should say “use the P2 screwdriver head.”
William Kolb -
This step should have included that information. It was very helpful and important. Thank you very much.
Jeffery -
ifixit supplied a set of replacement philips screws (marked “Liberate!”). Thanks but I’m sticking with the pentalobe since they fit more securely than philips which have a chance of stripping if not held with the right amount of pressure.
Don Libes -
What are you supposed to do if the screws are stripped or won’t come out. No luck with the tweezers either.
ibrokeit -
Yep i‘ve had the same problem. One screw out, one that won‘t budge!!!
Stennett -
“cheater” reading glasses are a big help. Carolyn
Carolyn Green -
In this step, it is the P02 screwdriver from the kit (see that the nib has five sides , exactly for ‘pentalobe’ screws). All the other steps involving screws it was the Philips 000 (there was a third screwdriver Y 000 in the kit which I did not use). Did not have any problems at all removing and readding screws back through the process.
Andre Silva -
I'm trying to fix my 5s’s but one has some water damage, and impeccable screen but won't turn on,then I have another one that has no water damage, screens a bit busted but won't turn because of the screen. If I use the good screen from the water damaged phone would it work?
samuel.m.fudge -
After removing the phone from a very good plastic case and before I started the repair I cleaned the entire phone with a soft cloth misted with rubbing alcohol. That removes all the grunge which builds up in the seams of the phone and the small spaces inside the case. Having a clean phone to work on makes the job a lot easier and prevents grunge from falling into the phone.
David Park -
General comment about the screwdriver tips and reassembly: If you get a screw nicely set in place using tweezers and then use the screwdriver, the magnet will probably pull the screw out before you can tighten it. If this is a problem use just the tip (without the handle) to start the screw, then tighten using the handle.
Kevin Patfield -
DO NOT disconnect the screen.
Benjamin Piscopo -
Having two SE’s needing batteries, I ordered an extra battery. The extra battery did not come with the Phillips replacement screws. It would be helpful if every battery came with a set of case replacement screws.
Dorothy Campbell -
Upon reassembly I found it useful to squeeze the phone right above the screws so everything lines up nice. I noticed that when I didn’t do this the new Phillips screws were trying to go in crooked. So just holding the phone together helps.
Samara Sullivan -
hello i am replacing my iphone 5s battery but i am stucked because the adhesive broke whiles pulling it out
before i started i made sure my battery was 0% but i am afraid that when i mistakenly puncture it with the spudger it might catch fire
please is the battery capable of catching fire when it has no power (0%)?
please can someone give me the honest answers before i continue
thank you
George Rockson -
The screws in my iPhoneSE were not P2 (1,2mm) but P1 (0,8mm). I had to order an extra screwdriver which is not available at iFixit.
Tadeus Nawka -
Instructions were fine until removing the battery , No adhesive strip at the bottom of the battery . Unable to remove battery as the battery was stuck sold with adhesive but could not get at the adhesive strip to remove battery . seems whoever put the battery together did not put a strip across the bottom . Had the phone from new and this was the first time I tried to replace the battery . Now I need a new phone
J Caley -
Instructions fine until removing the battery . No strip at bottom of the battery hence impossible to get at the adhesive strips around the battery . This must have been done in the factory as I have had the phone from new and this was the first time the battery was being replaced . Cheesed off as I now need a new phone
J Caley -
30 minutes - to an hour? I gave up after removing the screws and spending an hour trying to lift the display with a suction pad.
harwood -
iPhone 5s maderbored
Rahan Ali -