Einleitung

Use this guide to completely replace your logic board.

  1. RdKslWbbyVKNdorc
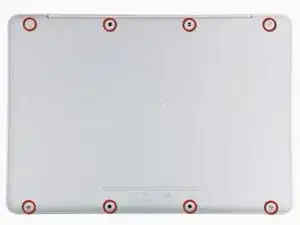
    • Remove the eight 4 mm Phillips screws securing the lower case to the MacBook.

    According to this page http://support.apple.com/kb/HT1651?viewl..., the 8 screws are not identical.

    Can anybody tell me where each kind of screw is supposed to go?

    Gregoire -

    They are all 100% Identical. You were probably looking at a different model, or Apple has entered the wrong information... Hey, It happens...

    weeowey weeowey -

    The screws on the Late 2009 are identical. The blue lock compound might make tightening some require a little more effort.

    svenaustx -

    Can I replace it with a SATA 3 cable?

    nm -

    A1342 macbook does not have the right controller to support sata III

    weeowey weeowey -

    hi, i just got back from the apple store and they are really keen for me to upgrade to a new laptop since my battery is old and the screen is cracked, so glad i found ifixit i would love to upgrade this puppy! gonna make it a real sleeper! styler hall wrote about sticking 16 gb of ram in his a 1342 ? is this a simply mather of ordering 3 4gb sticks ?aslo i currently have 4 gb and would like to upgrade to 8 ( or indeed 16) does that mean i need to buy all new sticks or can i continue to use the old one and stick a new one next to it ?

    thanks again mick van aar, perth western aus.

    michelvanaar -

    The A1342 will take up to 16 GB of RAM, however, there are only two RAM slots, so use two 8-GB RAM modules. Other World Computing (OWC) is a great reference source for info on exactly which RAM to use with which model; prices are usually much better on EBay though. Add an SSD from OWC and your machine will really scream!

    I hope that helps!

    gdesbrisay -

    Gregoire is right. The 8 screws are absolutely NOT identical, I’m looking at them right now, weeowey weeowey.

    John Guzman -

    I just wanted to say that, in 2020, i used these instructions to replace the magsafe socket on my A1286, mid-2012, pre-Retina MacBook Pro. The internal layout is not quite the same but close enough for me to do the job. I skipped the steps of fully disconnecting the fans and speakers because of what others had said about breaking the sockets. it just meant I had to be extremely careful when lifting up the main board so that I did not tear and break the connections. I was able to disconnect the old magsafe socket with the board flat and in situ, but there was no where near enough room to be able to aline and press home the new par home. Reluctantly i had to lever up the board. This was difficult as there is a tapped post that holds a screw in the way close to where the USB sockets are, that prevented the board lifting up and out. I had to be quite forceful to manouevre the sockets out from the edge of the case.

    Paul Burridge -

  2. 1hgTLEYwbMJScnWp
    1hgTLEYwbMJScnWp
    4FfgMS2wrQ1vpKT1
    GVdOUDCoEApQ1keZ
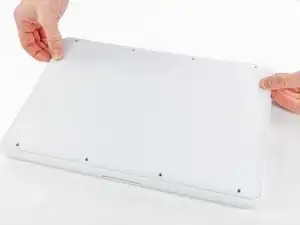
    • The lower case is constructed of rubber-coated aluminum. Do not excessively bend the aluminum during removal, as any permanent deformation will cause tolerance issues after reassembly.

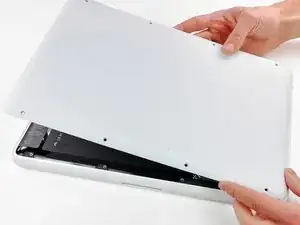
    • Slightly lift the lower case near the vent opening.

    • Continue running your fingers between the lower and upper cases until the upper case pops off its retaining clips.

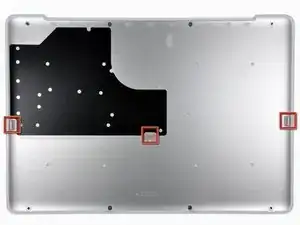
    • The location of these three clips is shown in the third picture.

    Do the retaining clips have to be re-engaged when replacing the lower case?

    John Morley -

    Answering my own question, the clips re-engage when the lower case is correctly positioned. You can help them by gently pressing the lower case with your thumbs midway along the two short sides. When everything is correctly aligned the eight screw holes line up.

    John Morley -

    Rather than running your fingernail down the sides to free up the retaining clips, I found that using an old credit card, inserted about 1/4”, to run along the left and right side popped those end retaining clips right off with no problem. You may need to twist the card slightly when in the middle area to help pop those off.

    bdahl385 -

  3. uRyXhccipZHxG6cV
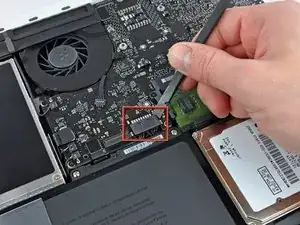
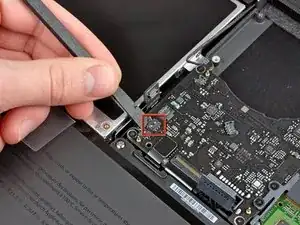
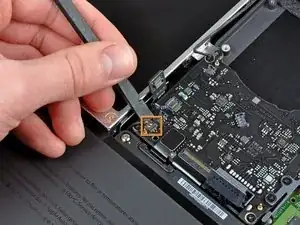
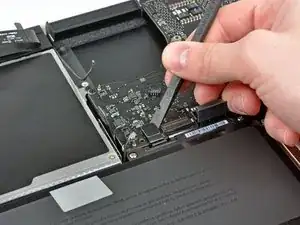
    • For precautionary purposes, we advise that you disconnect the battery connector from the logic board to avoid any electrical discharge. This step is optional and is not required.

    • Use the flat end of a spudger to lift the battery connector up out of its socket on the logic board.

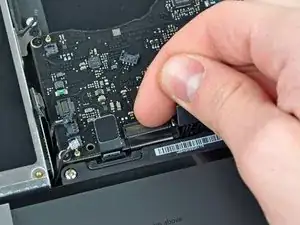
    • It may be easier to use your fingernails to lift up on both sides of the connector.

    you do not need to remove the battery when replacing the hard drive or ram

    brilldoctor -

    beware not to lift the connector to close of the angle, as the picture suggest it. It might broke the angle. Attack by the middle.

    naamol -

    Not necessary?

    hikkymemo -

    Be careful of the corner of the battery cable connector when trying to pry it off with the spudge. I knocked the corner of mine. No operational impact but was not very pleasing!

    jljordanweb -

    Not necessary, but a good idea, so as to avoid any spurious charges going through the boards...

    svenaustx -

    @Svenaustx - What could happen if not removing this battery? Worst case? Not a geek on this but did change RAM on my Macbook Pro "15. Can't remember disconneting the battery back then. Shouldn't it be sufficient shutting the Mac off and ensure it has been used for an hour or so before replacing RAM?

    Allan Clarke -

    i used a metal pry and noticed some sparking when i disconnected the battery. replaced ram. now it wont turn on. did i fry it?

    Ian Lynch -

  4. QEq5LPE5LPF1bCb3
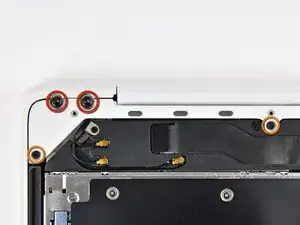
    • Remove the following screws from the optical drive side of the rear vent:

    • Two 10 mm T8 Torx

    • Two 5.2 mm Phillips

    Hi, i have an issue with the screw in the middle: it is blocked and the top is now damaged... Any suggestion?

    Corrado -

    I have a problem with the two middle screws

    Harlan Shannon -

    same here...

    rekidjinwoo -

  5. BfDr4UQCZRL3EXi5
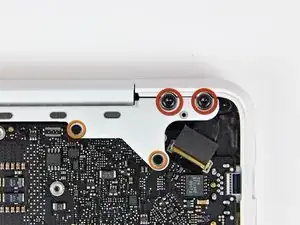
    • Remove the following screws from the port side of rear vent:

    • Two 10 mm T8 Torx

    • Two 5.2 mm Phillips

    The left-most philips screw in this picture does not seem to go in properly. The best I could do was use the screw with least of the blue screwlock on it and then err on the side of leaving the white plastic a bit Ioose in that location.

    QuincyMB -

    Be very careful when putting the Torx screws back as they are very easy to leverage and seems to bend the white piece at some point, making me nervous they could crack it. Don't overdo these.

    QuincyMB -

  6. WQrdxcAe2NRocHZa
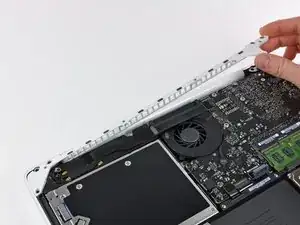
    • Carefully lift the rear vent out of the upper case.

    you can actually stop disassembling now and try to replace it now. after removing two t6 screws it came off pretty easily

    grze -

    Good tip, thanks! I skipped ahead to step 17 and had no problem getting the magsafe board out from under the logic board and the new one installed. Saves a lot of work disconnecting connectors indicated as Fragile!

    matt15 -

    Thank You! Saved me an hour or so of work and a lot of stress!

    15sweyandt -

    I also did Step 6, then skipped to Step 17 & 18. Once I had the display data cable off, I could remove the 2 T6 Torx screws holding the MagSafe board on and remove it. You can reach under the logic board with the point of the spudger to work the cable out of the socket. Note how you maneuver the board out of the tight space so you can maneuver it back in. When you put the new MagSafe board in, plug in the cable first. If you bend the wires so the plug approaches the socket at the appropriate angle, you can nudge it in with the pointed end of the spudger.

    hpendleton -

    Thanks a lot for this hint! You saved my macbook, when I failed to unscrew the fan because of one completely destroyed screw. Thanks to your comment I skipped steps 7-16 and went straight to replacing the magsafe board without problems. The spudger and some 3D imagination and done,

    Sebastian M -

  7. lD6TmHB4vnYmtMC2
    • Use the flat end of a spudger to pry the AirPort/Bluetooth ribbon cable up off the logic board.

    The steps from 7 up to 16, and then 19 and 20 are not necessary. It looks like Apple intentionally designed the shape in the corner around the magsafe connector, so that it can be replaced without disconnecting and unmounting the main board. Also, the placement of the two screws mounting the magsafe board confirms that - they are easily available. This is true at least for the 2009 model, which I've successfully repaired.

    So you can skip the risky steps of disconnecting of all the main board connectors and go straight to unscrewing the magsafe connector. Then, having the spudger and some 3D imagination, you can remove the magsafe board with some 3D rotations. Same for mounting the new magsafe.

    I've found out that crucial simplification only because I failed to unscrew the fan (broken a screw completely, while following this guide step by step). Then I found a comment from user grze under step 6, which saved my macbook by confirming, that 7 to 16 can be skipped.

    Sebastian M -

  8. AEKCf4R3cOrBcDIA
    AEKCf4R3cOrBcDIA
    3kHQmPw5hSIDgfDI
    VvJNpKcwCo1nIXXE
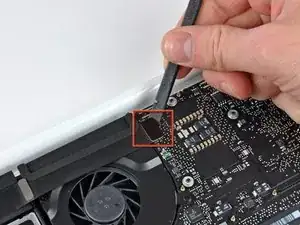
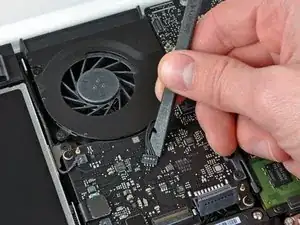
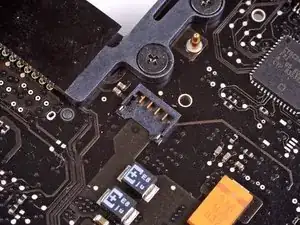
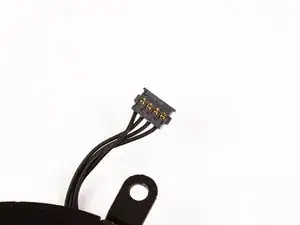
    • Use a spudger to pry the fan connector straight up and out of its socket on the logic board.

    • It is useful to twist the spudger axially from beneath the fan cable wires to release the connector.

    • The fan socket and the fan connector can be seen in the second and third pictures. Be careful not to break the plastic fan socket off the logic board as you use your spudger to lift the fan connector straight up and out of its socket. The layout of the logic board shown in the second picture may look slightly different than your machine but the fan socket is the same.

    Since this kind of connector and very fragile and easy to damage even with a spudger I use a needle that I insert in the front side of the connector, between the connector and the socket and only apply a little pressure while lifting up the needle. The connector will then pop up from one side. Repeat the procedure for the other side. With this method it's impossible to damage the connector. I adopted this method after ruining two or three connectors using the spudger.

    lemerise -

    Hi, how do you fix the axial which connects the fan with logic board..it's broken! Thanks in advance..

    Gagandeep -

    HELP! Both the connector AND socket detached from the logic board! Is it possible (barring micro-surgery) to reattach the socket to the logic board?

    John Watson -

    same problem here...any ideas? Did you fix it again, John?

    Ben Kn -

    I disconnected the connector and socket from the logic board because I wasn't being careful and wasn't using a spudger tool as was recommended. Luckily, a friend of mine that's handy with a soldering gun was able to individually solder each wire from the cooling fan's wire assembly back onto the soldering points on the logic board. It's really intricate, tricky, and risky...but at that point, what choice do you have? I verify it's possible to fix and my cooling fan is now running perfectly fine.

    Dan Barnhart -

    Hi my name is Lynn I made a mistake on the logic board trying to detach fan from laptop

    A1342 and the whole thing came off so I was wondering do

    I solder it back on or how can I fix it thank you and be Blessed

    lynn6202388 -

  9. aRbdWBWMUbDyyAl6
    aRbdWBWMUbDyyAl6
    GrDNbMoYZMHjA1dA
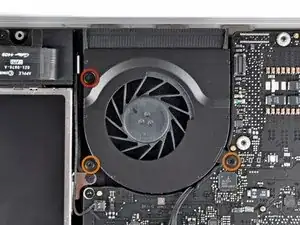
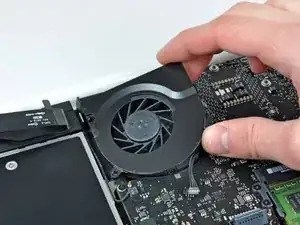
    • Remove the following three screws securing the fan to the upper case:

    • One 7.1 mm Phillips screw.

    • Two 5 mm Phillips screws.

    • Lift the fan out of the upper case.

  10. xxTF36FcFosA4ByK
    • Carefully pry the delicate rear speaker connector up off the logic board. These small L/R speaker connectors are quite easily broken.

    • Use extreme caution; this connector is easily destroyed.

    While these connectors are very delicate, a new upper body case will have new connectors already installed. I slightly broke two connectors while removing them.

    Also, the connectors have a notch underneath (on the logic board) for the corner of the spudger to fit into. The hard part is that you cannot see the notches until the connectors are removed.

    Nations81 -

    Hi. Long time ago, I know but.... How did you fix them?

    I snapped mine off, can it be soldered back on?

    Sai G -

    I used pointed tip of one side of the tweezers from the ifixit Home Tech Toolkit. I found this thinner pointed tip better than a spudger for hitting that notch in the socket underneath the connectors. Since this is a metal tool, I pried very gently and I was working on a MacBook with the battery taken out entirely (early on as suggested in the video) and was also using an Anti-Static wrist strap. I found the spudger broke one of the connectors because it's relatively thick plastic, and put too much pressure under the cables before the tip could reach the plastic block of the connector. The pressure under the cable popped the wire contact right through the top of the plastic block connector. (it was OK this connector broke since I didn't need to reuse it--my replacement keyboard/upper case came with its own cables.)

    Because the tips of the tweezers are angled, I felt I had better control of the torque I was applying than if I used a jeweler's flathead screwdriver.

    kenhtanaka -

    i used a very sharp dental pick - a tool i've permanently "added" to my ifixit tool kit bag

    pprod -

    Using a needle/pin works well. I did what another person mentioned in Step 8. Pry up from the back corner with the tip of the needle. Be gentle. One side will pop up a tiny bit. Move to the other side and gently pry there. Mine popped out completely at that point.

    stanos1 -

    Totally agree with the needle solution prying up from the side of the connector. A dentist tool is perfect!

    (yes, in 2021 i’m fixing a 2009 macbook! :P)

    Filippo Giadrossi -

  11. lO1wJVfH2ctku26v
    • Use the flat end of a spudger to pry the optical drive connector up off the logic board.

  12. OgAZYrc1y1DVVTTU
    OgAZYrc1y1DVVTTU
    2rPtMYrcYd1DVUnX
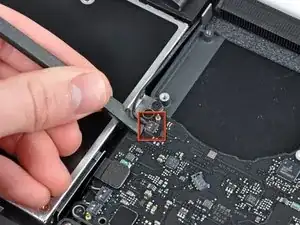
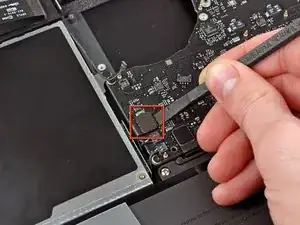
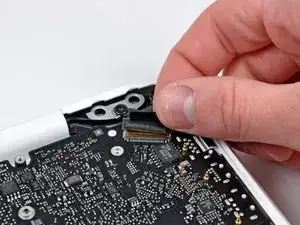
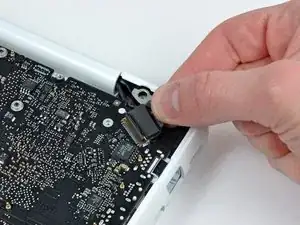
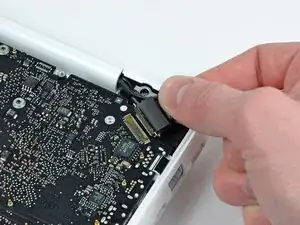
    • Use a spudger to pry the right speaker connector and sleep LED connector up off the logic board.

    • These connectors are very delicate and easily broken.

    I broke a speaker connector on this step. I found it easier to use a tiny flathead screwdriver to gently pry these connectors up.

    brad -

    Did u manage to fix the broken speaker connexion Brad? Mine snapped off. How can I fix that?

    Sai G -

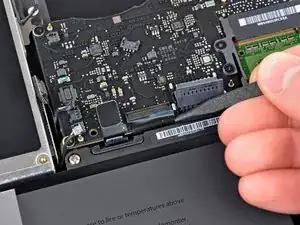
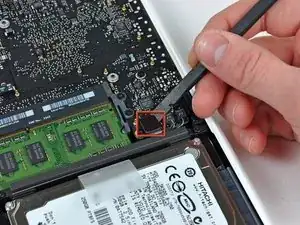
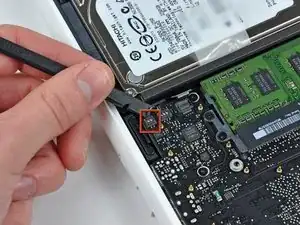
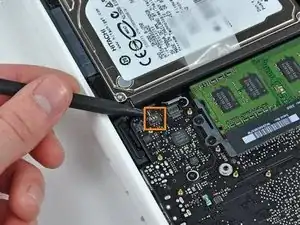
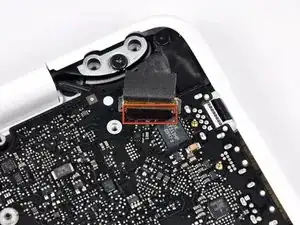
    what is the connector in the image that is two prong and has the orange and red box around it in the 3rd image? Need to replace that connector. Please help. Part number would be great

    ajfrasca -

  13. 2WKbD4n2LhqNl6Mo
    • Use the flat end of a spudger to pry the trackpad ribbon cable connector up off the logic board.

  14. 5Zq3XwyBF1DLt4r5
    5Zq3XwyBF1DLt4r5
    ndJWCwLfTHXwQSJP
    • Use your fingernail to flip up the locking flap on the ZIF socket for the keyboard ribbon cable.

    • Use the tip of a spudger to slide the keyboard ribbon cable out of its socket.

    I had to remove the battery again to insert the keyboard ribbon cable. I just couldn't get the right angle and force otherwise.

    asciimo -

    When reassembling make sure this cable is really deep in it's socket. (Use some force with the spudger wedging it in between the cable and battery). If you don't, you won't be able to power up the board. I had 2 logicboards that I thought were dead, but it turned out the cable was not inserted enough. Jump starting them with the jump pads did nothing (with or without cable connected), but connecting the cable properly made the board come alive. Really check this!!

    Peterdk -

    You sir, just saved my day! Switching boards between two mac and I thought I broke the two at once... This should be documented on the manual!!

    jorgecarleitao -

    Thanks for your help!!! I thought I did the replacement wrong. Greetings from Peru.

    Lalo Gonzalez -

    This was hugely helpful! The cable requires much more force than expected.

    Daniel DeGrasse -

    There really should be a comment in the steps regarding tips on how to put the ribbon back in. The tape did the trick and I am back up and running.

    alexhgreene -

    The two silver squares above the left corner of the Keyboard and to the right of the Trackpad cable ribbon are the jump pads to power on the MacBook if your power button may not be working.

    Jason Ognosky -

    Accidentally I broke this flap thing. Can I replace it some point?

    Thank you!

    MJS Nope -

    Nope big job to replace it. Use Kapton tape to hold it in place. https://www.amazon.com/Retermit-Resistan...

    mayer -

  15. EceXWL1PJla3BOIe
    • Use the flat end of a spudger to pry the hard drive cable connector up off the logic board.

  16. lxuJAstsY2QBRVxy
    lxuJAstsY2QBRVxy
    nwpRGEjRp4QgvfsX
    • Use a spudger to pry the left speaker connector and microphone connector up off the logic board.

    • These connectors are very delicate and easily broken.

    Note: the 2009 and 2010 model differ here. On one the 3 point connector is left and 2 point is right, on the other one the 3 point connector is right and 2 point is left.

    I found this while installing several logicboards for A1342.

    Peterdk -

    @Peterdk, are the connectors exchangeable?

    I mean, would putting the 3 pin on the 3 pin, and the 2 pin on the 2 pin, regardless of the position (left or right) be ok?

    Have you successfully used a 2010 logic board on a 2009 case?

    Alberto Einstein -

    I can't seem to connect those any suggestions

    Ayat -

    how do you reconnect these?

    yourstruly69101 -

    hi! i know iʻm 6 years late, and you probably figured it out already, but for the rest of us newbies , line the plug over the socket and gently press down. the correct orientation of the plug is the side with the tiny slots in them faces the logic board, aligning with the contacts in the socket. it may help to press the side farthest from the ribbon cable first.

    Kahana -

  17. iOPLflAfChGFt2eI
    iOPLflAfChGFt2eI
    iVjdrIVZ1hALQLUE
    • Grab the plastic pull tab secured to the display data cable lock and rotate it toward the DC-In side of the computer.

    Just lift the tab up slightly to release the clip that secures the data display cable. Then the cable will slide out easily.

    matt15 -

    If the video data cable has been disconnected before, the adhesive on the might not hold. Be extra cautious in disconnecting this. An illuminated magnifier would be a good help on this step as it is very delicate. This was where I feared I would fail. Was very relieved in getting through this step...

    svenaustx -

    I wasn't careful enough here, and didn't realize that the silver metal piece around the connector is actually a locking clip. No wonder disconnecting the cable required more than a gentle pull. The clip popped out of the cable-side connector in the process, and was bent; fortunately I was able to very carefully bend the clip out just enough to get it re-seated in the connector; there are tiny slots on the sides of the connector that the clip fits into.

    kmcrawford111 -

  18. KyyPPYagxuvikG5o
    KyyPPYagxuvikG5o
    NZjNxru4jxkRtcp1
    • Gently pull the display data cable connector away from its socket on the logic board.

    • Pull the socket parallel to the face of the logic board.

    • The display data cable socket is made of very thin metal and is easily bent. Be sure to pull the connector straight away from its socket.

  19. pYlV2OctFNVf1UUn
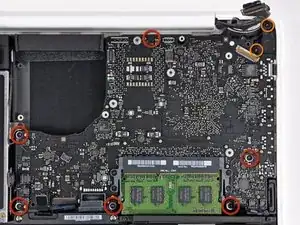
    • Remove the six 4.1 to 4.4 mm T6 Torx screws securing the logic board to the upper case.

    • Remove the two 4.1 to 4.5 mm T6 Torx screws securing the MagSafe board to the upper case.

    • On some models, these screws may be T7. Be careful not to strip away the head with a smaller bit.

  20. DwBEKTfNSKlvjFPB
    DwBEKTfNSKlvjFPB
    2fMtbh2evvZrnxJa
    FNTVebXtTjhWRsxy
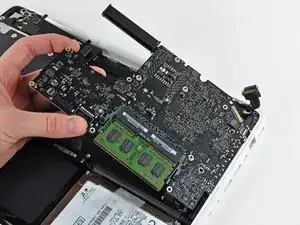
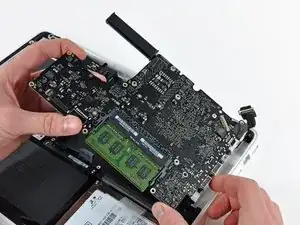
    • Lift the side of the logic board opposite the ports out of the upper case.

    • Rotate the logic board away from the upper case until the ports clear the lip molded in the upper case.

    • Pull the logic board and MagSafe board away from the edge of the upper case as one piece.

    • The MagSafe board may get accidentally disconnected during this process. As a precaution, be sure the MagSafe board connector is securely seated in its socket before lowering the logic board back into the upper case.

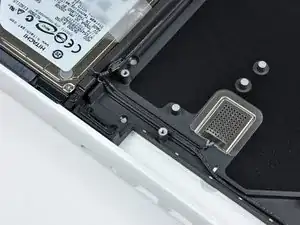
    • Before lowering the logic board back into the upper case, be sure the left speaker and microphone cables are seated in their channels cut into the upper case (as seen in the third picture).

    (When re-installing) Before screwing down the logic board, go around the edge and make sure no cables are caught underneath, remember there are 11 of them, 12 if the battery is present at this point.

    kenhtanaka -

    I reassembled the macbook A1342 using this guide and everything is perfect, except that if I shut down the computer and power it up after 1hour or so, I have to press the power button a few times before it starts. What could I have gone wrong? I checked the magsafe connector and it seems to be firmly seated. :(

    Alok -

  21. VCHeOVUchwAqQbVB
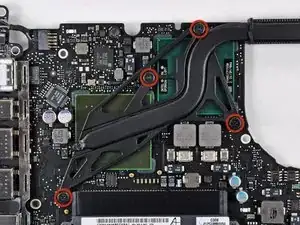
    • Remove the four 8.3 mm shouldered Phillips screws securing the heat sink to the logic board.

    • Keep track of the springs under each of the screws.

  22. PTIHWmdXDYu4JGTN
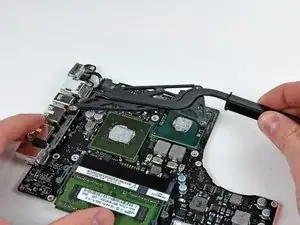
    • Lift the heat sink off the logic board.

    • If you need to mount the heat sink back into the laptop, we have a thermal paste guide that makes replacing the thermal compound easy.

    Looks like a terrible job of applying thermal compound. Its not china's fault though. Just how Apple tells foxconn to apply it. At least its better than the old worse issue in 2006. Apple's QC is declining.

    Nicholas Ouimet -

  23. mo3j3TF1MlLr65qm
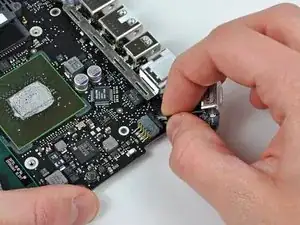
    • Pull the DC-in board connector away from its socket on the logic board.

    • Pull the connector parallel to the face of the logic board.

  24. CSaumlJphEYfIwCM
    • Carefully flip the logic board over.

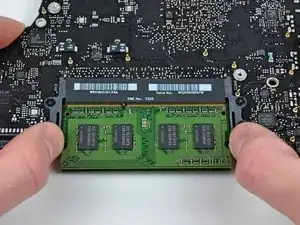
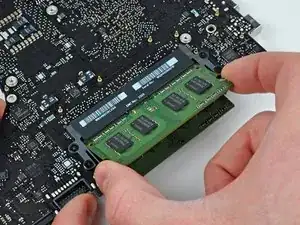
    • Release the tabs on each side of the chip by simultaneously pushing each tab away from the RAM.

    • These tabs lock the chip in place and releasing them will cause the chip to "pop" up.

  25. n6quPSMxZTdf1aGi
    • After the RAM chip has popped up, pull it straight out of its socket.

    • Repeat this process if a second RAM chip is installed.

    bjr

    les explications en francais ,ce serait mieux …merci

    cdsite -

    et apres l’étape 25 ? on fait quoi …? merci !!

    cdsite -

Abschluss

To reassemble your device, follow these instructions in reverse order.

Walter Galan

685540 Reputation

11 Kommentare

Starting in Step 10 there are very delicate connectors that are easily broken. I first attempted to lift one with a spudger and noticed it begin to crack. I found an alternative way that worked perfectly for all of these types of connectors. Using 2 straight pins, press the point of each one just on either side of the connector, between the connector and the housing. Then use each pin to evenly pry the connector up. It will pop right out of the socket with no damage.

scottgriz -

My macbook has been gradually getting hotter and running slower. Recently it started displaying some weird behavior that I assumed was a failing HD since it's 5 years old. I ran the extended Apple Hardware Test (more than once for confirmation) and got the following error: 4SNS/1/40000000: TN1D-104.000. Googling suggested that the CPU's northbridge was reaching a temperature of 104 deg. C and that macbooks have issues with overheating that can be attributed to poor application of thermal paste.

I followed this guide. The fan, heatsink fins and the underside of the logic board were almost completely clogged with dirt and cat hair. Got rid of it that, cleaned the excessive globs of dried up thermal paste, reapplied thermal paste and put everything back together. The macbook is now running cooler and faster and video is running quite smoothly which was an issue previously. I reran the Apple Hardware Test which reported, "No trouble found".

aeevr -

Hi, I have a mac book 4.1 with a gma x3100 32bit graphic chip, white plastic enclosure just like the one in the pictures.

The tutorial seems pretty detailed, great job, I feel confident I can get through without problems but I have a couple of questions.

Which logic board model will suit my mac book best, I also read that the heat sink and the SuperDrive connectors may be different, is that true?

thanks!

Andrea.

Andrea -

This page is for a macbook 6.1 or 7.1. Wrong page for your mac!

rozakis -
I'm about to replace the logic board, assuming everything gets connected properly should it just boot up like nothing ever happened? Will I lose any data?

Zachary Evans -
Two questions...

1. Anyone know if the logic board includes the MagSafe Board? Want to replace both.

2. Can you replace the 2.26Ghz logic board with the 2.4GHz logic board? Both for the A1342.

Thanks!

bumpshaman -

A little late to the party… but, for anyone with the same question, yes, you can upgrade a 6,1 with the newer motherboard as it supports more RAM and audio out via the 3.5mm jack. Both very handy. As an aside, you can also update the Macbook 1,1; 2,1; 3,1; & 4,1s motherboard with the 5,2 motherboard (the last produced A1181 board which supports the latest OSes), it just requires the newer designed heatsink, LCD inverter cable, and CPU fan, as the latter 2 have the flat 4 pin connectors.

technac1ous -

Following this idea, Do you know if I can replace the white macbook motherboard (A1342) with a macbook pro 2012 one ? I know it need some adaptation and changes of parts, do you know if it can works ?

thanks

dany34 -

Making a comparison between the mb 2010 A1342 and mb pro 2012 A1278 logicboards, it seems to be just lightly different.

MacBook Pro (13 Zoll, Mitte 2012, Unibody) Logic Board Austausch

MacBook Unibody Model A1342 Logic Board Replacement

Don't you think an adaptation is possible ?

Thnaks

dany34 -

My rear vent has a stripped screw. I took out all of the other screws on it, but I can’t take out the stripped screw. I’m having trouble forcing the logic board out, and I’m wondering if it’s because of the vent. Could anybody help clear things up?

[deleted] -

The vent is holding the logic board in and has to be removed before you can pull out the logic board. Check out our guide on removing stripped screws to get that last screw out!

Adam O'Camb -